- Configure
- Administrator tasks and considerations
- Feature flag management
- Enable traffic to the following URLs
- List IP addresses in an allow list
- LaunchDarkly system requirements
- Content Collaboration Service integration
- Limitations
- USB redirection
- Use and remove USB devices
- Enlightened Data Transport (EDT)
- Supported USB devices
- USB devices that work with USB redirection
- USB devices that fail with USB redirection
- Unverified USB Devices
- Support for Mass Storage devices
- Support for Isochronous devices
- Support for Composite devices
- Alternatives for unsupported USB devices
- Session reliability and auto client reconnect
- Using session reliability policies
- Configuring session reliability from Citrix Studio
- Configuring session reliability timeout
- Configuring auto client reconnection using Citrix Studio
- Configuring Auto client reconnection timeout
- Configuring the Reconnect user interface Transparency
- Auto client reconnect and session reliability interaction
- Auto client reconnection
- Session reliability
- How auto client reconnection and session reliability work
- Customer Experience Improvement Program (CEIP)
- Additional Information
- Application delivery
- Web access mode
- Self-service mode
- Configure self-service mode
- Citrix Workspace Updates
- Configuring using the GUI
- Configuring Citrix Workspace Updates using StoreFront
- auto-update-Check
- auto-update-DeferUpdate-Count
- auto-update-Rollout-Priority
- Keyboard layout synchronization
- Limitations
- Keyboard layout support for Windows VDA
- Keyboard layout support for Linux VDA
- Language bar
- Configure showing or hiding the remote language bar
- Citrix Casting
- Prerequisites
- Enable Citrix Casting
- Discover workspace hub devices automatically
- Discover workspace hub devices manually
- Disconnect the workspace hub device
- Known issues
- Client-side microphone input
- Windows special keys
- Windows shortcuts and key combinations
- Use Input Method Editors (IME) and international keyboard layouts
- To enable client-side IME
- To indicate explicitly the starting point when composing text
- To use server-side IME
- Mapped server-side IME input mode keys
- To use international keyboard layouts
- Multiple monitors
- Known Limitations
- Desktop toolbar
- Workspace Control
- To configure workspace Control settings
- Mapping client drives
Configure
After the Citrix Workspace app for Mac software is installed, the following configuration steps allow users to access their hosted applications and desktops.
Users might connect from the Internet or from remote locations. For those users, configure the authentication through Citrix Gateway.
Administrator tasks and considerations
This article discusses the tasks and considerations that are relevant for administrators of Citrix Workspace app for Mac.
If you are running macOS 10.15, ensure that your system is compliant with Apple’s requirements for trusted certificates in macOS 10.15 before you upgrade to Citrix Workspace app for Mac version 2106.
Feature flag management
If an issue occurs with Citrix Workspace app in production, we can disable an affected feature dynamically in Citrix Workspace app even after the feature is shipped. To do so, we use feature flags and a third-party service called LaunchDarkly. You do not need to make any configurations to enable traffic to LaunchDarkly, except when you have a firewall or proxy blocking outbound traffic. In that case, you enable traffic to LaunchDarkly via specific URLs or IP addresses, depending on your policy requirements.
You can enable traffic and communication to LaunchDarkly in the following ways:
Enable traffic to the following URLs
- events.launchdarkly.com
- stream.launchdarkly.com
- clientstream.launchdarkly.com
- Firehose.launchdarkly.com
- mobile.launchdarkly.com
List IP addresses in an allow list
If you must list IP addresses in an allow list, for a list of all current IP address ranges, see LaunchDarkly public IP list. You can use this list to ensure that your firewall configurations are updated automatically in keeping with the infrastructure updates. For details about the status of the infrastructure changes, see the LaunchDarkly Statuspage page.
LaunchDarkly system requirements
Ensure that the apps can communicate with the following services if you have split tunneling on Citrix ADC set to OFF for the following services:
- LaunchDarkly service.
- APNs listener service
Content Collaboration Service integration
Citrix Content Collaboration enables you to easily and securely exchange documents, send large documents by email, securely handle document transfers to third parties, and access a collaboration space.
Citrix Content Collaboration provides many ways to work, including a web-based interface, mobile clients, desktop apps, and integration with Microsoft Outlook and Gmail.
You can access Citrix Content Collaboration functionality from the Citrix Workspace app using the Files tab displayed within Citrix Workspace app. You can view the Files tab only if Content Collaboration Service is enabled in the Workspace configuration in the Citrix Cloud console.
Citrix Content Collaboration integration in Citrix Workspace app is not supported on Windows Server 2012 and Windows Server 2016. This is due to a security option set in the operating system.
The following image displays the example contents of the Files tab of the new Citrix Workspace app:

Limitations
- Resetting Citrix Workspace app does not cause Citrix Content Collaboration to log off.
- Switching stores in Citrix Workspace app does not cause Citrix Content Collaboration to log off.
USB redirection
HDX USB device redirection enables redirection of USB devices to and from a user device. For example, a user can connect a flash drive to a local computer and access it remotely from a virtual desktop or a desktop hosted application.
During a session, users can plug and play devices, including Picture Transfer Protocol (PTP) devices. For example:
Digital cameras, Media Transfer Protocol (MTP) devices such as digital audio players or portable media players
Point-of-sale (POS) devices, and other devices such as 3D Space Mice, Scanners, Signature Pads and so on.
Double-hop USB is not supported for desktop hosted application sessions.
USB redirection is available for the following:
By default, USB redirection is allowed for certain classes of USB devices, and denied for others. You can restrict the types of USB devices made available to a virtual desktop by updating the list of USB devices supported for redirection. More information is provided later in this section.
In environments where security separation between the user device and server is needed, Citrix recommends that users are informed about the types of USB devices to avoid.
Optimized virtual channels are available to redirect most popular USB devices, and provide superior performance and bandwidth efficiency over a WAN. Optimized virtual channels are usually the best option, especially in high latency environments.
For USB redirection purposes, Citrix Workspace app for Mac handles a SMART board the same as a mouse.
The product supports optimized virtual channels with USB 3.0 devices and USB 3.0 ports. For example, a CDM virtual channel is used to view files on a camera or to provide audio to a headset. The product also supports Generic USB Redirection of USB 3.0 devices connected to a USB 2.0 port.
Some advanced device-specific features, such as Human Interface Device (HID) buttons on a webcam, might not work as expected with the optimized virtual channel. If this is an issue, use the Generic USB virtual channel.
Certain devices are not redirected by default, and are only available to the local session. For example, it would not be appropriate to redirect a NIC that is directly attached via internal USB.
To use USB redirection:
Connect the USB device to the device where Citrix Workspace app for Mac is installed.
You are prompted to select the available USB devices on your local system.
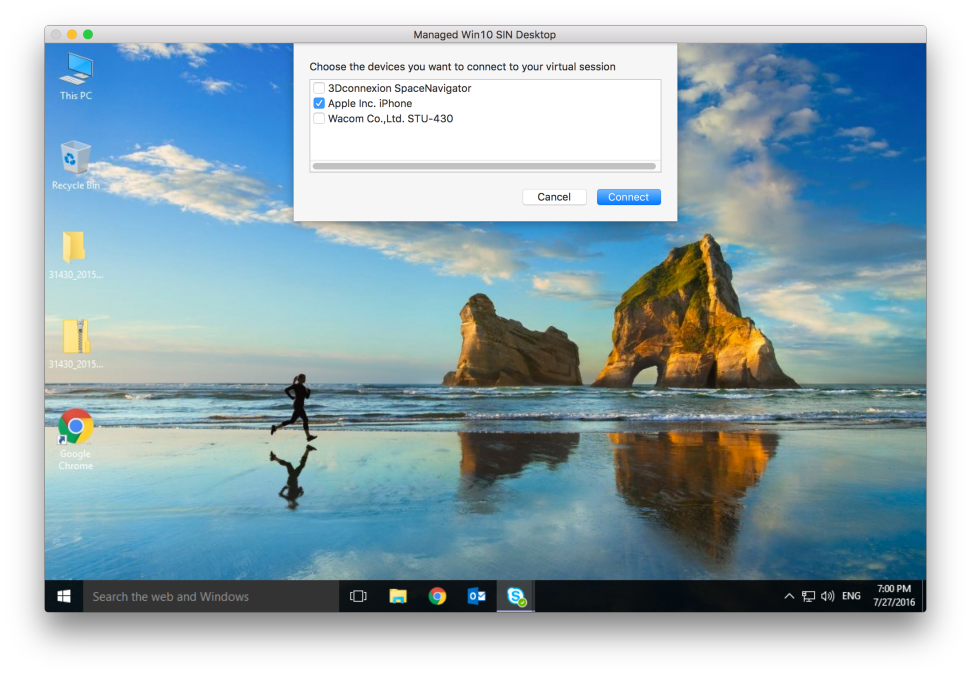
Select the device you want to connect and click Connect. If the connection fails, an error message appears.
In the Preferences window Devices tab, the connected USB device is listed in the USB panel:
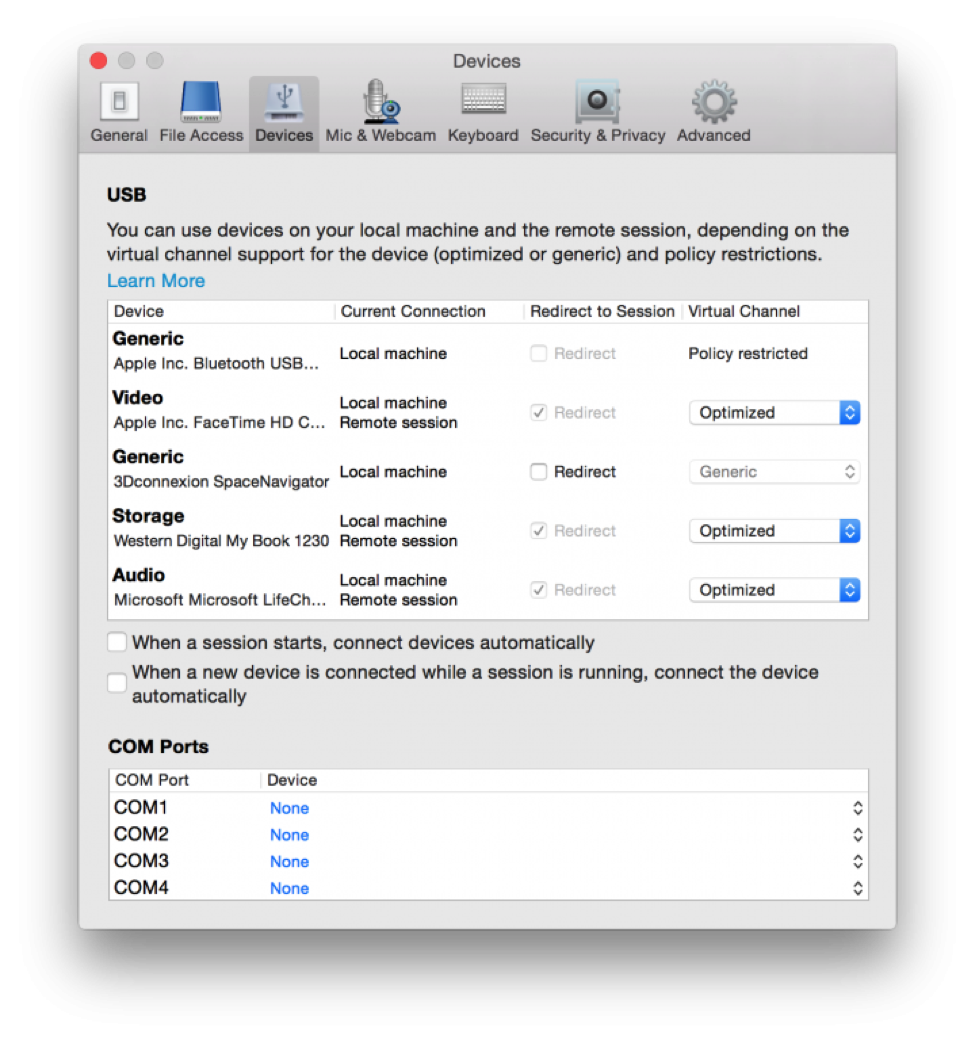
Select the type of virtual channel (Generic or Optimized) for the USB device.
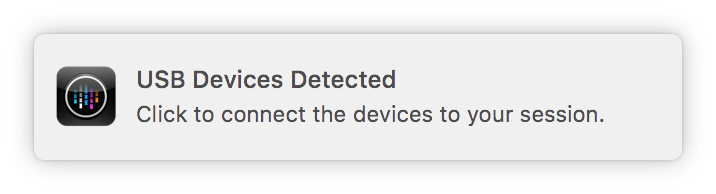
A message is displayed. Click to connect the USB device to your session:
Use and remove USB devices
Users can connect a USB device before or after starting a virtual session. When using Citrix Workspace app for Mac, the following apply:
- Devices connected after a session starts immediately appear in the USB menu of the Desktop Viewer.
- If a USB device is not redirecting properly, sometimes you can resolve the problem by waiting to connect the device until after the virtual session has started.
- To avoid data loss, use the Windows Safe removal menu before removing the USB device.
Enlightened Data Transport (EDT)
By default, EDT is enabled in Citrix Workspace app for Mac.
Citrix Workspace app for Mac reads the EDT settings as set in the default.ica file and applies it accordingly.
To disable EDT, run the following command in a terminal:
defaults write com.citrix.receiver.nomas HDXOverUDPAllowed -bool NO
Supported USB devices
With Apple announcing the deprecation of Kernel Extensions (KEXT), Citrix Workspace app for Mac migrated to the new user mode USB framework IOUSBHost provided by Apple. This articles lists the supported USB devices.
USB devices that work with USB redirection
The following USB devices work seamlessly with USB redirection:
3D Connexion SpaceMouse
Mass Storage Devices
Kingson Data Traveller USB Flash Drive
Seagate external HDD
Kingston/Transcend Flash drive 32 GB/64 GB
NIST PIV smartcard /reader
USB devices that fail with USB redirection
The following device does not work with USB redirection:
- Transend SSD external Hard disk
Unverified USB Devices
There are plenty of devices that are not verified by Citrix for successful USB redirection with Citrix Workspace app for Mac. Some of these devices are as follows:
Other Hard Disks
Special Keys on the keyboard and headsets that use custom HID protocol
Support for Mass Storage devices
We have seen that not all types of Mass Storage devices can be redirected successfully. For the devices which fail to redirect, there is an optimized virtual channel called Client Drive mapping. Using the Client Drive mapping, access to the mass storage devices can be completely controlled through the policies on the delivery controller.
Support for Isochronous devices
The Isochronous class of USB devices are not yet supported by generic USB redirection in Citrix Workspace app for Mac. Isochronous mode of data transfer in USB specification indicates devices that stream the timestamped data at a constant rate. For example: WebCams, USB Headphones, etc.
Support for Composite devices
A USB composite device is a single gadget that can perform more than one function. For example: multi-function printers, iPhone, etc. Currently, Citrix Workspace App for Mac does not support redirection of composite devices to the Citrix Virtual Apps and Desktops session.
Alternatives for unsupported USB devices
There are optimized virtual channels that can handle devices that are not supported with generic USB redirection. These virtual channels are optimized for speed when compared to generic USB redirection. Some examples are as follows:
Webcam redirection: Optimized for raw webcam traffic. Note that Microsoft Teams Optimization Pack has its own method of webcam redirection. Hence, it does not fall under the Webcam redirection virtual channel.
Audio redirection: Optimized to transfer Audio streams.
Client Drive Mapping: Optimized for redirecting mass storage devices to the Citrix Virtual Apps and Desktops session. For example: Flash Drives, Hard Disks, DVD ROM/RW, etc.
Session reliability and auto client reconnect
Session reliability keeps sessions active and on the user’s screen when network connectivity is interrupted. Users continue to see the application that they are using until network connectivity resumes.
With session reliability, the session remains active on the server. To indicate that connectivity is lost, the user’s display freezes until connectivity resumes on the other side of the tunnel. The user continues to access the display during the interruption and can resume interacting with the application when the network connection is restored. Session reliability reconnects users without reauthentication prompts.
- Citrix Workspace app for Mac users cannot override the server setting.
- If Session Reliability is enabled, the default port used for session communication switches from 1494 to 2598.
You can use session reliability with Transport Layer Security (TLS).
TLS encrypts only the data sent between the user device and Citrix Gateway.
Using session reliability policies
The session reliability connections policy setting allows or prevents session reliability.
The session reliability timeout policy setting has a default of 180 seconds, or three minutes. Though you can extend the time the session reliability keeps a session open, this feature is convenient to the user. Therefore, it does not prompt the user for reauthentication.
As you extend the amount of time a session is kept open, a user might get distracted and walk away from the user device. This potentially leaves the session accessible to unauthorized users.
Incoming session reliability connections use port 2598, unless you change the port number defined in the session reliability port number policy setting.
If you do not want users to be able to reconnect to interrupted sessions without having to reauthenticate, use the Auto Client Reconnect feature. You can configure the Auto client reconnect authentication policy setting to prompt users to reauthenticate when reconnecting to interrupted sessions.
If you use both session reliability and auto client reconnect, the two features work in sequence. Session reliability closes, or disconnects, the user session after the amount of time you specify in the Session reliability timeout policy setting. After that, the auto client reconnect policy settings take effect, attempting to reconnect the user to the disconnected session.
Session reliability is enabled by default at the server. To disable this feature, configure the policy managed by the server.
Configuring session reliability from Citrix Studio
By default, session reliability is enabled.
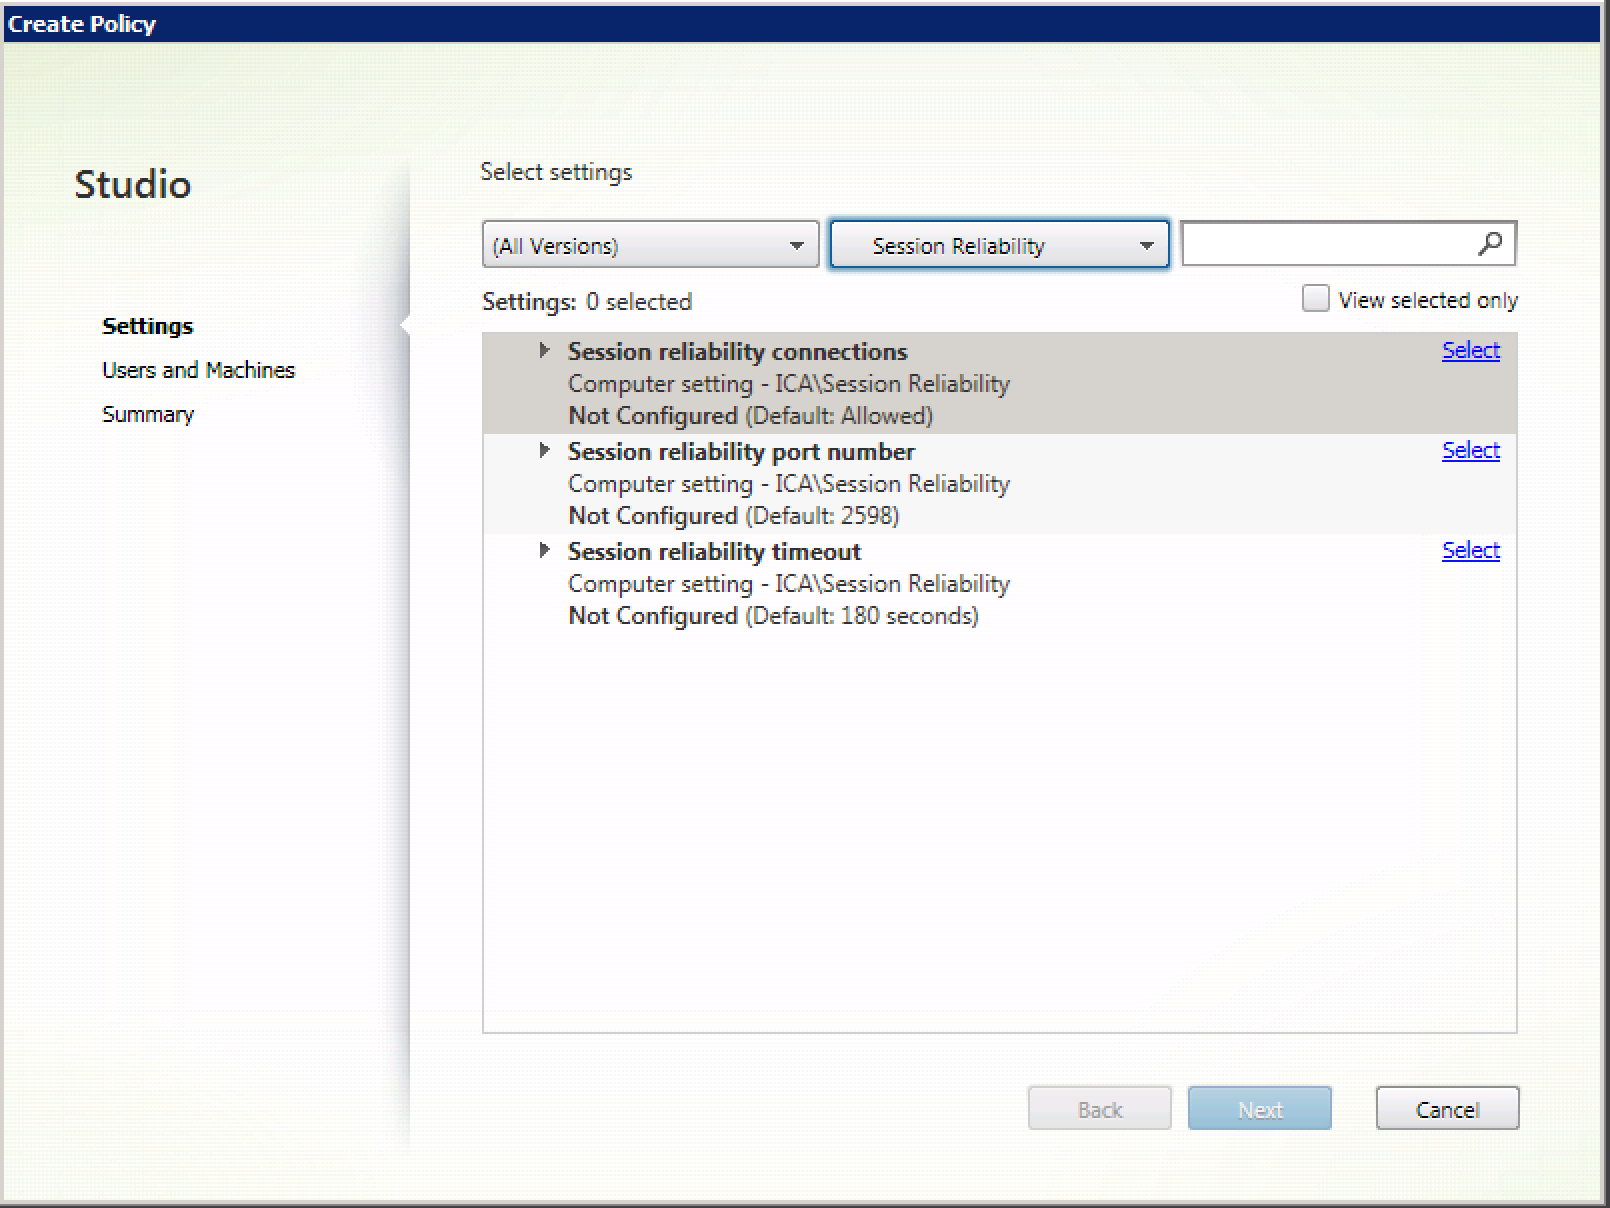
To disable session reliability:
- Launch Citrix Studio.
- Open the Session Reliability connections policy.
- Set the policy to Prohibited.
Configuring session reliability timeout
By default, the session reliability timeout is set to 180 seconds.
Session reliability timeout policy can be configured only with XenApp and XenDesktop 7.11 and later.
To modify session reliability timeout:
- Launch Citrix Studio.
- Open the Session reliability timeout policy.
- Edit the timeout value.
- Click OK.
Configuring auto client reconnection using Citrix Studio
By default, auto client reconnection is enabled.
To disable auto client reconnection:
- Launch Citrix Studio.
- Open the Auto client reconnect policy.
- Set the policy to Prohibited.

Configuring Auto client reconnection timeout
By default, Auto client reconnection timeout is set to 120 seconds.
Auto client reconnect timeout policy can be configured only with XenApp and XenDesktop 7.11 and later.
To modify auto client, reconnect timeout:
- Launch Citrix Studio.
- Open the Auto client reconnect policy.
- Edit the timeout value.
- Click OK.
On a Terminal Server VDA, Citrix Workspace app for Mac uses 120 seconds as timeout value irrespective of the user settings.
Configuring the Reconnect user interface Transparency
The Session User Interface is displayed during a session reliability and auto client reconnect attempts. The Transparency level of the user interface can be modified using Studio policy.
By default, Reconnect UI Transparency is set to 80%.
To modify Reconnect user interface Transparency level:
- Launch Citrix Studio.
- Open the Reconnect UI Transparency level policy.
- Edit the value.
- Click OK.
Auto client reconnect and session reliability interaction
There are mobility challenges associated with switching between various access points, network disruptions, and display timeouts related to latency. These create challenging environments when trying to maintain link integrity for active Citrix Workspace app for Mac sessions. To resolve this issue, Citrix enhanced session reliability and auto reconnection technologies are present in this version of Workspace app for Mac.
Auto client reconnection, along with session reliability, allows users to automatically reconnect to their Citrix Workspace app for Mac sessions after recovering from network disruptions. These features, enabled by policies in Citrix Studio, can be used to vastly improve the user experience.
Auto client reconnection and session reliability timeout values can be modified using the default.ica file in StoreFront.
Auto client reconnection
Auto client reconnection can be enabled or disabled using Citrix Studio policies. By default, this feature is enabled. For information about modifying this policy, see the auto client reconnection section earlier in this article.
Use the default.ica file in StoreFront to modify the connection timeout for AutoClienreconnect. By default, this timeout is set to 120 seconds (or two minutes).
| Setting | Example | Default |
|---|---|---|
| TransportReconnectRetryMaxTSeconds | TransportReconnectRetryMaxTSeconds=60 | 120 |
Session reliability
Session reliability can be enabled or disabled using Citrix Studio policies. By default, this feature is enabled.
Use the default.ica file in StoreFront to modify the connection timeout for session reliability. By default, this timeout is set to 180 seconds (or three minutes).
| Setting | Example | Default |
|---|---|---|
| SessionReliabilityTTL | SessionReliabilityTTL=120 | 180 |
How auto client reconnection and session reliability work
When auto client reconnection and session reliability are enabled for a Citrix Workspace app for Mac, consider the following:
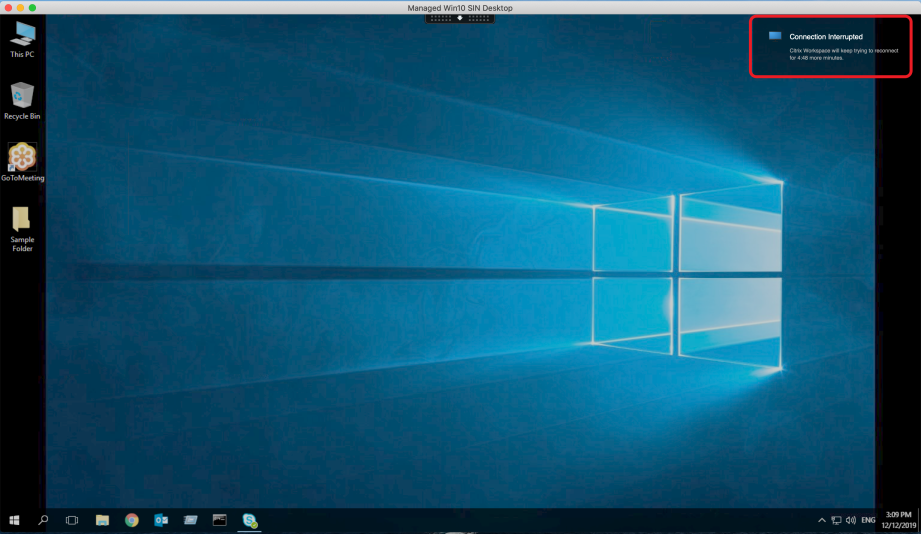
- A session window is grayed out when a reconnection is in progress. A countdown timer displays the amount of time remaining before the session is reconnected. Once a session is timed out, it is disconnected.
By default, the reconnect countdown notification starts at 5 minutes. This timer value represents the combined default values for each of the timers (auto client reconnection and session reliability), 2 and 3 minutes respectively. The following image illustrates the countdown notification which appears in the upper right portion of the session interface:
You can alter the grayscale brightness used for an inactive session using a command prompt. For example, defaults write com.citrix.receiver.nomas NetDisruptBrightness 80. By default, this value is set to 80. The maximum value cannot exceed 100 (indicates a transparent window) and the minimum value can be set to 0 (a fully blacked out screen).
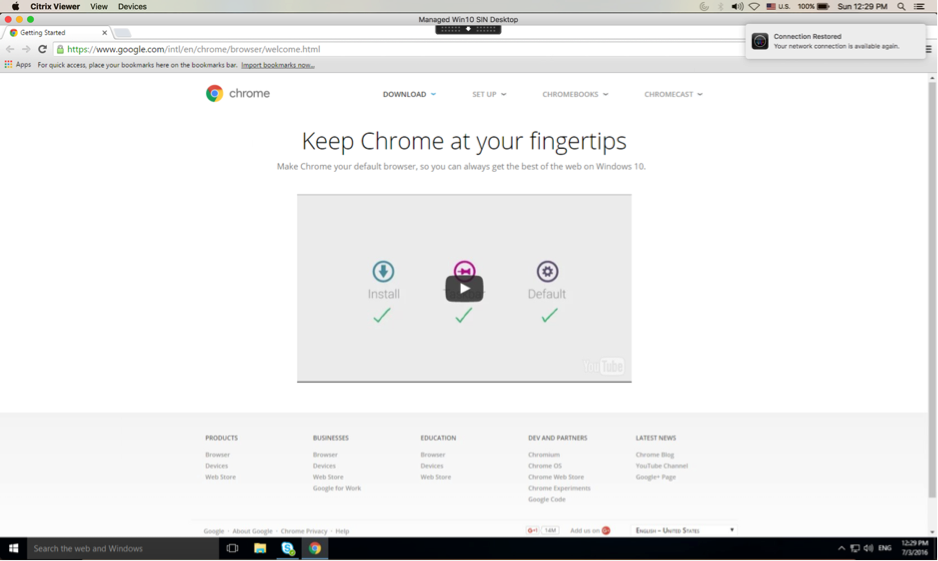
- Users are notified when a session successfully reconnects (or when a session is disconnected). This notification appears in the upper right portion of the session interface:
- A session window which is under auto client reconnect and session reliability control provides an informational message indicating the state of the session connection. Click Cancel Reconnection to move back to an active session.
Customer Experience Improvement Program (CEIP)
| Data Collected | Description | What we Use it for |
|---|---|---|
| Configuration and usage data | The Citrix Customer Experience Improvement Program (CEIP) gathers configuration and usage data from Workspace app for Mac and automatically sends the data to Citrix and Google Analytics. | This data helps Citrix improve the quality, reliability, and performance of Workspace app. |
Additional Information
Citrix will handle your data in accordance with the terms of your contract with Citrix, and protect it as specified in the Citrix Services Security Exhibit available on the Citrix Trust Center.
Citrix uses Google Analytics to collect certain data from Citrix Workspace app as part of CEIP. Please review how Google handles data collected for Google Analytics.
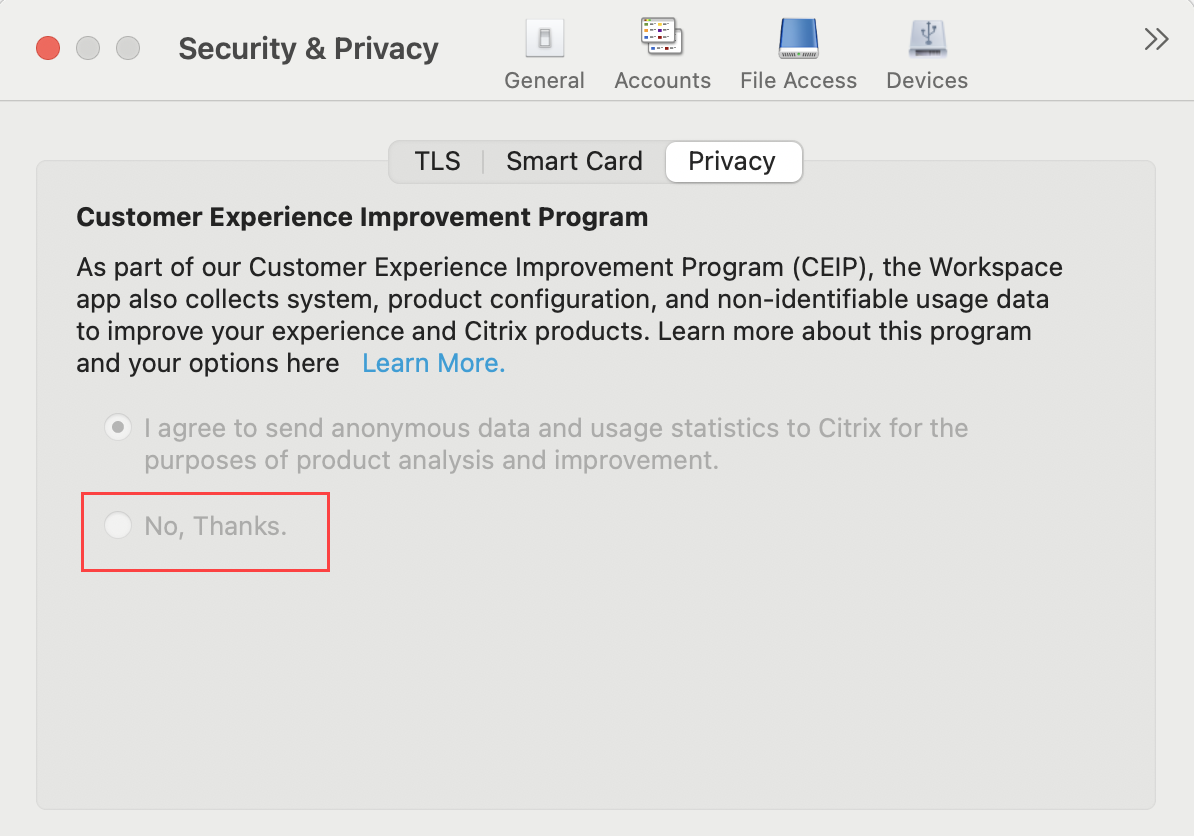
You may turn off sending CEIP data to Citrix and Google Analytics. To do this:
- In the Preferences window, select Security and Privacy.
- Select the Privacy tab.
- Select No, Thanks to disable CEIP or to forego participation.
- Click OK.
Alternatively, you can disable CEIP by running the terminal command:
defaults write com.citrix.receiver.nomas «CEIPEnabled» -bool NO
The specific data elements collected by Google Analytics are:
| Operating System Version | Session Launch | Generic USB Redirection Usage |
Application delivery
When delivering applications with Citrix Virtual Apps and Desktops, consider the following options to enhance the experience for your users when they access their applications:
Web access mode
Without any configuration, Citrix Workspace app for Mac provides web access mode: browser-based access to applications and desktops. Users simply open a browser to a Workspace for Web and select and use the applications that they want. In web access mode, no app shortcuts are placed in the App Folder on your user’s device.
Self-service mode
Add a StoreFront account to Citrix Workspace app for Mac or configuring Citrix Workspace app for Mac to point to a StoreFront site. Then, you can configure self-service mode, which enables your users to subscribe to applications through Citrix Workspace app for Mac. This enhanced user experience is similar to that of a mobile app store. In self-service mode you can configure mandatory, auto-provisioned, and featured app keyword settings as needed. When one of your users selects an application, a shortcut to that application is placed in the App Folder on the user device.
When they access a StoreFront 3.0 site, your users see the Citrix Workspace app for Mac preview.
When publishing applications on your Citrix Virtual Apps farms, you can enhance the experience for users accessing those applications through StoreFront stores. To do this, ensure that you include meaningful descriptions for published applications. The descriptions are visible to your users through Citrix Workspace app for Mac.
Configure self-service mode
As mentioned previously, you can add a StoreFront account to Citrix Workspace app for Mac or configure Citrix Workspace app for Mac to point to a StoreFront site. Thus, you can configure the self-service mode, which allows users to subscribe to applications from the Citrix Workspace app for Mac user interface. This enhanced user experience is similar to that of a mobile app store.
In self-service mode, you can configure mandatory, auto-provisioned, and featured app keyword settings as needed.
- Automatically subscribe all users of a store to an application by appending the string KEYWORDS:Auto to the description you provide when you publish the application in Citrix Virtual Apps. When users log on to the store, the application is automatically provisioned without the need for manual subscription to the application.
- Advertise applications to users or make commonly used applications easier to find by listing them in the Citrix Workspace app for Mac Featured list. To do this, append the string KEYWORDS:Featured to the application description.
For more information, see the StoreFront documentation.
Citrix Workspace Updates
Configuring using the GUI
An individual user can override the Citrix Workspace Updates setting using the Preferences dialog. This is a per-user configuration and the settings apply only to the current user.
Go to the Preferences dialog in Citrix Workspace app for Mac.
In the Advanced pane, click Updates. The Citrix Workspace Updates dialog appears.
Select one of the following options:
- Yes, notify me
- No, don’t notify me
- Use administrator specified settings
Close the dialog box to save the changes.
Configuring Citrix Workspace Updates using StoreFront
Administrators can configure Citrix Workspace Updates using StoreFront. Citrix Workspace app for Mac only uses this configuration for users who have selected “Use administrator specified settings.” To manually configure it, follow these steps.
Use a text editor to open the web.config file. The default location is C:\inetpub\wwwroot\Citrix\Roaming\web.config
Locate the user account element in the file (Store is the account name of your deployment)
Before the tag, navigate to the properties of that user account:
Add the auto-update tag after tag.
auto-update-Check
This determines that Citrix Workspace app for Mac can detect if updates are available.
Valid values:
- Auto – Use this option to get notifications when updates are available.
- Manual – Use this option to not get any notification when updates are available. Users must check manually for updates by selecting Check for Updates.
- Disabled – Use this option to disable Citrix Workspace Updates.
auto-update-DeferUpdate-Count
This determines the number of times the user is notified to upgrade before they are forced to update to the latest version of Citrix Workspace app for Mac. By default, this value is 7.
Valid values:
- -1 – The user has the option of getting reminded later when an update is available.
- 0 – The user is forced to update to the latest version of Citrix Workspace app for Mac when the update is available.
- Positive integer – The user is reminded these many times before being forced to update. Citrix recommends not to set this value higher than 7.
auto-update-Rollout-Priority
This determines how quickly a device sees that an update is available.
Valid values:
- Auto – The Citrix Workspace Updates system decides when available updates are rolled out to users.
- Fast – Available updates are rolled out to users on high priority as determined by Citrix Workspace app for Mac.
- Medium – Available updates are rolled out to users on medium priority as determined by Citrix Workspace app for Mac.
- Slow – Available updates are rolled out to users on low priority as determined by Citrix Workspace app for Mac.
Keyboard layout synchronization
Keyboard layout synchronization enables users to switch among preferred keyboard layouts on the client device when using a Windows or Linux VDA. This feature is disabled by default.
To enable keyboard layout synchronization, go to Preferences > Keyboard and select “Use local keyboard layout, rather than the remote server keyboard layout.”
- Using the local keyboard layout option activates the client IME (Input Method Editor). Users working in Japanese, Chinese, or Korean can use the server IME. They must disable the local keyboard layout option by clearing the option in Preferences > Keyboard. The session will revert to the keyboard layout provided by the remote server when they connect to the next session.
- The feature works in the session only when the toggle in the client is turned on and the corresponding feature enabled on the VDA. A menu item,“Use Client Keyboard Layout,” in Devices >Keyboard >International is added to show the enabled state.
Limitations
Using the keyboard layouts listed in “Supported Keyboard Layouts in Mac” works while using this feature. When you change the client keyboard layout to a non-compatible layout, the layout might be synced on the VDA side, but functionality cannot be confirmed.
Remote applications that run with elevated privileges (for example, running applications as an administrator) can’t be synchronized with the client keyboard layout. To work around this issue, manually change the keyboard layout on the VDA or disable UAC.
When RDP is deployed as an application and the user is working within an RDP session, it is not possible to change the keyboard layout using the Alt + Shift shortcuts. To work around this issue, users can use the language bar in the RDP session to switch the keyboard layout.
Keyboard layout support for Windows VDA

Keyboard layout support for Linux VDA

The enhanced client depends on the keyboard layout synchronization feature. By default, the enhanced feature is enabled when the keyboard layout synchronization feature is turned on. To control this feature alone, open the Config file in the
/Library/Application Support/Citrix Workspace/ folder, locate the “EnableIMEEnhancement” setting and turn the feature on or off by setting the value to “true” or “false,” respectively.
The setting change takes effect after restarting the session.
Language bar
You can choose to show or hide the remote language bar in an application session using the GUI. The language bar displays the preferred input language in a session. In earlier releases, you might change this setting using only the registry keys on the VDA. Starting with Citrix Workspace for Mac version 1808, you can change the settings using the Preferences dialog. The language bar appears in a session by default.
This feature is available in sessions running on VDA 7.17 and later.
Configure showing or hiding the remote language bar
- Open Preferences.
- Click Keyboard.
- Click or unclick Show the remote language bar for the published applications.
The setting changes take effect immediately. You can change the settings in an active session. The remote language bar does not appear in a session if there is only one input language.
Citrix Casting
Citrix Casting is used to cast your Mac screen to nearby Citrix Ready workspace hub devices. Citrix Workspace app for Mac supports Citrix Casting to mirror your Mac screen to workspace hub connected monitors.
For more information, see the Citrix Ready workspace hub documentation.
Prerequisites
- Citrix Workspace app 1812 for Mac or later.
- Bluetooth enabled on the device for hub discovery.
- Both Citrix Ready workspace hub and Citrix Workspace app must be on the same network.
- Ensure Port 55555 isn’t blocked between the device running Citrix Workspace app and the Citrix Ready workspace hub.
- Port 55556 is the default port for SSL connections between mobile devices and the Citrix Ready workspace hub. You can configure a different SSL port on the Raspberry Pi’s settings page. If the SSL port is blocked, users cannot establish SSL connections to the workspace hub.
- For Citrix Casting, ensure port 1494 isn’t blocked.
Enable Citrix Casting
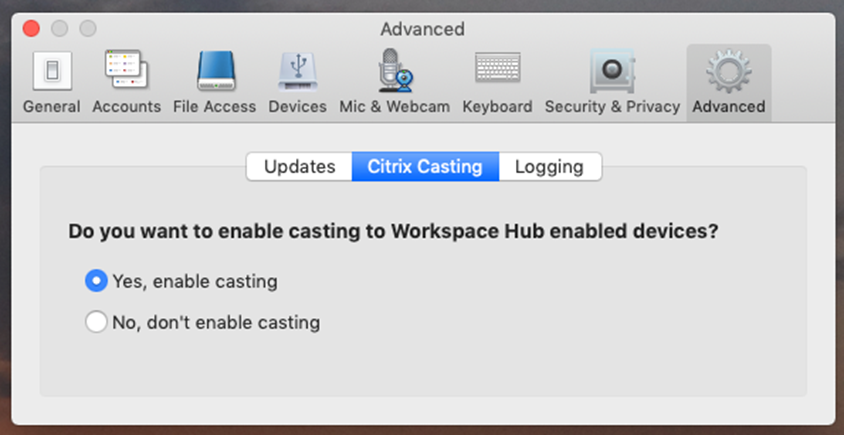
Citrix Casting is disabled by default. To enable Citrix Casting using Citrix Workspace app for Mac:
- Go to Preferences.
- Select Advanced in the panel and then choose Citrix Casting.
- Select Yes, enable casting.
A notification appears when Citrix Casting is launched and a Citrix Casting icon appears in the menu bar.
After enabling, Citrix Casting launches with Citrix Workspace app for Mac automatically every time until you disable it by selecting No, don’t enable casting in Preferences > Advanced > Citrix Casting.
Discover workspace hub devices automatically
To connect to workspace hubs automatically:
- On your Mac, sign in to Citrix Workspace app and ensure that Bluetooth is turned on. Bluetooth is used to discover nearby workspace hubs.
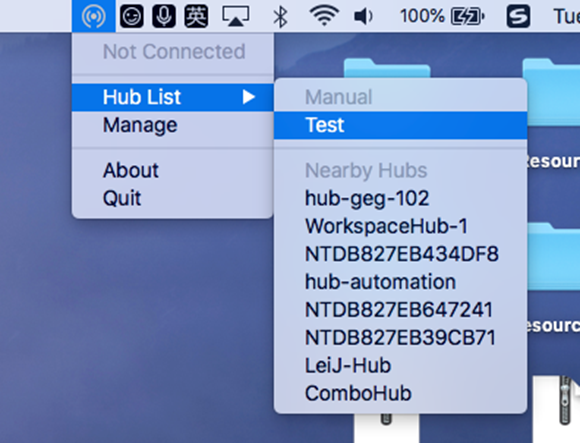
- Select the Citrix Casting icon in the menu bar. All Citrix Casting functions are operated through this menu.
- The Hub List submenu shows all nearby workspace hubs on the same network. Hubs are listed in descending order by their proximity to your Mac and display their workspace hub configured names. All automatically discovered hubs display under Nearby Hubs.
- Choose the hub you want to connect to by selecting its name.
To cancel selection of a workspace hub during connection, select Cancel. You can also use Cancel if the network connection is poor and connecting is taking longer than usual.
Occasionally, your chosen hub might not appear in the menu. Check the Hub List menu again after a few moments or add your hub manually. Citrix Casting receives the workspace hub’s broadcasting periodically.
Discover workspace hub devices manually
If you cannot find the Citrix Ready workspace hub device in the Hub List menu, add the workspace hub’s IP address to access it manually. To add a workspace hub:
- On your Mac, sign in to Citrix Workspace app and ensure that Bluetooth is turned on. Bluetooth is used to discover nearby workspace hubs.
- Select the Citrix Casting icon in the menu bar.
- Select Manage in the menu. The Manage hubs window appears.
- Click Add new to enter the IP address of your hub.
- After successfully adding the device, the Hub name column displays the hub’s friendly name. Use this name to identify the hub in the Manual section of the Hub List submenu.
Currently, only Mirror mode is supported. Mirror is the only available choice in the Display Mode column.
Disconnect the workspace hub device
You can disconnect your current session and exit the Citrix Ready workspace hub automatically or manually.
To disconnect the screen casting session automatically, close your laptop.
To disconnect the screen casting session manually:
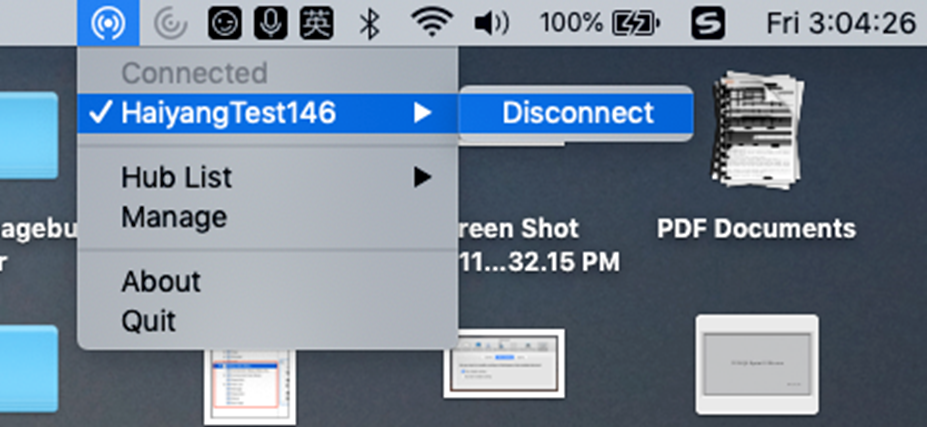
- Select the Citrix Casting icon.
- In the list of hubs, select the name of your workspace hub. The Disconnect option appears to the right.
- Select Disconnect to exit the hub.
Known issues
There are small latency issues when viewing the mirrored screen. In poor network conditions, latency might be even longer.
When SSL is enabled in a Citrix Ready workspace hub and the hub’s certificate is not trusted, an alert window appears. To solve the issue, add the certificate to your trusted certificate list with the Keychain tool.
Client-side microphone input
Citrix Workspace app for Mac supports multiple client-side microphone inputs. Locally installed microphones can be used for:
- Live events, such as softphone calls and Web conferences.
- Hosted recording applications, such as dictation programs.
- Video and audio recordings.
Digital dictation support is available with Citrix Workspace app for Mac.
You can use microphones attached to your user device in sessions by choosing one of the following options from the Mic & Webcam tab in Citrix Workspace app for Mac > Preferences:
- Use my microphone and webcam
- Don’t use my microphone and webcam
- Ask me each time
If you select Ask me each time, a dialog box appears each time you connect asking whether you want to use your microphone in that session.
Windows special keys
Citrix Workspace app for Mac provides several options and easier ways to substitute special keys such as function keys in Windows applications with Mac keys. Use the Keyboard tab to configure the options you want to use, as follows:
- “Send Control character using” lets you choose whether to send Command-character keystroke combinations as Ctrl+character key combinations in a session. Select “Command or Control” from the pop-up menu to send familiar Command-character or Ctrl-character keystroke combinations on the Mac as Ctrl+character key combinations to the PC. If you select Control, you must use Ctrl-character keystroke combinations.
- “Send Alt character using” lets you choose how to replicate the Alt key within a session. If you select Command-Option, you can send Command-Option and keystroke combinations as Alt+ key combinations within a session. Alternatively, if you select Command, you can use the Command key as the Alt key.
- “Send Windows logo key using Command (right)”. Lets you send the Windows logo key to your remote desktops and applications when you press the Command key on the right side of the keyboard. If this option is disabled, the right Command key has the same behavior as the left Command key according to the above two settings in the preferences panel. However, you can still send the Windows logo key using the Keyboard menu; choose Keyboard > Send Windows Shortcut > Start.
- “Send special keys unchanged” lets you disable the conversion of special keys. For example, the combination Option-1 (on the numeric keypad) is equivalent to the special key F1. You can change this behavior and set this special key to represent 1 (the number one on the keypad) in the session. To do this, select the “Send special keys unchanged” check box. By default, this check box is not selected so Option-1 is sent to the session as F1.
You send the function and other special keys to a session using the Keyboard menu.
If your keyboard includes a numeric keypad, you can also use the following keystrokes:
| PC key or action | Mac options |
|---|---|
| INSERT | 0 (the number zero) on the numeric keypad. Num Lock must be off; you can turn this on and off using the Clear key; Option-Help |
| DELETE | Decimal point on the numeric keypad. Num Lock must be off; you can turn this on and off using the Clear key; Clear |
| F1 to F9 | Option-1 to -9 (the numbers one to nine) on the numeric keypad |
| F10 | Option-0 (the number zero) on the numeric keypad |
| F11 | Option-Minus Sign on the numeric keypad |
| F12 | Option-Plus Sign on the numeric keypad |
Windows shortcuts and key combinations
Remote sessions recognize most Mac keyboard combinations for text input, such as Option-G to input the copyright symbol ©. Some keystrokes you make during a session, however, do not appear on the remote application or desktop. The Mac operating system interprets them. This can result in keys triggering Mac responses instead.
You might also want to use certain Windows keys, such as Insert, that many Mac keyboards do not have. Similarly, some Windows 8 keyboard shortcuts display charms and app commands, and snap and switch apps. Mac keyboards do not mimic these shortcuts. However, these can be sent to the remote desktop or application using the Keyboard menu.
Keyboards and the ways keys are configured can differ widely between machines. Citrix Workspace app for Mac therefore offers several choices to ensure that keystrokes can be forwarded correctly to hosted applications and desktops. These keystrokes are listed in the table. The default behavior is described. If you adjust the defaults (using Citrix Workspace app for Mac or other preferences), different keystroke combinations might be forwarded and other behavior might be observed on the Remote PC Access.
Certain key combinations listed in the table are not available when using newer Mac keyboards. In most of these cases, keyboard input can be sent to the session using the Keyboard menu.
Conventions used in the table:
- Letter keys are capitalized and do not imply that the Shift key must be pressed simultaneously.
- Hyphens between keystrokes indicate that keys must be pressed together (for example, Control-C).
- Character keys are those that create text input and include all letters, numbers, and punctuation marks. Special keys are those that do not create input by themselves but act as modifiers or Controllers. Special keys include Control, Alt, Shift, Command, Option, arrow keys, and function keys.
- Menu instructions relate to the menus in the session.
- Depending on the configuration of the user device, some key combinations might not work as expected, and alternative combinations are listed.
- Fn refers to the Fn (Function) key on a Mac keyboard. Function key refers to F1 to F12 on either a PC or Mac keyboard.
| Windows key or key combination | Mac equivalents |
|---|---|
| Alt+character key | Command–Option–character key (for example, to send Alt-C, use Command-Option-C) |
| Alt+special key | Option–special key (for example, Option-Tab); Command–Option–special key (for example, Command-Option-Tab) |
| Ctrl+character key | Command–character key (for example, Command-C); Control–character key (for example, Control-C) |
| Ctrl+special key | Control–special key (for example, Control-F4); Command–special key (for example, Command-F4) |
| Ctrl/Alt/Shift/Windows logo + function key | Choose Keyboard > Send Function key > Control/Alt/Shift/Command-Function key |
| Ctrl+Alt | Control-Option-Command |
| Ctrl+Alt+Delete | Control-Option-Fn-Command-Delete; Choose Keyboard > Send Ctrl-Alt-Del |
| Delete | Delete; Choose Keyboard > Send Key > Delete; Fn-Backspace (Fn-Delete on some US keyboards) |
| End | End; Fn-Right Arrow |
| Esc | Escape; Choose Keyboard > Send Key > Escape |
| F1 to F12 | F1 to F12; Choose Keyboard > Send Function Key > F1 to F12 |
| Home | Home; Fn-Left Arrow |
| Insert | Choose Keyboard > Send Key > Insert |
| Num Lock | Clear |
| Page Down | Page Down; Fn-Down Arrow |
| Page Up | Page Up; Fn-Up Arrow |
| Spacebar | Choose Keyboard > Send Key > Space |
| Tab | Choose Keyboard > Send Key > Tab |
| Windows logo | Right Command key (a keyboard preference, enabled by default); Choose Keyboard > Send Windows Shortcut > Start |
| Key combination to display charms | Choose Keyboard > Send Windows Shortcut > Charms |
| Key combination to display app commands | Choose Keyboard > Send Windows Shortcut > App Commands |
| Key combination to snap apps | Choose Keyboard > Send Windows Shortcut > Snap |
| Key combination to switch apps | Choose Keyboard > Send Windows Shortcut > Switch Apps |
Use Input Method Editors (IME) and international keyboard layouts
Citrix Workspace app for Mac allows you to use an Input Method Editor (IME) on either the user device or on the server.
When client-side IME is enabled, users can compose text at the insertion point rather than in a separate window.
Citrix Workspace app for Mac also allows users to specify the keyboard layout they want to use.
To enable client-side IME
- From the Citrix Viewer menu bar, choose Keyboard > International > Use Client IME.
- Ensure that the server-side IME is set to direct input or alphanumeric mode.
- Use the Mac IME to compose text.
To indicate explicitly the starting point when composing text
- From the Citrix Viewer menu bar, choose Keyboard > International > Use Composing Mark.
To use server-side IME
- Ensure that the client-side IME is set to alphanumeric mode.
Mapped server-side IME input mode keys
Citrix Workspace app for Mac provides keyboard mappings for server-side Windows IME input mode keys that are not available on Mac keyboards. On Mac keyboards, the Option key is mapped to the following server-side IME input mode keys, depending on the server-side locale:
| Server-side system locale | Server-side IME input mode key |
|---|---|
| Japanese | Kanji key (Alt + Hankaku/Zenkaku in Japanese keyboard) |
| Korean | Right-Alt key (Hangul/English toggle on Korean keyboard) |
To use international keyboard layouts
- Ensure both client-side and server-side keyboard layouts are set to the same locale as the default server-side input language.
Multiple monitors
Users can set Citrix Workspace app for Mac to work in full-screen mode across multiple monitors.
- Select the Desktop Viewer and click the down arrow.
- Select Window.
- Drag the Citrix Virtual Desktops screen between the monitors. Ensure that about half the screen is present in each monitor.
- From the Citrix Virtual Desktop toolbar, select Full-screen.
The screen is now extended to all monitors.
Known Limitations
- Full-screen mode is only supported on one monitor or all monitors, which are configurable through a menu item.
- Citrix recommends using a maximum of 2 monitors. Using more than 2 monitors might degrade session performance or cause usability issues.
Desktop toolbar
Users can now access the Desktop Toolbar in both windowed and full-screen mode. Previously, the toolbar was only visible in full-screen mode. Other toolbar changes include:
- The Home button has been removed from the toolbar. This function can be run by using the following commands:
- Cmd-Tab to switch to the previous active application.
- Ctrl-Left Arrow to switch to the previous Space.
- Using the built-in trackpad or Magic Mouse gestures to switch to a different Space.
- Moving the cursor to the edge of screen while in full-screen mode displays a Dock where you can choose which applications to make active.
- The Windowed button has been removed from the toolbar. Leaving full-screen mode for windowed mode can be run by the following methods:
- For OS X 10.10, clicking the green window button on the drop-down menu bar.
- For OS X 10.9, clicking the blue menu button on the drop-down menu bar.
- For all versions of OS X, selecting Exit Full Screen from the View menu of the drop-down menu bar.
- The toolbar drag behavior is updated to support dragging between windows in full screen with multiple monitors.
Workspace Control
Workspace Control lets desktops and applications follow users as they move between devices. This enables, for example, clinicians in hospitals to move from workstation to workstation without having to restart their desktops and applications on each device.
Policies and client drive mappings change appropriately when you move to a new user device. Policies and mappings are applied according to the user device where you are currently logged on to the session. For example, a healthcare worker logs off from a user device in the emergency room of a hospital and then logs on to a workstation in the hospital’s X-ray laboratory. The policies, printer mappings, and client drive mappings appropriate for the session in the X-ray laboratory go into effect for the session when the user logs on to the user device in the X-ray laboratory.
To configure workspace Control settings
- Click the down arrow icon in the Citrix Workspace app for Mac window and choose Preferences.
- Click General tab.
- Choose one of the following:
- Reconnect apps when I start Citrix Workspace app. Allows users to reconnect to disconnected apps when they start Citrix Workspace app.
- Reconnect apps when I start or refresh apps. Allows users to reconnect to disconnected apps either when they start apps or when they select Refresh Apps from the Citrix Workspace app for Mac menu.
Mapping client drives
Client drive mapping allows you to access local drives on the user device, for example, CD-ROM drives, DVDs, and USB memory sticks, during sessions. When a server is configured to allow client drive mapping, users can access their locally stored files, work with them during sessions, and then save them either on a local drive or on a drive on the server.
Citrix Workspace app for Mac monitors the directories in which hardware devices such as CD-ROMs, DVDs, and USB memory sticks are typically mounted on the user device and automatically maps any new ones that appear during a session to the next available drive letter on the server.
You can configure the level of read and write access for mapped drives using Citrix Workspace app for Mac preferences.
Источник


