- Steps to Run DiskPart Clean All Command to Erase SSD Drive
- When need to clean data on SSD drive?
- What does ”clean all” do in Diskpart?
- Steps to run “clean all” command on SSD
- A GUI tool to secure clean SSD without damage
- Final words
- cleanmgr cleanmgr
- Синтаксис Syntax
- Параметры Parameters
- Варианты Options
- Примеры Examples
Steps to Run DiskPart Clean All Command to Erase SSD Drive
In this post, you will learn how to use Diskpart “clean all” command to wipe SSD, as well as a better way to secure clean SSD drive in Windows 10/8/7.

By Emily  / Last Updated March 23, 2021
When need to clean data on SSD drive?
Solid State Drive has become a more popular choice for computer users to store important files than traditional hard disk drive thanks to its amazing reading and writing speed. However, sometimes we also need to clean data on the SSD drive for some reason including protecting sensitive information on the drive from prying eyes, releasing disk space for new data, optimize SSD performance, or giving it a start fresh.
What does ”clean all” do in Diskpart?
When it comes to cleaning SSD successfully, you can use DiskPart command «clean» or «clean all». Both commands can erase or wipe a disk leaving it unallocated and not initialized. But they have a slight difference.
в–ё «clean» command will delete all partitions on the SSD drive. But it only marks the data as deleted, not zero the disk. This data can be recovered using special data recovery software.
в–ё “clean all” command will erase the drive’s contents securely. It will write over every sector on the disk and zero out completely to delete data on the disk. And the deleted data cannot be recovered via usual tools.
Steps to run “clean all” command on SSD
From the «diskpart clean vs. clean all» above, we know that Diskpart clean all command is more secure to delete everything on the solid-state drive and decrease data recovery possibility. So many users would like to use this command when it is necessary to clean the SSD drive. Below is how to do it step by step.
Before proceeding:
в–ёGo to Disk Management to check the disk number of the SSD drive you want to erase and remember it to ensure you erase the right disk.
в–ёIf you want to keep something important on the SSD drive, you can back up them to another hard drive via free backup software.
1. Open the elevated command prompt: click «start» button, input «cmd» in the search box and press Enter, right click the program and choose «Run as administrator».
2. In the pop-out command prompt window, type «diskpart» and press Enter to launch the utility.
3. Type «list disk» and press Enter: get a list of disk numbers to select from.
4. Type «select disk #» and press Enter: substitute # for the disk number listed that you want to run «clean all» command on. Here we select disk 2.
5. Type «clean all» and press Enter.
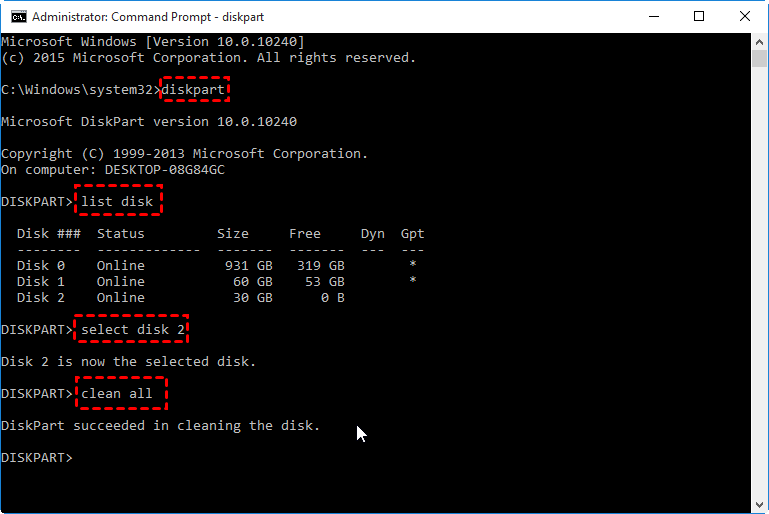
When the word “DiskPart succeeded in cleaning the disk” appears, type «exit» and press Enter to close the elevated command prompt window.
Frequently Asked Questions about clean all command on SSD
Q: How long does Diskpart clean all on SSD take?
A: «Clean all» command will take around an hour per 320GB to finish running since it performs a secure erase.
Q: Does diskpart clean remove MBR?
A: Use the diskpart clean command on a disk only removes all partitions from the disk with focus. It won’t clean MBR.
Q: Is it safe to use “clean all” command on SSD drive?
A: It is not recommended to run “clean all” on a solid-state drive too often since writing zero to every sector might reduce its SSD lifespan to some degrees.
Q: What if the SSD is offline in the disk list?
A: If you find the status of the target SSD drive is offline in the disk list, you need to execute «disk online» command between «select disk #» and «clean all» commands.
A GUI tool to secure clean SSD without damage
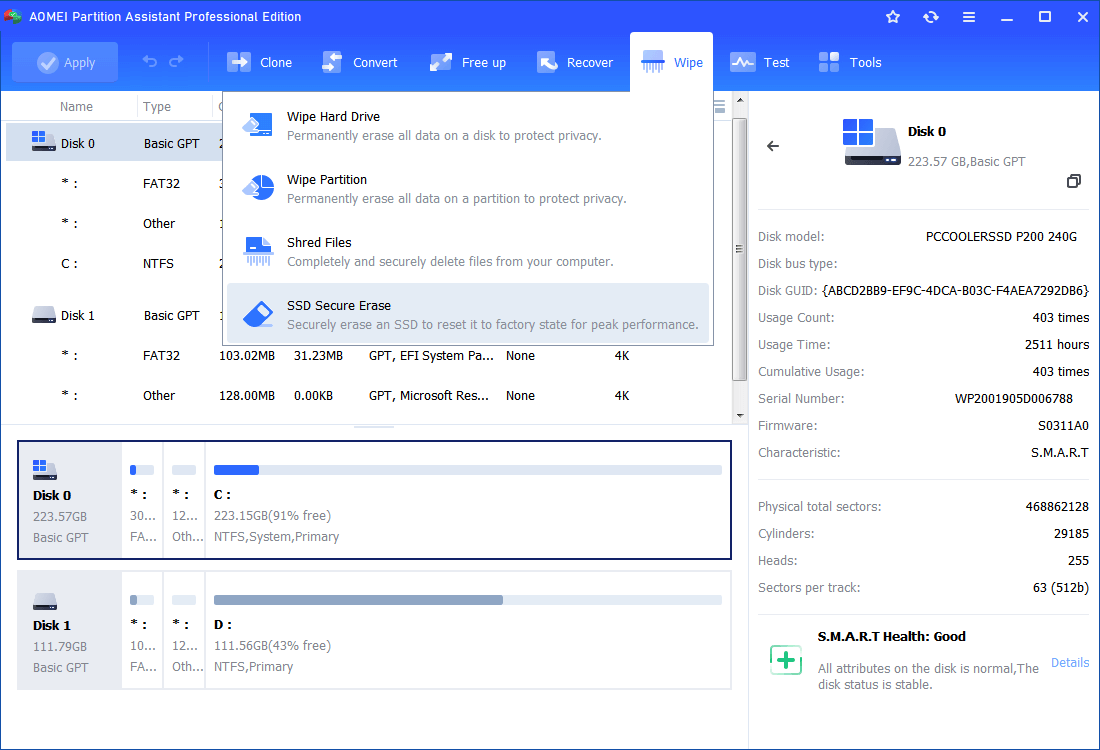
If you are not good at wiping SSD from command prompt in Windows, or you think it takes a very long time to securely erase an SSD drive, you can switch to AOMEI Partition Assistant Professional. This GUI tool is quite intuitive, easy to use for both computer experts and newbies.
Compared with Diskpart clean all command, its “SSD Secure Erase” feature can clean SSD data without damaging its lifespan and performance. This feature only works on Windows 7 computer by far, so you need to connect the target SSD to a Windows 7 PC before taking the following steps.
1. Install and run AOMEI Partition Assistant Professional. (The Demo Version is available for a free trial).
2. In its main interface, right click the SSD drive and select «SSD Secure Erase» from the drop-down menu.
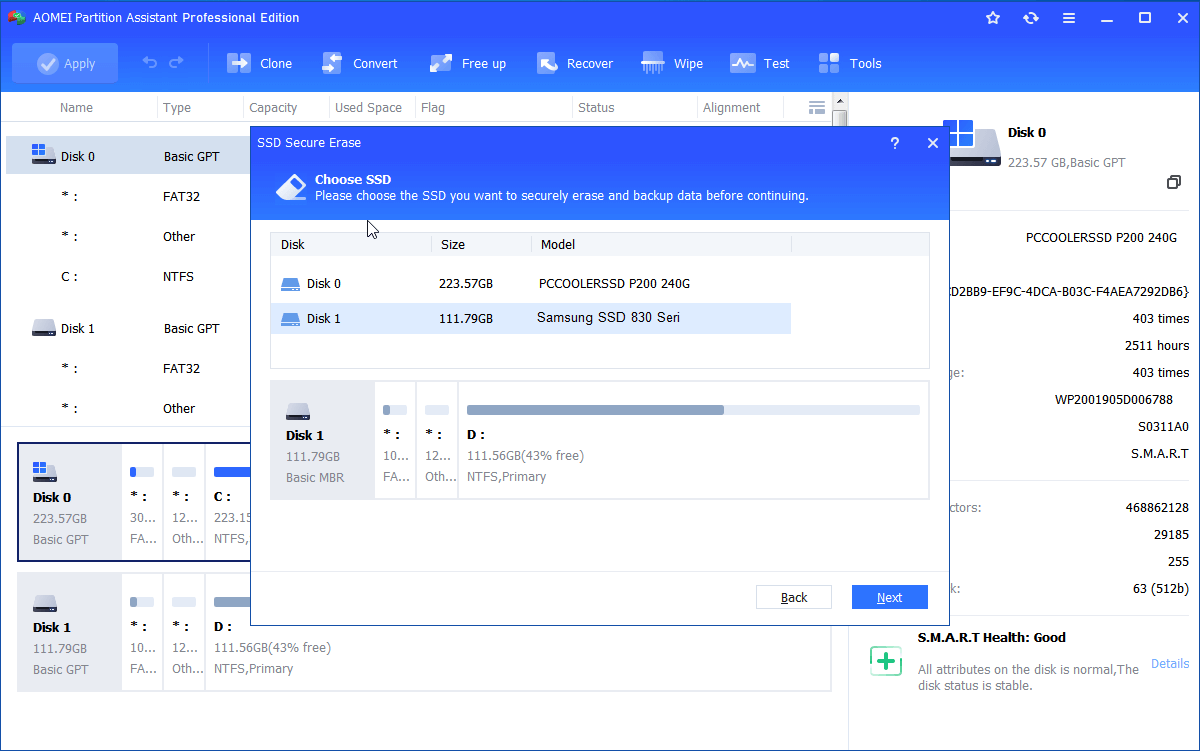
3. Choose the SSD drive you need to erase from the given disk list and click «Next».
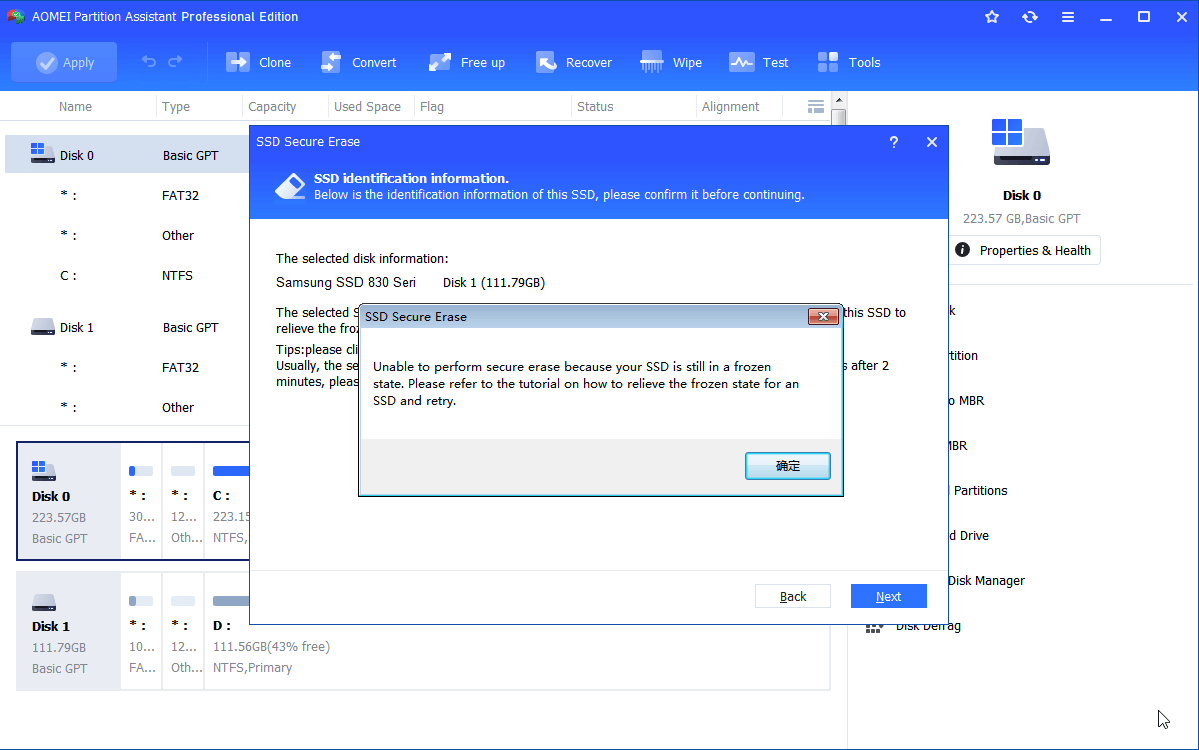
4. Here you can view and check the basic information of the selected SSD drive.
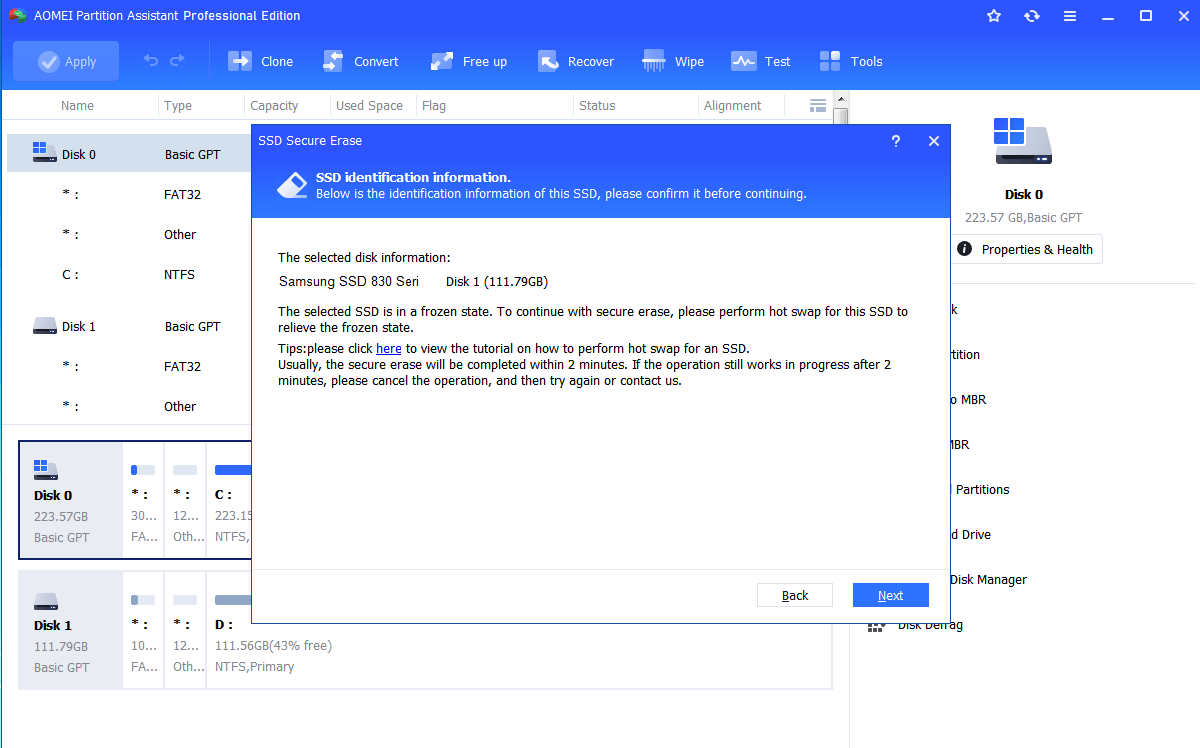
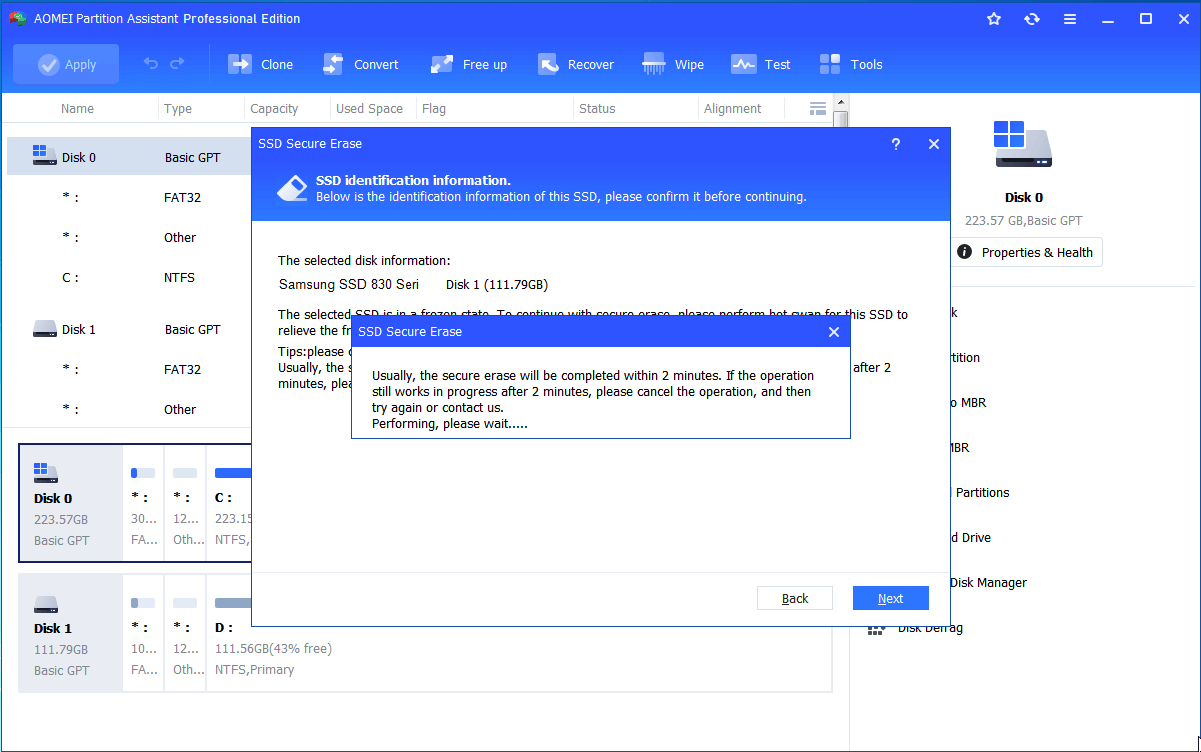
Warning: you might find the SSD drive is in a frozen state, if you click «Next», you will receive an error message shown below. To continue with secure erase, you can refer to the given tutorial to perform hot swap for the SSD.
5. After a successful hot swap, then click «Next» to start the SSD Secure Erase.
Apart from cleaning SSD drive in a simpler and safer way, AOMEI Partition Assistant Professional also offers many other amazing functions to manage disk partition in Windows 10/8/7 and Windows XP/Vista, such as:
в–ёAlign SSD partition to boost its data writing and reading speed;
в–ёMigrate OS to SSD or HDD with successful boot from the destination disk;
в–ёWipe a hard disk drive (HDD), or other USB drives completely and securely;
в–ёConvert boot disk from MBR to GPT, or GPT to MBR without deleting partitions/losing data.
Final words
On this page, we have discussed how to perform Diskpart clean all on SSD, as well as shared a better way to securely clean SSD drive. Now you can choose one based on your needs. To help users to manage disk partition more flexibly and conveniently, AOMEI Partition Assistant Server is developed for Windows Server 2019/2016/2012/2008/2003 users. If you want to install such a versatile program on unlimited Windows PC and Server, the Unlimited Edition can satisfy you.
cleanmgr cleanmgr
Область применения: Windows Server 2019, Windows Server 2016, Windows Server 2012, Windows Server 2008 R2, Windows Server (половина ежегодного канала) Applies to: Windows Server 2019, Windows Server 2016, Windows Server 2012, Windows Server 2008 R2, Windows Server (Semi-Annual Channel)
Удаляет ненужные файлы с жесткого диска компьютера. Clears unnecessary files from your computer’s hard disk. С помощью параметров командной строки можно указать, что cleanmgr очищает временные файлы, файлы Интернета, скачанные и перезапускают файлы bin. You can use command-line options to specify that Cleanmgr cleans up Temp files, Internet files, downloaded files, and Recycle Bin files. Затем можно запланировать выполнение задачи в определенное время с помощью средства запланированные задания . You can then schedule the task to run at a specific time by using the Scheduled Tasks tool.
Синтаксис Syntax
Параметры Parameters
| Параметр Parameter | Описание Description |
|---|---|
| /d /d | Указывает диск, на котором должна быть очищена Очистка диска. Specifies the drive that you want Disk Cleanup to clean. |
Примечание. Параметр /d не используется с /sagerun:n . NOTE: The /d option is not utilized with /sagerun:n .
Варианты Options
Параметры для файлов, которые можно указать для очистки диска с помощью команды /sageset и /сажерун , включают: The options for the files that you can specify for Disk Cleanup by using /sageset and /sagerun include:
Временные файлы установки — это файлы, созданные программой установки, которая больше не выполняется. Temporary Setup Files — These are files that were created by a Setup program that is no longer running.
Загруженные файлы программы — Скачанные программные файлы — это элементы ActiveX и Java-программы, загружаемые автоматически из Интернета при просмотре определенных страниц. Downloaded Program Files — Downloaded program files are ActiveX controls and Java programs that are downloaded automatically from the Internet when you view certain pages. Эти файлы временно хранятся в папке downloaded Program Files на жестком диске. These files are temporarily stored in the Downloaded Program Files folder on the hard disk. Этот параметр включает кнопку «просмотреть файлы», чтобы просмотреть файлы до их удаления. This option includes a View Files button so that you can see the files before Disk Cleanup removes them. При нажатии кнопки открывается папка Program Files К:\виннт\довнлоадед. The button opens the C:\Winnt\Downloaded Program Files folder.
Временные файлы Интернета . папка временных файлов Интернета содержит веб-страницы, которые хранятся на жестком диске для быстрого просмотра. Temporary Internet Files — The Temporary Internet Files folder contains Web pages that are stored on your hard disk for quick viewing. Программа очистки диска удаляет эти страницы, но оставляет личные настройки веб-страниц без изменений. Disk Cleanup removes these page but leaves your personalized settings for Web pages intact. Этот параметр также включает кнопку «Просмотреть файлы», которая открывает папку «C:\Documents and Сеттингс\усернаме\локал Сеттингс\темпорари Internet Files\Content.IE5». This option also includes a View Files button, which opens the C:\Documents and Settings\Username\Local Settings\Temporary Internet Files\Content.IE5 folder.
Старые файлы chkdsk . когда chkdsk проверяет диск на наличие ошибок, CHKDSK может сохранять потерянные фрагменты файлов в виде файлов в корневой папке на диске. Old Chkdsk Files — When Chkdsk checks a disk for errors, Chkdsk might save lost file fragments as files in the root folder on the disk. Эти файлы не нужны. These files are unnecessary.
Корзина — в корзине содержатся файлы, удаленные с компьютера. Recycle Bin — The Recycle Bin contains files that you have deleted from the computer. Эти файлы не удаляются окончательно, пока корзина не будет очищена. These files are not permanently removed until you empty the Recycle Bin. Этот параметр включает кнопку «Просмотреть файлы», которая открывает корзину. This option includes a View Files button that opens the Recycle Bin.
Примечание. Корзина может отображаться на нескольких дисках, например, не только в% SystemRoot%. Note: A Recycle Bin may appear in more than one drive, for example, not just in %SystemRoot%.
Временные файлы — программы иногда хранят временные данные во временной папке. Temporary Files — Programs sometimes store temporary information in a Temp folder. Перед завершением работы программы эта информация обычно удаляется. Before a program quits, the program usually deletes this information. Вы можете безопасно удалить временные файлы, которые не были изменены в течение прошлой недели. You can safely delete temporary files that have not been modified within the last week.
Временные автономные файлы — временные автономные файлы — это локальные копии недавно использованных сетевых файлов. Temporary Offline Files — Temporary offline files are local copies of recently used network files. Эти файлы кэшируются автоматически, поэтому их можно использовать после отключения от сети. These files are automatically cached so that you can use them after you disconnect from the network. Кнопка Просмотреть файлы открывает папку автономные файлы. A View Files button opens the Offline Files folder.
Автономные файлы — автономные файлы — это локальные копии сетевых файлов, которые должны быть доступны в автономном режиме, чтобы их можно было использовать после отключения от сети. Offline Files — Offline files are local copies of network files that you specifically want to have available offline so that you can use them after you disconnect from the network. Кнопка Просмотреть файлы открывает папку автономные файлы. A View Files button opens the Offline Files folder.
Сжатие старых файлов — Windows может сжимать файлы, которые не использовались недавно. Compress Old Files — Windows can compress files that you have not used recently. Сжатие файлов экономит место на диске, но вы по-прежнему можете использовать эти файлы. Compressing files saves disk space, but you can still use the files. Файлы не удаляются. No files are deleted. Поскольку файлы сжимаются по разным тарифам, отображаемый объем дискового пространства будет приблизительным. Because files are compressed at different rates, the displayed amount of disk space that you will gain is approximate. Кнопка Параметры позволяет указать число дней ожидания перед тем, как программа очистки диска будет сжимать неиспользуемый файл. An Options button permits you to specify the number of days to wait before Disk Cleanup compresses an unused file.
Файлы каталога для индексатора содержимого . Служба индексирования ускоряет и улучшает поиск файлов, сохраняя индекс файлов на диске. Catalog Files for the Content Indexer — The Indexing service speeds up and improves file searches by maintaining an index of the files that are on the disk. Эти файлы каталога остаются из предыдущей операции индексирования и могут быть удалены безопасно. These Catalog files remain from a previous indexing operation and can be deleted safely.
Примечание. Файл каталога может отображаться на нескольких дисках, например, не только в %SystemRoot% . Note: Catalog File may appear in more than one drive, for example, not just in %SystemRoot% .
При указании очистки диска, содержащего установку Windows, все эти параметры доступны на вкладке Очистка диска . Если указать любой другой диск, на вкладке Очистка диска будут доступны только Корзина и файлы каталога для параметров индекса содержимого. If you specify cleaning up the drive that contains the Windows installation, all of these options are available on the Disk Cleanup tab. If you specify any other drive, only the Recycle Bin and the Catalog files for content index options are available on the Disk Cleanup tab.
Примеры Examples
Чтобы запустить приложение «Очистка диска», чтобы можно было использовать его диалоговое окно для указания параметров для дальнейшего использования, сохраните параметры в набор 1, введите следующую команду: To run the Disk Cleanup app so that you can use its dialog box to specify options for use later, saving the settings to the set 1, type the following:
Чтобы запустить очистку диска и включить параметры, указанные с помощью команды cleanmgr/sageset: 1, введите: To run Disk Cleanup and include the options that you specified with the cleanmgr /sageset:1 command, type:
Для запуска cleanmgr /sageset:1 и cleanmgr /sagerun:1 совместного выполнения введите: To run cleanmgr /sageset:1 and cleanmgr /sagerun:1 together, type:


