- Как выполнить «чистую» загрузку в Windows 10
- Варианты загрузки
- Как выполнить «чистую» загрузку
- Чистая загрузка Windows
- Как выполнить чистую загрузку Windows 10 и Windows 8
- Чистая загрузка Windows 7
- Примеры использования режима чистой загрузки
- Как выполнить чистую загрузку в Windows 10?
- How to perform a clean boot in Windows
- Summary
- How to perform a clean boot
Как выполнить «чистую» загрузку в Windows 10
Если компьютер стал работать медленно и нестабильно, то обычно пользователи прибегают к стандартным процедурам: проверяют систему на вирусы, выполняют перезагрузку и запускают проверку диска на ошибки. Но что делать, если ПК продолжает испытывать проблемы работоспособности, а вы никак не можете определить их причину?
В самых экстремальных случаях, ряд пользователей выбирают полную переустановку Windows, предполагая, что все проблемы связаны именно с операционной системой. Другие пользователи пытаются удалить и переустановить приложения, считая, что неполадки возникают из-за стороннего ПО.
Тем не менее, есть более простой способ диагностики программных ошибок, которые могут вызывать проблемы производительности. Данный способ связан с использованием «чистой» загрузки Windows — это режим загрузки, когда загружаются исключительно критически важные драйвера и службы операционной системы.
На официальном сайте Microsoft сообщается:
«Чистая» загрузка системы применяется для запуска Windows с минимальным набором драйверов и программ из автозагрузки. Это помогает устранить конфликты программного обеспечения, возникающие при установке программы или обновления либо при запуске программы в Windows 10, Windows 8.1, Windows 8, Windows 7 или Windows Vista. «Чистая» загрузка также позволяет устранить неполадки или выяснить, какой конфликт является причиной проблемы.
Варианты загрузки
Прежде всего, убедитесь, что вы вошли в систему с помощью учетной записи администратора, потому что вам нужно внести изменения в систему, которые недоступны для ограниченных аккаунтов.
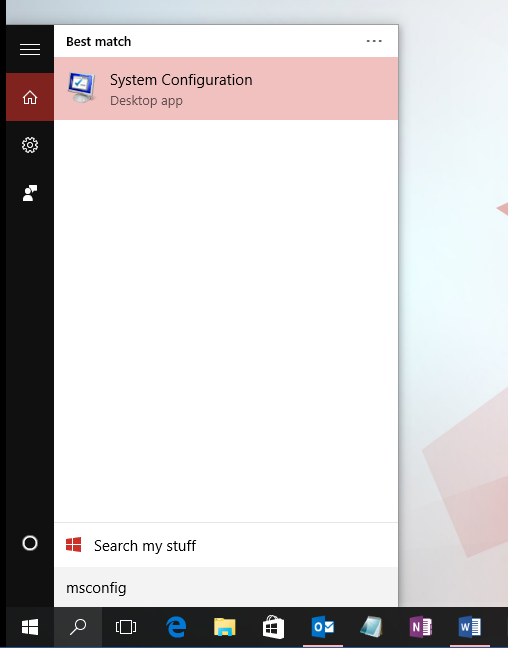
Существует несколько параметров загрузки, которые вы можете настроить перед выполнением «чистой загрузки» Windows. Нажмите клавишу Windows + R и введите msconfig. В диалоговом окне «Конфигурация системы» на вкладке «Общая» выберите один из доступных вариантов запуска — Обычный запуск, Диагностический запуск или Выборочный запуск.

- Обычный запуск используется при повседневном использовании компьютера. В этом режиме загружаются все настроенные драйвера и службы Microsoft и сторонних приложений.
- Диагностический запуск позволяет загружать только основные устройства и службы, которые помогают изолировать ошибку и по возможности определить источник проблемы.
- Выборочный запуск предлагает множество дополнительных опций — пользователь может сам настраивать какие компоненты будут загружены (службы, программы в автозагрузке) и может использовать оригинальную конфигурацию загрузки. Если данные параметры загрузки помогут восстановить производительность системы, то ручная настройка «чистой» загрузки больше не потребуется.
Как выполнить «чистую» загрузку
Если вы хотите использовать проверенный временем метод «чистой» загрузки, то в разделе Конфигурация системы на вкладке Службы и установите флажок Не отображать службы Microsoft. Это означает, что на вашем компьютере будут отображаться только службы, не созданные Microsoft. Отключите все из них, но запомните текущую конфигурации служб (запишите, сделайте скриншот), чтобы после «чистой» загрузки восстановить службы в том же порядке.

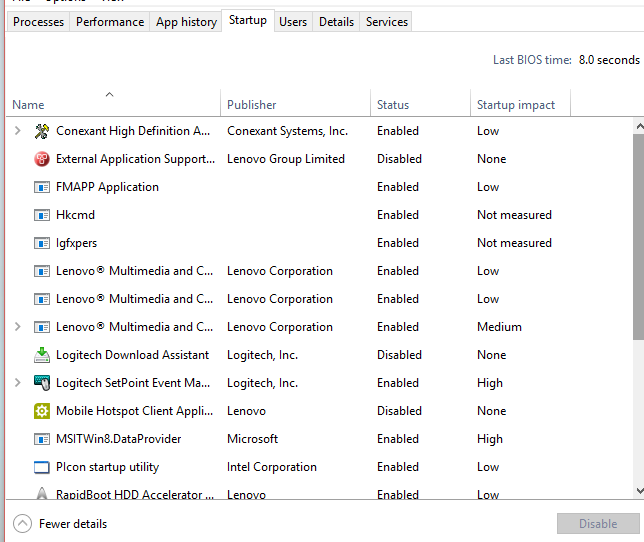
После отключения ненужных служб, откройте вкладку Автозагрузка и нажмите на ссылку «Открыть диспетчер задач». Отключите все элементы, но снова сохраните информацию об исходной конфигурации для последующего восстановления.

Теперь вы можете закрыть все окна и перезагрузить компьютер. Если система загружается корректно, и исходная производительность системы восстановлена, то проблемы связаны со сторонним ПО. В противном случае, придется настраивать Windows.
Совет. Если в режиме «чистой» загрузки система работает корректно, это свидетельствует о том, что причиной сбоя была одна или несколько программ, которые Вы отключили. В такой ситуации методом исключения, т.е. включая программы и службы по одной, выполняя перезагрузку и проверяя работу, можно определить программу, влияющую на работу. Выявив программу, которая влияет на работу, либо оставьте её отключенной, либо удалите, либо свяжитесь с её разработчиком для дальнейшего решения вопроса.
После этого не забудьте восстановить конфигурацию и вернуться в обычный режим загрузки. Кроме того, после «чистой» загрузки вы можете удалить любое приложение, которое, по вашему мнению, может быть источником проблемы и негативно сказывается на производительности системы.
Для того, чтобы отключить режим «чистой» загрузки, на вкладке Общие окна программы Конфигурация системы выберите пункт Обычный запуск. Затем нажмите ОК, затем Перезагрузка.
Чистая загрузка Windows
 Чистая загрузка в Windows 10, 8 и Windows 7 (не путать с чистой установкой, под которой понимается установка ОС с флешки или диска с удалением предыдущей системы) позволяет исправить проблемы с системой, вызванные неправильной работой программ, конфликтами ПО, драйверов и служб Windows.
В чем-то чистая загрузка (clean boot) схожа с безопасным режимом (см. Как зайти в безопасный режим Windows 10), но не является тем же самым. В случае входа в безопасном режиме, в Windows отключается почти всё, что не является обязательным для запуска, а для работы используются «стандартные драйвера» без аппаратного ускорения и других функций (что может быть полезно при исправлении проблем с оборудованием и драйверами).
При использовании чистой загрузки Windows, предполагается, что с сама операционная система и оборудование работают исправно, а при запуске не загружаются компоненты от сторонних разработчиков. Данный вариант запуска подходит для тех случаев, когда нужно выявить именно проблемное или конфликтующее программное обеспечение, сторонние службы, мешающие нормальной работе ОС. Важно: для того, чтобы настроить чистую загрузку, вы должны быть администратором в системе.
Как выполнить чистую загрузку Windows 10 и Windows 8

Для того, чтобы выполнить чистый запуск Windows 10, 8 и 8.1, нажмите клавиши Win+R на клавиатуре (Win — клавиша с эмблемой ОС) и введите msconfig в окно «Выполнить», нажмите Ок. Откроется окно «Конфигурация системы».
Далее по порядку выполните следующие шаги
- На вкладке «Общие» выберите «Выборочный запуск» и снимите отметку с «Загружать элементы автозагрузки». Примечание: у меня нет точной информации, работает ли это действие и является ли обязательным для чистой загрузки в Windows 10 и 8 (в 7-ке — точно работает, а здесь есть основания предполагать, что нет).

- На вкладе «Службы» поставьте отметку «Не отображать службы Майкрософт», а затем, при наличии сторонних служб, нажмите кнопку «Отключить все».
- Перейдите на вкладку «Автозагрузка» и нажмите «Открыть диспетчер задач».
- Диспетчер задач откроется на вкладке «Автозагрузка». Кликните по каждому из пунктов в списке правой кнопкой мыши и выберите «Отключить» (или сделайте это с помощью кнопки внизу списка для каждого из пунктов).
- Закройте диспетчер задач и нажмите «Ок» в окне конфигурации системы.


После этого перезагрузите компьютер — произойдет чистая загрузка Windows. В дальнейшем, чтобы вернуть обычную загрузки системы, верните все сделанные изменения в исходное состояние.
Предвидя вопрос о том, зачем мы дважды отключаем элементы автозагрузки: дело в том, что простое снятие отметки «Загружать элементы автозагрузки» выключает не все автоматически загружаемые программы (а возможно и вообще не отключает их в 10-ке и 8-ке, о чем я упомянул в п.1).
Чистая загрузка Windows 7
Шаги для чистой загрузки в Windows 7 почти ничем не отличаются от тех, что были перечислены выше, кроме пунктов, имеющих отношение к дополнительному отключению пунктов автозагрузки — эти действия в Windows 7 не нужны. Т.е. действия по включению чистой загрузки будут следующими:
- Нажать Win+R, ввести msconfig, нажать «Ок».
- На вкладке «Общие» выбрать «Выборочный запуск» и снять отметку с «Загружать элементы автозагрузки».
- На вкладке «Службы» включить «Не отображать службы Майкрософт», а затем выключить все сторонние службы.
- Нажать Ок и перезагрузить компьютер.
Возврат обычной загрузки производится отменой сделанных изменений тем же самым образом.
Примечание: на вкладе «Общие» в msconfig вы могли также заметить пункт «Диагностический запуск». По сути, это та же чистая загрузка Windows, но не дающая возможности контролировать, что именно будет загружаться. С другой стороны, в качестве первого шага перед диагностикой и поиском ПО, вызывающего проблемы, диагностический запуск может быть полезен.
Примеры использования режима чистой загрузки
Некоторые возможные сценарии, когда чистая загрузка Windows может быть полезна:
- Если не удается установить программу или удалить ее через встроенный деинсталлятор в обычном режиме (может потребоваться ручной запуск службы Установщик Windows).
- Не запускается программа в обычном режиме по неясным причинам (не отсутствие необходимых файлов, а что-то еще).
- Не удается совершить действия над какими-то папками или файлами, так как они используются (на эту тему см. также: Как удалить файл или папку, которые не удаляются).
- Появляются необъяснимые ошибки при работе системы. В этом случае диагностика может быть долгой — начинаем с чистой загрузки, и, если ошибка не проявляется, пробуем по одной включать сторонние службы, а затем программы автозапуска, перезагружаясь каждый раз, чтобы выявить элемент, вызывающий проблемы.
Как выполнить чистую загрузку в Windows 10?
Технический уровень : Базовый
Краткое содержание
В данной статье я расскажу как выполнить чистую загрузку в Windows 10
Подробности
«Чистая» загрузка выполняется для запуска Windows с минимальным набором драйверов и программ при запуске. Это позволяет исключить конфликты программного обеспечения, возникающих после установки программы или обновления или при запуске программы в Windows .
Можно также определить какая сторонняя программа, служба вызывает неполадки, выполнив «чистую» загрузку.
Почему возникают конфликты программного обеспечения?
При обычном запуске Windows некоторые приложения и службы запускаются автоматически, а затем работают в фоновом режиме. Эти программы включают основные системные процессы, антивирусное программное обеспечение, программы системы приложений и другого программного обеспечения, которое было ранее установлено. Эти приложения и службы могут вызывать конфликты программного обеспечения.
- Необходимо войти в систему на компьютере как администратор, чтобы иметь возможность выполнить «чистую» загрузку.
- При «чистой» загрузке у вашего компьютера могут не работать некоторые функции.
При запуске компьютера в обычном режиме функции вернуться. - Если компьютер подключен к сети, параметры сетевой политики могут помешать выполнению следующих действий.
Выполните следующие действия, чтобы запустить Windows 10 в режиме «чистой загрузки».
- Нажмите на кнопку Поиск
- Введите msconfig в поле поиска и затем щелкните Конфигурация системы.
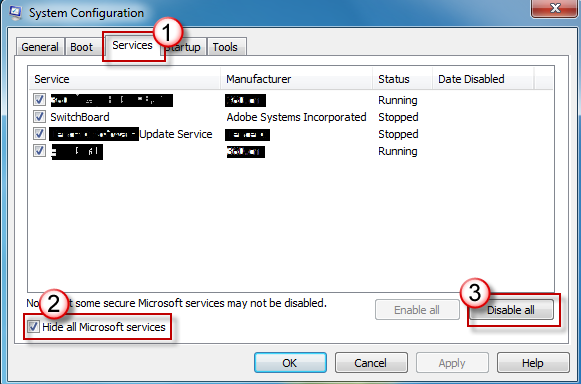
На вкладке Службы диалогового окна Конфигурации системы установите флажок Не отображать службы Майкрософт и нажмите кнопку Отключить все.
Перейдите во вкладку Автозагрузка, нажмите кнопку Открыть диспетчер задач.
Более подробно про «чистую» загрузку Windows и как с ее помощью можно определить какая именно программа вызывает ошибку в работе можно прочитать в официальной статье от компании Microsoft:
How to perform a clean boot in Windows
Notes: If your issue prevents you from booting into Windows, you won’t be able to follow the steps in this article. After the device tries to restart a few times, you should get Windows Recovery Options, which you can use to try to resolve the issue. Click a link below that corresponds to your version of Windows:
Summary
A “clean boot” starts Windows with a minimal set of drivers and startup programs, so that you can determine whether a background program is interfering with your game or program. This is similar to starting Windows in Safe Mode, but provides you more control over which services and programs run at startup to help you isolate the cause of a problem.
How to perform a clean boot
These steps might look complicated at first glance, but following them in order, step-by-step, will help you get you back on track.
Use the following steps to perform a clean boot in Windows 10. Perform a clean boot for Windows 7, Windows 8 and Windows 8.1
Sign in to the computer as an administrator. If you don’t have an administrator account, you can create one. Create a local user or administrator account in Windows 10 .
In the search box on the taskbar, type msconfig and select System Configuration from the results.
Important If the computer is connected to a network, network policy settings might prevent you from following these steps. Only use the System Configuration utility to change the advanced boot options on the computer with guidance from a Microsoft support engineer. Using the System Configuration utility might make the computer unusable.
On the Services tab of System Configuration, select Hide all Microsoft services, and then select Disable all.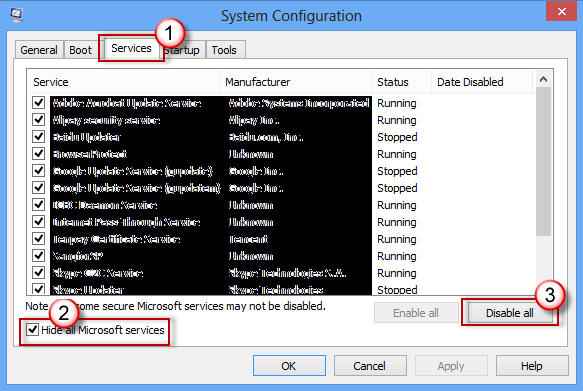
On the Startup tab of System Configuration, select Open Task Manager.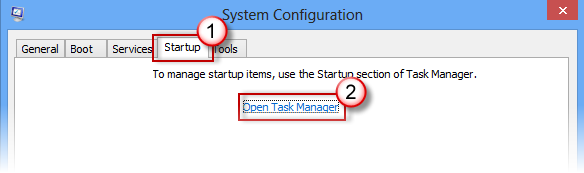
Under Startup in Task Manager, for each startup item, select the item and then select Disable.
Close Task Manager.
On the Startup tab of System Configuration, select OK. When you restart the computer, it’s in a clean boot environment. Follow troubleshooting steps to install, uninstall, or run your application. Your computer might temporarily lose some functionality while in a clean boot environment. Reset the computer to start normally after clean boot troubleshooting and resume functionality.
Swipe in from the right edge of the screen, and then select Search. Or, if you’re using a mouse, point to the lower-right corner of the screen, and then select Search.
Type msconfig in the search box, and then select msconfig. 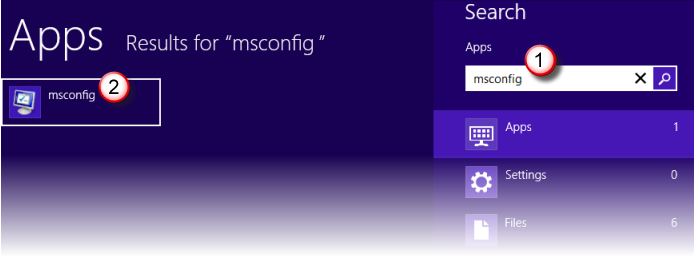
On the Services tab of System Configuration, select Hide all Microsoft services, and then select Disable all.
Important If the computer is connected to a network, network policy settings might prevent you from following these steps. Only use the System Configuration utility to change the advanced boot options on the computer with guidance from a Microsoft support engineer. Using the System Configuration utility might make the computer unusable.
On the Startup tab of System Configuration, select Open Task Manager.
Select Startup in Task Manager, then for each startup item, select the item and then select Disable.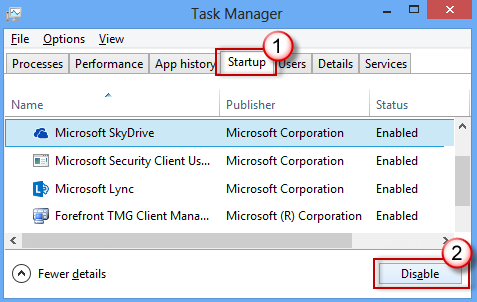
Close Task Manager.
On the Startup tab of System Configuration, select OK, and then restart the computer. 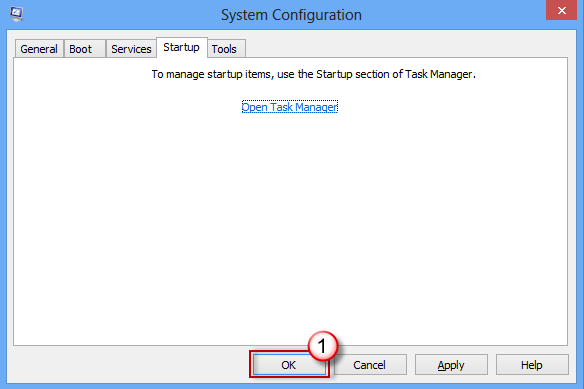
The computer restarts in a clean boot environment. Follow troubleshooting steps to install, uninstall, or run your application. Your computer might temporarily lose some functionality while in a clean boot environment, however that functionality will return. Finish troubleshooting and reset the computer to start normally.
Sign in to the computer by using an account that has administrator rights.
Select Start, type msconfig.exe in the Start Search box, and then press Enter to start the System Configuration utility.
Note If you’re prompted for an administrator password or for confirmation, type the password or provide confirmation.
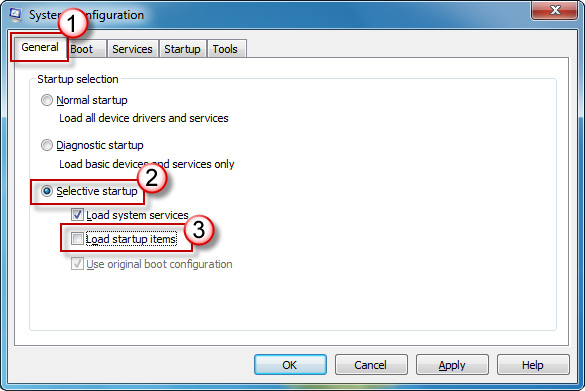
On the General tab, select Selective startup, and then deselect Load startup items. (The Use Original Boot.ini check box is unavailable.)
 Important If the computer is connected to a network, network policy settings might prevent you from following these steps. Only use the System Configuration utility to change the advanced boot options on the computer with guidance from a Microsoft support engineer. Using the System Configuration utility might make the computer unusable.
On the Services tab, select Hide all Microsoft services, and then select Disable all.
Note This step lets Microsoft services continue to run. These services include Networking, Plug and Play, Event Logging, Error Reporting, and other services. If you disable these services, you might permanently delete all restore points. Do not do this if you want to use the System Restore utility together with existing restore points.
Select OK, and then select Restart. The computer restarts in a clean boot environment. Follow troubleshooting steps to install, uninstall, or run your application. Your computer might temporarily lose some functionality while in a clean boot environment, however that functionality will return. Finish troubleshooting and reset the computer to start normally.
Install, uninstall, or run an application
After you restart the computer, you’ll have a clean boot environment. Then, do one of the following, as appropriate for your situation:
Note If you receive the «The Windows Installer service could not be accessed» error during the installation or uninstallation, you’ll need more information. How to start the Windows Installer service when system services are not loaded. Then install or uninstall the program or update again.
If the installation or uninstallation is successful, you issue is resolved and you can start as you usually do. How to reset the computer to start as usual
If the installation or uninstallation still fails, that means this issue is not caused by application or service interference. You mght need to contact the program manufacturer for more specific support.
If the program runs correctly, this issue is caused by application or service interferences. You can find out which application or service is causing the issue. How to determine what is causing the issue by performing a clean boot
If the program still doesn’t run as expected, this issue is not caused by application or service interference. You might need to contact the program manufacturer for more specific support.
How to determine what is causing the problem after you do a clean boot
If your problem does not occur while the computer is in a clean boot environment, then you can determine which startup application or service is causing the problem by systematically turning them on or off and restarting the computer. While turning on a single service or startup item and rebooting each time will eventually find the problematic service or application, the most efficient way to do this is to test half of them at a time, thus eliminating half of the items as the potential cause with each reboot of the computer. You can then repeat this process until you’ve isolated the problem. Here’s how:
Sign in to the computer by using an account that has administrator rights. If you don’t have an administrator account, you can create one. Create a local user or administrator account in Windows 10
For Windows 10, in the search box on the taskbar, type msconfig. (In Windows 8 or 8.1, swipe in from the right edge of the screen, and then select Search. Or, if you’re using a mouse, point to the lower-right corner of the screen, and then select Search. In the search box, type msconfig.)
Select msconfig or System Configuration from the search results.
Select Services, and then select Hide all Microsoft services.
Select each of the check boxes in the upper half of the Service list.
Select OK, and then select Restart.
After the computer restarts, determine whether the problem still occurs.
If the problem still occurs, one of the checked items is the problematic service. Repeat steps 1 through 6, but in Step 5, clear the lower half of the boxes in the Service list that you selected in your last test.
If the problem doesn’t occur, the checked items are not the cause of the problem. Repeat steps 1 through 6, but in Step 5, turn on the upper half of the boxes that you cleared in the Service list in the last test.
Repeat these steps until you’ve either isolated the problem to a single service, or until you’ve determined that none of the services are the cause of the problem. If you experience the problem when only one service is selected in the Service list, go to step 10. If none of the services cause the problem, go to step 8.
Select Startup, and then select the upper half of the check boxes in the Startup Item list.
Select OK, and then select Restart.
If the problem still occurs, repeat step 8, but this time clear the lower half of the boxes in the Startup Item list that you selected in your last test.
If the problem does not occur, repeat step 8, and turn on the upper half of the boxes that you cleared in the Startup Item list in the last test.
If you still experience the problem after only one Startup Item is selected in the Startup Item list, this means that the selected Startup Item causes the problem, and you should go to step 10. If no Startup Item causes this problem, there might be a problem with a Microsoft service. Repair the service, reset, or reinstall Windows
After you determine the startup item or the service that causes the problem, contact the program manufacturer to determine whether the problem can be resolved. Or, run Windows with the problem item disabled. To do this, run the System Configuration utility and enable your Services and Startup Items, but clear the check box for the problem item.
Sign in to the computer by using an account that has administrator rights.
Select Start, type msconfig.exe in the Start Search box, and then press Enter to start the System Configuration utility.
Note If you’re prompted for an administrator password or for confirmation, type the password or provide confirmation.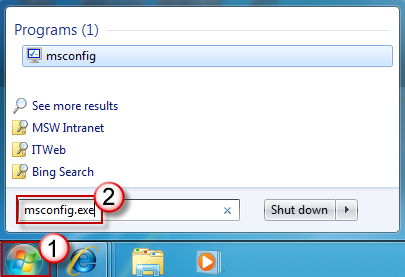
Select the Services tab, and then select Hide all Microsoft services.
Select the upper half of the check boxes in the Service list.
Select OK, and then select Restart.
After the computer finishes restarting, determine whether the problem still occurs.
If the problem still occurs, repeat steps 1 through 5, but in Step 4, clear the lower half of the boxes in the Service list that you selected in your last test.
If the problem does not occur, the checked items are not the cause of the problem. Repeat steps 1 through 5, but in Step 4, turn on the upper half of the boxes that you cleared in the Service list in the last test.
If you still experience the problem after only one service is selected in the Service list, this means that the selected service causes the problem. Go to step 9. If no service causes this problem, go to step 7.
Select Startup, and then select the upper half of the check boxes in the Startup Item list. 
Select OK, and then select Restart.
If the problem still occurs, repeat step 7, but this time clear the lower half of the boxes in the Startup Item list that you selected in your last test.
If the problem does not occur, repeat step 7, and select only the upper half of the remaining check boxes that are cleared in the Startup Item list. Repeat these steps until you have selected all the check boxes.
If you still experience the problem after only one Startup Item is selected in the Startup Item list, this means that the selected Startup Item causes the problem. Go to Step 10. If no Startup Item causes this problem, a Microsoft service probably causes the problem. To repair the service, Microsoft recommends that you reset or reinstall Windows.
After you determine the startup item or the service that causes the problem, contact the program manufacturer to determine whether the problem can be resolved. Or, run Windows with the problem item disabled. (Run the System Configuration utility and enable your Services and Startup Items, but clear the check box for the problem item.)
Reset the computer to start normally after clean boot troubleshooting
After you finish troubleshooting, follow these steps to reset the computer to start normally.
In Windows 10, in the search box on the taskbar, type msconfig. (In Windows 8 or 8.1, swipe in from the right edge of the screen, and then select Search. Or, if you’re using a mouse, point to the lower-right corner of the screen, and then select Search. Type msconfig.)
Select msconfig or System Configuration from the search results.
On the General tab, select Normal Startup.
Select Services, clear the check box beside Hide all Microsoft services, and then select Enable all.
Select Startup, and then select Open Task Manager.
In Task Manager, enable all of your startup programs, and then select OK.
When you’re prompted to restart the computer, select Restart.
Click Start, type msconfig.exe in the Start Search box, and then press Enter.
Note If you’re prompted for an administrator password or for confirmation, type the password or select Continue.
On the General tab, select Normal Startup, and then select OK.
When you’re prompted to restart the computer, select Restart.
How to start the Windows Installer service when system services are not loaded
If you run a Setup program without starting the Windows Installer service, you might receive the following error message:
The Windows Installer service could not be accessed. Contact your support personnel to verify that the Windows Installer service is properly registered.
The Windows Installer service doesn’t start if you clear the Load system services check box in the System Configuration utility. To use the Windows Installer service when system services are not loaded, start the service manually. Here’s how:
In Windows 10, in the search box on the taskbar, type computer management. (In Windows 8 or 8.1, swipe in from the right edge of the screen, and then select Search. Or, if you’re using a mouse, point to the lower-right corner of the screen, and then click Search. Type computer management.)
Right-click or swipe down on Computer Management in the search results, and then select Manage.
In the console tree, select Services and Applications, and then select Services.
In the details pane, right-click or swipe down on Windows Installer, and then select Start.
Click Start, right-click Computer, and then select Manage.
Note If you’re prompted for an administrator password or for confirmation, type the password or provide confirmation.
In the console tree, select Services and Applications, and then select Services.
In the details pane, right-click Windows Installer, and then select Start.


