- Использование очистки диска на Windows Server Using Disk Cleanup on Windows Server
- Включение очистки диска в более ранней версии Windows Server с помощью установки возможности рабочего стола Enable Disk Cleanup on an earlier version of Windows Server by installing the Desktop Experience
- Добавление средства очистки диска вручную на более ранних версиях Windows Server Manually add Disk Cleanup to an earlier version of Windows Server
- Tutorial: Undo Disk Cleanup in Windows, No Data Loss
- Disk Cleanup Deleted My Downloads Folder
- How to Undo Disk Cleanup in Windows 10/8/7 and Restore Deleted Files
- Quick navigation:
- Method 1. Restore from File History Backup
- Method 2. Restore from File Recovery Software
- Использование утилиты Очистка диска (Disk Cleanup) в Windows 8.1
Использование очистки диска на Windows Server Using Disk Cleanup on Windows Server
Применяется к: Windows Server 2019, Windows Server 2016, Windows Server 2016 R2, Windows Server 2012, Windows Server 2012 R2 Applies to: Windows Server 2019, Windows Server 2016, Windows Server 2012 R2, Windows Server 2012, Windows Server 2008 R2
Средство очистки диска удаляет ненужные файлы в среде Windows Server. The Disk Cleanup tool clears unnecessary files in a Windows Server environment. Это средство доступно по умолчанию в Windows Server 2019 и Windows Server 2016, но в более ранних версиях Windows Server могут потребоваться дополнительные действия вручную для его включения. This tool is available by default on Windows Server 2019 and Windows Server 2016, but you might have to take a few manual steps to enable it on earlier versions of Windows Server.
Чтобы запустить средство очистки диска, выполните команду cleanmgr.exe или последовательно выберите Пуск, Средства администрирования Windows, Очистка диска. To start the Disk Cleanup tool, either run the Cleanmgr.exe command, or select Start, select Windows Administrative Tools, and then select Disk Cleanup.
Кроме того, средство очистки диска можно запустить командой Windows cleanmgr, указав в параметрах командной строки параметры для удаления определенных файлов. You can also run Disk Cleanup by using the cleanmgr Windows command and use command-line options to specify that Disk Cleanup cleans up certain files.
Если вы просто хотите освободить место на диске, рассмотрите возможность использования Синхронизации файлов Azure с включенным распределением по уровням облака. If you’re just looking to free up disk space, consider using Azure File Sync with cloud tiering enabled. Благодаря этому вы сможете кэшировать часто используемые файлы локально и распределять редко используемые файлы по уровням облака, сохраняя пространство в локальном хранилище и поддерживая производительность. This allows you to cache your most frequently accessed files locally and tier your least frequently accessed files to the cloud, saving local storage space while maintaining performance. Дополнительные сведения см. в статье Планирование развертывания Синхронизации файлов Azure. For details, see Planning for an Azure File Sync deployment.
Включение очистки диска в более ранней версии Windows Server с помощью установки возможности рабочего стола Enable Disk Cleanup on an earlier version of Windows Server by installing the Desktop Experience
Выполните описанные ниже действия, чтобы использовать мастер добавления ролей и компонентов для установки возможностей рабочего стола на сервере под управлением Windows Server 2012 R2 или более ранней версии, в составе которых устанавливается и средство очистки диска. Follow these steps to use the Add Roles and Features Wizard to install the Desktop Experience on a server running Windows Server 2012 R2 or earlier, which also installs Disk Cleanup.
Если диспетчер серверов уже открыт, переходите к следующему шагу. If Server Manager is already open, go on to the next step. Если диспетчер серверов еще не открыт, откройте его одним из следующих способов. If Server Manager is not already open, open it by doing one of the following.
На рабочем столе Windows запустите диспетчер серверов, щелкнув Диспетчер серверов на панели задач Windows. On the Windows desktop, start Server Manager by clicking Server Manager in the Windows taskbar.
Откройте Начальный экран и щелкните плитку «Диспетчер сервера». Go to Start and select the Server Manager tile.
В меню Управление выберите добавление ролей и компонентов. On the Manage menu, select add Roles and Features.
На странице Прежде чем приступить к работе проверьте готовность конечного сервера и сетевого окружения к установке нужного компонента. On the Before you begin page, verify that your destination server and network environment are prepared for the feature that you want to install. Выберите Далее. Select Next.
На странице Выбор типа установки выберите Установка ролей или компонентов, чтобы установить все компоненты для отдельного сервера. On the Select installation type page, select Role-based or feature-based installation to install all parts features on a single server. Выберите Далее. Select Next.
На странице Выбор целевого сервера выберите сервер из пула серверов или автономный виртуальный жесткий диск. On the Select destination server page, select a server from the server pool, or select an offline VHD. Выберите Далее. Select Next.
На странице Выбор ролей сервера щелкните Далее. On the Select server roles page, select Next.
На странице Выбор компонентов выберите элемент Пользовательский интерфейс и инфраструктура, а затем — Возможности рабочего стола. On the Select features page, select User Interface and Infrastructure, and then select Desktop Experience.
В диалоговом окне Добавление компонентов, необходимых для возможностей рабочего стола щелкните элемент Добавить компоненты. In Add features that are required for Desktop Experience?, select Add Features.
Продолжите установку, затем перезагрузите систему. Proceed with the installation, and then reboot the system.
Убедитесь, что в диалоговом окне «Свойства» появилась кнопка Очистка диска. Verify that the Disk Cleanup option button appears in the Properties dialog box.

Добавление средства очистки диска вручную на более ранних версиях Windows Server Manually add Disk Cleanup to an earlier version of Windows Server
Средство очистки диска (Cleanmgr.exe) отсутствует в Windows Server 2012 R2 и более ранних версиях, если не установлен дополнительный компонент «Возможности рабочего стола». The Disk Cleanup tool (cleanmgr.exe) isn’t present on Windows Server 2012 R2 or earlier unless you have the Desktop Experience feature installed.
Чтобы использовать программу cleanmgr.exe, установите возможности рабочего стола, как описано выше, или скопируйте два файла cleanmgr.exe и cleanmgr.exe.mui, которые уже имеются на сервере. To use cleanmgr.exe, install the Desktop Experience as described earlier, or copy two files that are already present on the server, cleanmgr.exe and cleanmgr.exe.mui. С помощью следующей таблицы выберите нужные файлы для используемой операционной системы. Use the following table to locate the files for your operating system.
| Операционная система Operating System | Архитектура Architecture | Расположение файла File Location |
|---|---|---|
| Windows Server 2008 R2 Windows Server 2008 R2 | 64-разрядная 64-bit | C:\Windows\winsxs\amd64_microsoft-windows-cleanmgr_31bf3856ad364e35_6.1.7600.16385_none_c9392808773cd7da\cleanmgr.exe C:\Windows\winsxs\amd64_microsoft-windows-cleanmgr_31bf3856ad364e35_6.1.7600.16385_none_c9392808773cd7da\cleanmgr.exe |
| Windows Server 2008 R2 Windows Server 2008 R2 | 64-разрядная 64-bit | C:\Windows\winsxs\amd64_microsoft-windows-cleanmgr.resources_31bf3856ad364e35_6.1.7600.16385_en-us_b9cb6194b257cc63\cleanmgr.exe.mui C:\Windows\winsxs\amd64_microsoft-windows-cleanmgr.resources_31bf3856ad364e35_6.1.7600.16385_en-us_b9cb6194b257cc63\cleanmgr.exe.mui |
Найдите файл cleanmgr.exe и переместите его в папку %systemroot%\System32. Locate cleanmgr.exe and move the file to %systemroot%\System32.
Найдите файл cleanmgr.exe.mui и переместите его в папку %systemroot%\System32\en-US. Locate cleanmgr.exe.mui and move the files to %systemroot%\System32\en-US.
Теперь вы можете запустить средство очистки диска, выполнив команду Cleanmgr.exe из командной строки, или открыв начальный экран и набрав строку Cleanmgr на панели поиска. You can now launch the Disk cleanup tool by running Cleanmgr.exe from Command Prompt, or by clicking Start and typing Cleanmgr into the search bar.
Чтобы в диалоговом окне «Свойства» для диска появилась кнопка «Очистка диска», необходимо установить компонент «Возможности рабочего стола». To have Disk Cleanup button appear on a disk’s Properties dialog, you will also need to install the Desktop Experience feature.
Tutorial: Undo Disk Cleanup in Windows, No Data Loss
Disk Cleanup deleted downloads folder by mistake? Do not wait. You should undo disk cleanup and try to recover files within the folder via a backup or third-party file recovery software.
Table of Contents
About the Author
Reviews and Awards
Disk Cleanup Deleted My Downloads Folder
«Disk Cleanup deleted my Downloads folder which contained 5 years’ worth of personal files and pictures. How can I get them back?»
This is a snippet picked from the Reddit forum. It’s said about a user routinely performs Disk Cleanup to free up disk space, and he has done it probably hundreds of times, but this time he did not pay attention to the ‘Downloads folder’, and he deleted it.
According to the official explanation of Microsoft, Disk Cleanup is a utility used to free up disk space by deleting temporary files, junk files, and many other unnecessary files. You’ll get an option to choose what to remove from your hard drive disk.
Mostly, the personal files and system files are not included in the option, which makes it unlikely that Disk Cleanup delete personal files. However, ‘Downloads’ in Disk Cleanup is newly introduced in version 1809 in Windows 10, and many of us are not aware of that.В This is why many other Windows 10 users are facing the same accidental deletion of the Downloads folder while freeing up disk space.
How to Undo Disk Cleanup in Windows 10/8/7 and Restore Deleted Files
As the screenshot demonstrates, when I execute the Disk Cleanup for my C drive in Windows 10 1809, the Downloads folder shows up in the list, and it’s checked by default.
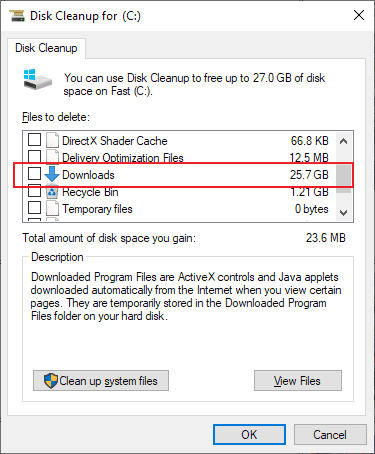
Except for the downloads folder, users are likely to delete Windows ESD installation files as well, and deletion of such files may result in your computer not working properly. Can you undo disk cleanup so as to restore the wrongly cleaned up files? Windows utility does not have an undo option for Disk Cleanup, but you can try to retrieve mistakenly deleted files from Windows File History backup, or directly use a third-party data recovery program.
Quick navigation:
- If you’ve created a backup of your computer disk partition data with File History, please refer to Method 1.В Use the other restore function of particular backup methods, e.g. if you created backups to the cloud, using data backup software.
- If you don’t have a backup at all, directly go to Method 2. EaseUS data recovery software is able to recover deleted files & folders after deletion, formatting or virus infection. It’s by far one of the best Windows data recovery software for file recovery after performing Disk Cleanup as well as other disk cleaning tools.
Method 1. Restore from File History Backup
Step 1. Find the folder path of your lost files on Windows 10/8/7 PC. You may click on «This PC» to see the folder path where you lost disk files by Disk Cleanup utility: Desktop, Downloads, Documents, Music, Pictures, Videos or Libraries, etc.
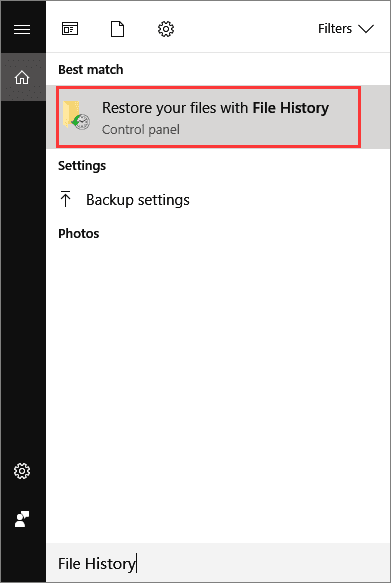
Step 2. Type: File History in the search box > Select and click on Restore your files with File History.
Step 3. ClickВ the «History» button to show all your backed up folders.
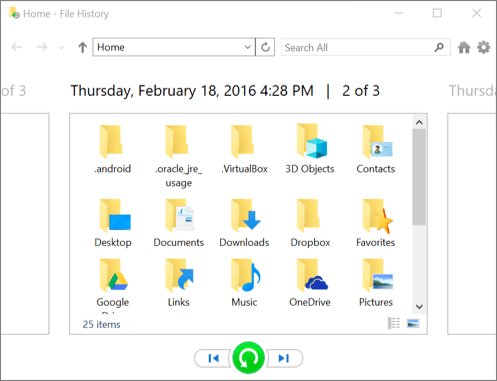
Step 4. Choose files that you want to restore and select the right version that you need. Then click the «Restore» button to get lost files back from File History backups. Select «Replace the file in the destination» if the computer already contains a file or folder with the same name.
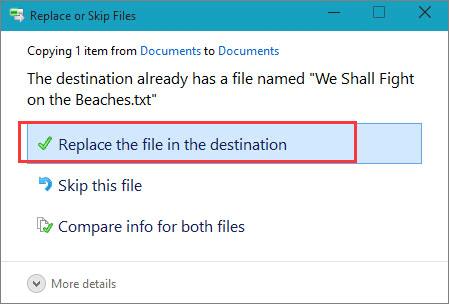
You may also choose «Skip This File» or «Compare Info for Both Files» if there is a file conflict. After restoring your lost files from the File History backup, exit Windows File History. Try to open, check and continue using the restored files again.
Method 2. Restore from File Recovery Software
If you don’t have a File History backup or a system restore point, the best way to find your removed files is to let professional file recovery software to help. Here you should try EaseUS Data Recovery Wizard for a full recovery of all your lost files.В It’s secure and clean, and it will thoroughly scan your disk partition with an advanced scanning algorithm.В
Moreover, EaseUS recovery software is recognized as a simple, super easy-to-use yet powerful DIY data recovery software. The whole recovery process is for three steps.
Step 1. Select a location and start scanning.
Launch EaseUS Data Recovery Wizard, hover on the partition, external hard drive, USB, or memory card where you want to perform erased data recovery, and then click «Scan».

Step 2. Select the files you want to recover.
When the scanning has finished, select the deleted files you want to recover. Double-click the file to preview its content if you need to.

Step 3. Recover lost data.
After choosing the data, click «Recover» and choose a location on another drive to save the deleted data.
Использование утилиты Очистка диска (Disk Cleanup) в Windows 8.1

Утилита Очистка диска (Disk Cleanup) проверяет диски на наличие файлов, в которых больше нет надобности, она удаляет временные файлы, очищает корзину и удаляет множество системных файлов и других неиспользуемых элементов.
Для запуска утилиты, нажмите сочетание клавиш  + R и в открывшемся окне Выполнить введите команду cleanmgr и нажмите клавишу Enter ↵.

Для систем, оснащенных несколькими жесткими дисками, выводится диалоговое окно Очистка диска: выбор устройства (Drive Selection) для выбора очищаемого диска.
В выпадающем списке Диски (Drives) выберите требуемый диск, а затем нажмите кнопку OK.


Запустится процесс первоначальной проверки.

Утилита исследует выбранный диск на предмет пользовательских файлов, которые можно удалить, и файлов, подлежащих удалению. Чем больше файлов содержит диск, тем дольше занимает процесс поиска.
По завершению первоначальной проверки выводится окно Очистка диска (Disk cleanup) со списком категорий файлов, которые можно удалить.

Этот список можно расширить, нажав кнопку Очистить системные файлы (Cleanup system files) внизу окна.

Снова появится диалоговое окно выбора диска, выбираем диск, нажимаем кнопку OK.

Запустится проверка диска.


По завершению проверки диска появится окно Очистка диска с выбором файлов для удаления.

Список файлов, доступных для удаления, может включать следующие категории:
- Загруженные файлы программ. Содержит файлы, загруженные для использования в браузере, такие как элементы управления ActiveX и апплеты Java. Это временные файлы, которые можно безопасно удалить.
- Файлы обновлений Windows. Файлы, сохраненные с предшествующей установки Windows, которые не были определены, как системные файлы Windows. После сохранения всех необходимых данных с предыдущих установок Windows, включая пользовательские данные, можно установить флажок этой категории, чтобы удалить эти файлы.
- Очистка файла гибернации. Содержит файл состояния компьютера при переходе в режим гибернации. Если на компьютере гибернация не применяется, этот файл можно безопасно удалить.
- Временные файлы Microsoft Office. Содержит временные файлы и журналы Microsoft Office. Эти файлы также можно удалить, чтобы высвободить место на диске.
- Автономные файлы. Содержит локальные копии сетевых файлов, выделенных для автономного использования. Эти файлы используются для автономной работы и их также можно удалить.
- Автономные веб-страницы. Содержит локальные копии веб-страниц, выделенные для автономного использования. Эти файлы используются для автономной работы и их также можно удалить.
- Предыдущие установки Windows. Файлы предыдущих установок Windows, хранящиеся в папке %SystemDrive%\\Windows.old. После сохранения всех необходимых данных с предыдущих установок Windows, включая пользовательские данные, можно установить флажок этой категории, чтобы удалить эти файлы.
- Временные автономные файлы. Содержит автоматически кэшируемые общие файлы. Эти файлы используются для автономной работы и их также можно удалить.
- Корзина. Содержит файлы, удаленные из файловой системы, но доступные для восстановления. Удаление этих файлов из Корзины полностью удаляет их с жесткого диска.
- Временные файлы. Основные временные файлы данных и приложений, хранящиеся в папке Temp.
- Временные файлы Интернета. Кэшированные веб-страницы, которые можно безопасно удалить.
- Эскизы. Содержит эскизы рисунков, видео и документов, созданных в Windows 8.1. При первом обращении к папке Windows 8.1 создает эскизы содержащихся в ней рисунков, видео и документов. Эти эскизы сохраняются, чтобы не повторять процесс их создания при последующих обращениях к папке, ускорив таким образом их отображение. Удаленные эскизы создаются снова при следующем обращении к папке.
Для удаления файлов требуемой категории установите соответствующий флажок, а затем нажмите кнопку OK.

При выводе запроса подтвердить удаление выбранных файлов нажмите кнопку Удалить файлы.

Начнется процесс очистки диска.


По окончании процесса очистки диска, утилита автоматически завершит свою работу не выводя никакие дополнительные окна.


