- How to Remove Unused Drivers from Driver Store
- How to Find and Delete Old Driver Versions in Windows 7
- How to Delete Old Drivers in Windows 10/8 Using Disk Cleanup
- DriveCleanup v1.6.1 – by Uwe Sieber
- DriveCleanup 1.6.1
- Основная информация о программе
- Driver Cleaner Professional Edition 1.3 — удаляем остатки драйверов из Windows
- реклама
- реклама
- 7 Ways to Detect And Remove Old, Unused or Hidden Device Drivers
How to Remove Unused Drivers from Driver Store
When you install or update device drivers in Windows, older driver versions are still stored in the system. Thus, a user can roll back to the previous driver version if the new driver is unstable (a useful opportunity, as in the case of rolling back a Wi-Fi driver). However, Windows does not automatically clean and delete old driver versions, so as the time goes the size of disk space occupied by drivers becomes quite large. In this article, we’ll discuss how to remove old driver versions (duplicates) using the integrated system tools (without any third-part software).
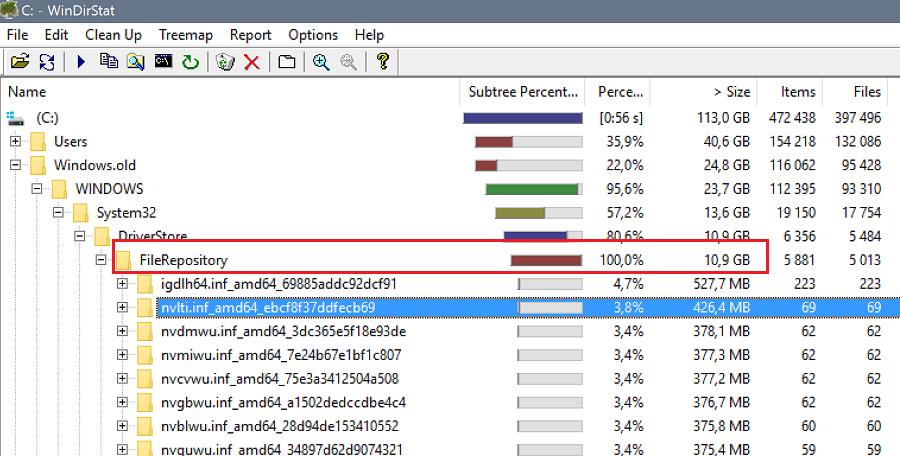
Windows stores all driver files in its driver repository (Driver Store) located in %WINDIR%\System32\DriverStore\FileRepository. In my case on my home laptop running Windows 7 (installed almost 8 years ago), FileRepository folder occupies about 11 GB and contains over 5,000 files. It’s a good many! In particular, over 20 Nvidia driver versions are stored here.
- Never delete any files from DriverStore manually.
- Prior to clearing up the Driver Store, it is strongly recommended that you create a system restore point ( Checkpoint-Computer -Description «BeforeDriversDelete» ) or back up your system image.
- After cleaning the storage, you may have to download and install drivers manually if a new device is connected.
How to Find and Delete Old Driver Versions in Windows 7
Let’s see how to find and delete obsolete drivers in Windows 7. (In Windows 8 and Windows 10, easier ways to delete old drivers are used, these are described below).
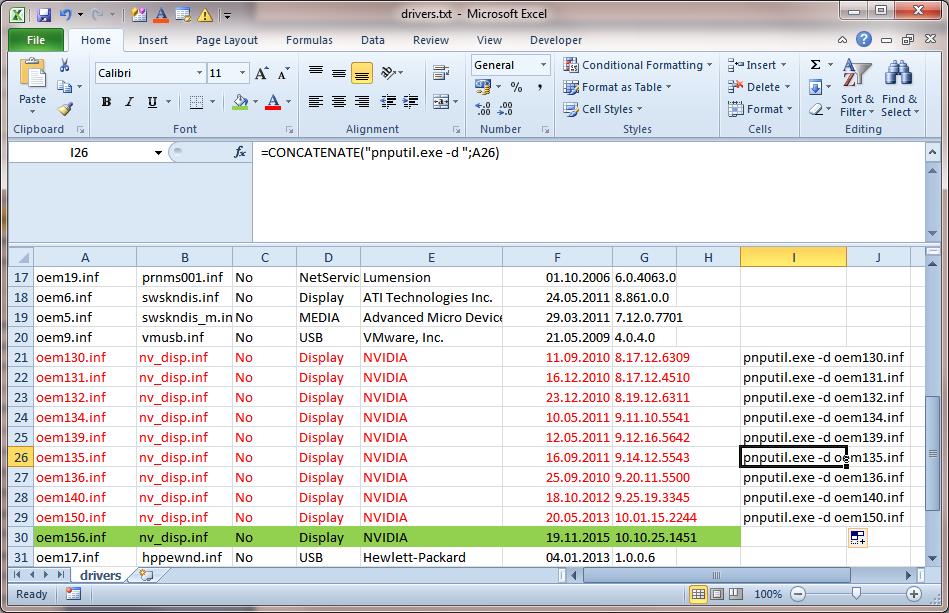
Get the list of all third-party drivers available in the system and export them to a text file. To do it, run the following command in the command prompt with the administrator privileges:
dism /online /get-drivers /format:table > c:\tmp\drivers.txt

Import this text file into Excel, and delete all odd data in a way that only the table containing the list of drivers in the repository is left. The table should contain the number of the driver in the system (oemXXX.inf), the name of the original INF file, device class, manufacturer, installation date and driver version.
Sort this table by column B (containing the name of the original INF file) and column F (driver installation date). Among the drivers with the same name mark for removal all driver versions except the last one. In my case, you can see that the most part of old drivers are refer to the NVIDIA video adapter.
To delete a driver, you can use pnputil command:
pnputil.exe -d oemxxx.inf
To make it more convenient, we will create in the empty column the commands to remove each driver using the formula: =CONCATENATE(«pnputil.exe -d «;A21)
Copy and run these commands in the command prompt or a BAT file.

pnputil.exe –d oem9.inf
Microsoft PnP Utility
Driver package deleted successfully
Thus, I have deleted about 40 old driver versions and freed about 8 GB of space (mostly due to removing of NVIDIA drivers).
How to Delete Old Drivers in Windows 10/8 Using Disk Cleanup
In Windows 10 / 8.1, there is a more convenient tool to delete earlier driver versions — familiar Disk Cleanup tool (cleanmgr.exe) that also allows to delete deprecated updates.
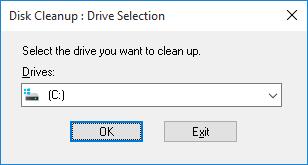
- Run Disk Cleanup: Win+R ->cleanmgr
- Select the system disk

- Click Clean up system files
- Check Device driver packages in the list
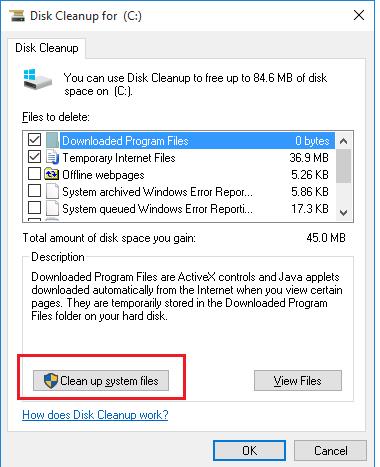
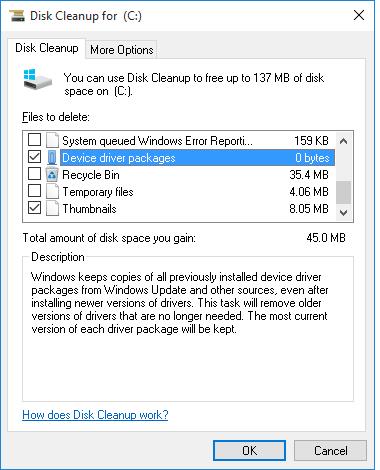
Cleanmgr will delete all old unused driver versions. However, you should understand that the Roll back driver button in Driver Properties tab of Device Manage will become inactive.
DriveCleanup v1.6.1 – by Uwe Sieber

Немецкая консольная утилита, для удаления из реестра Windows, информации о ранее подключённых устройствах. Вот что мне в ней нравиться, так это то, что ничего в ней нажимать не надо, достаточно просто запустить её и она всё сделает сама.
Работает со следующими устройствами:
– USB hubs
– USB mass storage devices (флешки)
– USB Disk devices
– USB CDROM devices
– USB Floppy devices
– USB Storage Volumes
– USB WPD devices (Vista, Win7, Win8 and higher only)
Ищет и стирает данные в следующих разделах реестра:
– HKEY_LOCAL_MACHINE\SYSTEM\MountedDevices
– HKEY_LOCAL_MACHINE\SYSTEM\CurrentControlSet\Enum
– HKEY_LOCAL_MACHINE\SYSTEM\CurrentControlSet\Control\UsbFlags
– HKEY_LOCAL_MACHINE\SYSTEM\CurrentControlSet\Control\DeviceClasses
– HKEY_CURRENT_USER\Software\Microsoft\Windows\CurrentVersion\Explorer\MountPoints2
– HKEY_CURRENT_USER\Software\Microsoft\Windows\CurrentVersion\Explorer\MountPoints2\CPC\Volume
Утилита в меру гибкая и поддерживает следующие ключи:
no params: cleanup all
-t test mode
-n no wait for keypress when finished if started standalone
-u only USB mass storage devices
-d only USB Disk devices
-c only USB CDROM devices
-f only USB Floppy devices
-v only USB Storage Volume devices
-r only registry items of USB volumes
-w only USB WPD devices
Программа совместима со следующими операционными системами: Windows XP и выше.
В дистрибутиве утилиты, имеются отдельные файлы для 32 и 64 разрядных операционных систем.
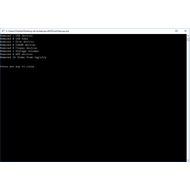
В данном случае, утилита подтёрла инфу в реестре о двух флешках, одна из которых Alcor, вторая Innostor.
show=1
DriveCleanup V1.1.0 (Win32)
Uninstalls non present USB hubs, USB storage devices, Disks, CDROMs, Floppies, storage volumes and WPD devices
and deletes their registry items
Freeware by Uwe Sieber
removing USB device ‘USB\VID_058F&PID_6387\C3F52A8C’
OK
removing USB device ‘USB\VID_1F75&PID_0903\000002’
OK
removing Disk device ‘USBSTOR\DISK&VEN_GENERIC&PROD_FLASH_DISK&REV_8.07\C3F52A8C&0’
OK
removing Disk device ‘USBSTOR\DISK&VEN_USBDEV&PROD_DATA_GUARDIAN&REV_1.00\000002&0’
OK
removing volume ‘STORAGE\REMOVABLEMEDIA\8&2EE0015B&0&RM’
OK
removing volume ‘STORAGE\REMOVABLEMEDIA\9&6F43818&0&RM’
OK
Regkey delete HKCU\SYSTEM\CurrentControlSet\Control\UsbFlags\1f7509030001
OK
Removed 2 USB devices
Removed 0 USB hubs
Removed 2 Disk devices
Removed 0 CDROM devices
Removed 0 Floppy devices
Removed 2 Storage volumes
Removed 1 Items from registry
DriveCleanup 1.6.1

| Автор | Uwe Sieber |
| Языки | Английский |
| Лицензия | Freeware (Бесплатная) |
Основная информация о программе
DriveCleanup — это небольшое приложение командной строки, которое всего за несколько секунд удалит из вашей системы все следы и «записи» оставленные носителями, ранее подключенными к компьютеру. Windows хранит информацию абсолютно обо всех внутренних и внешних дисках. Для этих целей даже выделяются отдельные ветки реестра. Так вот именно их DriveCleanup и ищет.
Приложение помогает избавиться от ключей и записей, относящихся к удаленным из системы HDD/SSD-дискам, когда-либо подключаемых к компьютеру «флешкам», а также к картам данных и всем типам оптических носителей. Помимо очевидной пользы от очистки «мусора», программа также будет полезна тем, что сможет удалить неактуальные пункты из древа устройств, которые из-за распространенной ошибки Windows могли остаться отображаться там даже при «физическом» отсутствии носителя в соответствующем порту.
Несмотря на отсутствие у программы графической оболочки, пользоваться ею все равно довольно просто. Просто запустите исполняемый файл и подождите, пока DriveCleanup в автоматическом режиме найдет и удалит все лишние записи. По окончании этого процесса вы получите краткий отчет. Обратите внимание, что запускать приложение нужно от имени администратора. В противном случае вы увидите предложение о запуске тестового анализа, после которого найденные записи и ключи не будут удалены.
Для вызова меню со всеми доступными командами введите «-help». Вообще список параметров не очень длинный, да и вряд ли хотя бы одна из них пригодится обычному пользователю.
Driver Cleaner Professional Edition 1.3 — удаляем остатки драйверов из Windows
Первое, что надо сделать, так это удалить драйверы через панель управления и после перезагрузки запустить программу. Дальше выбрать нужный профиль для удаления драйвера и запустить очистку. Желательно ознакомится с файлом readmе после установки программы. Программа поддерживает темы для Windows.
реклама
В нее входит компонент Cab Cleaner. Как понятно из названия, он очищает cab-файлы с драйверами после установки сервисных пакетов. Cab Cleaner удалит драйверы ATI и nVidia. Можно выбрать любой cab-архив для очистки.
В эту версию внесены такие изменения:
реклама
- добавлено:
- удаление драйверов 3Dlabs Wildcat 4
- удаление драйверов 3Dlabs Wildcat REALIZM
- удаление драйверов 3Dlabs Wildcat VP
- удаление драйверов ATI TV Wonder
- удаление драйверов VIA Envy Audio
- удаление драйверов VIA HD Audio
- удаление драйверов VIA Vinyl Audio
- албанский языковой файл
- обновлено:
- удаление драйверов ATI
- удаление драйверов ATI WDM
- удаление ATI Uninstall Utility
- удаление драйверов nVidia
- удаление драйверов Realtek AC’97
- итальянский языковой файл
- улучшено:
- поиск ключей в реестре
- исправлено:
- Cab Cleaner не работает правильно, когда cab-файл имеет атрибут read only (только для чтения)
- Cab Cleaner не очищал cab-файлы, если они находилось в папке windows\i386
Поддерживаются Windows 95, 98, 98SE, ME, 2000, XP, XP-x64. Непроверенна, но так же должна работать и на Windows 2003/Longhorn/Vista.
- Driver Cleaner Professional Edition 1.3 (2.6 MB, freeware), зеркало.
7 Ways to Detect And Remove Old, Unused or Hidden Device Drivers
Almost every piece of hardware attached to your Windows computer will show up in Device Manager as an installed device. This includes Graphics cards, CPUs, USB devices, disk drives, network adapters and just about anything else. When the device is first connected to the computer, Windows will pick it up and either install the device driver automatically or you install it yourself from CD or the internet.
After that, it’s not a problem while the device remains connected but can potentially become a problem if you disconnect it. The driver that was installed when the new hardware was connected does not get uninstalled when the hardware is removed. Over time this can leave dozens of driver entries on the system for devices which have long since been removed. Some applications also do the same and install a software driver but don’t remove it when you uninstall the software.

Even if the hardware or software is no longer available, Windows will still look for it on boot. This can lengthen boot time and potentially cause future driver conflicts so it makes sense to remove what is no longer required. As Windows hides them by default, we show you 7 ways to find and remove these old and unused devices from your system. All methods were tested on Windows 7 and 10, make sure to run the programs or Command Prompts as administrator where possible.
GhostBuster has been developed with the express intention of allowing for the detection and removal of old, unused or hidden devices. Otherwise known as ghost devices. Both setup installer and portable versions are available which is useful as this is not a tool you use every day, so installation isn’t really necessary.

All unused devices are listed in a light orange color while any in use devices are shown in green. To add devices to the removal list and turn them dark orange right click an entry and click the selected Add option. Note you cannot remove individual entries and can only remove by Device type (Generic USB Hub or System board etc) or Class (all System devices or all Disk drives etc). When ready optionally tick the to create a restore point box and then press the Remove Ghosts button.
2. Nirsoft DevManView
DevManView is an alternative tool to the Windows Device Manager, but it displays a whole lot more useful information. Like all Nirsoft tools, DevManView is small, portable and packs a lot into its small size. Before viewing and removing any devices it’s a good idea to first change a couple of settings so things are easier to see.

Go into the Options menu and enable Mark Connected Devices and Show Non Plug and Play Drivers, then click on the Connected column header to sort the list by which devices are connected and which aren’t. Then click, Shift+click or Ctrl+click to select the required devices and go to File > Uninstall Selected Devices. Devices can be disabled instead of removed for troubleshooting purposes. Command line options are also available, /uninstall and /use_wildcard being the most useful for the purpose of removing unused and hidden devices.
3. Device Remover
In terms of a third party device management application, Device Remover is probably the most advanced and feature rich free program available. Sadly for some reason the program is no longer developed and the official website has disappeared. The last available version is from 2014 so is new enough to work fine for most people. Both portable and installer versions can be downloaded.

During first run you will be asked if you want to let the program run an optimize routine, allowing it should speed up the device detection and enumeration process. Once loaded, devices can be viewed in a tree or list style, selectable from the tabs. To switch to showing only hidden devices click Display Mode on the toolbar and select Show only hidden/detached devices.
From there it’s a simple process of looking through the devices and checking the boxes of any to remove, then click Remove all checked when ready. A device removal warning and confirmation window will appear to give you one last opportunity to back out of the changes. Click Remove all devices when you’re ready or Cancel to go back. Although the device removal procedure is quite simple, Device Remover is a powerful tool so other functions need to be handled with care.
Download Device Remover (Copy of original website served by the Internet Archive)
4. Device Cleanup Tool
The Device Cleanup Tool is a nice and simple program by Uwe Sieber that detects devices that are not currently in use, and allows you to remove them. It does this by checking the device for the “Currently, this hardware device is not connected to the computer. (Code 45)” status code. Device Cleanup Tool is portable with separate 32-bit and 64-bit versions, make sure to use the right one.

Deleting devices can be done on an individual basis by clicking each device, right clicking and choosing Remove Device. Multiple devices can be selected with Shift+click or Ctrl+click. If you’re unsure about the device either leave it or go to the File menu and create a restore point first. The Select all option is definitely not recommended unless you are totally sure all devices can be removed safely. The last used column should display the last time the device was in use but sometimes just displays the the last time it was enumerated on boot, so is not always accurate.
5. Device Cleanup Tool Command Line Version
This is the command line version of above which will come in useful for advanced users deleting devices from batch files and scripts. It only allows you to delete plug and play devices that are listed as not connected.

There are three main ways to remove devices using the command line tool. Mass deletion of all devices at once, delete devices that haven’t been used for xx number of days/months/years or delete by hardware device ID ( * wildcard pattern accepted). A few examples are:
DeviceCleanupCmd * (Remove all devices)
DeviceCleanupCmd * -m:3m (Remove all devices unused for more than 3 months)
DeviceCleanupCmd.exe HID\vid_* (Remove HID devices, usually keyboards, mice, joysticks etc)
A couple of optional arguments are -s to bypass creating a restore point, and -t to test the command only. Hardware IDs are found in the Details tab in the Properties window for the device in Device manager. Make sure to use the correct 32-bit or 64-bit version for your system.
6. DriveCleanup
This is the third tool in our list by Uwe Sieber and unlike above, it’s not a general command line remover for non present devices. Instead DriveCleanup specifically removes unused USB Hubs, Mass Storage Devices, Disks, CDROMs, Floppies, Storage Volumes and Windows Portable Devices. It also cleans the registry and removes entries related to those devices.

The tool will automatically run the delete and clean on double click, so be careful if that’s not what you want. Running from the command line you can supply the -t argument to run a test only. Or supply a number of arguments to specifically remove the device types you want. For example, -f and -c will remove only floppy and CDROM devices, the readme lists the other arguments. Like the other two tools here by Uwe Sieber, run the 32-bit or 64-bit version that matches your system.
7. Remove Hidden Devices With Windows Device Manager
The built in Windows driver and device tool, Device Manager, is also able to show and remove hidden devices from the system. It has an added ability the other tools don’t which is an option in some cases to delete old or redundant files related to the driver you are removing. The overriding problem with using Device Manager for this task is it’s not easy to delete multiple devices at once.
Before being able to view and edit hidden devices in Device Manager, your system needs to be told to show them. This doesn’t happen by default and a new environment variable needs to be added to Windows first.
1. Right click on the Computer/This PC desktop icon > Properties > Advanced system settings, click the Environment Variables button. Alternatively, press Win/Start, type env into search and press Enter.
2. Press the upper New button. Enter DEVMGR_SHOW_NONPRESENT_DEVICES as the variable name and 1 as the variable value. Press OK twice.

3. Now start Device Manager by right clicking Computer/This PC > Properties > Device Manager. Or type devmgmt.msc into Start or the Run dialog. For convenience we have created a small batch file which will add the environment variable to the system and run Device Manager automatically. Simply download Set_DEVMGR_SHOW_NONPRESENT_DEVICES.bat and double click it.
4. In Device Manager go to the View menu and select Show hidden devices. This will repopulate the main window with extra categories like floppy drives and controllers, Non plug and play drivers, storage volumes and shadow copies.

5. Now all hidden devices are visible you can go through the categories and look for devices you don’t want. The devices that are not in use will have dimmed icons, simply right click on one and select Uninstall to remove the entry.

Some third party devices such as graphics cards, sound cards, printers etc, will have an extra option in the uninstall confirmation box. This is a “Delete the driver software for this device” check box. Using it will remove driver files connected with the device in addition to the registry entry. If ever you reconnect the device you will likely have to manually reinstall the driver for it.
Editor’s Note: Some devices are hidden by Windows and are meant to be hidden. A number of examples are usually in Network connections, Sound devices, System and Non plug and play. It is recommended you DO NOT automatically select all hidden devices for deletion in any of the above programs. If you are not experienced or sure, only delete the blatantly obvious entries like an old USB storage device or game controller.


