- How to Clean a Hard Drive in Windows 10? [2 Ways Included]
- “How to clean my hard drive to sell it?”
- 2 Methods to wipe clean a hard drive in Windows 10
- 1. Clean a hard drive via Command Prompt
- 2. Clean hard drive via a GUI professional disk wiper
- Final Words
- Here’s how to clean out your bloated hard drive in Windows 10
- Empty the recycle bin
- How to delete temporary files and downloads
- How to uninstall apps
- How to change how you use OneDrive
- Use your Xbox One
- Use an external drive
- Use a cloud storage service
- How to Clean C Drive & Increase Space in Windows 10/7?
- Do you wish to clean C drive of your Windows and increase its space? Read on as the guide has covered 10 expert suggestions on how to clean C drive without any harm.
- What Takes up C Drive Space
- How to Increase C Drive Space?
- 1 Uninstall Junk Applications
- 2 Delete Junk Files by Storage Sense
- 3 Delete Temp Files by Disk Cleanup
- 4 Empty Recycle Bin
- 5 Move Data to Another Hard Drive
- 6 Disable Hibernation in Windows 10/7
- 7 Compress Installation Data
- 8 Disable System Restore
- 9 Compress System Files
- 10 Extend the C Drive Storage
- Bonus: How to Get Data off an Old Broken Hard Drive?
- Tip 1: Recover Lost Data from C Drive
- Step 1 Select a source to scan
- Step 2 Scan the selected source
- Step 3 Restore your data safely
- Tip 2: Check the C Drive Storage Regularly
How to Clean a Hard Drive in Windows 10? [2 Ways Included]
If you want to completely clean up a hard drive in Windows 10, 8, 7, here we round up 2 methods for your reference: clean up hard drive via CMD and a professional disk wiping tool. Keep reading and choose the proper one!

By Emily  / Last Updated March 24, 2021
“How to clean my hard drive to sell it?”
“I have a Dell computer running Windows 10 Pro. The computer’s second hard drive contains sensitive material. Now I want to sell it and buy another larger one, so I need to completely and permanently erase all my files on the hard drive so that nobody can recover and see it. I have been researching different methods online but it is a minefield, can anyone help? How to clean a hard drive Windows 10?”
2 Methods to wipe clean a hard drive in Windows 10
Cleaning a hard drive is to erase all data stored on the hard drive; it is a great way to free up space on hard drive, or prevent personal data leakage after selling, donating or throwing away it. But how to wipe clean a hard drive in Windows 10/8/7? You can try the following two methods.
1. Clean a hard drive via Command Prompt
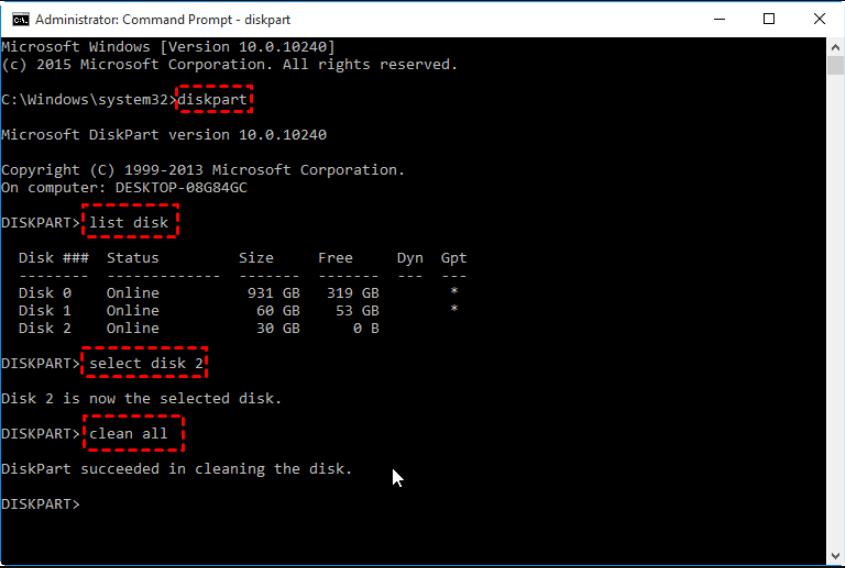
First of all, you can make use of Windows built-in Command Prompt to clean a hard drive. Open Command Prompt: press Windows+R at the same time, input “cmd” in the Run box and press Enter. In the elevated Command Prompt window, type “diskpart” to enter diskpart window. Then run the following commands:
list disk: list all disks on your computer.
select disk 1,2,3…: select the disk you want to wipe completely. Here we select disk 2.
clean all: delete all data from the selected disk.
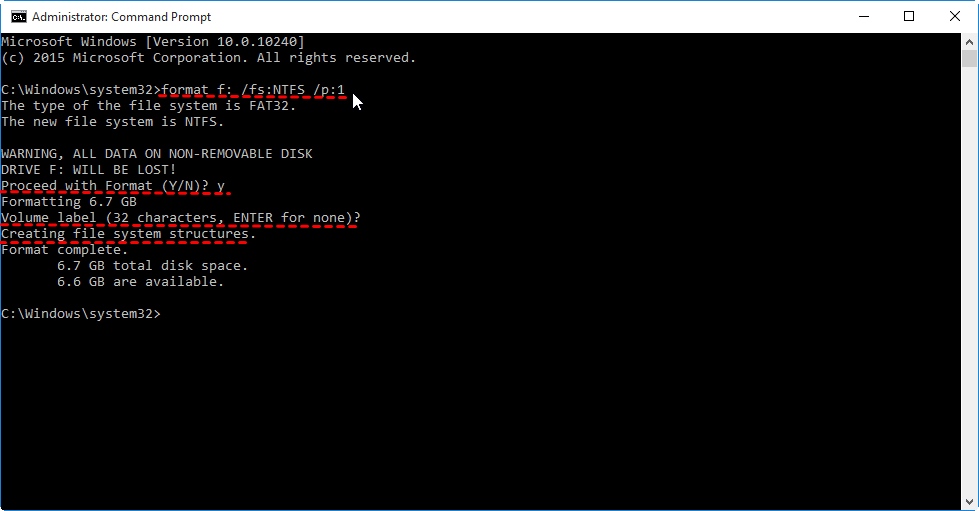
Note: Besides running the clean command, you can also execute a special format command “format f: /fs:NTFS /p:1”. This command will format the f drive with the NTFS file system and write zeros to the drive for a single pass. It can prevent most hardware based and all software based recovery methods from lifting information from the drive.
2. Clean hard drive via a GUI professional disk wiper
Wiping hard drive clean via Diskpart seems like a great solution, but some users report this command line based utility is difficult to operate and easy to wipe the wrong disk, so most users scount for a GUI hard drive eraser tool like the below one.
“Looking for GUI software to write zero to HDD. I have a few hard drives around that I don’t use and plan to put them up on eBay for reselling. I want to make sure them sold without any data left inside.”
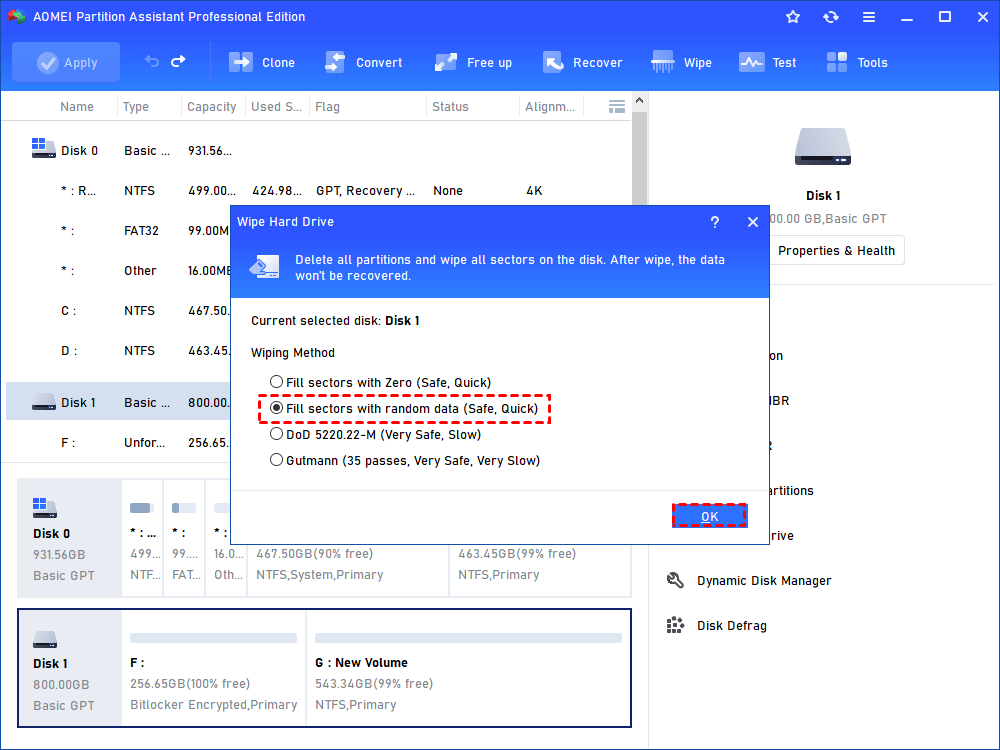
In this situation, I highly recommend AOMEI Partition Assistant Professional. With an intuitive interface, every user can easily choose the right disk and perform a disk wiping operation. Besides, it provides 4 different methods to clean a hard drive in Windows 10/8/7: Fill sectors with Zero, Fill sectors with random data, DoD 5220.22-M and Gutmann.
Note: The data will be removed completely via this method and it’s impossible to recover them after that. So please be careful and back up important data to cloud or external at first.
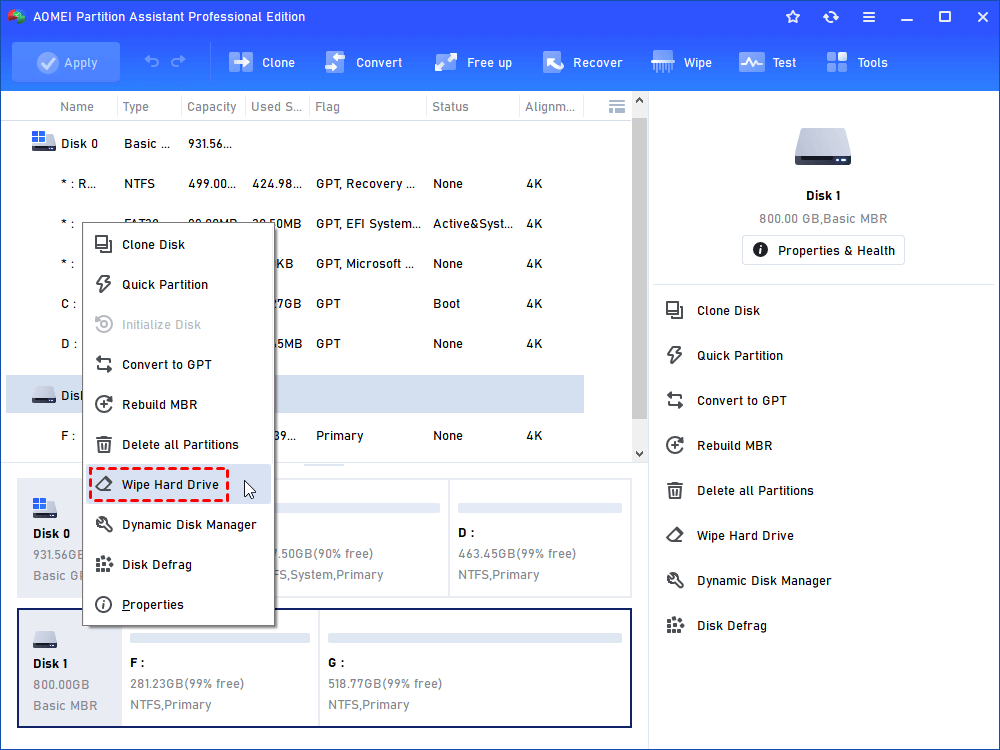
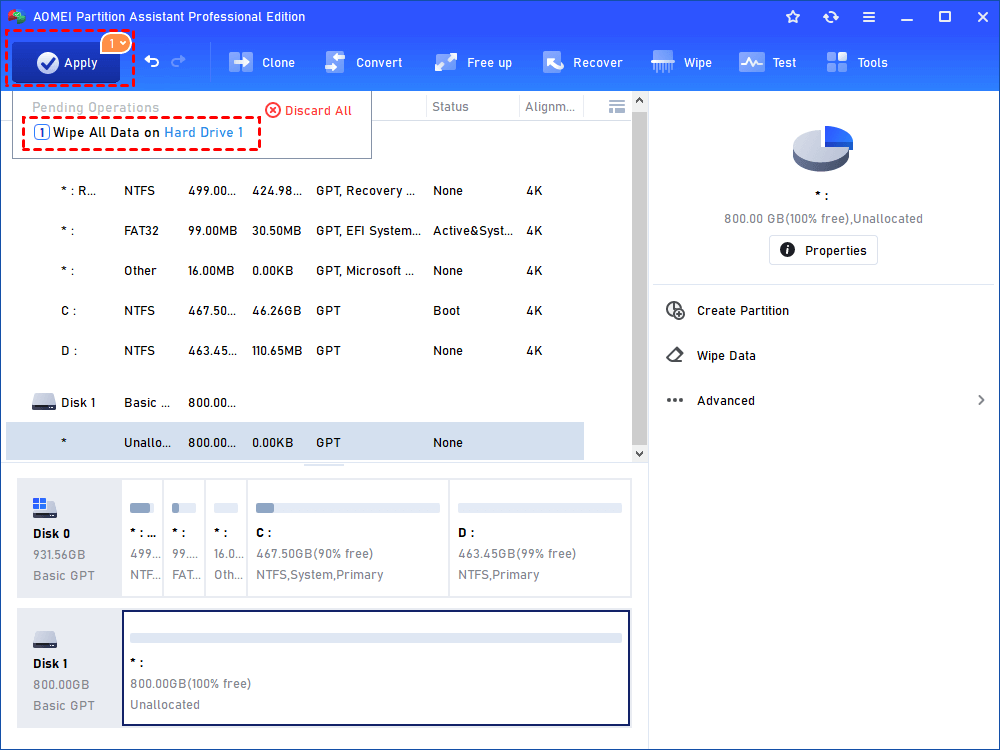
Step 1. Install and launch AOMEI Partition Assistant Pro on your Windows 10 computer, right-click the disk you want to wipe and choose “Wipe Hard Drive”.
Step 2. In the subsequent window, you can choose a suitable wiping method from the 4 options according to your actual requirements. Then click “OK”.
Step 3. Back to the main interface, click “Apply” on the top left corner to actually starting erasing the selected hard drive.
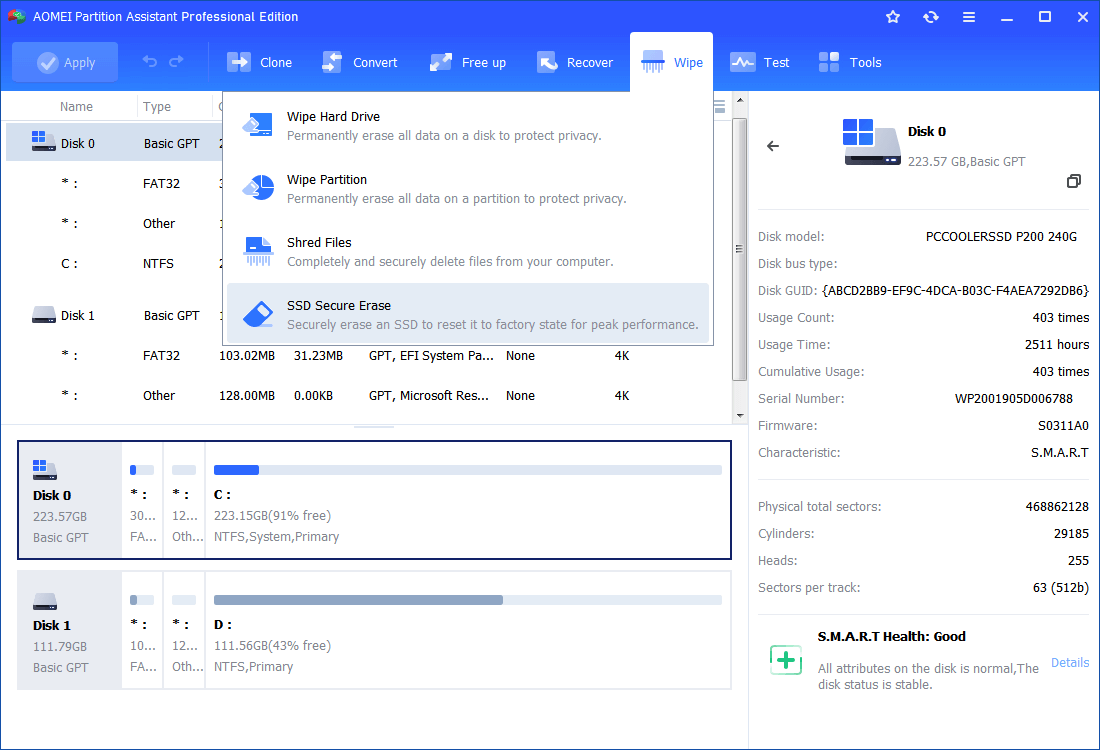
On completion, all data have been successfully wiped out from the hard drive. If you want to erase an SSD drive without hurting it, AOMEI Partition Assistant Professional’s “SSD Secure Erase Wizard” can satisfy you best.
Final Words
This is all about how to clean a hard drive Windows 10 via Command Prompt and professional hard drive wiper software. Besides wiping a hard drive clean, AOMEI Partition Assistant Pro offers many other fantastic functions such as clone HDD to another SSD/HDD, recovering partition deleted accidentally, transfer OS from HDD to SSD, and more. If you are running Windows Server, you can try AOMEI Partition Assistant Server.
Here’s how to clean out your bloated hard drive in Windows 10
Is your hard drive feeling a little crowded lately? Having more free space on your hard disk can improve speed. By getting rid of files and moving data to other devices, you can quickly clean your hard drive in Windows 10. Here are the easiest ways to free up PC space quickly.
Empty the recycle bin
Ah, the beloved old recycle bin. It’s nice to know that some things about Windows haven’t changed in a long time. Windows 10 still uses the recycle bin to hide all the files you want to throw away, and emptying it can prove useful in freeing up extra space.
You can right-click on the Recycle Bin icon for the option to empty it directly. If you can’t find the icon, then head to the Start menu, and go to Settings > System > Storage. You will be able to select local storage under This PC — look for and click Temporary Files. Doing so will bring up any locations for temporary files, including Recycle Bin. Tick the box next to Recycle Bin, select the Remove Files option at the top of the screen, and confirm your decision. That’s all it takes!
It should be noted that emptying your recycle bin will only help clean your Windows 10 hard disk if there’s a lot of stuff in that bin. When you first download Windows 10 — and long afterward, depending on your desktop habits — emptying it may not affect your hard drive much at all. If you aren’t sure, take a peek inside your bin and see how full it is first. A few GBs worth of data can still make a difference.
How to delete temporary files and downloads
Remember how emptying the recycle bin took you through the temporary files section? If you want to broaden your hard drive cleaning activities, then you can delete all temporary files.
What exactly are you getting rid of here? Well, Windows temp files manage document editing, some application processes, various printing tasks, and so on.
These files are usually automatically deleted, but sometimes they hang on. Please get rid of them all by ticking the box next to each file type, then clicking on the Remove Files option at the top of the screen.
 Digital Trends
Another time files are automatically created occurs when you download anything from the internet. These files pop up in your downloads and tend to stick around — which means they can quickly stack up if you are downloading a lot of content to your Windows 10 desktop.
Go to your Downloads folder via File Explorer > This PC > Downloads and delete any files that you no longer need by highlighting them in groups or individually. This method is a great way to clear out space manually without accidentally deleting something you’ll need later.
How to uninstall apps
Too many apps can lead to an eventual slowdown or lack of space for other content, especially on smaller, lighter Windows devices (looking at you, Surface tablets). Some apps can take up a lot of space — the trick is finding which hog the most room on your hard drive and which you can live without.
From the Start menu, go to Settings, select Apps, and then select Apps & Features. Here, you can see all the apps downloaded. Windows 10 allows you to arrange them by various statistics — if you have a long list, organize them by the amount of hard drive space they are taking up.
See which apps are hogging the most data, and delete those that you don’t use. Double-check that the app doesn’t have anything too valuable, then select it and choose Uninstall.
 Digital Trends
How to change how you use OneDrive
OneDrive is a cloud service for Windows, so you would think that all the cloud data it uses would help free hard drive space, not take it up. This is true, except for one particular OneDrive feature — the ability to save files offline, which you may not even know that you are using.
Sometimes this is handy. If you are dealing with sensitive files or big projects with some sharp deadlines, it’s a good idea to have a backup. But if you are using OneDrive and automatically saving offline for every file and doc at work, school, or home, you probably waste hard drive space.
 Digital Trends
The OneDrive icon should be waiting on the right side of your taskbar (it may be lurking under the Show Hidden Icons arrow). Click on the Cloud icon, choose Settings (the three dots in the upper-right corner), and then select the Preferences option. Doing so will take you to all the file types that OneDrive is saving offline and how much space each takes up.
Unselect all the OneDrive folders that you don’t need. Remember, you can still access all these files online at OneDrive.com, so you aren’t losing anything.
Use your Xbox One
Microsoft platforms are growing increasingly interconnected, and the convergence is very apparent in Windows 10, which connects more freely to other Microsoft devices like the Xbox One game console. If you have an Xbox One, you can use it to help save some space by swapping out select apps and data. You can stream content from the Xbox to your Windows 10 PC with just a few steps.
This service allows you to store data on the game console and free up your PC if you have content you only use at home. Just remember to delete the data from your PC after you transfer it to the Xbox.
Use an external drive
From USB drives to full external hard drives, one of the simplest ways to clean up your hard drive on Windows 10 is to move extra data outside your computer.
First, hook up a hard drive and make sure that it is properly formatted and ready for uploads. Dragging and dropping a file into the new drive using File Explorer will create a copy of the file, allowing you to erase the original.
 Digital Trends
However, it is also possible for you to move large chunks of files at one time. Go to the taskbar and open your File, Explorer . From there, select all the files you want to transfer outside your PC hard drive. Once you have them all highlighted, go to the Home menu at the top of the screen. Select Move To , then select Choose Location . Find your external drive on the list and select it. All of your files will drop into that destination. This is a full transfer, so you don’t even have to erase anything from your computer afterward.
Use a cloud storage service
Purchasing an external hard drive or USB device isn’t your only option for offloading and saving your files. Instead, you can copy your files to free or paid cloud storage services . You can then delete the copy on your PC, which will free up more space on your computer.
Cloud storage is a safe and easy way to store your files. Some of the advantages include the ability to copy your operating system and files to transfer and restore them on a new device if you need to.
Rather than relying on physical storage like USBs and external hard drives, you can use a cloud-based service to “carry” documents with you and access them anywhere you need to. All you need is a login email or username and password to access your files.
Many smartphones will automatically save certain files, such as photos, to the cloud. The cloud is an ideal backup system because you can save your files even if your phone crashes. You’re also able to access any files in the cloud from different devices.
PC users can either drag-and-drop data to cloud storage or upload the files with little difficulty. Be aware of how much cloud storage space you have so you’ll know you have room for all of your files.
Widely-used examples of cloud-based services include iDrive (our favorite), plus Dropbox, Google Drive, Microsoft OneDrive, and iCloud. Companies are constantly developing cloud options, so you’ll be able to find the perfect fit for your storage needs.
Read reviews and consider how big of a name your cloud service has so you can be sure it’s trustworthy and secure. That way, you can practically guarantee your files aren’t going anywhere — ever.
How to Clean C Drive & Increase Space in Windows 10/7?
Do you wish to clean C drive of your Windows and increase its space? Read on as the guide has covered 10 expert suggestions on how to clean C drive without any harm.

Theo Lucia
Jan 18, 2021 • Filed to: Answer Hard Drive Problems • Proven solutions
If you are also a Windows user, then you must have doubted this as well. While Windows is undoubtedly one of the most popular operating systems – it has a major drawback. A lot of times, it doesn’t clean its mess and residual content that piles up a lot of space on the disk. As a result, users look for different ways to clean the C drive (the Windows drive). While doing so, just make sure that you don’tВ delete any important file. To teach you how to clean C drive safely and effectively, we have come up with this in-depth tutorial.

What Takes up C Drive Space
Before we start, it is important to note that we have referred the «C» drive as the partition where Windows is installed. WhileВ the drive letter might vary, in most cases, Windows is installed on the «C» partition. Apart from the usual content, it can consist of the following things:
- System files: This is the most important part of the C drive as it consists of the vital firmware component. Apart from that, it also stores important data related to your computer as well.
- App data: You might have installed tons of programs and applications on your system’s C drive. The more the apps, the more space they would consume.
- Junk: When we delete something, it is moved to the Recycle Bin instead. The C drive is where all the data in Recycle Bin is stored.
- Cache, temp, and log files: While running, your system would store all kinds of temporary, cache, and log files to provide a faster experience. All of this would be stored in the C drive.
- User data and other content: There are all kinds of downloaded files, important documents, photos, synced cloud data, and other content present in the C drive as well.
If you want to know what kind of data is stored in your system’s C drive, then just go to its Settings > System > Storage. This will list an in-depth bifurcation of what is taking how much space on C drive.

How to Increase C Drive Space?
Without much ado, let’s dive into the details and learn how to increase C drive space in Windows 10 and 7. Although most of these suggestions can be implemented, we have started with the ones that are recommended by the experts.
1 Uninstall Junk Applications
If you have been using your Windows system for a while now, then it must have accumulated a lot of unwanted applications. To start with, you can review all the installed applications on your system and get rid of all the «junk» programs that you no longer need.
1. Uninstalling apps on Windows 10/8/7 is pretty easy. To start with, you can just visit Windows’ Settings from its Start menu. Once it is launched, visit its «System» settings.

2. As the System Settings would be loaded on the screen, visit the «Apps & features» option from the sidebar. This will list all the applications that are currently installed on your system.
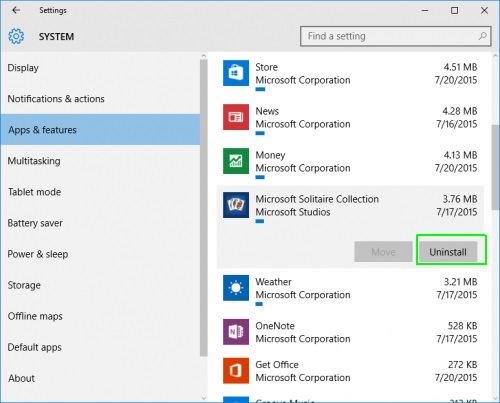
3. Select the application you wish to remove and double-click its icon to get more options. Click on the «Uninstall» button from here.
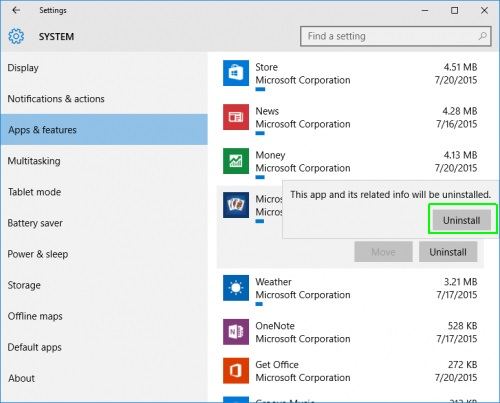
4. If you get a confirmation prompt, click on the «Uninstall» button again and enter the administrator details of the system. Wait for a while as the application would be deleted from your computer.
While the process is the same to uninstall apps in Windows, the overall interface might vary among different versions. Also, consider restarting your system after uninstalling apps to reset its app data and cache content.
2 Delete Junk Files by Storage Sense
If you have a Windows 10 #1903 (released on May 10, 2019) or a newer version, then you can also take the assistance of Storage Sense. It is an inbuilt Windows Utility tool that can help you free up space on C drive automatically. When turned on, it will optimize space on C drive by deleting the unwanted temp files and managing the OneDrive data. Here’s how to increase the C drive space with the Storage Sense settings.
1. From the start menu, go to Windows’ Settings and navigate to System > Storage. Here, you can turn on the «Storage Sense» feature.
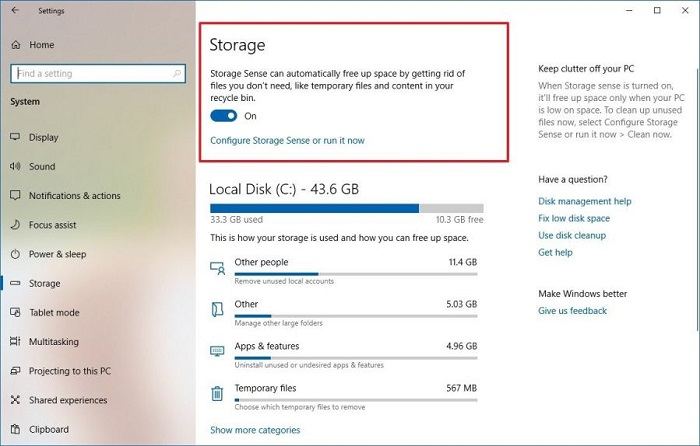
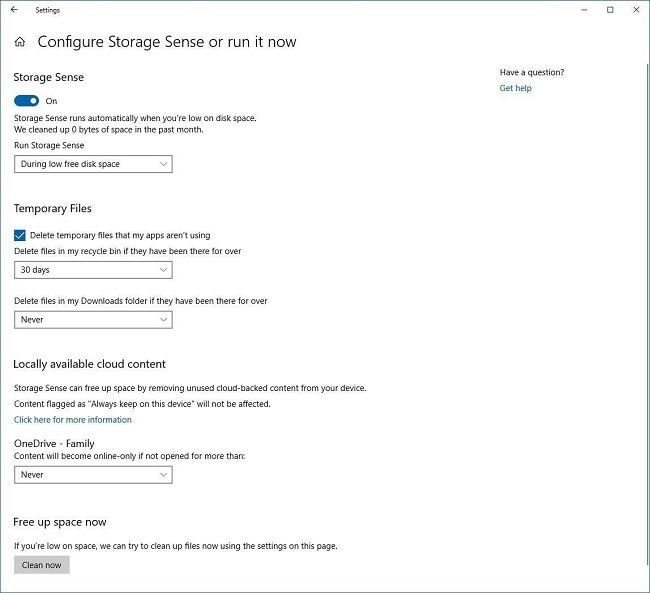
2. To further customize things, you can click on the «Change how we free up space automatically» button adjacent to it.
3. This will provide a list of various options that you can select to clear C drive. For instance, you can turn on the automatic deletion of temporary files, remove data from Recycle Bin, and make cloud content available on the drive. After making the appropriate selections, click on the «Clean Now» button.
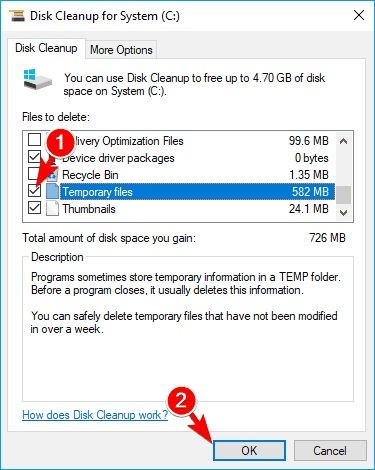
3 Delete Temp Files by Disk Cleanup
While working on your Windows system for a while, chances are that you might end up accumulating a lot of temporary data. Although temp files are used to store certain vital details and make the overall experience smoother, they can also consume a lot of space. The best way to clear the C drive is by cleaning its temporary data at regular intervals by using the Disk Cleanup Utility.
1. There are multiple ways to access the Disk Cleanup app. One of the easiest ways is to look for it from the start menu.
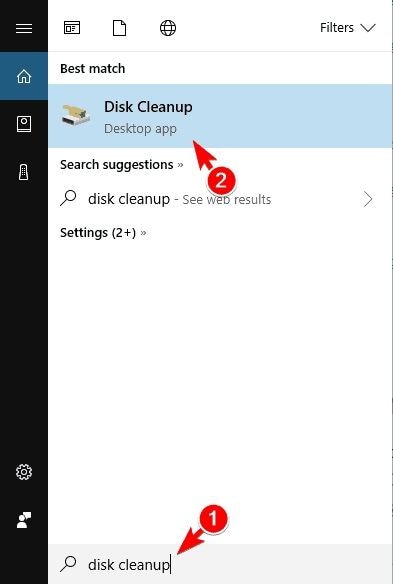
2. Once the Disk Cleanup application is launched, you need to select the drive you wish to clean. In this case, it will be the C drive.
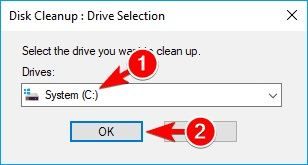
3. Wait for a while as the application would calculate the data that it can clean from the drive.
4. In the end, it will display a dedicated prompt with details of the data you can delete. From here, select the «Temporary Files» option and click on the «Ok» button to clean C drive.
4 Empty Recycle Bin
If you are a regular Windows user, then you must be familiar with the Recycle Bin. Ideally, when we delete something from the system, it is moved to the Recycle Bin, where it is stored temporarily. Therefore, you can check the Recycle Bin storage and clear it to free up space on C drive. While doing so, just make sure that you don’t get rid of any important file.
1. There are different ways to empty Recycle Bin. For instance, you can just select its icon from the desktop, right-click, and choose the «Empty Recycle Bin» option.
![]()
2. Alternatively, if you wish to view the data present in Recycle Bin first, then double-click to open it. From the toolbar, you can also click on the «Empty Recycle Bin» button.
![]()
3. Confirm your choice by clicking on the «Yes» button when you get the prompt. In a few seconds, all the stored content from Recycle Bin would be deleted.
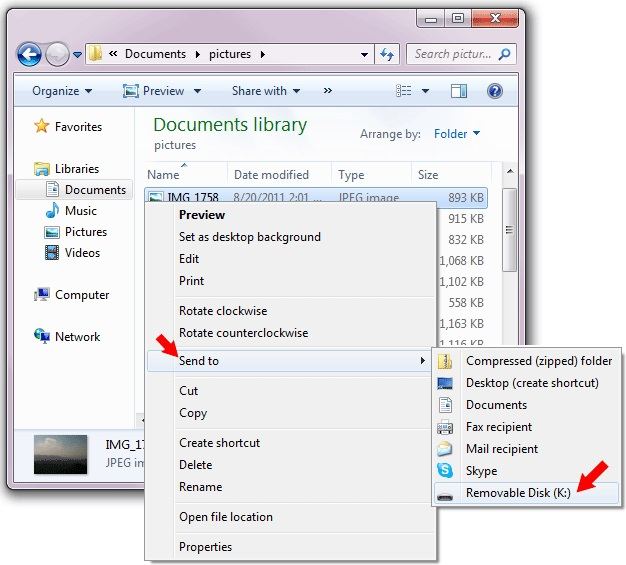
5 Move Data to Another Hard Drive
If you are not sure of what you can delete from your system, then this would be an ideal option. Simply get another hard drive (like an external hard disk) and move your important files to it instead. In this way, you can keep your files to another location separately without losing them from your system.
1. Simply connect the second hard disk or an external hard drive to your system and wait for it to be detected.
2. Now, go to My Computer > C Drive and browse the data you wish to get rid of. Cut it from here and paste it on the hard drive.
3. If you want, you can also right-click the file/folder you wish to move, go to the «Send to» option, and select the connected hard disk as a source. This will directly send this file/folder to your hard drive.
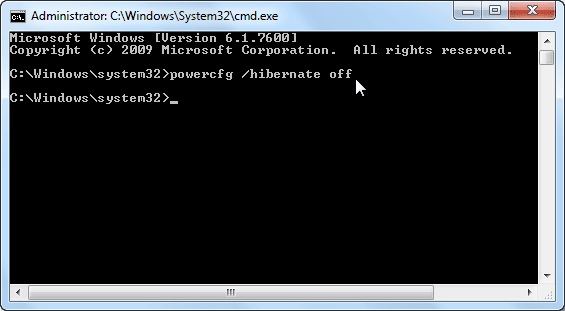
6 Disable Hibernation in Windows 10/7
A lot of Windows users put their system on hibernation to save power and time. Though, it can backfire – since the feature creates a dedicated system file (hiberfil.sys). During the hibernation, the file would store all the vital details of the system so that you can start from where you left off before. Ideally, it is not recommended to turn off hibernation, if you are used to it. Nevertheless, if you wish to learn how to clean C drive, then you can give this option a try.
1. To turn off the hibernation feature, you need to launch the Command Prompt first. Go to the Start menu to do it. Just make sure that you launch Command Prompt as an administrator.
2. After when the Command Prompt is launched, simply type and enter the «powercfg –h OFF» command.
3. Alternatively, you can also type the «powercfg /hibernate off» command and press enter. This will automatically disable the hibernation mode on your system.
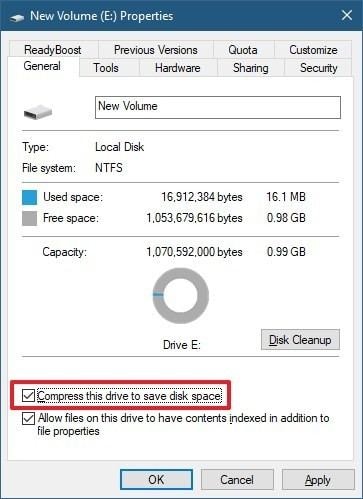
7 Compress Installation Data
This is another method that mostly the experts use to clean C drive on Windows 10, 8, or 7. In this, we will take the assistance of Windows’ native feature to compress the OS installation files and other kinds of data. Though, if you wish your system to run in an optimum manner, then you can avoid this suggestion.
1. To start with, simply launch Windows Explorer > My Computer and select your C drive.
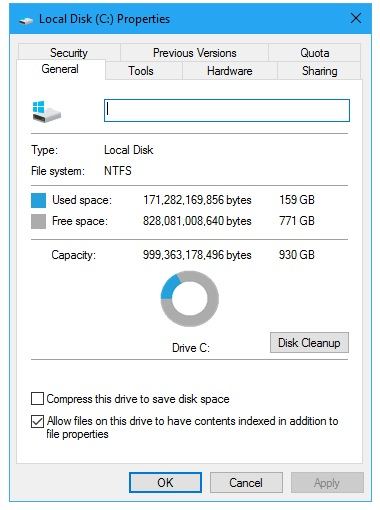
2. Right-click and visit its Properties. Under the General tab, you can see an option for «Compress this drive to save disk space». Enable this and implement the changes to compress the drive.
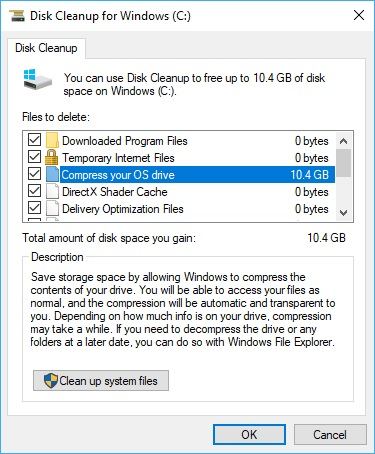
3. Besides that, you can also compress the installation files (OS updates) as well. To do this, click on the «Disk Cleanup» button on the General tab here.
4. As the Disk Cleanup window would be initialized and launched, you can view the «Compress your OS drive» option. Select it and click on the «Ok» button to implement it.
8 Disable System Restore
In the latest Windows systems (like 7, 8, or 10), there is an option to restore the system files after an unwanted crash. While most of the experts would recommend keeping the feature enabled, it can end up taking a lot of space on your drive. Therefore, you can consider disabling this only if the C drive is running short on free space. To know how to increase C drive space by disable the System Restore option, follow these steps:
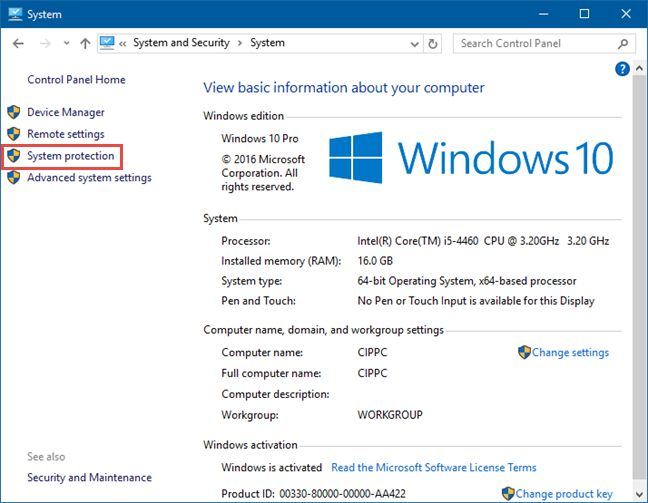
1. Firstly, launch Control Panel from the Start menu on your Windows and go to its System & Security > System settings. From the sidebar, launch the «System Protection» feature.
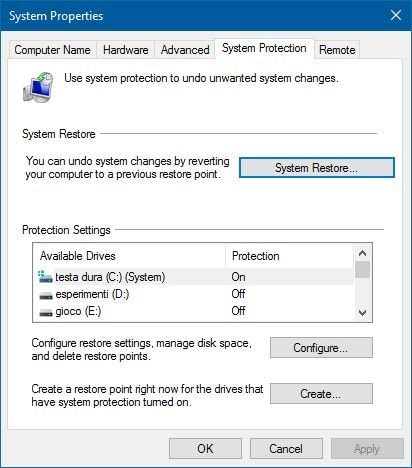
2. As the System Properties window will open, go to the «System Protection» tab and click on the «System Restore» button.
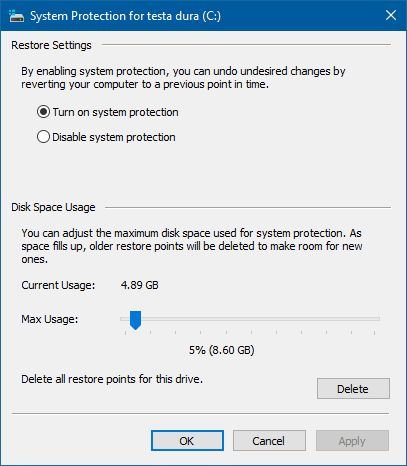
3. From here, you can just disable this feature. Apart from that, you can also adjust the space that is allocated to this feature on the C drive.
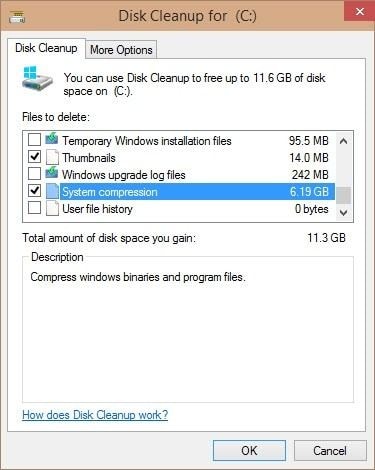
9 Compress System Files
We have already listed how Windows can compress certain files to free up space on C drive. Though, just like compressing the installation files, it is not recommended to follow this suggestion as it might affect the overall processing of your system. Ideally, you should consider it as a last resort when you have to clear C drive data immediately.
1. Simply select the C drive from My Computer and go to its Properties by right-clicking it. From here, you can visit the Disk Cleanup feature.
2. Wait for a while as the disk cleanup options would be loaded. From the list, select the «System Compression» feature and click on the «Ok» button. This will automatically compress all the system files on your Windows.
10 Extend the C Drive Storage
If nothing else would seem to work, then you can also extend the storage of the C drive as well. Beforehand, just make sure that there is enough available space on the disk. If not, you can format a partition and have available space that can be merged to the C drive. If your C drive is running out of space, then follow these steps:
1. To begin with, launch the Disk Management application on Windows. You can find it from the Start menu.
2. As the Disk Management window will open, you can view the storage allocated to each partition and the available free space as well.
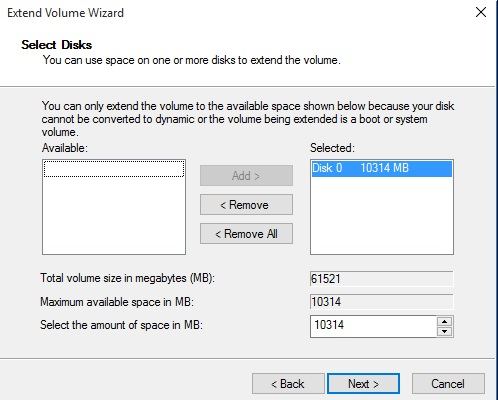
3. Right-click the C drive option from here and go to the «Extend Volume» feature.
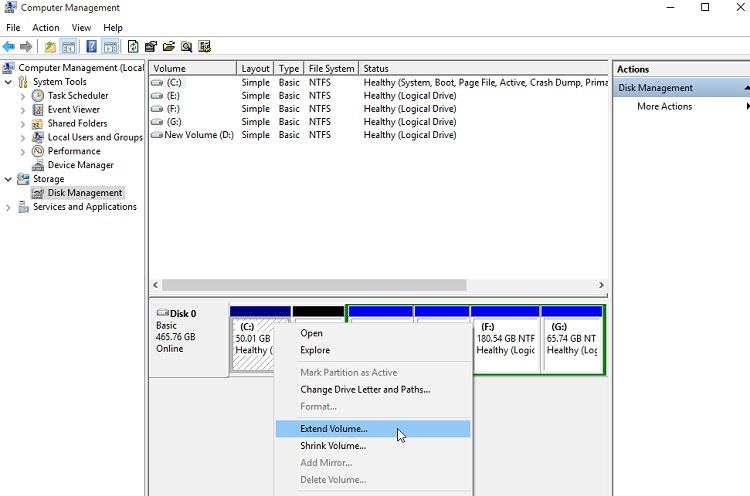
4. This will launch a dedicated Extend Volume Wizard that you can run by following a simple click-through process. From here, you can select the available space and add it to the C drive.
Please note that if the free space is not available, then you can create it from the Disk Management application. You can do this by defragmenting the disk or removing the free space from any other partition.
Bonus: How to Get Data off an Old Broken Hard Drive?
If you have an old or broken hard drive, then it might get tough to extract data from it. In case if you can’t simply copy your files from it the usual way, then try a dedicated recovery solution instead.
Tip 1: Recover Lost Data from C Drive
WondershareВ Recoverit Data RecoveryВ is a professional tool that is recommended by experts to extract the lost content from a hard drive. Therefore, if you have lost or deleted your files from the C drive, then consider using Recoverit immediately. The sooner you run it, the better results you are expected to get.
What is special about Recoverit is that it has one of the highest data recovery success rates (96%) in the industry. Also, it features an extremely simple user interface, which does not require any technical background. You can just download it on your Windows PC for free by visiting its website and follow these steps.
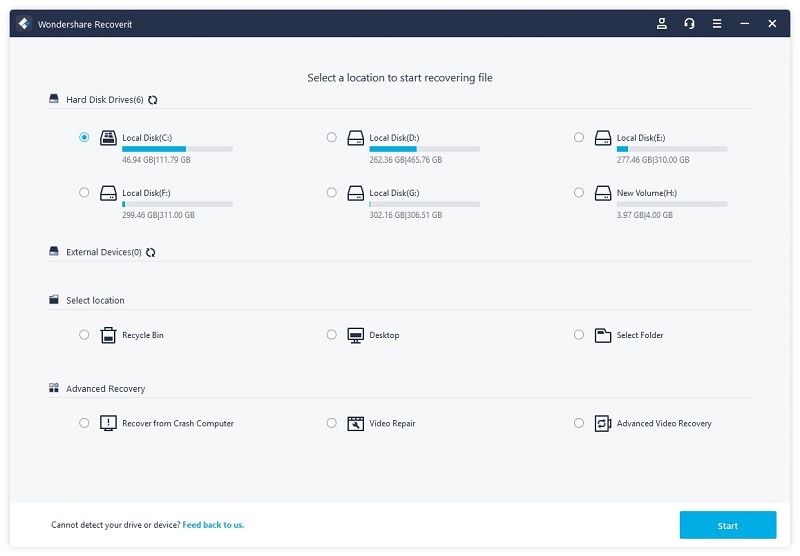
Step 1 Select a source to scan
Firstly, launch the Recoverit Data Recovery application on your system, and from its home, select a location to scan. If you want, you can select the entire C drive partition or browse to a specific folder to extract lost data from it.
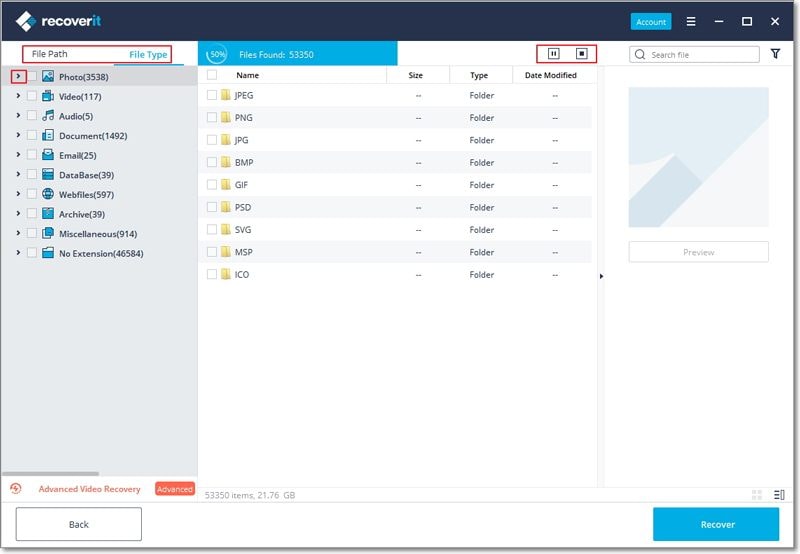
Step 2 Scan the selected source
Once the target location is selected, click on the «Start» button and wait for a few minutes while Recoverit would scan it. You can view the progress of the scan on the interface and even pause it whenever you want. To get the maximum output, let the application run the complete scan.
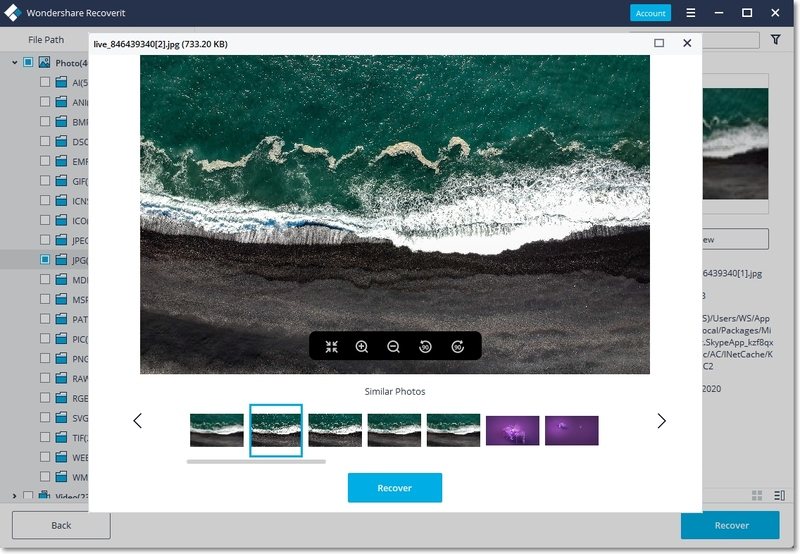
Step 3 Restore your data safely
That’s it! After when the scan is over, all the extracted content will be listed under different file types and folders. You can switch between them from the sidebar and get a preview of your photos, videos, documents, etc. as well. Now, just pick the files you wish to get back and click on the «Recover» button. Make sure you get off this data to a trusted location in the end.
Tip 2: Check the C Drive Storage Regularly
Apart from that, you should also make a habit of checking the storage of C drive regularly. There are plenty of ways to do this. You can just go to your PC’s Settings > System > Storage to view it. Also, you can go to My Computer and right-click the C drive icon. Go to its Properties > General tab to know how much space is left on the drive presently. As soon as you think the free space is limited, take preventive measures to clean up C drive.
This brings up to the conclusion of this in-depth guide on how to clean C drive in Windows 7 and 10. To help you, we have listed not one, but 10 different options to clear space on C drive. Not just that – the guide also lists a smart and fast solution to recover data from your computer as well. The ball is in your court now! Go ahead and try some of these suggestions to free up space on C drive. If you also have some tips on how to increase C drive space, then why not share them with us in the comments below.


