- 5 Tips For Cleaning High Windows
- Get up to 4 Free Quotes!
- 1. Schedule A Day
- 2. Choose Your Method of Getting to the Exterior
- 3. Prepare the Windows
- Get up to 4 Free Quotes!
- 4. Get Your Supplies Together
- 5. Wash the Windows
- Conclusion
- The Ultimate Cleaning Schedule for Your Day, Week, Month, and Year
- The Definitive Cleaning Schedule
- How to Tackle Everything on Your List
- Tips for Cleaning Every Day
5 Tips For Cleaning High Windows


Get up to 4 Free Quotes!
It’s time to clean those areas that maybe only need it once a year to ensure both you and your house are ready for some balmy weather. One of those areas is high windows. Windows are one of the top five areas that make people happy when they’re cleaned. They’re number five on the list, behind floors, toilets, countertops and showers. They’re also something that 72% of us want to include in our spring cleaning plans
It’s particularly important to clean high windows but it’s possible to overlook them. Cleaning them is a major event, as you have to gather equipment, work on a ladder and even choose the right weather. Here is a step-by-step guide to having windows that sparkle and shine.

1. Schedule A Day
Believe it or not, you shouldn’t just wake up one morning and say, “Windows, here I come!” Cleaning your windows must be a planned process. You don’t want to go through the time and effort of cleaning your high windows only to have them streak. Streaking will happen if you wash the windows on a sunny or hot day.
The cleaner will dry very quickly on your glass if the sun is warming your windows, quicker than you can wipe it off, which creates streaks. Since the streaks are made by the cleaner, you won’t be able to remove them by more rubbing.
Ditto for trying to clean on a hot day. The heat will dry the cleaner on the glass before you can remove it. Streaks will mar your windows yet again. Your goal is sparkling, clean windows, not partly clean and partly streaked.
Aim for a day when the temperature isn’t projected to go over 70 degrees. That’s the optimum temperature to clean windows. And, of course, aim for a day when it isn’t raining.

2. Choose Your Method of Getting to the Exterior
If you need to clean tall windows, you’ll need a safe method for accessing the exterior. There are two ways to accomplish this: a squeegee with a long handle or a ladder. These can, of course, also be combined. Your windows may require a ladder and a long-handled squeegee.
Never try to clean your windows by standing in the interior and hanging out of the exterior windows if more than your arm has to be extended. If you need to stretch from the waist or below, it’s potentially dangerous. The last thing you want is to tumble out of windows on your way to a clean exterior.
It’s also important to not put weight on portions of the roof that can be unsteady or susceptible to damage. If you lean on a gutter, it may give way under your weight. And if you followed one of the recent exterior home design trends and installed copper gutters, that can be a costly mistake in terms of home value.
If you need a ladder, either an extension ladder or a stepladder will work. A test the to be sure the ladder is at a safe angle by standing with your toes touching the feet of the ladder, then stretch your arms out. If your fingertips can touch the rungs of the ladder, the angle is correct. If not, move the ladder until you can touch the rungs.
Also, follow the belt buckle rule. Whether you’re actually wearing a buckle or not, keep that area of your body within the ladder’s boundaries at all times. If you have to stretch so far that it isn’t, don’t. Doing so could cause you to lose your balance and fall. That’s a sign that the ladder needs to be moved.

3. Prepare the Windows
Get up to 4 Free Quotes!
Remember that your interior and exterior windows likely have not been cleaned in a long time, so they have plenty of dirt to clean. The outside may have additional leaves, insects and cobwebs to clean off. Just like you do when you paint, put in some prep time first.
A small hand-held portable vacuum cleaner can do a world of good in removing leaves, insects, cobwebs and any grime. Soft-bristled brushes like the ones used to clean kitchen counters will work too, but you’ll still need a miniature broom for the leaves and insects.
4. Get Your Supplies Together
You’ll need specific supplies to clean windows. Gather them together before you begin.
- Mild liquid dishwashing detergent or white vinegar
- Two buckets
- Squeegees, with or without extension poles
- Large sponges
- Rubber gloves
- All-purpose cleaner, without ammonia
- Towels
- Lint-free cloths like chamois, cloth diapers, old t-shirts or other soft clothing
If you use old clothing, be sure to choose clothes that haven’t been treated with fabric softener. Softener residue can streak your windows. Also, never use paper towels to clean windows. They leave lint behind.

5. Wash the Windows
For exterior windows, mix half white vinegar and half water as the cleaning solution in a large bucket. Water and dishwashing liquid will work equally well. Use just a few drops of dishwashing liquid. Any more than a few drops and the water will be too soapy. Fill a second bucket with just water for rinsing the sponge and squeegee.
Put a sponge in the cleaning solution and wash the windows with it. Wet a squeegee as a dry squeegee blade won’t have traction. Use only water, though, and not the cleaning solution.
Move the squeegee vertically down the window with a straight stroke, beginning at the right upper corner. Go back for the next stroke and do it the same way. Overlap the prior stroke just a bit. After you complete a stroke, use a second sponge or one of the cloths to wipe the squeegee’s rubber edge. When you’re done moving across the entire window, pull across the window’s bottom horizontally with the squeegee.
For cleaning inside windows, use a towel to catch any drips. Take a sponge or cloth to dry the sill if it gets wet. For interior windows, use a wet cloth and a non-ammonia cleaner to wipe the frames.
Remove the cleaner with a rise. Use a clean wet cloth. Dry the frames immediately. Water can harm wood. Clean the sponge and squeegee in the second bucket.
Conclusion
There you have it! Your windows will be clean and sparkling, and your house will look much and feel much brighter. You’ll also have the satisfaction of knowing another year’s worth of spring cleaning on those upper windows is finished.
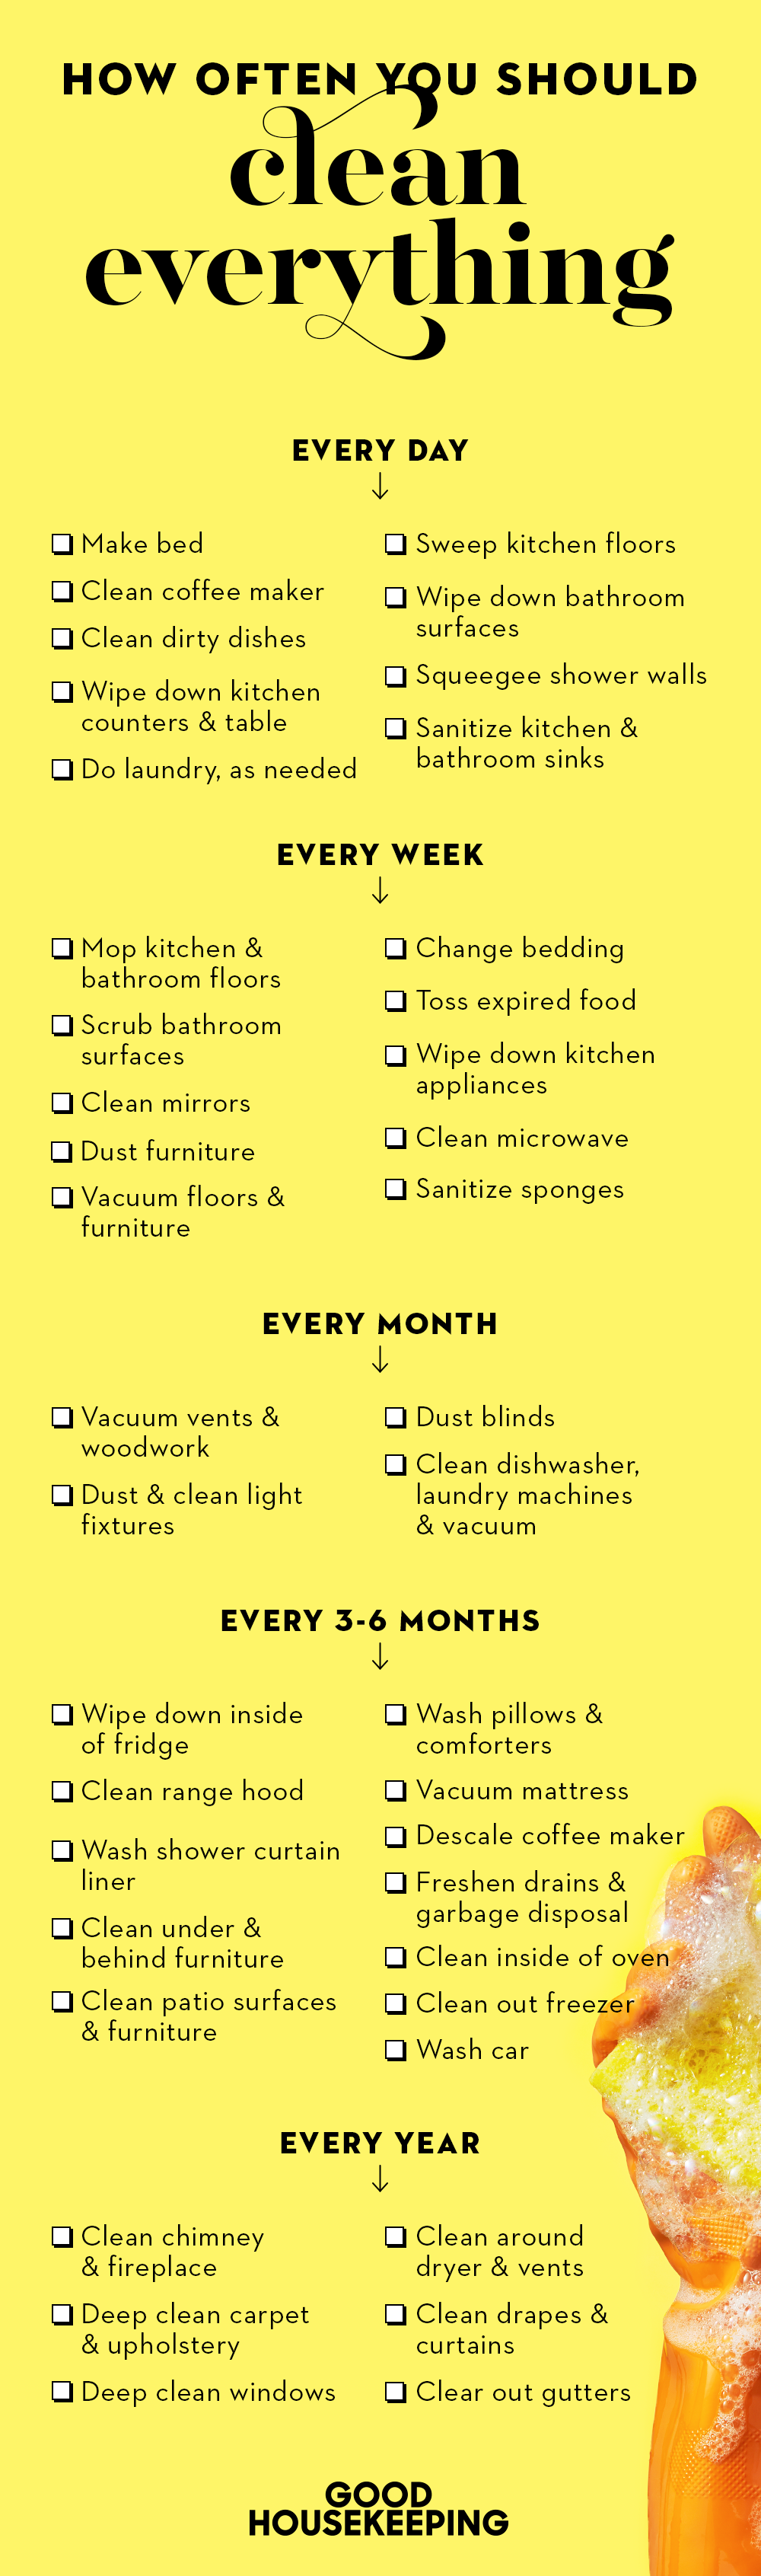
The Ultimate Cleaning Schedule for Your Day, Week, Month, and Year
Our experts revealed the truth about how often you need to clean everything.
Raise your hand if you find keeping your home clean totally daunting. Or if you stumble upon dust, rust, or dirt in spots you totally forget about too often for comfort. We get it. Which is why we created this super handy checklist with the Good Housekeeping Institute Cleaning Lab to help you stay on top of how often you should bust out your cleaners and get to work — but there are a few exceptions to keep in mind.
First of all, the obvious: If something looks dirty, don’t wait — add it to your immediate to-do list. Secondly, when it comes to sanitation, our guidelines represent the bare minimum so you can ramp up those tasks as needed. And finally, don’t forget about laundry, for which we created separate guidelines to follow.
The Definitive Cleaning Schedule
How to Tackle Everything on Your List
Now that you’ve got the schedule, read up on our time-saving tips and all-time favorite products that will make these jobs as painless as possible.
Tips for Cleaning Every Day
These essential daily tasks cut down on future scrubbing and scouring — not to mention harmful germs and bacteria.
Clean coffee maker or Keurig: Wash removable parts with warm, soapy water or stick dishwasher-safe pieces in the machine. Wipe down the outside and warming plate to remove spills.
Clean dirty dishes: Skip pre-rinsing. Today’s machines and detergents make it unnecessary — and a waste of water and time! Enzymes in your dishwasher detergent actually work better when they can attach themselves to food particles.
Sanitize sinks: Use an eraser-type sponge (like Mr. Clean Magic Eraser) to remove marks, then sanitize by plugging the drain, filling the basin with warm water, and swishing a tablespoon of bleach around. Let it sit for five minutes, then rinse.


