- Windows: Clear Print Queue
- Command Method
- GUI Method
- You Might Also Like
- Принудительная очистка очереди печати в Windows
- How to Forcefully Clear the Print Queue in Windows
- Clear Print Queue in Windows
- How to Clear the Print Queue in Windows 10 Without Restarting
- 1. Clear Print Queue from the Settings App
- 2. Clear Print Queue from the Control Panel
- 3. Stop, Clear, and Restart Print Spooler from Command Prompt to Clear Print Queue
- 4. Stop Print Spooler Service and Clear Queued Files
Windows: Clear Print Queue
By Mitch Bartlett 15 Comments
If you have a long list of hung or corrupt print jobs in Microsoft Windows 10, 8, or 7, you can clear the print queue easily by using either of these methods.
Command Method
You can clear the print queue using commands like this.
- Select Start.
- Type Command .
- Right-click “Command Prompt” and select “Run as administrator“.
- Type net stop spooler then press “Enter“.
- Type del %systemroot%\System32\spool\printers\* /Q then press “Enter“.
- Type net start spooler then press “Enter“.
- The print queue on your Windows should now be cleared. Type exit , then press “Enter” to exit the command window.
GUI Method
You can clear the print queue using this the Windows GUI.
- Hold down the Windows Key and press “R” to bring up the Run dialog.
- Type services.msc , then press “Enter“.
- Find the “Print Spooler” service in the list. Right-click it, then select “Stop“.
- Leave the Services window open. Hold down the Windows Key and press “R” to bring up the Run dialog.
- Type %systemroot%\System32\spool\printers\ , then press “Enter“.
- Select all of the files by holding “CTRL” and pressing “A“.
- Press the “Delete” key to delete all of the files.
- Go back to the Services window, right-click “Print Spooler“, then select “Start“
Some files remain in the “printers” folder and will not allow me to delete them. How to I get rid of these?
Make sure the Print Spooler is stopped. If you’re sure it’s stopped, you might want to try opening a command prompt and running “chkfdsk /f /r” to run a check on the hard disk. Once complete, attempt to delete the file.
You Might Also Like
Filed Under: Windows Tagged With: Windows 10
Принудительная очистка очереди печати в Windows
Рассмотрим особенности очистки «подвисшей» очереди печати в системах Windows. Рассмотренная методика позволяет удалить из очереди документы, которые по какой-то причине не печатаются и мешают отправке на печать других файлов и документов.
«Мягкий» способ очистки текущей очереди печати принтера выполняется из окна Панели управления (Control Panel ->Devices and Printers). В списке принтеров нужно найти проблемный принтер, щелкнуть по нему ПКМ и выбрать в меню пункт See what’s printing.
 В открывшемся окне управления очередью печати принтера в меню выбираем пункт Printer-> Cancel All Documents . Все документы, в том числе зависшие, должны удалиться из очереди печати принтера.
 В том случае, если какие-то документы не удаляются из очереди печати, значит они в данный момент заблокированы системой или драйвером самого принтера. Они пропадут из очереди печати после перезагрузки. Если перезагрузка выполнить проблематично, можно принудительной удалить все задания из очереди службы печати Windows.
Напомним, что при отправке документа на печать на принтер, служба печати Windows (Print Spooler) формирует задание печати и создает два файла: один с расширением .SHD (содержит настройки задания печати), второй — .SPL (хранит собственно данные, которые нужно распечатать). Таким образом, задания печати будут доступны службе печати, даже после закрытия программы, инициировавшей печать. Данные файлы хранятся в каталоге спулера (по умолчанию, «%systemroot%\System32\spool\PRINTERS”). После успешной печати, эти файлы автоматически удаляются из этого каталога, и, соответственно, из очереди печати.
Нам нужно вручную очистить содержимое этой папки, тем самым мы удалим все задания в памяти Print Spooler.
Откройте командную строку с правами администратора и последовательно выполните команды:
net stop spooler
del %systemroot%\system32\spool\printers\*.shd /F /S /Q
del %systemroot%\system32\spool\printers\*.spl /F /S /Q
net start spooler
![]() Этот набор команд последовательно останавливает службу печати Windows, рекурсивно удаляет все файлы с расширениями *.shd и *.spl из каталога %systemroot%\system32\spool\printers и запускает остановленную службу.
Этот набор команд последовательно останавливает службу печати Windows, рекурсивно удаляет все файлы с расширениями *.shd и *.spl из каталога %systemroot%\system32\spool\printers и запускает остановленную службу.
Архив с готовым bat файлом можно скать по ссылке reset_spooler.zip (запускать от имени администратора)
Рассмотренные выше методики помогут очистить очередь печати в любой версии Windows, будь то Windows 7, 8 или Windows 10.
How to Forcefully Clear the Print Queue in Windows
Get rid of that stuck print job
Have you ever run into the situation where you try to print something and nothing happens? You wait for it to print, but the job doesn’t go through? There are a ton of reasons why a print job may not actually print, but one of the common causes is that the printer queue has a stuck print job.
This can happen for a number of reasons. Let’s say you tried to print something a few hours back, but the printer was off. You ended up not needing the document and you forgot about it. Then you come back and try to print. The print job is added to the queue and if the previous job didn’t get removed automatically, it will be behind that print job that never got printed.
Sometimes you can manually go in and delete the print job, but sometimes you just can’t get rid of it! In this type of case, you have to clear the print queue manually. In this article, I’ll show you the steps to clear the print queue.
Clear Print Queue in Windows
In order to get the printing services back up and running, follow these steps:
1. Go to Start, Control Panel and Administrative Tools. Double click on Services icon.
2. Scroll down to the Print Spooler service and right click on it and select Stop. In order to do this, you need to be logged in as Administrator. At this point, no one will be able to print anything on any of the printers that are being hosted on this server.
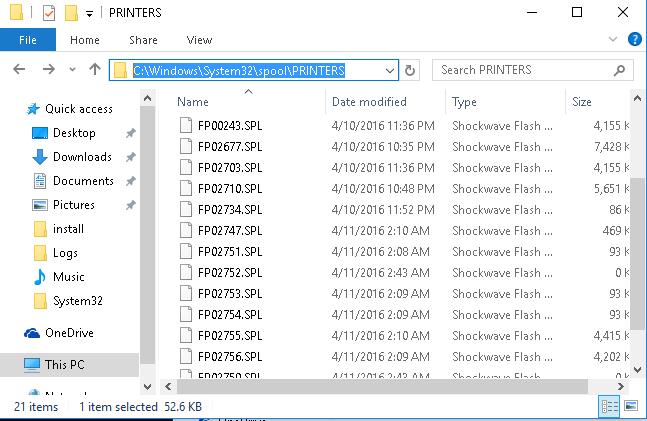
3. Next you need to go to the following directory: C:\WINDOWS\System32\spool\PRINTERS. You can also type %windir%\System32\spool\PRINTERS into the address bar in Explorer if the C drive is not the default Windows partition. Delete all the files in this folder.
This will clear all print queues (If you’re doing this on a server, it’s a good idea to first make sure there are no other print jobs being processed for any of the other printers on the server because doing this step will delete those jobs also).
![]()
4. Now you can go back to the Services console and right-click and choose Start for the Print Spooler service!
At this point, you should be able to print without a problem. If you prefer to use a script, i.e. for a server, then you can create a batch file with the commands below or just type them into the command prompt:
net stop spooler
del %systemroot%\System32\spool\printers\* /Q /F /S
net start spooler
The first and third commands are fairly obvious: they stop and start the print spooler service. The middle command deletes everything in the printers folder and the /Q is for quiet mode, which means you won’t get a prompt asking if you want to delete each file. /F will force delete all read-only files and /S will delete any subdirectories if those exist. Deleting content from this folder can never harm your computer, so don’t worry if you see some files or folders and aren’t sure waht they are for.
You can read my previous post if you want to know how to create a batch file. Then all you have to do is run the batch file anytime you want to clear out the print queue. Luckily, the procedure for clearing out the print queue is the same for Windows 8, Windows 7, Vista, and XP.
Founder of Online Tech Tips and managing editor. He began blogging in 2007 and quit his job in 2010 to blog full-time. He has over 15 years of industry experience in IT and holds several technical certifications. Read Aseem’s Full Bio
How to Clear the Print Queue in Windows 10 Without Restarting
Printers are the bane of the computer. No matter what printer you are using, for whatever reason, you will face all sorts of problems while connecting or trying to print files. One of those problems is the print getting stuck. When a print is stuck, it will not be printed. What’s more, it will stop all the other prints in the queue from printing. Simply put, if you have one print that is stuck, it will stop the entire queue and prevent other files from printing.
To make matter worse, the options to clear print queue are hidden deep and the apps provided by the printer manufacturer are no better either. That being said, though the options are not so easy to find, it is quite easy to clear the print queue with just a few clicks. There are four different methods to clear the print queue. I will list all of them. Follow the one you like.
Jump to:
1. Clear Print Queue from the Settings App
Every time you try to print something, Windows adds it as a print job. By clearing the print job list, you can clear the print queue. The new Windows 10 Settings app has proper options to clear print job list.
1. Open the Settings app by pressing the keyboard shortcut Win + I . You can also open the Settings app by searching for it in the start menu or by clicking on the “All Settings” button in the Notification center.
2. In the Settings app, go to “Devices -> Printers and Scanners”.
3. On the right-panel, click on your printer device and click on the “Open Queue” button.
![]()
4. The above action will show all the print jobs in the queue. Right-click on each print job and select “Cancel” option.
![]()
5. In the confirmation window, click on the “Yes” button.
6. Once you cleared the print queue, this is how it should like in the print job window.
![]()
That is it. By canceling all the print jobs, you’ve successfully cleared the print queue in Windows 10.
2. Clear Print Queue from the Control Panel
You can also use the good old control panel to cancel print jobs and clear the print queue. In fact, this method is basically the same as the above one. The only difference is that you will be using the control panel rather than the settings app.
1. Search for “Control Panel” in the start menu and open it.

2. Make sure the View By is set to “Large icons”, find “Device and Printers” and click on it.
![]()
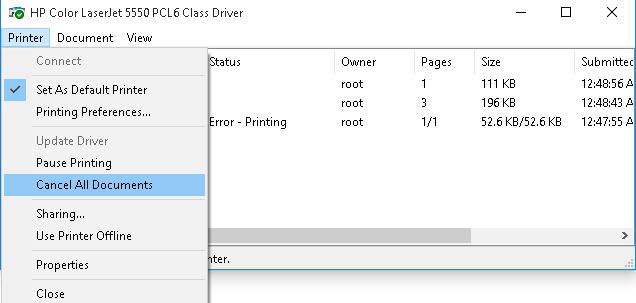
3. You will see all the devices attached to your computer. Find your printer under “Printers” section, right-click on it and select the option “See what’s printing”.
![]()
4. The above action will open the print job window. Here, right-click on each print job and select the “Cancel” option.
![]()
5. You will see a confirmation window. Click on the “Yes” button.
6. This is how it should look like in the print job window after clearing all the job.
![]()
You are done clearing the print queue. You can start a new print queue and the printing process should work fine.
3. Stop, Clear, and Restart Print Spooler from Command Prompt to Clear Print Queue
Whenever you try to print a file, Windows creates a print job and adds it as a file in the Printers folder located in the C drive. By deleting all those print job files, you can clear the print queue. Since the files are actively used by the print spooler service, you need to first stop it and then delete the print job files. From the command prompt, you can stop the Print Spooler service, clear the queue and start the service in one go. Let me show you how.
1. Search for the “Command Prompt” in the start menu. Right-click on the command prompt and select “Run as Administrator” option.

2. The above action will open the command prompt with admin rights. Use the below command to stop the print spooler service.
3. Next, you need to delete the print job files. For that, use the below command to delete files. Don’t worry, we are not deleting anything important. These files are just responsible for the print queue.
4. After deleting the print job files, you need to start the print spooler again so that you can print your files without restarting Windows. For that use the below command.
That is it. From now on, you should be able to print files without the print queue getting stuck. If the print queue does get stuck again, follow the above procedure once more to clear the print queue.
4. Stop Print Spooler Service and Clear Queued Files
If you don’t like or not comfortable using the command prompt method, you can manually stop the print spooler services from the management console and manually delete the print job files. Let me show you how.
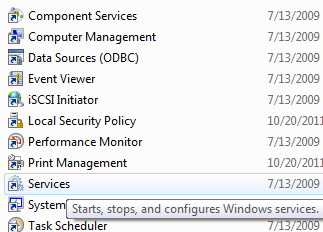
1. Press Win + R to open the Run dialog box. In the empty field, type services.msc and press Enter . This will open the Windows Services management console window. This is where you can manage various Windows and other services.

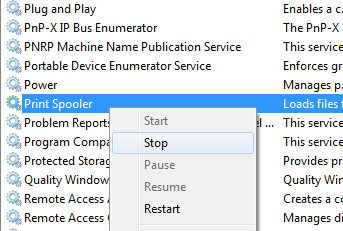
2. Scroll down and find the “Print Spooler” service. Now, right-click on it and select “Stop” option.
![]()
3. The service will be stopped almost instantly.
![]()
4. Now, open the Run dialog box again using the keyboard shortcut Win + R . Type %windir%\System32\spool\PRINTERS\ in the field and press Enter . This will open the print jobs folder.
Note: If you see an administrator confirmation prompt while opening the folder, click on the “Continue” button.
![]()
5. Select all the files and hit the Delete button on your keyboard.
![]()
4. Once deleted, this is how the PRINTERS folder should look like.
![]()
6. Now, go to the Services window, right-click on the “Print Spooler” service and select the “Start” option. This will start the print spooler service so that you can print your files.
![]()
After deleting the print job files, you are done clearing the print queue. You can now start printing again and don’t have to worry about stuck prints.


