- Connecting Excel to ClickHouse using the Windows ODBC driver
- Installing the ODBC driver
- Creating a ClickHouse data source
- Connecting to ClickHouse from Excel
- Selecting Data from Whole Tables
- Selecting Data from Queries
- Additional Advice
- Fixing Data Sources
- Bad Credentials on Data Sources
- Large Tables
- Bugs, Feedback, and Improvements
- ODBC драйвер для Windows. Использование в SQL Server Intergation Services (SSIS) #1826
- Comments
- DSeratila commented Jan 26, 2018 •
- Как установить ClickHouse? — Руководство для digital-аналитиков
- Видеоинструкция
- Покупка сервера для установки ClickHouse
- Установка ClickHouse
- Clickhouse odbc driver windows
Connecting Excel to ClickHouse using the Windows ODBC driver
19 December, 2019?
Many years ago a wise customer once said, “every report wants to be an Excel spreadsheet when it grows up!” I have always had a soft spot for Excel–it’s one of the most useful programs that Microsoft ever released. To honor that long lost user this article will show how to bring joy to your ClickHouse reporting by pulling data into Excel.
The key is to use the ClickHouse ODBC driver. We’ll walk through how to install the ODBC driver, create a clickhouse data source, and finally fetch data into Microsoft Excel. In the best Windows tutorial tradition we’ll show screenshots of all steps.
The examples that follow use Windows 10 and MS Office 365 version 1910 (32 bit). The ClickHouse ODBC driver is version 1.1.2.
Installing the ODBC driver
Driver builds are located on the ClickHouse ODBC driver project on GitHub. Go to the Release tab to find build files. Pick either the latest 64- or 32-bit .msi file and download. In our case we’ll use the 32-bit driver to match the Excel build.
Important Note : Ensure you have the latest ODBC driver version 1.1.2 or above. It fixes a few bugs that show up in ODBC on Windows.
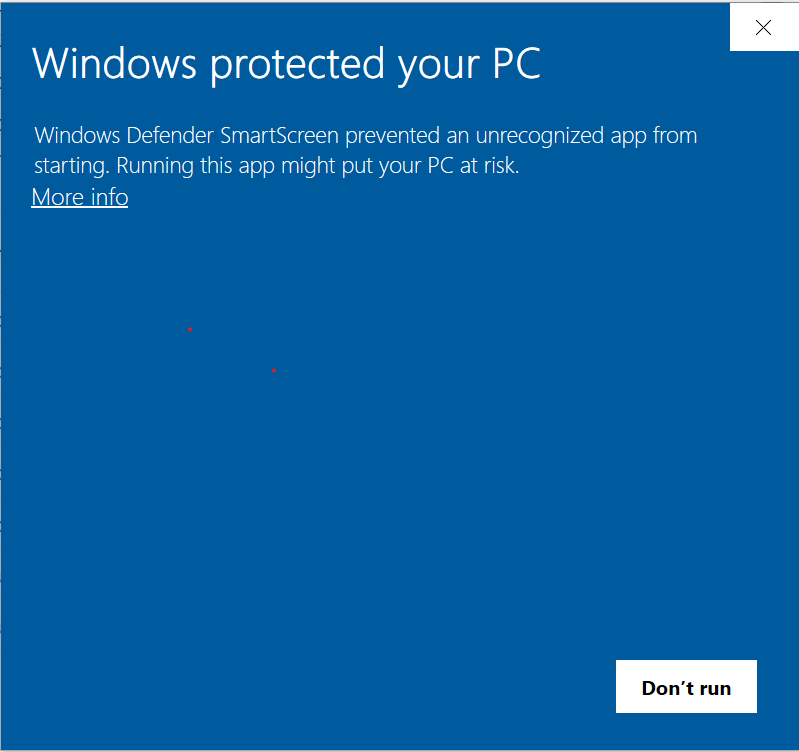
Click the .msi file icon to start installation. In Windows 10 you have to step past a screen like the following. Click on the “More info” link to see a “Run anyway” button and press it.
You’ll now see the clickhouse-odbc Setup Wizard, which looks like the following.

Click “Next,” accept the agreement, and step through another screen to get the “Install” button. Press it to complete installation. Windows 10 will ask you for permission to update files. Once you give permission the installation will finish in a couple of seconds. You will see the following screen after a successful install.
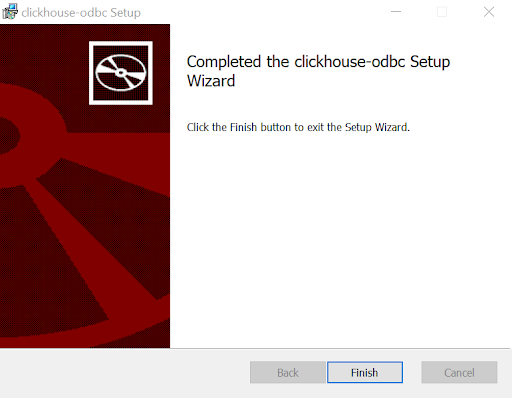
Press “Finish” to end the process. The ODBC driver is now installed and ready for use.
Creating a ClickHouse data source
ODBC uses preconfigured connections to databases called data sources. The idea is that you set up all the information to locate the ClickHouse server and authenticate. The data source has a name that you can refer to in Excel when connecting to the server.
The first step is to find ODBC. On Windows 10 we will do this the easy way: just drop down to the search bar and type “ODBC”, then select ODBC Data Sources (32-bit). If you are using 64-bit Excel you’ll need to select the 64-bit version. Either way, a screen like the following will pop up.
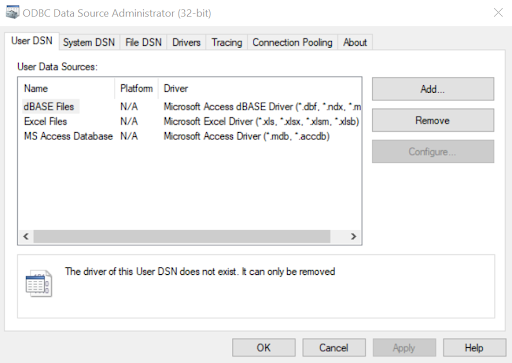
User DSNs are data sources that are visible only to the account you are using. System DSNs are data sources that are visible to anyone using the Windows machine. We’ll press “Add” to create a User DSN. You’ll see a screen like the following.
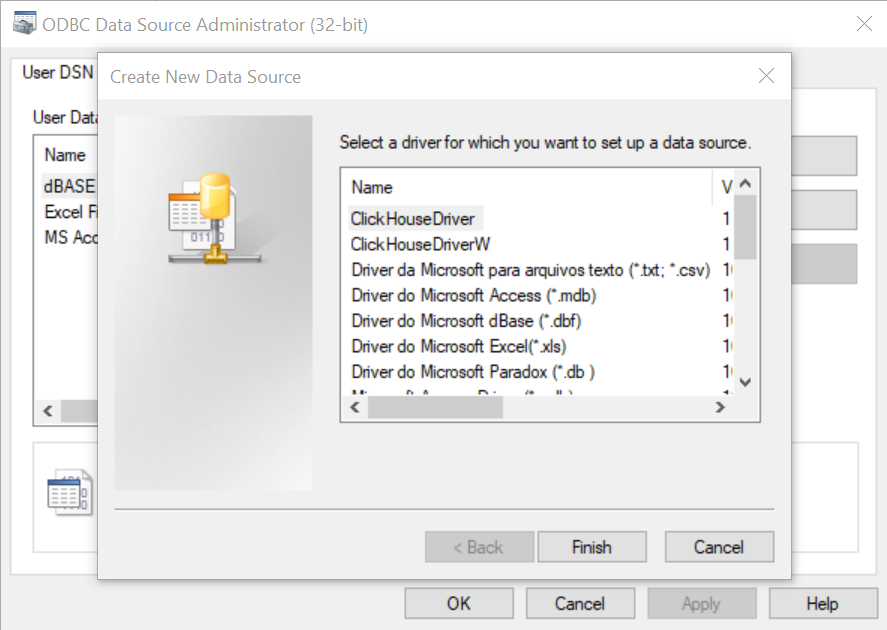
Pick ClickHouseDriver and press “Finish.” You will now see a screen with connection information. The easiest way to fill out the cluster connection information is to put in a URL. Or you can specify the host and port explicitly. The following examples show two identical definitions of an https ClickHouse connection with a self-signed certificate. The user is ‘default’ and it requires a password.
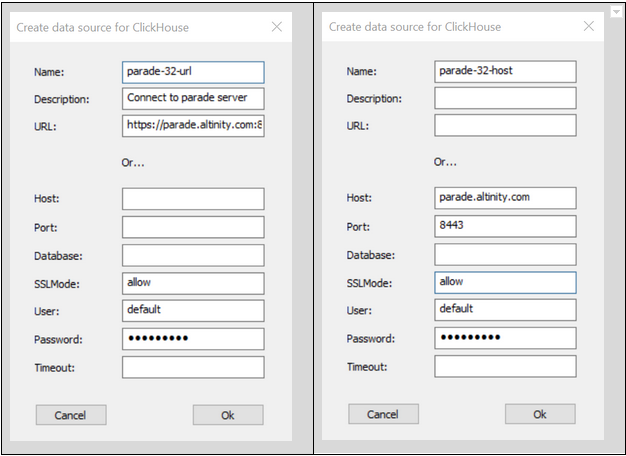
Here are a few more details about ClickHouse data sources.
The URL follows the ClickHouse HTTP interface format. If you use the URL form, you must provide the port for https connections.
If you choose the host form, enter the ClickHouse host, port, and database (optional). In this case the driver will construct a URL for you.
SSLmode has two values. They are:
require – check server X509 certificate and fail the connection if certificate cannot be verified.
allow – ignore self-signed and bad certificates. Use with caution. (It’s handy for development or demos like this one.)
The login and password are optional. If you leave them out Excel will prompt for them.
Timeout sets how long to wait for queries to ClickHouse. It defaults to 30 seconds.
Once you press OK, the data source is saved. We can now use it with Excel.
Connecting to ClickHouse from Excel
Selecting Data from Whole Tables
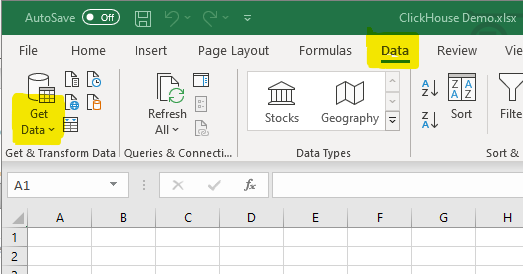
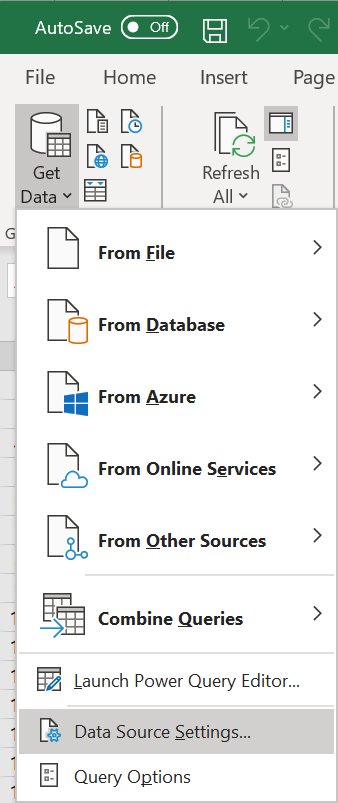
The final step is to connect an Excel spreadsheet to ClickHouse and fetch some real data. Let’s start by firing up Excel and creating a new spreadsheet. Once you are in the spreadsheet, select the Data tab and press ‘Get Data’ on the left, as shown below.
In the drop-down that appears under “Get Data,” select “From Other Sources” followed by “From ODBC.” A dialog like the following will appear with a list of available data sources.
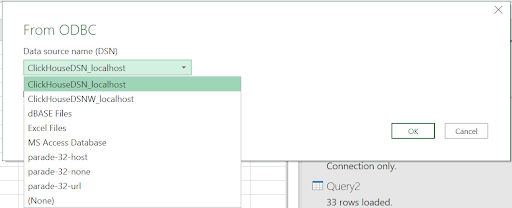
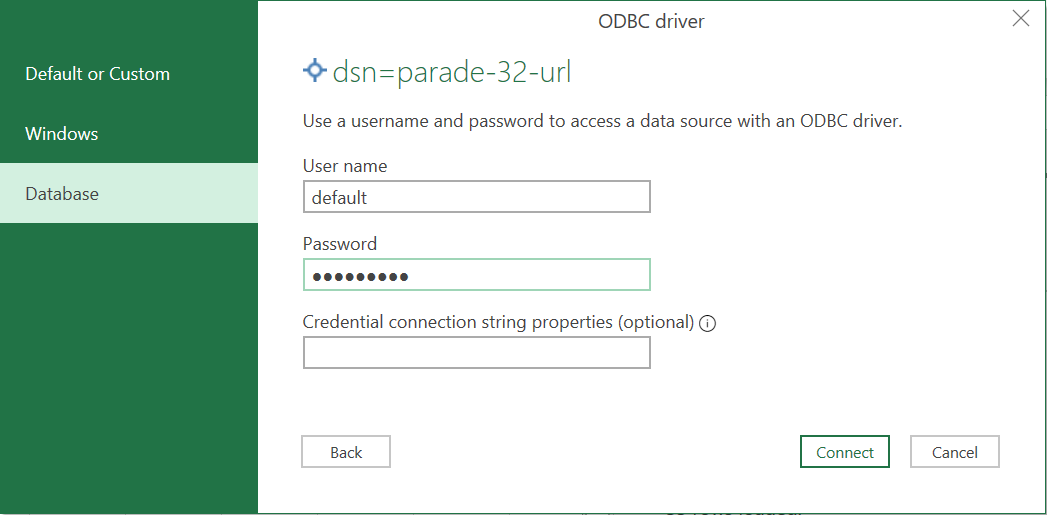
We pick the parade-32-url data source. At this point Excel will try to load data. The first time you use the data source Excel will pop up a window to enter connection credentials. Here’s an example. You can press the ‘Default or Custom’ tab to proceed with the credentials from the ODBC data source itself. Or you can enter the credentials again and press ‘Connect’ as shown below.
Assuming the connection is OK, Excel will show a handy navigator listing all tables in your ClickHouse server. For small datasets you can just navigate down to a table and select it, as in the following example.
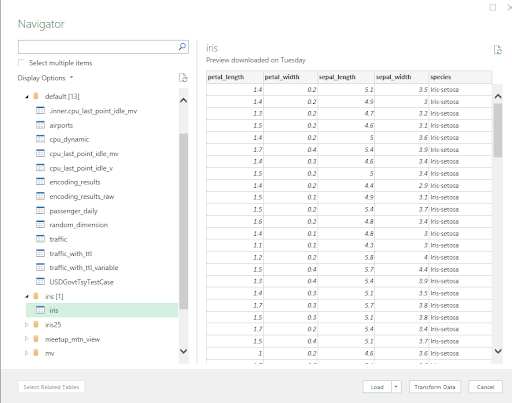
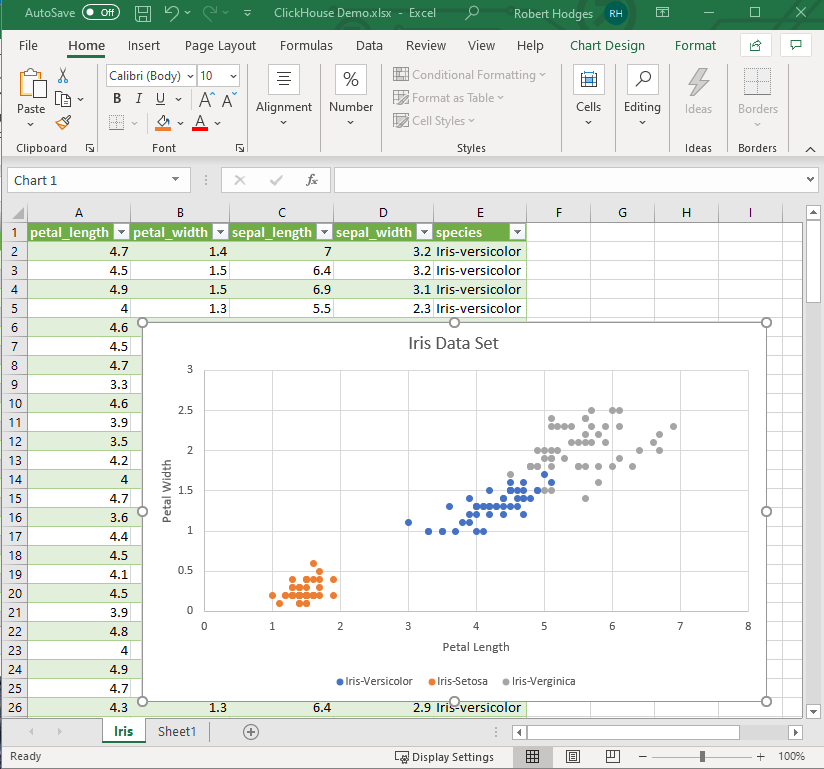
Press the load button and the data will be pulled into Excel. You can then play with the values to your heart’s content using your favorite features of Excel, such as graphs or pivot tables. Here is an example. Old hands at data science will recognize the famous Iris data set from Ronald Fisher’s 1936 paper.
Selecting Data from Queries
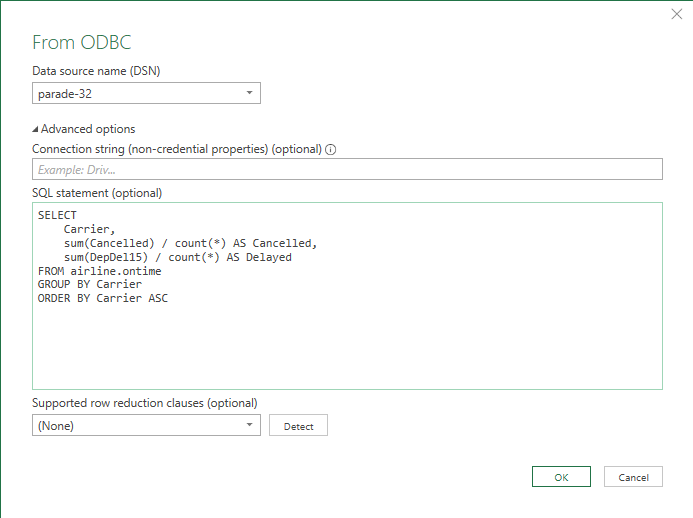
ClickHouse tables tend to be pretty big, so selecting all the data is perhaps not such a good idea. Instead, we can select a smaller quantity of data using a query. Let’s do that as follows.
Select the “Data” table on the top menu followed by “Get Data.” Follow the same steps as before in the drop downs to find the parade-32-url data source. When it appears press “Advanced options” and enter a query. Here’s an example.
You’ll need to go through the same steps to preview and load data but in the end you’ll have the query result in a new tab and can work on it as before. Here’s an example of what the results might look like.

If you are an Excel fan like me, I’m sure you’ll be happy to see this.
Additional Advice
Here are a few more tips for success with Excel.
Fixing Data Sources
The ClickHouse ODBC driver does not currently offer a way to test connections before use. If there is a problem with the data source you’ll find out when you try to fetch data. If this happens, open up the ODBC driver utility, fix the data source, and try again.
Bad Credentials on Data Sources
As we showed above, Excel lets you enter credentials for connections that don’t have them in the ODBC definition. If you enter the wrong credentials or they change later, your queries will no longer work. To fix this problem find the ‘Data Source Settings’ menu and select it. Excel will pop up the credentials screen so you can fix the problem.
Large Tables
The ClickHouse ODBC driver will happily try to select from tables that are far too large for Excel. You will see the query pulling down hundreds of thousands of rows (or more). Fortunately, Excel lets you cancel the query. Retry with a query that selects less data.
Bugs, Feedback, and Improvements
Altinity maintains the ClickHouse ODBC driver and has made a number of improvements over the last few months. If you run into a problem or have a question please log an issue on GitHub . If you have a bug fix, please file a pull request. Windows ODBC usage is relatively new, so there will certainly be a few problems to fix in the future. Getting help from the community makes this easier.
Finally, if you need major improvements to the driver for your projects, Altinity can implement new features as a commercial service. Please contact [email protected] and we will be glad to help.
Thanks for reading this article. Now get out there and have fun with ClickHouse and Excel!
p.s., I would like to thank Denis Glazachev, the ODBC driver maintainer, for his help in preparing this article. Denis has done a lot of recent heavy lifting to make the ODBC driver work better on all platforms, including Windows.
Subscribe
Join the growing Altinity community to get the latest updates from us on all things ClickHouse!
ODBC драйвер для Windows. Использование в SQL Server Intergation Services (SSIS) #1826
Comments
DSeratila commented Jan 26, 2018 •
Версия сервера ClickHouse: 
Версия драйвера от 2017-11-07 (ANSI).
ClickHouse/clickhouse-odbc@018c1d1
При попытке использование драйвера UNICODE крэшится Visual Studio
Версия Visual Studio: 
Версия ОС: Windows 10 Pro x64
При попытке обратиться с любым запросом как к источнику данных с использованием выдает ошибку «There was an error while truing to get schema information. Table has no columns» 
В качестве источника данных используется DSN
Если вместо запроса попытаться получить список таблиц, получаем ошибку: 
The text was updated successfully, but these errors were encountered:
Как установить ClickHouse? — Руководство для digital-аналитиков
ClickHouse — это колоночная база данных, разработанная Яндексом для обработки аналитических запросов, которая идеально подходит для решения задач интернет-маркетинга.
Мы подготовили данное руководство, чтобы облегчить начало работы с ClickHouse digital-аналитикам.
Видеоинструкция
Покупка сервера для установки ClickHouse
Чтобы установить ClickHouse, необходимо купить виртуальную машину, которая работает на операционной системе Ubuntu.
В качестве примера рассмотрим покупку сервера на DigitalOcean.
После регистрации выберите Create Droplets:

После чего откроется страница конфигурации сервера. Выберите следующие настройки:
- Операционную систему Ubuntu.
Версия: 18.04. - Местоположение сервера — Амстердам.
- Укажите размер виртуальной машины: 3 GB Memory, 1 vCPU и 60 GB SSD.
По мере постепенного увеличения объема данных вам понадобится более производительный сервер. DigitalOcean поддерживает масштабирование сервера, что позволяет комфортно увеличить технические характеристики.
После создания виртуальной машины на почту приходит письмо с SSH-доступом к серверу.
Установка ClickHouse
Чтобы установить ClickHouse, необходимо подключиться к серверу, воспользовавшись для этого SSH-клиентом.
SSH-клиент — это программа, позволяющая управлять сервером через командную строку.
Подойдет любое приложение, например:
Запустите SSH-клиент.
Для подключения к серверу укажите IP-адрес сервера, логин, а после авторизации задайте пароль.
Далее следуйте инструкции, подготовленной нашей командой.
Для этого копируйте команды из Google Docs или последовательно вставляйте указанные команды ниже в консоль SSH-клиента:
#1. Укажите репозиторий, с которого будет загружен ClickHouse:
#2. Затем запустите процесс установки (это занимает несколько минут):
Clickhouse odbc driver windows
ODBC Driver for ClickHouse 
This is the official ODBC driver implementation for accessing ClickHouse as a data source.
For more information on ClickHouse go to ClickHouse home page.
For more information on what ODBC is go to ODBC Overview.
The canonical repo for this driver is located at https://github.com/ClickHouse/clickhouse-odbc.
See LICENSE file for licensing information.
Table of content
Pre-built binary packages of the release versions of the driver available for the most common platforms at:
The ODBC driver is mainly tested against ClickHouse server version 20.3 . Older versions of ClickHouse server as well as newer ones (with greater success) should work too. Possible complications with older version may include handling Null values and Nullable types, alternative wire protocol support, timezone handling during date/time conversions, etc.
Note, that since ODBC drivers are not used directly by a user, but rather accessed through applications, which in their turn access the driver through ODBC driver manager, user have to install the driver for the same architecture (32- or 64-bit) as the application that is going to access the driver. Moreover, both the driver and the application must be compiled for (and actually use during run-time) the same ODBC driver manager implementation (we call them «ODBC providers» here). There are three supported ODBC providers:
- ODBC driver manager associated with MDAC (Microsoft Data Access Components, sometimes referenced as WDAC, Windows Data Access Components) — the standard ODBC provider of Windows
- UnixODBC — the most common ODBC provider in Unix-like systems. Theoretically, could be used in Cygwin or MSYS/MinGW environments in Windows too.
- iODBC — less common ODBC provider, mainly used in Unix-like systems, however, it is the standard ODBC provider in macOS. Theoretically, could be used in Cygwin or MSYS/MinGW environments in Windows too.
If you don’t see a package that matches your platforms, or the version of your system is significantly different than those of the available packages, or maybe you want to try a bleeding edge version of the code that hasn’t been released yet, you can always build the driver manually from sources:
Note, that it is always a good idea to install the driver from the corresponding native package ( .msi , etc., which you can also easily create if you are building from sources), than use the binaries that were manually copied to some folder.
Native packages will have all the dependency information so when you install the driver using a native package, all required run-time packages will be installed automatically. If you use manual packaging, i.e., just extract driver binaries to some folder, you also have to make sure that all the run-time dependencies are satisfied in your system manually:
The first step usually consists of registering the driver so that the corresponding ODBC provider is able to locate it.
The next step is defining one or more DSNs, associated with the newly registered driver, and setting driver-specific parameters in the body of those DSN definitions.
All this involves modifying a dedicated registry keys in case of MDAC, or editing odbcinst.ini (for driver registration) and odbc.ini (for DSN definition) files for UnixODBC or iODBC, directly or indirectly.
This will be done automatically using some default values if you are installing the driver using native installers.
Otherwise, if you are configuring manually, or need to modify the default configuration created by the installer, please see the exact locations of files (or registry keys) that need to be modified in the corresponding section below:
The list of DSN parameters recognized by the driver is as follows:
| Parameter | Default value | Description |
|---|---|---|
| Url | empty | URL that points to a running ClickHouse instance, may include username, password, port, database, etc. Also, see URL query string |
| Proto | deduced from Url , or from Port and SSLMode : https if 443 or 8443 or SSLMode is not empty, http otherwise | Protocol, one of: http , https |
| Server or Host | deduced from Url | IP or hostname of a server with a running ClickHouse instance on it |
| Port | deduced from Url , or from Proto : 8443 if https , 8123 otherwise | Port on which the ClickHouse instance is listening |
| Path | /query | Path portion of the URL |
| UID or Username | default | User name |
| PWD or Password | empty | Password |
| Database | default | Database name to connect to |
| Timeout | 30 | Connection timeout |
| SSLMode | empty | Certificate verification method (used by TLS/SSL connections, ignored in Windows), one of: allow , prefer , require , use allow to enable SSL_VERIFY_PEER TLS/SSL certificate verification mode, SSL_VERIFY_PEER | SSL_VERIFY_FAIL_IF_NO_PEER_CERT is used otherwise |
| PrivateKeyFile | empty | Path to private key file (used by TLS/SSL connections), can be empty if no private key file is used |
| CertificateFile | empty | Path to certificate file (used by TLS/SSL connections, ignored in Windows), if the private key and the certificate are stored in the same file, this can be empty if PrivateKeyFile is specified |
| CALocation | empty | Path to the file or directory containing the CA/root certificates (used by TLS/SSL connections, ignored in Windows) |
| DriverLog | on if CMAKE_BUILD_TYPE is Debug , off otherwise | Enable or disable the extended driver logging |
| DriverLogFile | \temp\clickhouse-odbc-driver.log on Windows, /tmp/clickhouse-odbc-driver.log otherwise | Path to the extended driver log file (used when DriverLog is on ) |
URL query string
Some of configuration parameters can be passed to the server as a part of the query string of the URL.
The list of parameters in the query string of the URL that are also recognized by the driver is as follows:
| Parameter | Default value | Description |
|---|---|---|
| database | default | Database name to connect to |
| default_format | ODBCDriver2 | Default wire format of the resulting data that the server will send to the driver. Formats supported by the driver are: ODBCDriver2 and RowBinaryWithNamesAndTypes |
Note, that currently there is a difference in timezone handling between ODBCDriver2 and RowBinaryWithNamesAndTypes formats: in ODBCDriver2 date and time values are presented to the ODBC application in server’s timezone, wherease in RowBinaryWithNamesAndTypes they are converted to local timezone. This behavior will be changed/parametrized in future. If server and ODBC application timezones are the same, date and time values handling will effectively be identical between these two formats.
Troubleshooting: driver manager tracing and driver logging
To debug issues with the driver, first things that need to be done are:
- enabling driver manager tracing:
- Enabling driver manager tracing: MDAC/WDAC (Microsoft/Windows Data Access Components)
- Enabling driver manager tracing: UnixODBC
- Enabling driver manager tracing: iODBC
- enabling driver logging, see DriverLog and DriverLogFile DSN parameters above
- making sure that the application is allowed to create and write these driver log and driver manager trace files
Building from sources
The general requirements for building the driver from sources are as follows:
- CMake 3.13.5 and later
- C++17 and C11 capable compiler toolchain:
- Clang 4 and later
- GCC 7 and later
- Xcode 10 and later (on macOS 10.14 and later)
- Microsoft Visual Studio 2017 and later
Additional requirements exist for each platform, which also depend on whether packaging and/or testing is performed.
See the exact steps for each platform in the corresponding section below:
The list of configuration options recognized during the CMake generation step is as follows:
| Option | Default value | Description |
|---|---|---|
| CMAKE_BUILD_TYPE | RelWithDebInfo | Build type, one of: Debug , Release , RelWithDebInfo |
| CH_ODBC_ALLOW_UNSAFE_DISPATCH | ON | Allow unchecked handle dispatching (may slightly increase performance in some scenarios) |
| CH_ODBC_ENABLE_SSL | ON | Enable TLS/SSL (required for utilizing https:// interface, etc.) |
| CH_ODBC_ENABLE_INSTALL | ON | Enable install targets (required for packaging) |
| CH_ODBC_ENABLE_TESTING | inherits value of BUILD_TESTING | Enable test targets |
| CH_ODBC_PREFER_BUNDLED_THIRD_PARTIES | ON | Prefer bundled over system variants of third party libraries |
| CH_ODBC_PREFER_BUNDLED_POCO | inherits value of CH_ODBC_PREFER_BUNDLED_THIRD_PARTIES | Prefer bundled over system variants of Poco library |
| CH_ODBC_PREFER_BUNDLED_SSL | inherits value of CH_ODBC_PREFER_BUNDLED_POCO | Prefer bundled over system variants of TLS/SSL library |
| CH_ODBC_PREFER_BUNDLED_GOOGLETEST | inherits value of CH_ODBC_PREFER_BUNDLED_THIRD_PARTIES | Prefer bundled over system variants of Google Test library |
| CH_ODBC_PREFER_BUNDLED_NANODBC | inherits value of CH_ODBC_PREFER_BUNDLED_THIRD_PARTIES | Prefer bundled over system variants of nanodbc library |
| CH_ODBC_RUNTIME_LINK_STATIC | OFF | Link with compiler and language runtime statically |
| CH_ODBC_THIRD_PARTY_LINK_STATIC | ON | Link with third party libraries statically |
| CH_ODBC_DEFAULT_DSN_ANSI | ClickHouse DSN (ANSI) | Default ANSI DSN name |
| CH_ODBC_DEFAULT_DSN_UNICODE | ClickHouse DSN (Unicode) | Default Unicode DSN name |
| TEST_DSN_LIST | $| ; -separated list of DSNs, each test will be executed with each of these DSNs | |
Configuration options above can be specified in the first cmake command (generation step) in a form of -Dopt=val .
Run-time dependencies: Windows
All modern Windows systems come with preinstalled MDAC driver manager.
Another run-time dependecies are C++ Redistributable for Visual Studio 2017 or same for 2019 , etc., depending on the package being installed, however the required DLL’s are redistributed with the .msi installer, and you can choose to install them from there, if you don’t already have them installed in your system.
Run-time dependencies: macOS
Homebrew: execute the following in the terminal (assuming you have Homebrew installed):
Homebrew: execute the following in the terminal (assuming you have Homebrew installed):
Run-time dependencies: Red Hat/CentOS
Execute the following in the terminal:
Execute the following in the terminal:
Run-time dependencies: Debian/Ubuntu
Execute the following in the terminal:
Execute the following in the terminal:
Configuration: MDAC/WDAC (Microsoft/Windows Data Access Components)
To configure already installed drivers and DSNs, or create new DSNs, use Microsoft ODBC Data Source Administrator tool:
- for 32-bit applications (and drivers) execute %systemdrive%\Windows\SysWoW64\Odbcad32.exe
- for 64-bit applications (and drivers) execute %systemdrive%\Windows\System32\Odbcad32.exe
For full description of ODBC configuration mechanism in Windows, as well as for the case when you want to learn how to manually register a driver and have a full control on configuration in general, see:
Note, that the keys are subject to «Registry Redirection» mechanism, with caveats.
You can find sample configuration for this driver here (just map the keys to corresponding sections in registry):
In short, usually you will end up editing /etc/odbcinst.ini and /etc/odbc.ini for system-wide driver and DSN entries, and
/.odbc.ini for user-wide driver and DSN entries.
There can be exceptions to this, as these paths are configurable during the compilation of UnixODBC itself, or during the run-time via ODBCINI , ODBCINSTINI , and ODBCSYSINI .
For more info, see:
You can find sample configuration for this driver here:
These samples can be added to the corresponding configuration files using the odbcinst tool (assuming the package is installed under /usr/local ):
In short, usually you will end up editing /etc/odbcinst.ini and /etc/odbc.ini for system-wide driver and DSN entries, and
/.odbc.ini for user-wide driver and DSN entries.
In macOS, if those INI files exist, they usually are symbolic or hard links to /Library/ODBC/odbcinst.ini and /Library/ODBC/odbc.ini for system-wide, and
/Library/ODBC/odbc.ini for user-wide configs respectively.
There can be exceptions to this, as these paths are configurable during the compilation of iODBC itself, or during the run-time via ODBCINI and ODBCINSTINI . Note, that ODBCINSTINI in iODBC contains the full path to the file, while for UnixODBC it is a file name, and the file itself is expected to be under ODBCSYSINI dir.
For more info, see:
You can find sample configuration for this driver here:
Enabling driver manager tracing: MDAC/WDAC (Microsoft/Windows Data Access Components)
Comprehensive explanations (possibly, with some irrelevant vendor-specific details though) on how to enable ODBC driver manager tracing could be found at the following links:
Enabling driver manager tracing: UnixODBC
Comprehensive explanations (possibly, with some irrelevant vendor-specific details though) on how to enable ODBC driver manager tracing could be found at the following links:
Enabling driver manager tracing: iODBC
Comprehensive explanations (possibly, with some irrelevant vendor-specific details though) on how to enable ODBC driver manager tracing could be found at the following links:
Building from sources: Windows
CMake bundled with the recent versions of Visual Studio can be used.
An SDK required for building the ODBC driver is included in Windows SDK, which in its turn is also bundled with Visual Studio.
You will need to install WiX toolset to be able to generate .msi packages. You can download and install it from WiX toolset home page.
All of the following commands have to be issued in Visual Studio Command Prompt:
- use x86 Native Tools Command Prompt for VS 2019 or equivalent for 32-bit builds
- use x64 Native Tools Command Prompt for VS 2019 or equivalent for 64-bit builds
Clone the repo with submodules:
Enter the cloned source tree, create a temporary build folder, and generate the solution and project files in it:
Build the generated solution in-place:
. and, optionally, run tests (note, that for non-unit tests, preconfigured driver and DSN entries must exist, that point to the binaries generated in this build folder):
. or open the IDE and build all , package , and test targets manually from there:
Building from sources: macOS
You will need macOS 10.14 or later, Xcode 10 or later with Command Line Tools installed, as well as up-to-date Homebrew available in the system.
Build-time dependencies: iODBC
Homebrew: execute the following in the terminal (assuming you have Homebrew installed):
Build-time dependencies: UnixODBC
Homebrew: execute the following in the terminal (assuming you have Homebrew installed):
Clone the repo with submodules:
Enter the cloned source tree, create a temporary build folder, and generate a Makefile for the project in it:
Build the generated solution in-place:
. and, optionally, run tests (note, that for non-unit tests, preconfigured driver and DSN entries must exist, that point to the binaries generated in this build folder):
. or, if you configured the project with ‘-G Xcode’ initially, open the IDE and build all , package , and run_tests targets manually from there:
Building from sources: Red Hat/CentOS
Build-time dependencies: UnixODBC
Execute the following in the terminal:
Build-time dependencies: iODBC
Execute the following in the terminal:
All of the following commands have to be issued right after this one command issued in the same terminal session:
Clone the repo with submodules:
Enter the cloned source tree, create a temporary build folder, and generate a Makefile for the project in it:
Build the generated solution in-place:
. and, optionally, run tests (note, that for non-unit tests, preconfigured driver and DSN entries must exist, that point to the binaries generated in this build folder):
Building from sources: Debian/Ubuntu
Build-time dependencies: UnixODBC
Execute the following in the terminal:
Build-time dependencies: iODBC
Execute the following in the terminal:
Assuming, that the system cc and c++ are pointing to the compilers that satisfy the minimum requirements from Building from sources.
If the version of cmake is not recent enough, you can install a newer version by folowing instructions from one of these pages:
Clone the repo with submodules:
Enter the cloned source tree, create a temporary build folder, and generate a Makefile for the project in it:
Build the generated solution in-place:
. and, optionally, run tests (note, that for non-unit tests, preconfigured driver and DSN entries must exist, that point to the binaries generated in this build folder):


