- Fix: Audio Crackling Windows 10
- Solution 1: Changing Minimum Processor State
- Solution 2: Changing your Sound Format
- Solution 3: Uninstalling drivers
- Solution 4: Editing the Registry
- Solution 5: Disabling Audio Enhancements and Exclusive mode
- Solution 6: Purchasing a USB to 3.5mm adapter
- Fix sound problems in Windows 10
Fix: Audio Crackling Windows 10
Users experience the Audio in their Windows 10 ‘crack’ when playing primarily because of internal system settings. In rare cases, the sound hardware of the computer is the culprit. According to use reports, the audio output was much distorted and had a specific “crackling or popping” sound whenever used. Your audio drivers might not be updated or your processor state needs changing. We will guide you step by step on how to fix all these problems and get your audio up and running in no time.
Solution 1: Changing Minimum Processor State
Your minimum processor state might be causing this issue. Windows 10 has an integrated power saving protocol which minimizes the usage of your processor in order to save energy and prolong battery life. Although this can be a plus point for most of the people, it can affect your audio quality directly. Whenever the processor usage lowers, the audio output isn’t the same and you may experience distortion and bad sound. We will try to set the minimum processor state to 100% and check if this solves the problem.
- Press Windows + S button to bring up your start menu’s search bar. Type “Power and Sleep” in the dialogue box and open the first result.

- Once in the Power and Sleep settings, select “Advanced power settings” option present at the right side of the screen.

- You will see different power plans your computer has. Select the one you are using and click “change plan settings”.
- A new window will come forward consisting of details such as when to turn off the display etc. Ignore all of this and click on “Change advanced power settings” located at the near bottom of the tab.

- Now a small window will pop up consisting of different advanced options that you can change. Navigate through them and locate “Processor power management”. From the subheadings, select “Minimum processor state”.

- Change the value from 5% to 100% in both cases (on battery and plugged in).

- Save changes and exit. Restart your computer and don’t change your computer’s power plan. Keep it where we made the changes. Now check if your audio has improved or not.
Solution 2: Changing your Sound Format
Windows has an option to change your sound quality according to your speakers. You can set CD quality, DVD quality or Studio quality. The frequencies vary in all these options accordingly. The maximum being 192000 Hz with the lowest 44100 Hz. If you don’t have high-quality speakers or the speakers don’t configure correctly, setting high sound quality can cause the popping sound in your audio. We can try changing your sound quality and checking if the problem got solved.
- Press Windows + R button to launch your Run In the dialogue box, type “Control Panel” to launch the application.
- Once in the control panel, type “sound” on the search bar present at the top right side of the screen. Open the options of sound the return in the search result.

- Once the sound options are opened, click on the audio device connected to your computer. Right click and select Properties.
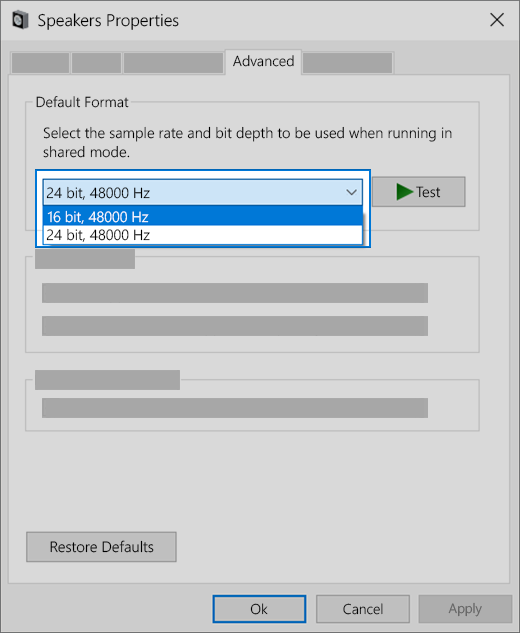
- Select the Advanced tab present at the top of the screen. Here you will see a section of “Default Format”. Click it and a drop down will appear.
- Select CD quality (the first option present) and save changes.
- You might want to restart your computer even though the effects are immediate. Check if your issue is fixed.
Note: You can always try changing the sound formats to different values and keep checking if this solved your problem.
Solution 3: Uninstalling drivers
There can also be an issue of your sound drivers not properly installed or being outdated. Drivers are at the very core of your sound quality. They relay information to your speakers and are practically running your speakers and producing the sound. We can try updating them through reinstallation and checking if the problem gets solved.
- Press Windows + R button to bring up the Run application on your computer. In the dialogue box type “devmgmt.msc”. This will launch your computer’s device manager.

- All connected devices to your computer will be listed here according to a category. Click on the category of “Audio inputs and outputs”
- Right click on Speakers and select Properties.
- Click on Driver tab present at the top of the screen. Here you will see an option to uninstall your sound driver. Click it.
- Now Windows will confirm your action. After confirming the driver will be uninstalled from your system.
- Restart your PC Upon the restart, Windows will install the default drivers for your speakers.

- Head over to the sound options just like we did. Right click on Speakers and open its properties.
- Now click on the option of “Update Driver”. Windows will prompt you to either install the drivers manually or automatically. Select automatically and let Windows search and install the drivers.
- Check if your sound quality improved.
Solution 4: Editing the Registry
We can change registry settings on your computer and check if it brings any improvement to the sound quality. Your sound chipset powers down after a specified time of inactivity to save power and conserve energy. This can be the likely cause of the popping sound and the high pitched tone. You can easily configure this by editing the registry settings.
- Press Windows + R to bring up the Run application. In the dialogue box, type “regedit”. This will launch your PC’s registry so you can edit it accordingly.

HKEY_CURRENT_USER\Software\Realtek\RAVCpI64\Powermgnt
- The settings are as following:
Delay time: It is the time in seconds which triggers the powering down of the chipset. The default value is 10.
Enabled: This option enables the power management. The default value is 0. You should set it to 1 to disable and prevent the popping sounds coming.
Only Battery: If your power management is enabled, you should set this setting to 1 to disable the power management only when the laptop is plugged in. You will still be able to hear the popping sounds if your laptop is on battery.
Solution 5: Disabling Audio Enhancements and Exclusive mode
Some sound drivers use enhancements in an attempt to improve your sound quality. If these properties are not compatible or if your CPU is being overloaded a lot, this can result in some major problems. We can try disabling the audio enhancements and check the sound quality gets better. Not all sound drivers perform this function. They may have the Enhancements tab renamed as a sound blaster. In that case, we can try disabling all the effects to the audio.
Some sound drivers also have an issue with the “Exclusive mode” option which allows other applications to take full control of your sound card. This shouldn’t be a problem but it is worth a try to see if this fixed our problem.
- Press Windows + R button to launch your Run In the dialogue box, type “Control Panel” to launch the application.
- Once in the control panel, type “sound” on the search bar present at the top right side of the screen. Open the options of sound the return in the search result.
- Once the sound options are opened, click on the audio device connected to your computer. Right click and select Properties.

- Now head over to the Enhancements tab and uncheck all the enhancements enabled (you can also check the box which says “Disable all enhancements”).
- Now select the Advancedtab and uncheck the exclusive mode where applications are allowed to override the settings. Save your changes and exit.
Note: If this doesn’t bring any change you can always turn all these options back on.
Solution 6: Purchasing a USB to 3.5mm adapter
If you are experiencing popping sounds on your external speakers, it might be possible that your audio jack is damaged or isn’t working as expected. You can purchase a USB to 3.5mm jack. You plug one end of the cable into the USB slot on your computer and the end will be connected to your audio device. This way Windows will automatically detect that an external speaker is connected and we can bypass your audio jack this way.
Fix sound problems in Windows 10
If you’re having audio problems, the following suggestions might help. The tips are listed in order, so start with the first one, see if that helps, and then continue to the next one if it doesn’t.
If multiple audio output devices are available, check that you have the appropriate one selected. Here’s how:
Select the Speakers icon on the taskbar.
Next, select the arrow to open a list of audio devices connected to your computer.
Check that your audio is playing to the audio device you prefer, such as a speaker or headphones.
If this doesn’t help, continue to the next tip.
The audio troubleshooter might be able to fix audio problems automatically.
To run the troubleshooter
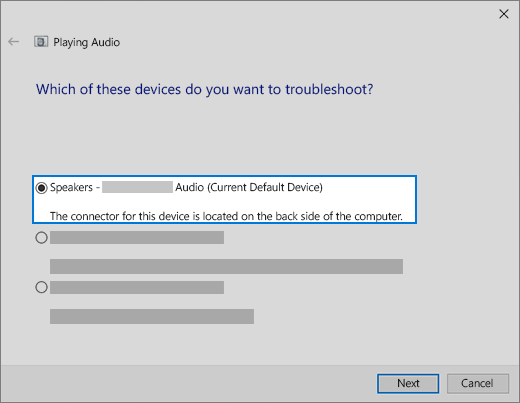
In the search box on the taskbar, type audio troubleshooter, select Fix and find problems with playing sound from the results, then select Next.
Select the device you want to troubleshoot and then continue through the troubleshooter.
You can also launch the troubleshooter from audio Settings. Select Start > Settings > System > Sound > Troubleshoot.
If running the troubleshooter doesn’t help, continue to the next tip.
To check for updates
Select Start > Settings > Update & Security > Windows Update > Check for updates.
Do one of the following:
If the status says «You’re up to date, go to the next tip.
If the status says «Updates are available,» select Install now.
Select the updates you want to install, then select Install.
Restart your PC and see if your sound is working properly.
If that didn’t solve your problem, continue to the next tip.
Try these steps
Check your speaker and headphone connections for loose cords or cables. Make sure all cords and cables are plugged in.
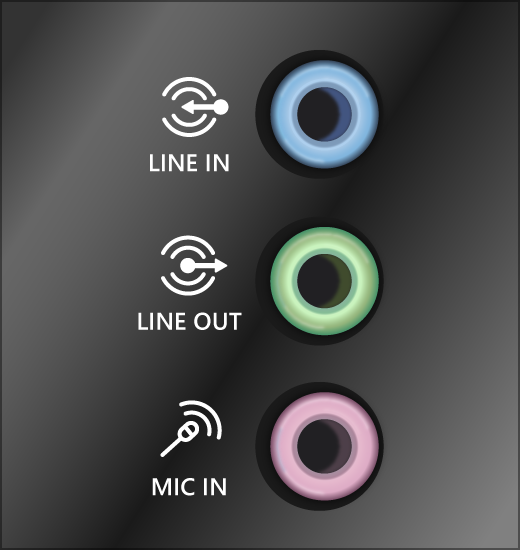
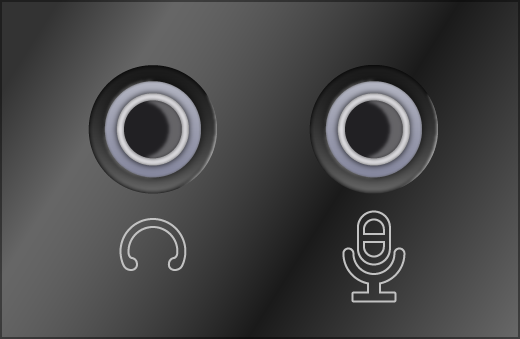
If you have multiple 5mm jacks to plug into, especially on a surround sound system, make sure all cords and cables are plugged into the correct jack.
If it’s not clear which jack goes with which cord, consult your hardware manufacturer, or try the most obvious outputs one at a time and see if they work.
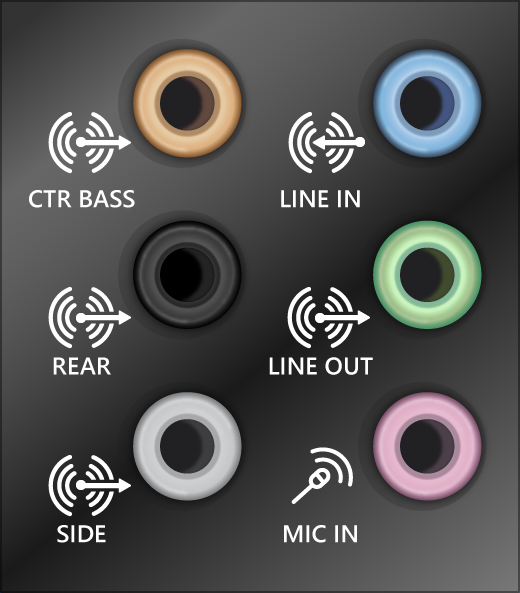
Note: Some systems use a green jack for output and pink for mic input and others will be labeled «headphone» or «microphone.»
Make sure the power is turned on and check the volume level.
Make sure the mute setting is not turned on, and try turning up all the volume controls.
Remember some speakers and apps have their own volume controls. Be sure to check them all.
Try connecting your speaker and headphones to a different USB port.
It’s possible that your speakers won’t work when your headphones are plugged in. Unplug your headphones and see if that helps.
If your cables and volume are OK, see the next sections for additional troubleshooting.
Check to make sure your audio devices aren’t muted and haven’t been disabled.
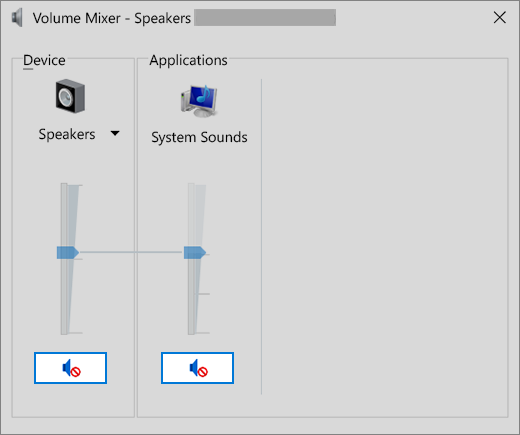
Right-click the Speakers icon on the taskbar, and then select Open Volume mixer.
You’ll see a set of volume controls for your devices. Make sure none of them are muted. If any of them are muted, you’ll see a red circle with a line through it next to the volume control. In that case, select the volume control to unmute.
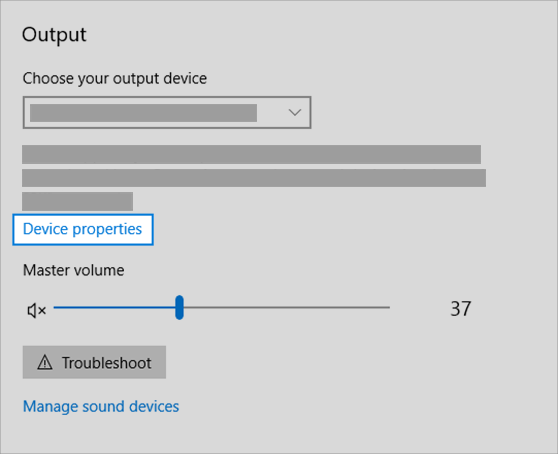
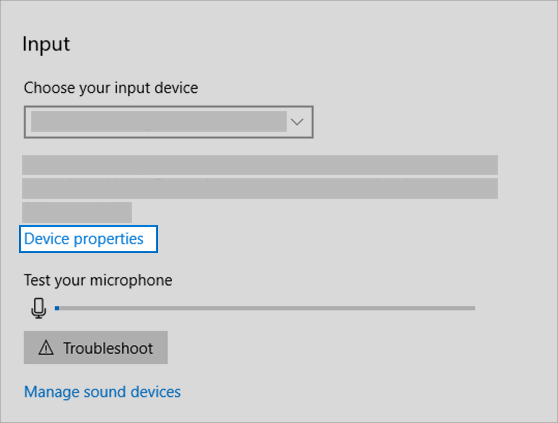
Check your device properties to make sure that your devices have not been disabled by mistake. Select Start > Settings > System > Sound .
Select your audio device, and then select Device properties. Be sure to select Device properties for both the output and input devices.
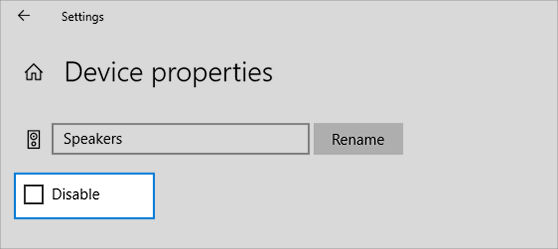
Make sure the Disable check box is cleared for the output and input devices.
If that didn’t solve your problem, continue to the next tip.
Hardware problems can be caused by outdated or malfunctioning drivers. Make sure your audio driver is up to date and update it if needed. If that doesn’t work, try uninstalling the audio driver (it will reinstall automatically). If that doesn’t work, try using the generic audio driver that comes with Windows. If you’re having audio issues after installing updates, try rolling back your audio driver.
To update your audio driver automatically
In the search box on the taskbar, type device manager, then select it from the results.
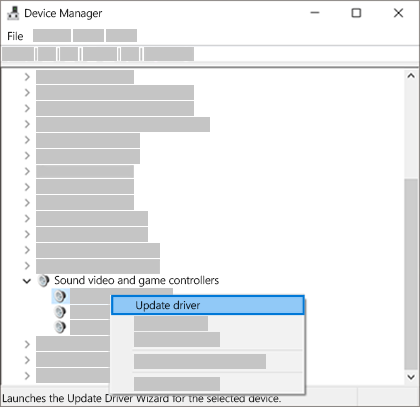
Select the arrow next to Sound, video and game controllers to expand it.
Right-click the listing for your sound card or audio device, such as headphones or speakers, select Update driver, then select Search automatically for updated driver software. Follow the instructions to complete the update.
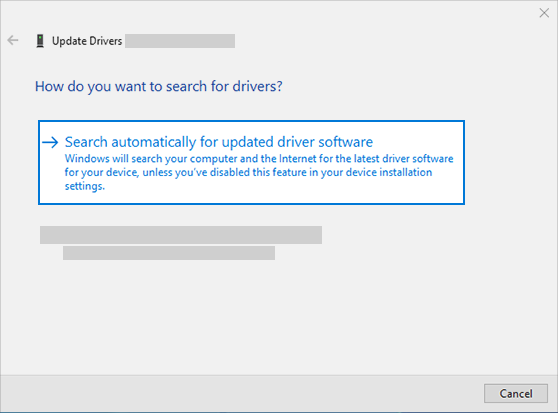
If Windows doesn’t find a new driver, look for one on the device manufacturer’s website and follow those instructions. If that doesn’t work, try uninstalling your audio driver.
To uninstall your audio driver
In the search box on the taskbar, type device manager, then select it from the results.
Select the arrow next to Sound, video and game controllers to expand it.
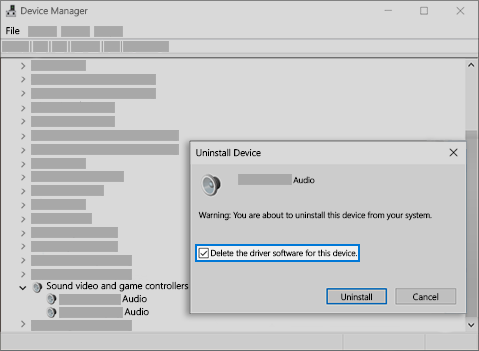
Right-click the listing for your sound card or audio device, select Uninstall device, select the Delete the driver software for this device check box, and then select Uninstall.
Restart your PC.
Note: Be sure to save documents and any other current work before you restart.
This restart will automatically prompt your PC to reinstall your audio driver.
To restart, select Start > Power > Restart .
If those options didn’t work, try using the generic audio driver that comes with Windows.
To use the generic audio driver that comes with Windows
In the search box on the taskbar, type device manager, then select it from the results.
Select the arrow next to Sound, video and game controllers to expand it.
Right-click the listing for your sound card or audio device, then select Update driver > Browse my computer for driver software > Let me pick from a list of device drivers on my computer.
Select the audio device whose driver you want to update, select Next, and then follow the instructions to install it.
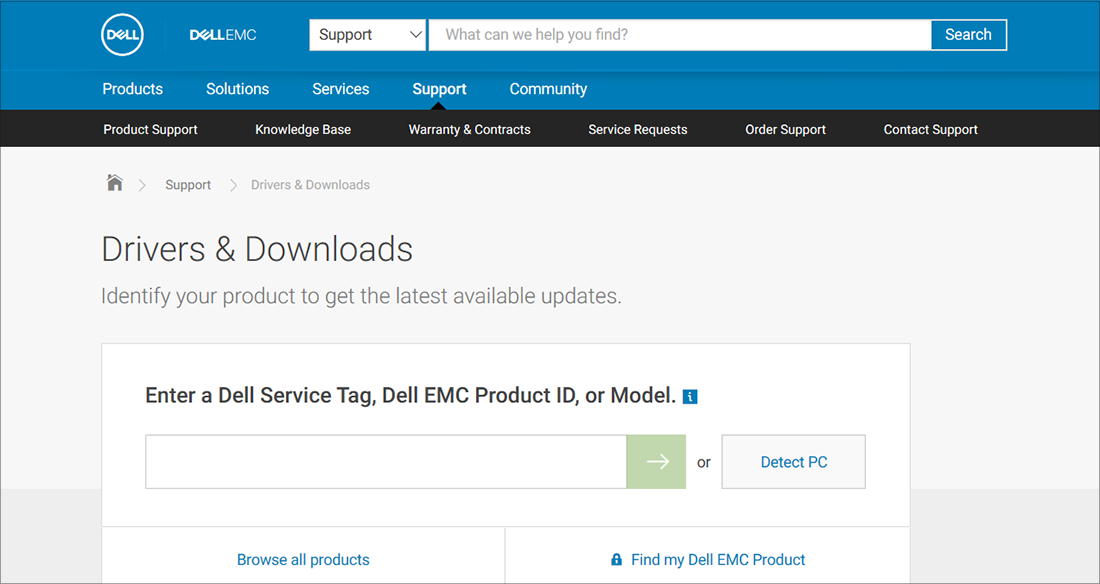
If these steps didn’t solve your audio issue, visit your device manufacturer’s website and install the most recent audio/sound drivers for your device. Following is an example of a driver download page for a sound device manufacturer.
If you have audio issues after installing updates
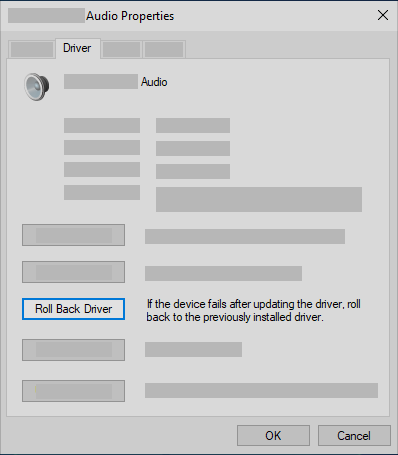
If your audio was working before you ran Windows Update and now isn’t working, try rolling back your audio driver.
To roll back your audio driver
In the search box on the taskbar, type device manager, then select it from the results.
Select the arrow next to Sound, video and game controllers to expand it.
Right-click the listing for your sound card or audio device, then select Properties.
Select the Driver tab, then select Roll Back Driver.
Read and follow the instructions and then select Yes if you want to roll back your audio driver.
If rolling back your audio driver didn’t work or wasn’t an option, you can try to restore your PC from a system restore point.
Restore your PC from a system restore point
When Microsoft installs updates on your system, we create a system restore point in case problems arise. Try restoring from that point and see if that fixes your sound problems. For more info, see «Restore from a system restore point» in Recovery options in Windows 10.
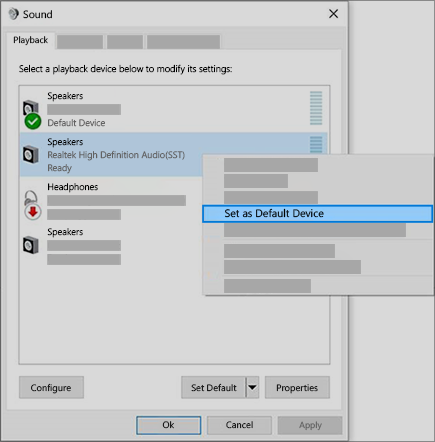
If you’re connecting to an audio device—such as headphones or speakers—using USB or HDMI, you might need to set that device as the default audio device. If you’re using an external monitor that doesn’t have built-in speakers, make sure that the monitor isn’t already selected as your default output device. if it is, you won’t have any audio. You can check that when you set your default output audio device. Here’s how:
In the search box on the taskbar, type control panel, then select it from the results.
Select Hardware and Sound from the Control Panel, and then select Sound.
On the Playback tab, right-click the listing for your audio device, select Set as Default Device, and then select OK.
If setting your audio device as the default device doesn’t help, continue to the next tip for additional troubleshooting.
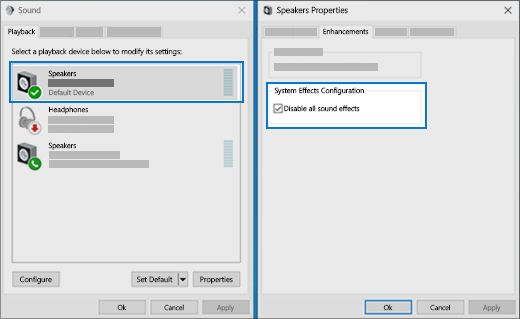
Sometimes having audio enhancements on can result in audio issues. Disabling them may resolve your issue.
In the search box on the taskbar, type control panel, then select it from the results.
Select Hardware and Sound from the Control Panel, and then select Sound.
On the Playback tab, right-click the Default Device, and then select Properties.
On the Enhancements tab, select either the Disable all enhancements or the Disable all sound effects check box (depending on which option you see), select OK, and try to play your audio device.
If that doesn’t work, on the Playback tab, select another default device (if you have one), select either the Disable all enhancements or the Disable all sound effects check box (depending on which option you see), select OK, and try to play audio again. Do this for each default device.
If turning off audio enhancements doesn’t help, see the next sections for additional troubleshooting.
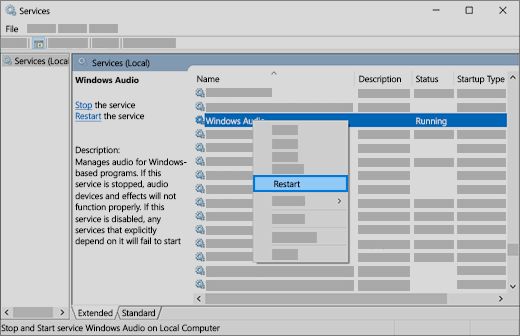
In the search box on the taskbar, type services, then select it from the results.
Select each of the following services, right-click, and then select Restart:
Windows Audio Endpoint Builder
Remote Procedure Call (RPC)
If restarting these services doesn’t resolve your issue, see the next sections for more troubleshooting.
In the search box on the taskbar, type control panel, and then select it from the results.
Select Hardware and Sound from the Control Panel, and then select Sound.
On the Playback tab, right-click (or press and hold) Default Device, and then select Properties.
On the Advanced tab, under Default Format, change the setting, select OK,and then test your audio device. If that doesn’t work, try changing the setting again.
If trying different audio formats doesn’t help, see the next sections for additional troubleshooting.
Many updates require you to restart your device.
To check and see if you have installed updates pending and need to restart
Save your work and close all open applications.
Select Start > Power . If you have installed updates pending, you’ll see options to Update and restart and Update and shut down.
Select one of those restart options to apply the updates
If restarting doesn’t help, see the next section for additional troubleshooting.
Some audio problems might be caused by an issue with the audio system’s IDT High Definition Audio CODEC. This can be fixed with a manual driver update which allows you to choose the sound driver you want to use.
Note: Not all systems will have an IDT High Definition Audio CODEC.
To check and see if you have one, and to manually update the driver
In the search box on the taskbar, type device manager, then select it from the results.
Select the arrow next to Sound, video and game controllers to expand it.
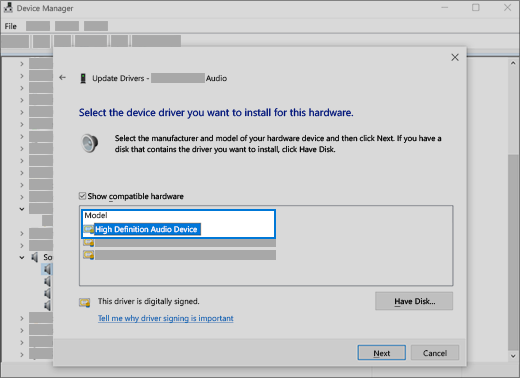
Look for IDT High Definition Audio CODEC. If it’s listed, right-click it and select Update driver, then select Browse my computer for driver software > Let me pick from a list of device drivers on my computer.
You’ll see a list of pre-installed drivers. Select High Definition Audio Device, and then select Next.
1. Select Start > Settings > Privacy , and then select Microphone from the left menu.
Under Allow access to the microphone on this device, select Change. Make sure the toggle is turned On.
If you’re having this issue with a specific app, scroll down to Choose which Microsoft Store apps can access your microphone and make sure that the toggle next to that app is turned On as well.


