- New Windows 10 screen clipping tool supports multi-screen captures
- Программа Ножницы в Windows
- Детально о программе Ножницы
- Snipping Tool for Windows 10
- Где найти утилиту
- Как работать с Ножницами
- Редакция изображения в Snipping Tool
- Сохранение снэпшота
- Ножницы для Виндоуз 8
- Ножницы в «Семёрке»
- Snipping Tool for Windows 10 and Its Alternative
- Snip in Delay Time with Snipping Tool
- Apowersoft Screen Capture Pro
- Conclusion
New Windows 10 screen clipping tool supports multi-screen captures

Microsoft’s watcher WalkingCat recently revealed that the company is working on a new feature that will be available in the coming weeks.
Initially, the leaker had suggested that it would be hidden in build Windows 10 build 17627, which was reiterated by fellow watchers, who intimated that a new UWP clipping experience was also being worked on.
For more than a year now, the tech giant has been working on the new clipping experience for Windows, which will mean that you can cut data from one device, and transfer it by pasting to another device like your phone or PC.
In a tweet posted Thursday evening, WalkingCat, who discovered the resources in the Windows 10 RS5 build, said the new feature should be complete in the 17634 build.
A new Settings page found in the RS5 build reveals more details of the feature, which suggests that it may work either in Automatic or Manual Mode. In the former, everything you copy will be automatically synced, while the latter offers the targeted devices to paste the clipping to.
With the new clipping experience, users can draw any shape on the screen to create a screen snip, and copy it to their clipboard. However, users with multiple screens will only be allowed to clip one screen only, or all screens simultaneously.
It also lets users capture their ‘Left Screen, Right Screen, or Both Screens’, all of which aren’t available with current Microsoft devices on the market.
The feature’s underpinnings are already being seen in Microsoft apps such as Swiftkey and Launcher, on which it would rely to deliver the data to your device. Ultimately, this would ease workflow as it connects your phone and PC together.
For those of you who are in search of a good clipboard manager for your Windows PC and you don’t have the time to wait for the new clipping tool to be released, we strongly suggest you to download and try Comfort Clipboard Pro. This is a great clipboard with a user-friendly interface and a bunch of useful features.
Despite the numerous screen clipping experiences already in existence, one would wonder whether there’s a new device in the making.
Rumors abound over a new Surface Phone in the works, what with the rash of Microsoft patents relating to a folding device, besides Project Andromeda.
We’ll wait and hear from Windows Insiders on this one.
Программа Ножницы в Windows
Иногда самый простой способ сделать копию изображения с экрана монитора – это сделать скриншот. Программа «Ножницы» или в англоязычных версиях операционных систем «Snipping Tool» предназначена для продуманного подхода к решению поставленных задач. Утилита поможет пользователю сделать снэпшот всего дисплея или отдельно открытого окна/приложения. Можно вырезать и сохранять изображения в качестве вставки в документ/электронное письмо или в качестве отдельных файлов, как прямоугольной формы, так и в произвольной. Как скачать Сниппинг Тул для компьютера и стоит ли это делать, рассмотрено в данном материале.
Детально о программе Ножницы
Разработка команды Microsoft представляет собой встроенный бесплатный инструмент для фиксации изображения на экране персонального компьютера. Многие пользователи даже не подозревают о наличии у себя такого полезнейшего инструмента. Как найти Snipping Tool на своём ПК и как им пользоваться?
Snipping Tool for Windows 10
Где найти утилиту
Утилита экранные ножницы находится в папке «Windows Accessories» вместе с другими полезными программами, которые могут обеспечить более продуктивную работу пользователя.
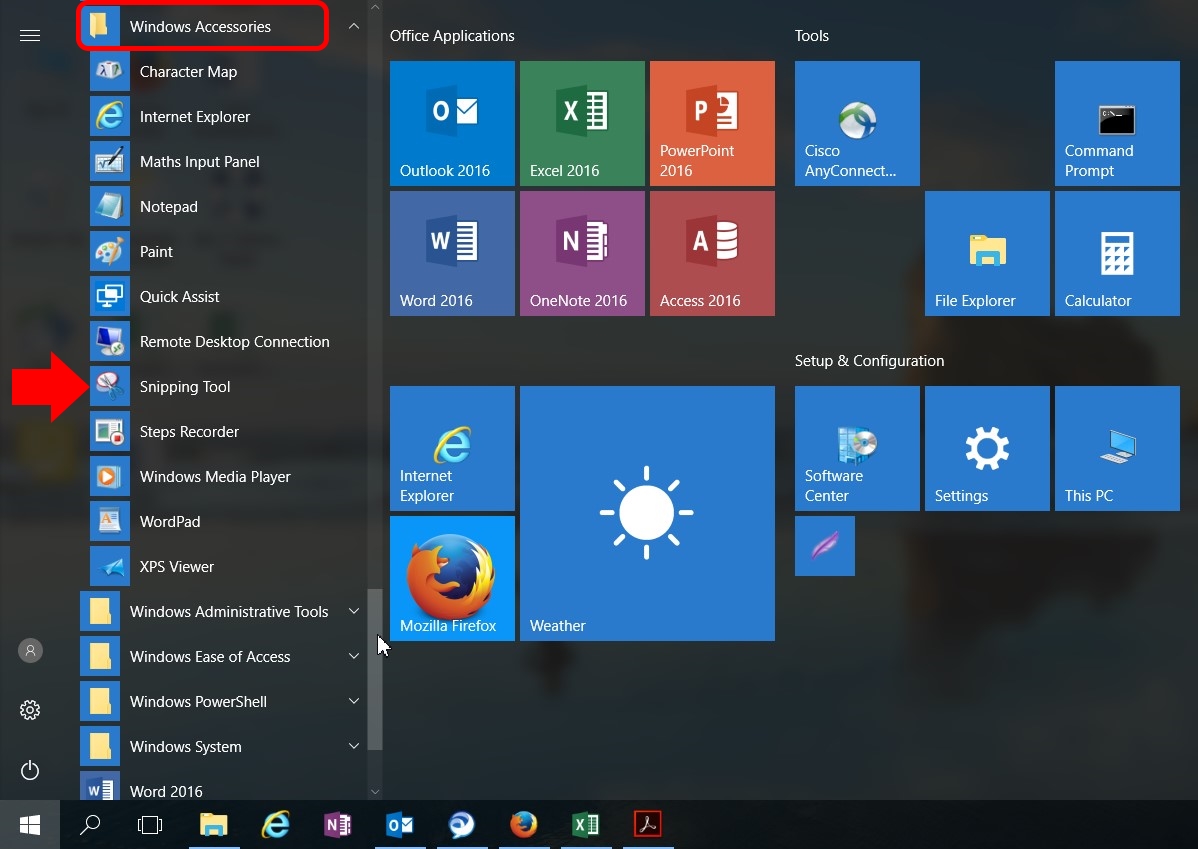
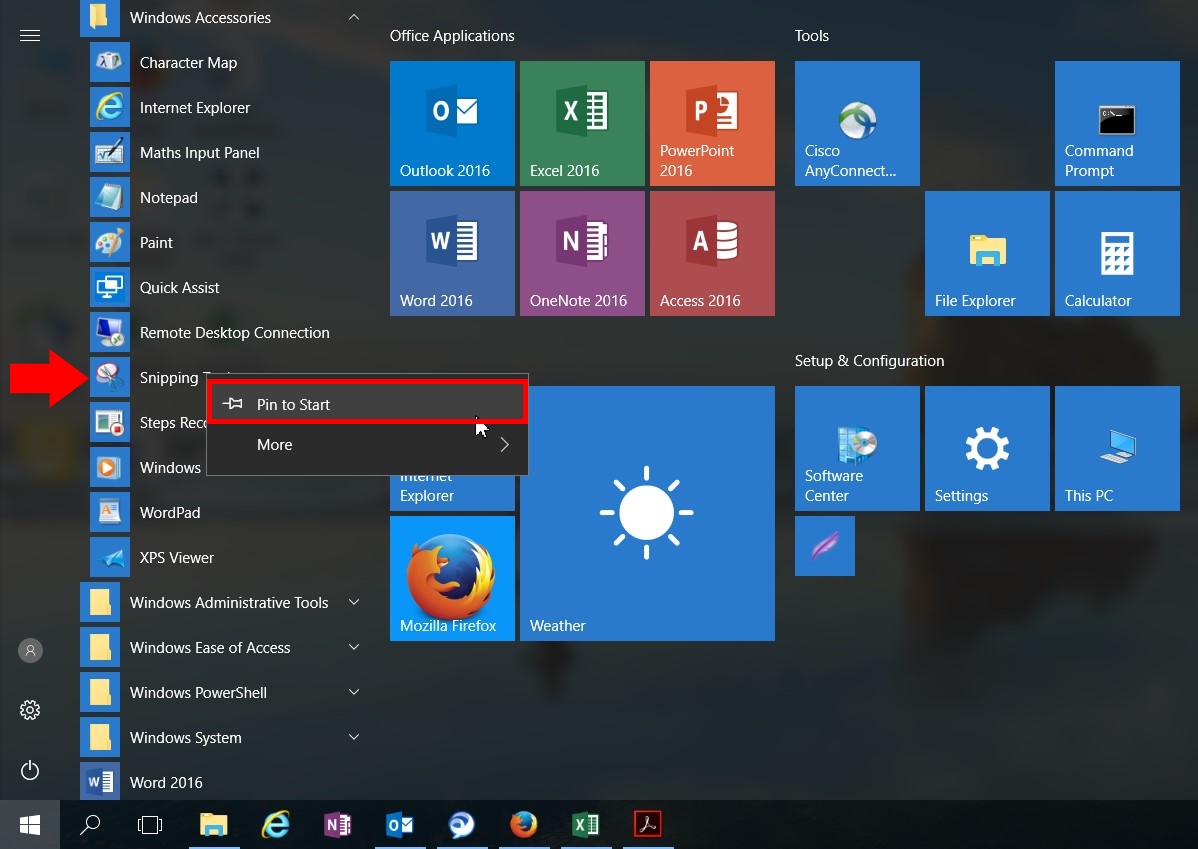
Нажав на искомую утилиту правой кнопкой мыши, появится возможность прикрепить Snipping Tool к окну инструментов быстрого доступа.
«Pin to Start»
Теперь поиск и запуск программы для фиксации изображения или части его будет у пользователя всегда под рукой.

Как работать с Ножницами
После запуска программы-помощника, открывается небольшое окошко «Ножниц» с подсказкой для начала работы по фиксированию изображений с экрана монитора персонального компьютера. Окошко можно перемещать по экрану по своему усмотрению.
Прежде чем приступить к процессу Snapshot, стоит выбрать метод скриншотирования.
Четыре варианта Сниппов:
- Free-form – свободная форма (можно вырезать изображение любой доступной формы, удобно для работы с картинками и фотографиями);
- Rectangular – произвольная прямоугольная форма (практично для использования в качестве вставки прямоугольной части изображения в электронное письмо или в презентацию);
- Window – скриншот отдельного открытого окна;
- Full-screen — моментальный снимок всего дисплея (когда необходимы все детали отображённые на мониторе).
Возможность отсрочки фиксации в диапазоне от одной до пяти секунд.
Традиционная вкладка «Options/Настройки» для включения/выключения тех или иных параметров.
Редакция изображения в Snipping Tool
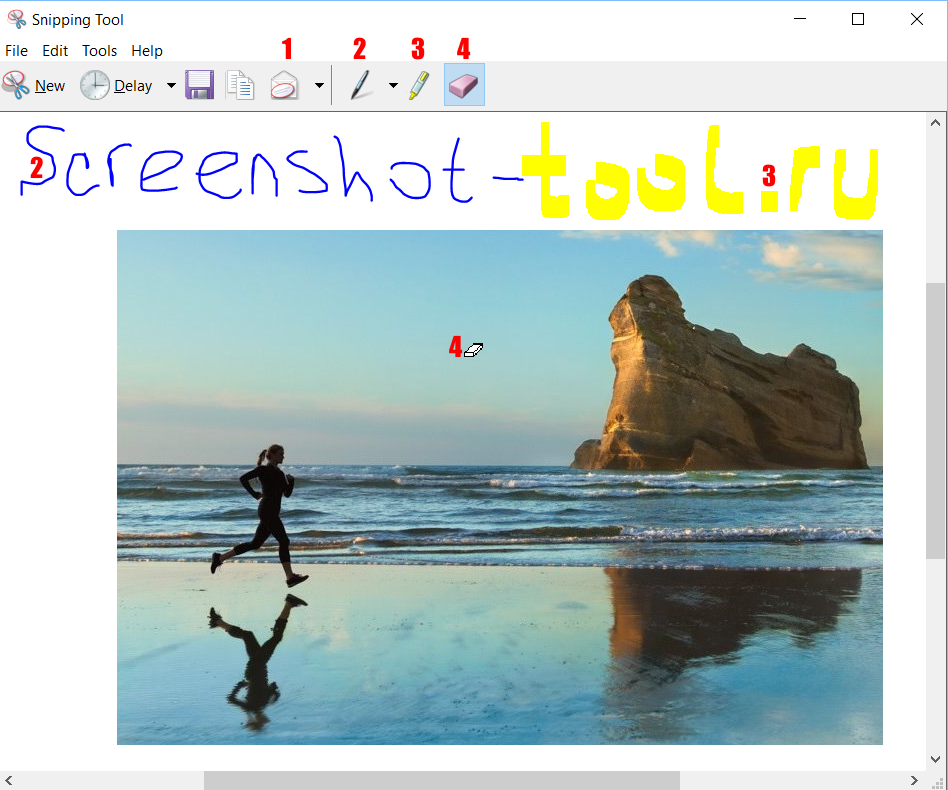
Зафиксировав изображение или часть его, можно приступить к элементарному редактированию:
- Отправить по E-mail в качестве картинки или вложенного файла;
- Добавить подпись к изображению (По-умолчанию есть три цветовых варианта: красный, синий, чёрный, или можно настроить цвет, толщину, тип ручки по своему усмотрению, выбрав опцию «Customize…»);
- использовать фломастер (маркер для выделения текста, а не полноценного закрашивания);
- Стиральная резинка для удаления своих подписей и выделений текста.
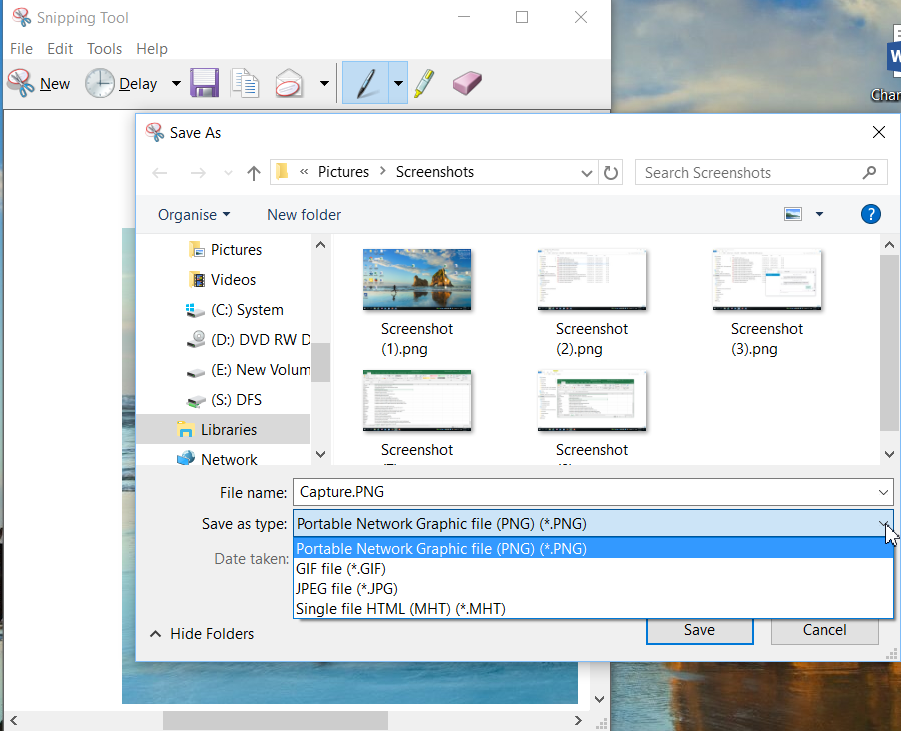
Сохранение снэпшота
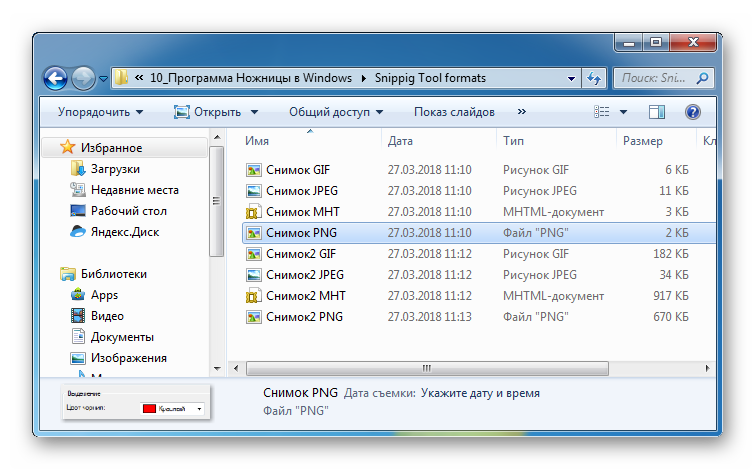
Закончив с редактированием и удовлетворившись конечным результатом, пользователь может сохранить изображение в одном из предложенных форматов (PNG, GPG, GIF, MHT) или отправить по электронной почте, выбрав опцию номер 1.
Папку для сохранения пользователь выбирает для себя сам, а если необходимо незамедлительно вставить полученную картинку в документ или письмо, нужно кликнуть правой кнопкой по рисунку и выбрать действие «Copy/Копировать».
Ножницы для Виндоуз 8
Экранные ножницы – неотъемлемый встроенный инструмент в оболочку операционной системы Wibdows 8. Единственное с чем может столкнуться начинающий пользователь персонального компьютера, так это с отсутствием понятия, как найти Snipping Tool на своей технике.
Самый простой способ найти нужную утилиту – воспользоваться действием «Поиск». В поисковой строке указать ключевые слова «Ножницы» или «Snipping». Далее стоит вынести программу для фиксации изображений Сниппинг Тул в отдельный ярлык на «Рабочий стол».
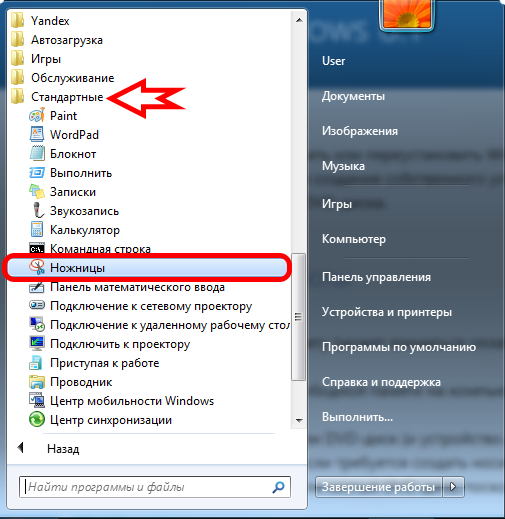
Ножницы в «Семёрке»
Если искать экранные ножницы через кнопку «Пуск/Start» в поисковой строке, то пользователю стоит знать, что в зависимости от версии операционной системы (Русскоязычная или English version) стоит использовать ключевое слово – «Ножницы» или «Snip» соответственно.
В Виндоуз 7 программа для снэпшотов находится в папке «Стандартные».
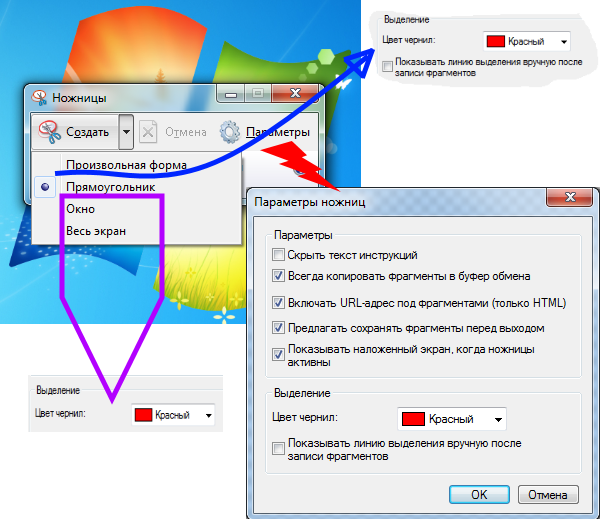
Скриншоты в Snipping Tool можно делать четырьмя способами:
- Произвольная форма позволяет вырезать фрагмент изображения любой неровной геометрической фигуры.
- Прямоугольником.
- Скриншот одного окна.
- Классический вариант – снэпшот всего экрана.
После снятия скриншота открывается окно для предварительного просмотра полученного результата с возможностью небольшой редакцией.
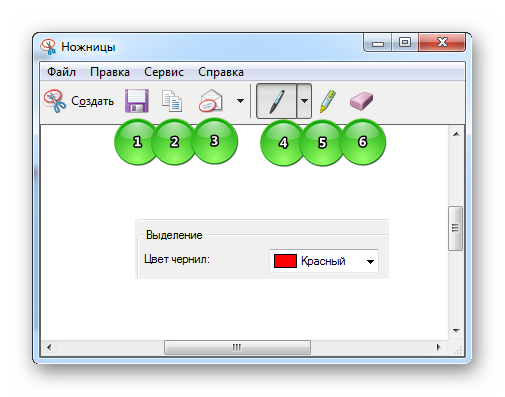
Иконки для быстрого доступа:
- Если получившийся результат удовлетворяет запросу – можно сохранить картинку в одном из четырёх форматов (PNG, GPG, GIF, MHT);
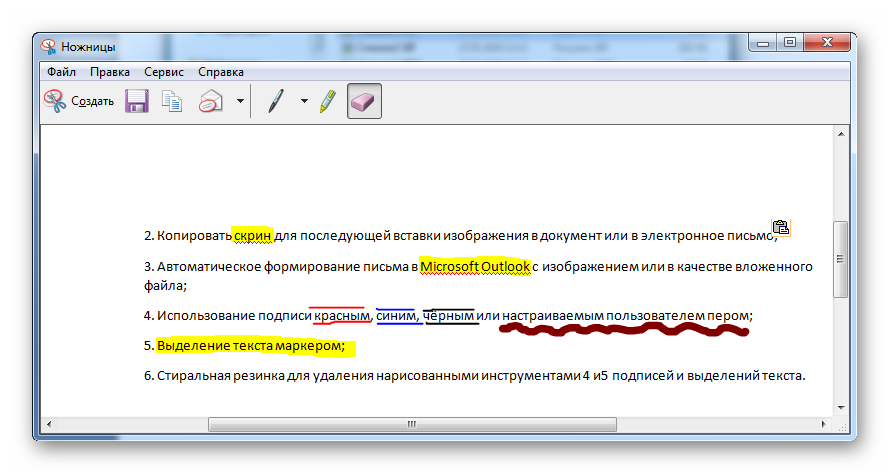
- Копировать скрин для последующей вставки картинки в документ/электронное письмо;
- Автоматическое формирование письма в Microsoft Outlook с изображением или в качестве вложенного файла;
- Использование подписи красным, синим, чёрным или настраиваемым пользователем пером;
- Выделение текста маркером;
- Стиральная резинка для удаления нарисованными инструментами 4 и5 подписей и выделений текста.
Освоив элементарные возможности удобного и полезного инструмента Snipping Tool, пользователь иначе взглянет на свой повседневный труд. Офисная работа станет динамичнее, информативнее, творческой, в конце концов.
Snipping Tool for Windows 10 and Its Alternative
Snipping Tool is a small utility on Windows OS. With this light tool, you can snip a free-form region, a rectangular region, an active window and the full screen. When a screenshot is taken, it will be loaded into the image editor of Snipping Tool, which provides fairly simple annotation options like a pen and an eraser. Microsoft has made a slight improvement to Snipping Tool for Windows 10. It now features a time-delay shutter option which enables you to capture pop-up or drop-down menus, as well as tooltips. The detailed steps are provided below.
Snip in Delay Time with Snipping Tool
- Open up the Snipping Tool. To find this utility, you can input “snipping tool” in the search box at the bottom left of the screen.
- Click “Delay” and choose your delay time. You can choose from 0 to 5 seconds. Let’s take 5 seconds for example.

After that, hit the arrow besides “New” and choose a snip mode (Free-form, Rectangular, Window or Full-screen).

This new feature of Windows 10’s Snipping Tool is indeed a great improvement. However, it still falls short in some situations. For instance, you have to click “New” every time you start a snip, you have no more than 5 seconds to perform a delay capture, and the annotation tools are limited to a pen, a highlighter and an eraser. To get more useful functions, here is a great alternative.
Apowersoft Screen Capture Pro
This program supports Windows XP, 7, 8 and 10, letting more people enjoy its amazing features. It has more than 10 screenshot modes. On its interface, there is a quick settings area which provides an option to customize any delay time for snapping screen. Aside from that, this application also has other robust functions like an advanced image editor, a task scheduler (for taking screenshot automatically) and a screen recorder for producing videos (supports real-time editing during recording). It is way more powerful than the Snipping Tool for Windows 10.
To capture a pop-up or drop-down menu or any part on the screen, you can follow the steps below.
- First of all, download, install and launch this program on your PC.

Tips: Snipping Tool on Windows 10 only gives you 5s to create a snip. While Apowersoft Screen Capture Pro allows you to set any long delay time. Here’s how you do it:
- Choose the “All in one” mode, so you can capture more than just a menu.
- Check the “Delay _ Second(s)” option in “Settings” under the screenshot modes. Then, input any time you want in the box. And hit the blue camera icon at the bottom right or press the hotkeys of “Print Screen” or “Ctrl + Q”.
- Present the menu or tooltip on the screen within the time you set. There will also be a countdown reminder at the bottom right of the screen.
- When it gets the time point, the screen will freeze and your mouse cursor will turn into a blue crosshair. Click, hold and drag your mouse to select an area and release it to confirm the screenshot.
- Your screenshot will be loaded into the advanced image editor. There you can edit the screenshot. Lastly, click “Save” to keep it on your PC.

Conclusion
The Snipping Tool for Windows 10 indeed improved a lot with the delay feature, but still not perfect. If you want a more advanced tool with more convenience and functions, then Apowersoft Screen Capture Pro is the best choice. It gives options to set any long delay time, press hotkeys to trigger screen capture, edit screenshots with various drawing tools, and upload screenshots to free cloud space.


