- How to Do System Clone in Windows 10 without Reinstalling OS?
- Why Need System Clone in Windows 10?
- Best Windows 10 System Clone Software — AOMEI Backupper
- How to Clone Windows 10 System to SSD or HDD with Simple Steps?
- Conclusion
- How to Clone or Move Your Windows 10 Installation to a Larger Hard Disk or SSD
- Migrate your Windows 10 Installation to a New Hard Disk or SSD
- Restoring to a Smaller Hard Disk or SSD
- Tutorial: Clone Windows System to SSD in Windows 10, 8, 7 [2 Methods]
- Why clone Windows system to SSD drive?
- Best software to clone Windows 10/8/7 system to SSD
- Tutorial: clone Windows system to SSD via 2 methods
- Method 1. Clone only Windows OS to SSD
- Method 2. Clone Windows system disk to SSD
- How to boot from the SSD drive after clone?
- Summary
How to Do System Clone in Windows 10 without Reinstalling OS?
System clone in Windows 10 allows you to make a copy of the current operating system and applications without reinstallation when you are going to upgrade/replace your disk. It is very convenient for you.

By AOMEI  / Last Updated June 12, 2020
Quick Navigation:
Why Need System Clone in Windows 10?
Usually, with time goes by the free space of hard disk will become less and less due to the installed programs, temporary files, caches or other things. If the situation is still remaining, you will be warned with low disk space by Windows 10, especially for your system partition. Low disk space will lead to slow booting up speed and data accessing speed. This will bring trouble to your work.
In order to solve this problem, many users choose to upgrade hard drive in Windows 10 to a larger drive or an SSD. Of course, you can reinstall things on the new disk to finish the upgrade. But the fact is that users don’t expect to reinstall system. In this situation, you need system clone in Windows 10 to avoid reinstalling system. What is system clone? It refers to moving the exactly same OS in your present hard disk to a larger one or an SSD.
Best Windows 10 System Clone Software — AOMEI Backupper
If you prefer one easy & quick way to clone OS in Windows 10, then powerful disk cloning software named AOMEI Backupper Professional can be your best choice. It provides System Clone and Disk Clone features to help you clone Windows 10 system.
System Clone: It will automatically detect system-related partitions (such as C drive, system reserved partition, etc.) and copy them to the target drive. System customized settings, personal files and installed programs on the system drive will be copied to target new drive as well.
Disk Clone: It enables you to clone the whole hard drive with the OS to the new hard drive. And it’s possible to clone larger drive to smaller SSD.
It’s different from the simple copy and paste. System Clone feature in AOMEI Backupper will allow you to boot up your computer and run the application programs without reinstalling the system. In addition, with the user-friendly interface, you can complete Windows 10 system clone job with no effort. Keep reading to get the detailed steps.
How to Clone Windows 10 System to SSD or HDD with Simple Steps?
First, install or connect the target hard drive to your computer. Make sure it is detected. Then, install and run AOMEI Backupper Professional. Now follow the guidance below to clone system drive in Windows 10 via AOMEI Backupper:
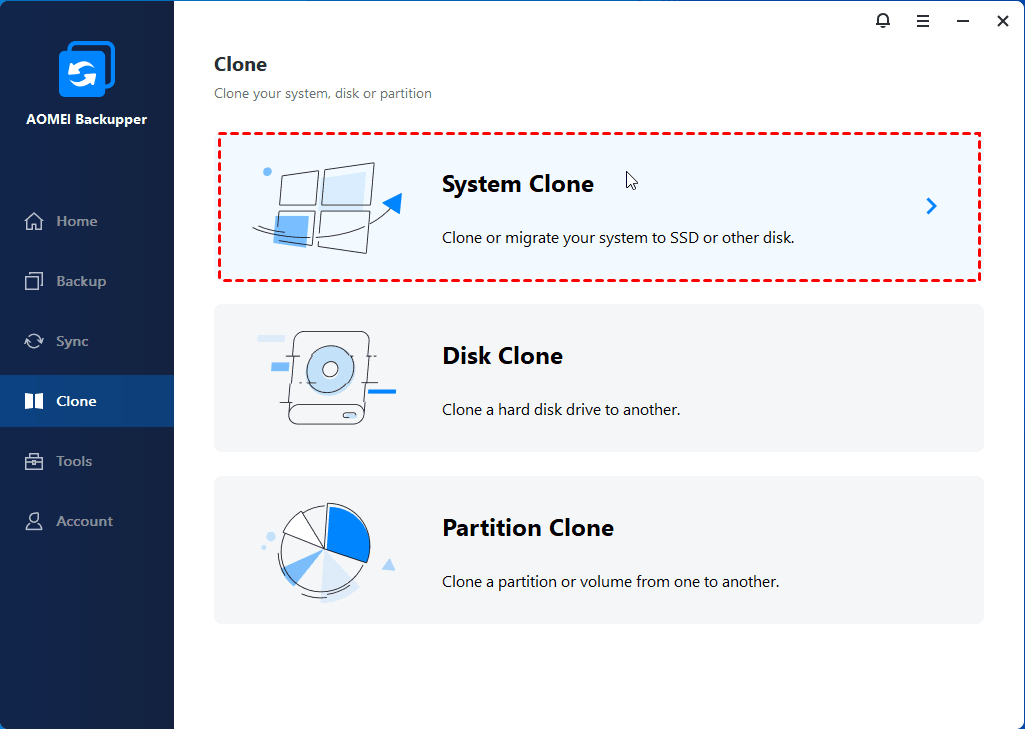
Step 1. Click Clone and select System Clone.
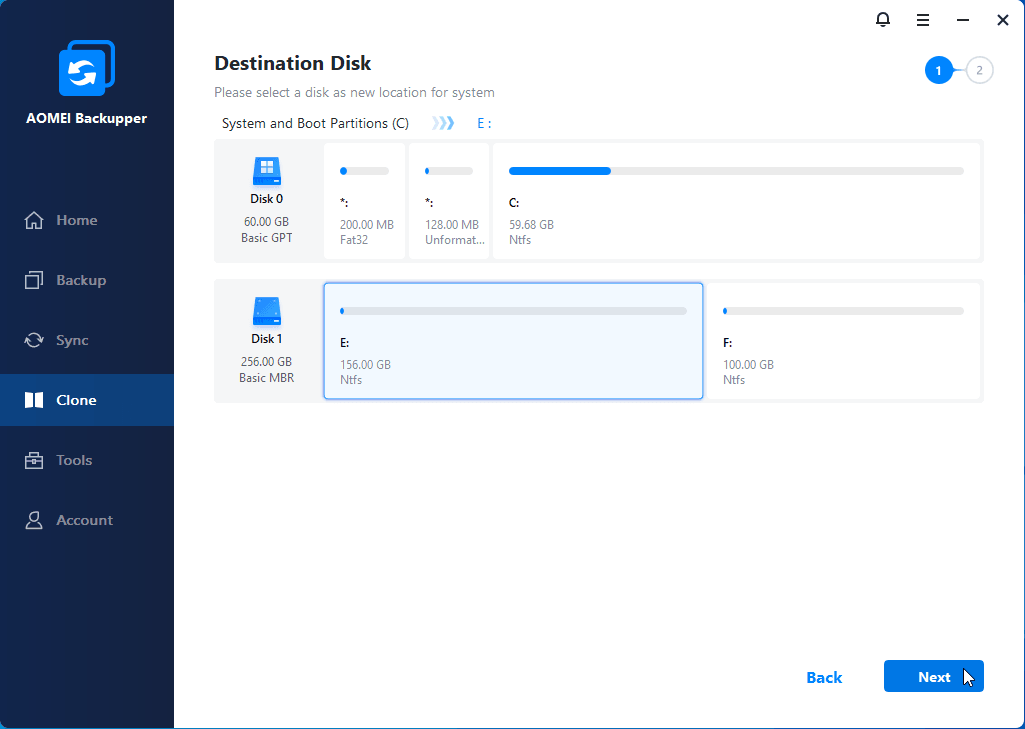
Step 2. This software will select system partition(s) as source partition(s) automatically. So just choose the destination partition and then click Next to continue.
вњЌ Notes:
Please select the first partition or area as the destination location for system; otherwise, you can’t boot up Windows 10 system from the target disk.
If there are data on the destination partition, all the data will be overwritten or deleted during the cloning process. Please backup important files or synchronize files to another place beforehand.
Step 3. Click Start Clone to begin system clone progress after you confirm the source and destination partitions.
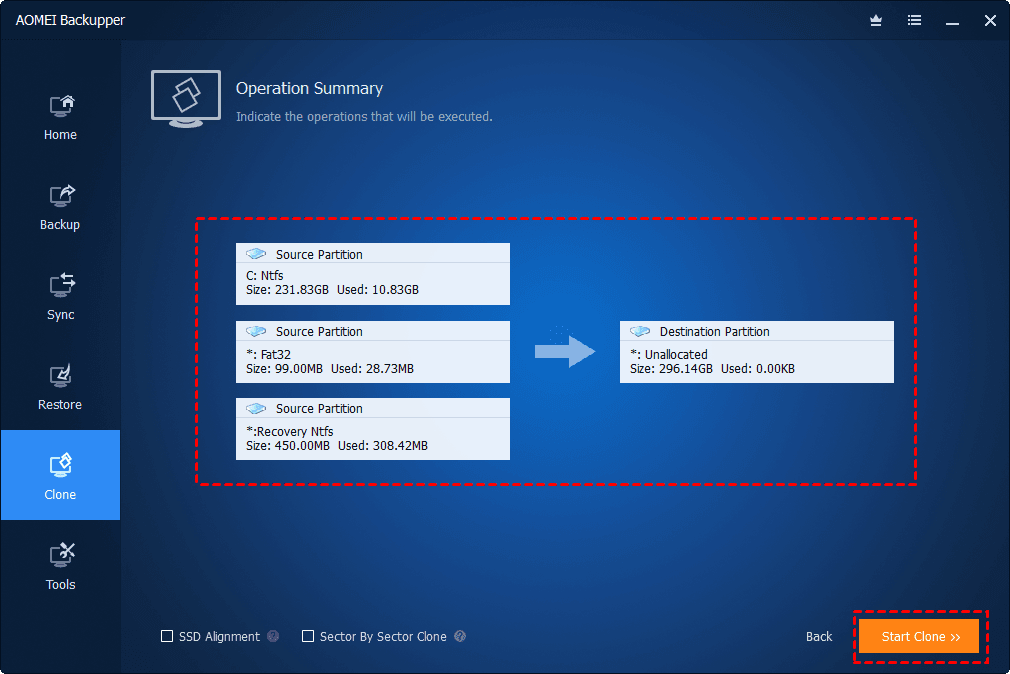
>> SSD Alignment: if the destination disk is an SSD, you can choose this option to improve the performance of SSD.
>> Sector By Sector Clone: it will clone all the sectors on system partition(s) no matter whether they are used or not and this will take longer time.
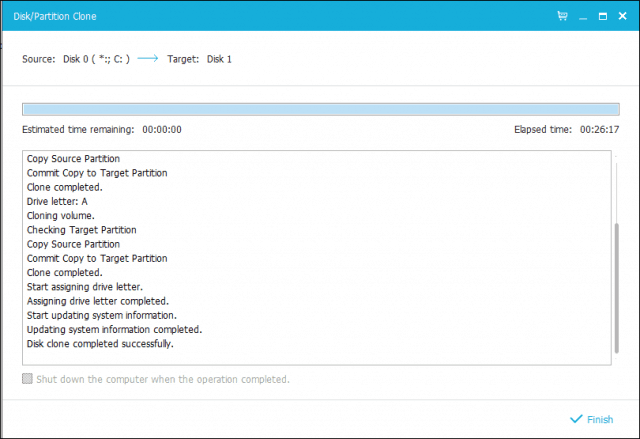
Step 4. When the progress gets 100%, please click Finish to exit the interface.
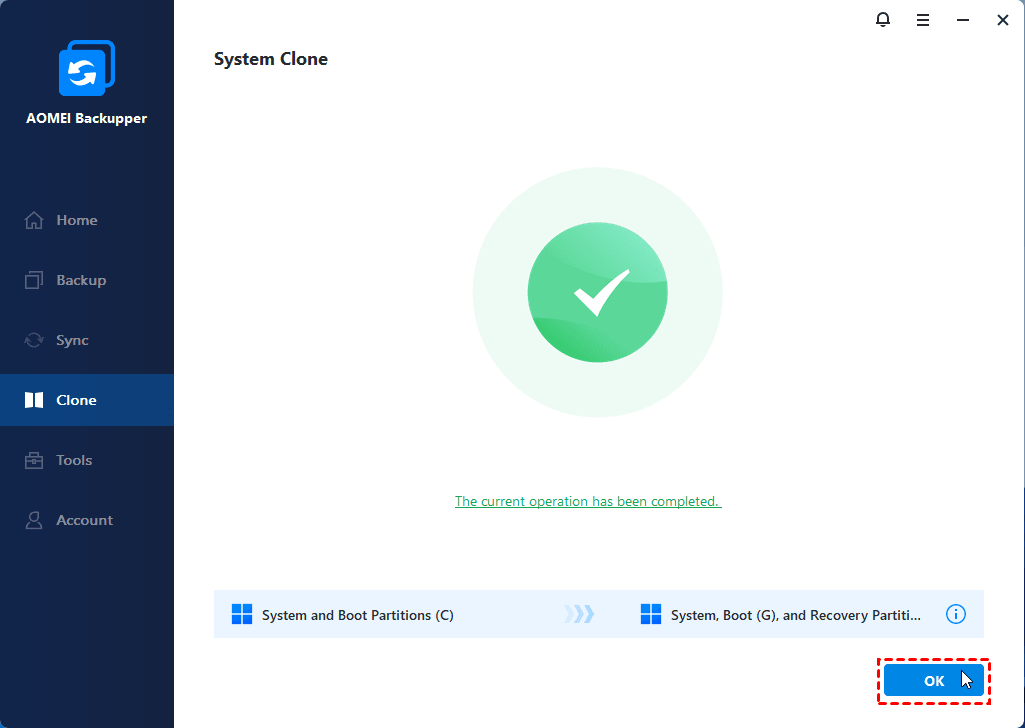
вњЋ Tips: To boot off Windows 10 from the cloned drive, you can either change boot order in BIOS or replace the old hard drive with the new drive.
Conclusion
As you can see, AOMEI Backupper offers you an easy way to perform system clone in Windows 10. Besides, AOMEI Backupper is not only specialized cloning software for Windows 10 but also powerful backup & restore software. It can help users to backup Windows 10 to external hard drive, make an event-triggered scheduling backup, and perform universal restore to dissimilar hardware, etc.
All Windows PC operating systems including Windows 10/8.1/8/7/Vista/XP are supported by AOMEI Backupper Professional. If you are running Windows Server, please turn to AOMEI Backupper Server.
How to Clone or Move Your Windows 10 Installation to a Larger Hard Disk or SSD


 When it comes to technology, upgrading is a fact of life, whether it’s your operating system, applications, or hardware devices. One of the most common hardware components users want/need to upgrade is their local hard drive. Reasons include limited space, better performance, and the ability to take advantage of advanced features like UEFI or support for GPT disks. Upgrading to a new SSD drive, for example, can extend the life of a desktop or laptop PC for many years. I know I’ve done it several times.
However, the issue with upgrading is dealing with the migration of your existing OS and data to the new drive. After all, who wants to rebuild the OS, figure out how to re-activate it, track down and reinstall all the apps, and oh yeah, move all your personal files over. Yeah, not me! That’s why today, I’m going to review an alternative process using the built-in System Image and Easeus Todo Backup to restore your installation to a larger or smaller disk.
There is an alternative in system imaging and cloning. In this article, we take a look using the built-in System Image and Easeus Todo Backup to clone your drive to a larger or faster hard drive.
Migrate your Windows 10 Installation to a New Hard Disk or SSD
Windows 10 includes a built-in option called System Image, which lets you create a complete replica of your installation along with partitions. We already covered the steps on how to create the system image. To back up your installation, you will need a USB external hard disk to store the image. An external hard disk with lots of storage is cheap, and a recommended buy, whether you plan on performing an activity such as this or keeping your system backed up regularly.
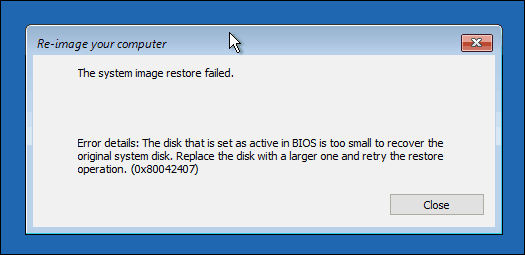
There is one major problem with System Image in Windows 10 and earlier versions of Windows; it doesn’t support restoring to partition layouts smaller in size than the drive it’s replacing. For instance, if you go from a 500 GB hard disk to a 256 GB SSD, when you attempt to restore the system image created from the 500 GB disk, you will receive an error indicating the disk is too small. If this is the case for you, then system imaging is of no use; instead, you should consider cloning, detailed further in this article.
After creating your backup, shut down the computer, install your hard disk or SSD drive, start the computer then load your BIOS or UEFI firmware. Check to make sure the drive is detected. After confirming these changes, connect your external hard disk, then power on the device. Boot from your Windows 10 install media, which will be used to facilitate the restoration of your system image created earlier. When you arrive at the Install Now screen, click the Repair computer link; this will load the Recovery Environment.
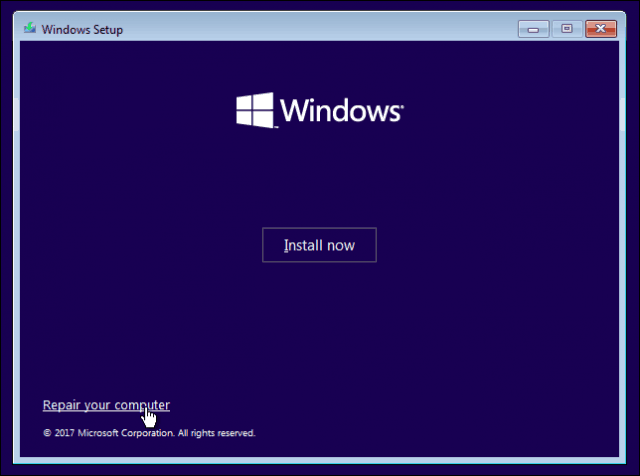
Click Troubleshoot, then click the System Image Recovery menu.

Your external hard disk should be detected along with the most recent system image you created. If it’s not the right one, use the Select a system image radio box, select the right image, then click Next.

If you have more than one local disk or partition, you can exclude it from the restoration process.

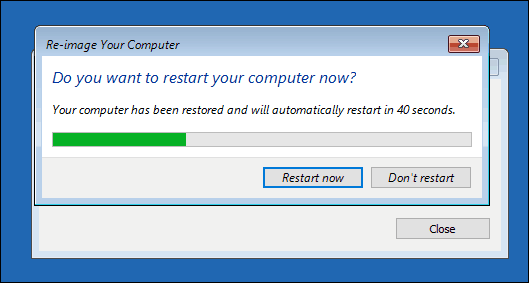
After confirming your selections, click Next to begin the restoration, then wait. Restoration can take some time, depending on the size of the system image. When complete, Windows 10 will restart then boot to the Windows 10 desktop.
There is a possibility if you restored the system image to larger disks, you will need to reconfigure your partitions if you restored the image to a larger hard disk or SSD. In Windows 10, press Windows key + X and click Disk Management. You will see an unallocated space created for you. You can recover this space using the Extend volume wizard. Right-click the system partition, then click Extend, click Next, then click Finish.

Restoring to a Smaller Hard Disk or SSD
If you are going the opposite direction, restoring to a smaller hard disk or SSD, cloning will be the recommended option. The best solution I have found for cloning and restoring a Windows 10 installation is the free EaseUs Todo Backup. EaseUs Todo Backup can not only restore a backup of your Windows 10 installation, but it can also do so to a non-corresponding partition layout. You can download a free copy here.
Once you have EaseUS Todo Backup installed, launch the app. You will need to connect the target hard disk or SSD to your computer where you would like to clone your Windows 10 installation. This can be done multiple ways; you can install the storage device as a local disk; or install it in a USB external enclosure, then attach it to your computer. After settling on a method of attaching the target disk, launch EaseUs Todo Backup, click the Clone tab.

Choose your source disk containing the operating system. As you can see below, I have two sets of disk attached: my Windows 10 installation on hard disk 0 31 GB and my new LOCALNEW disk 25 GB where the clone will be copied. Click Next.
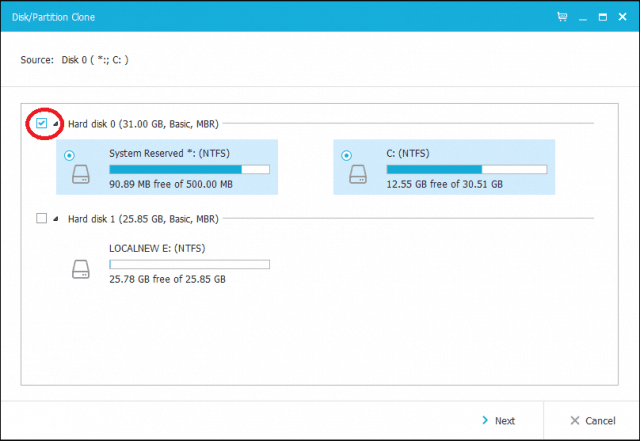
The next step is to select the target disk, in this case, our LOCALNEW disk 25 GB drive. Click the checkbox, then click Next.

The following screenshot shows the disk layout after cloning the old drive to the new. Click Proceed to begin the clone.

Click OK to confirm the changes.

This process can take some time, depending on the clone’s size and the amount of data. After the clone is complete, click Finish, shut down your computer, remove the old storage device, install and configure the new hard disk or SSD as your boot drive.
Please turn on your computer; Windows 10 should start as it previously did. Still, if you experience activation problems, you can use the Activation Troubleshooter in Windows 10 Anniversary Update or later to resolve any problems.
This is definitely an involved task, and users considering upgrading their storage device should think carefully about the migration method they plan on using. My personal lesson, if you are moving to a storage device that’s larger than the one you are replacing, the built-in System Image tool in Windows 10 is more than sufficient. If you are moving to a smaller hard disk or SSD storage, then you will need a third-party utility such as EaseUs Todo Backup to help you. It goes without saying, additional tools to facilitate the restoration might be needed, such as an external hard disk or even an external enclosure.
Tutorial: Clone Windows System to SSD in Windows 10, 8, 7 [2 Methods]
Cloning Windows system to SSD drive can help speed up Windows computer. This post will show you how to clone Windows system partition or disk to SSD in Windows 10/8/7 and how to boot from the destination disk.

By Emily  / Last Updated March 23, 2021
Why clone Windows system to SSD drive?
If your Windows system has installed on the mechanical hard disk drive (HDD), and the computer is struggling to load some large files or run many applications simultaneously, you can upgrade the computer HDD to SSD to speed some things up a little because the data read-write speed of SSD is much faster than HDD.
To use SSD as an OS disk, you can clean reinstall Windows onto SSD, but you will need to back up all personal files, add the new SSD drive, reinstall OS and other programs on it, and set everything to the way it was. It is time-consuming and troublesome! As a workaround, you can directly clone the already installed Windows system to SSD instead of reinstalling everything from scratch.
Best software to clone Windows 10/8/7 system to SSD
Actually, copying Windows system to SSD will be an easy task as long as a professional OS cloning utility is chosen to help. In the software market, countless cloning software is available. Here we strongly recommended AOMEI Partition Assistant Professional for Windows 10/8/7 (64 bit and 32 bit). This software provides the following two methods to help you clone either the Windows system drive or the entire system disk to SSD drive.
1. Only clone Windows OS to SSD: only migrate only Windows 10, 8, 7 partition to SSD, and leave the rest data partitions on the old hard disk.
2. Clone Windows system disk to SSD: copy every partition (OS partition and other partitions) from one disk to SSD drive.
No matter which method you finally choose to clone Windows OS to SSD, you can do the following further operations:
в—†Aligning SSD partitions to optimize SSD performance further.
в—†Resize SSD partition in the Windows system to SSD clone process.
в—†Clone larger OS drive/disk to smaller SSD as long as it has enough space to hold the used sectors of the OS drive or disk.
в—†Boot from the cloned SSD drive after clone.
Tutorial: clone Windows system to SSD via 2 methods
Now, back to the most important point-how to clone Windows operating system to SSD in Windows 10/8/7 via those two different methods. Download its Demo version and check out the how-to guide below.
What you need to do before clone:
1. Back up your system in advance just in case something uncontrollable occurs during the process such as power outage.
2. Move everything important on the SSD drive to another location since the Windows system clone will erase all contents on it.
3. Shrink your system drive or disk to make it as small as possible and better fit on the SSD since SSD drives usually have less space than HDDs.
4. Connect the SSD drive to your computer and make sure it is detected successfully.
>>If you are using desktop, you need to open the case and hook up the SSD to motherboard.
>>If your computer is a laptop, you have to connect SSD via USB port and the SSD should be put in a USB adapter.
Method 1. Clone only Windows OS to SSD
If you want to clone only the Windows system partition to SSD, try “Migrate OS to SSD” Wizard.
1. Install and open AOMEI Partition Assistant Professional. Choose “Migrate OS to SSD” in the left panel and click “Next” in the pop-out window.

2. Choose an unallocated space on the SSD drive. If there are partitions on it, tick «I want to delete all partitions. » to generate unallocated space and click “Next”.

3. In this window, you can resize partition as you need, then click “Next”.

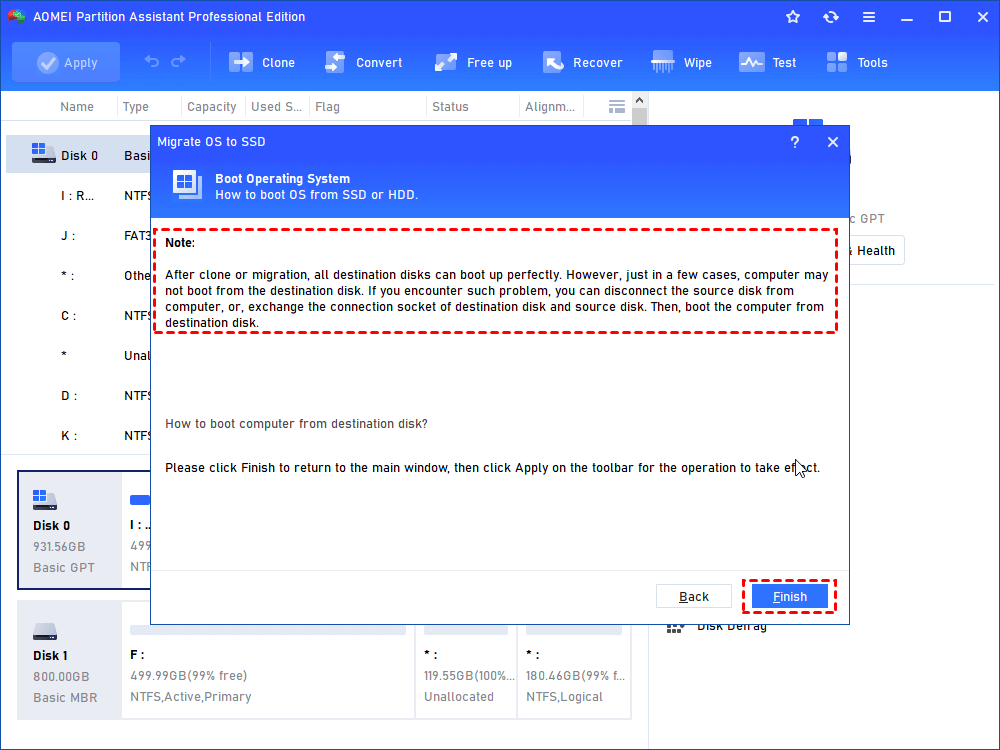
4. A note on how to boot from the destination disk will appear, read it carefully and click “Finish”.
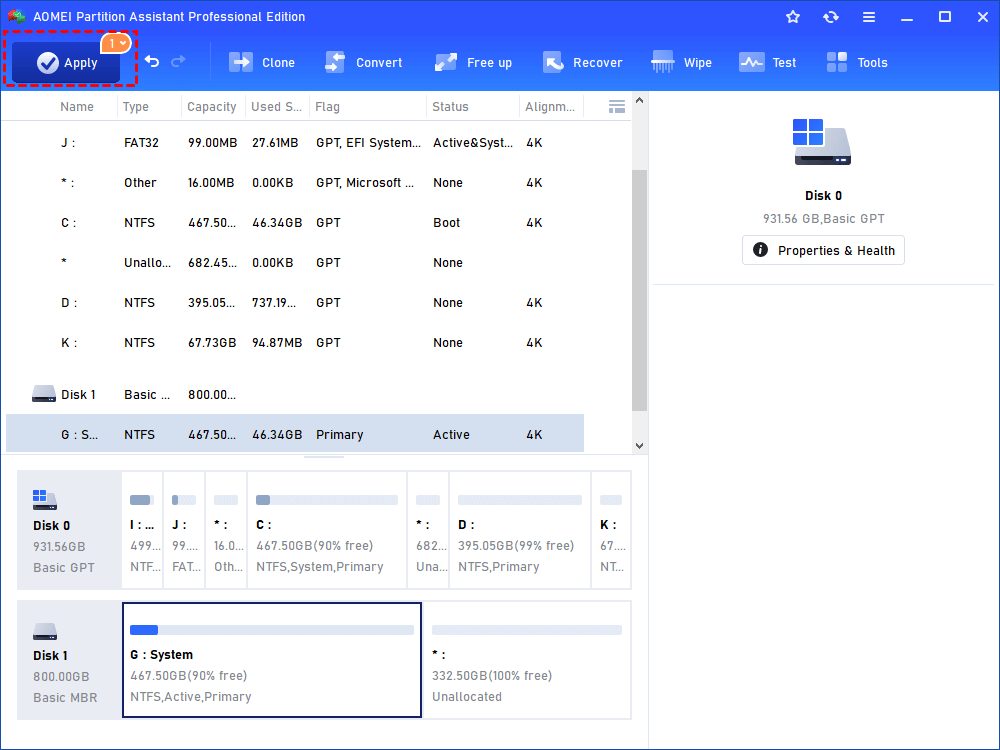
5. Click “Apply” to commit the Windows 10/8/7 system clone to SSD operation.
Method 2. Clone Windows system disk to SSD
If you need to clone the entire Windows system disk to SSD, try “Disk Clone Wizard”.
1. In the main interface of AOMEI Partition Assistant Professional. Click “All Tools” and then “Disk Clone Wizard” on the left side.
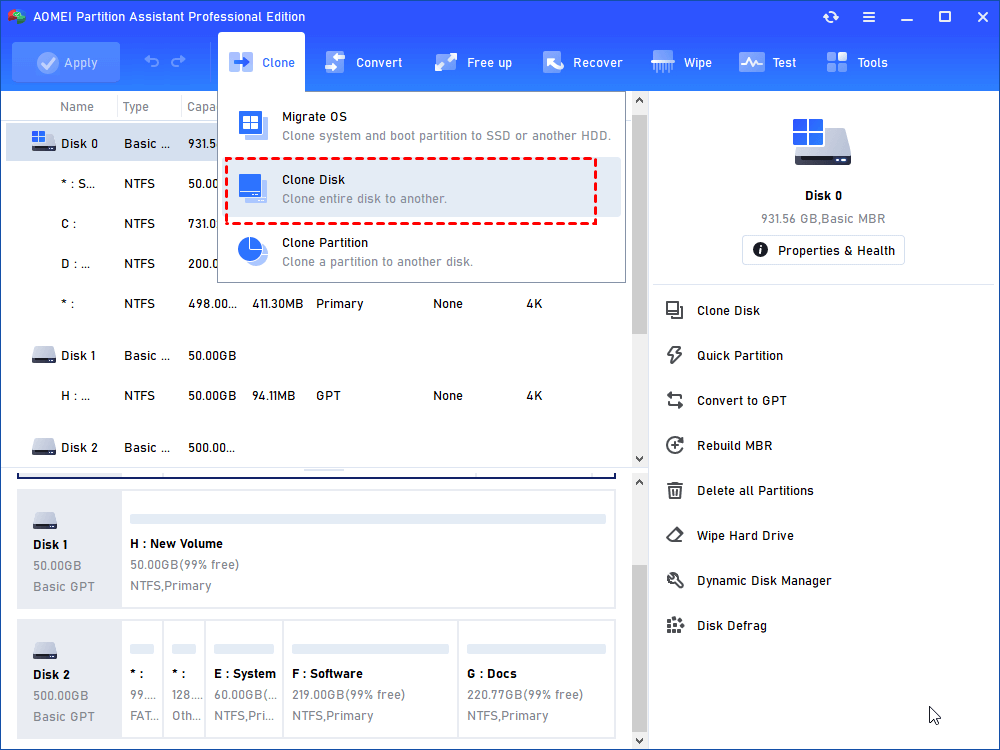
2. Select a copying method as you need from «Clone Disk Quickly» and «Sector-by-Sector Clone». Here we select “Clone Disk Quickly” as an example.
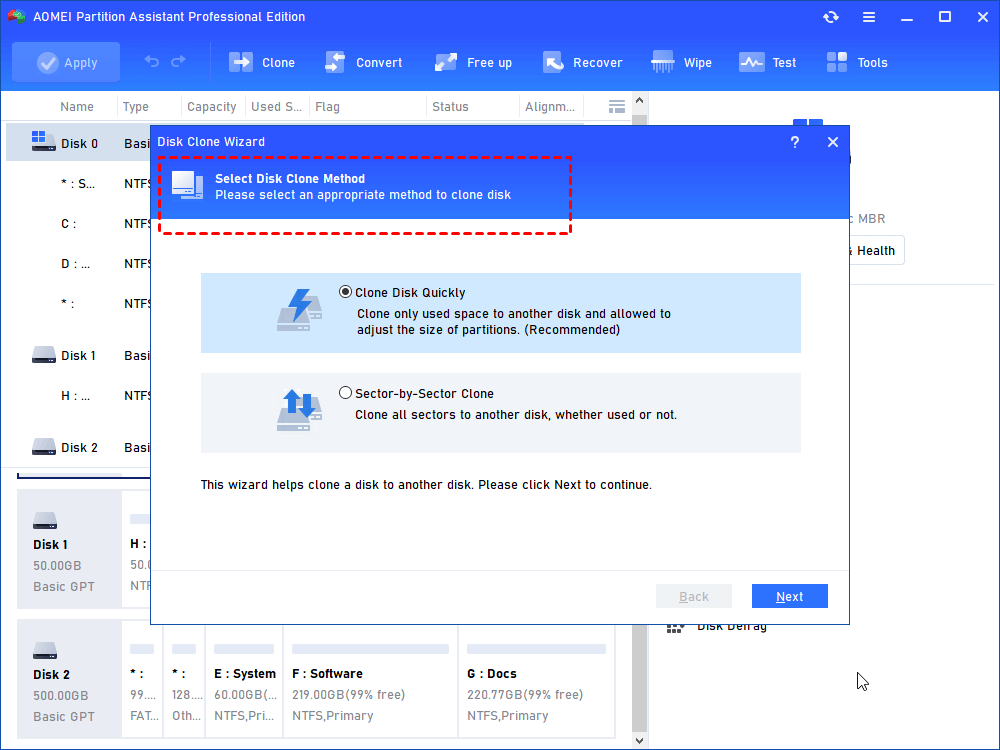
Notes:
▶“Clone Disk Quickly” only copies the used sectors to the destination location, allowing the target disk smaller than the total size of the source disk.
▶“Sector-by-Sector Clone” will copy all sectors to the target disk, so the destination disk must be equal to or larger than the source disk.
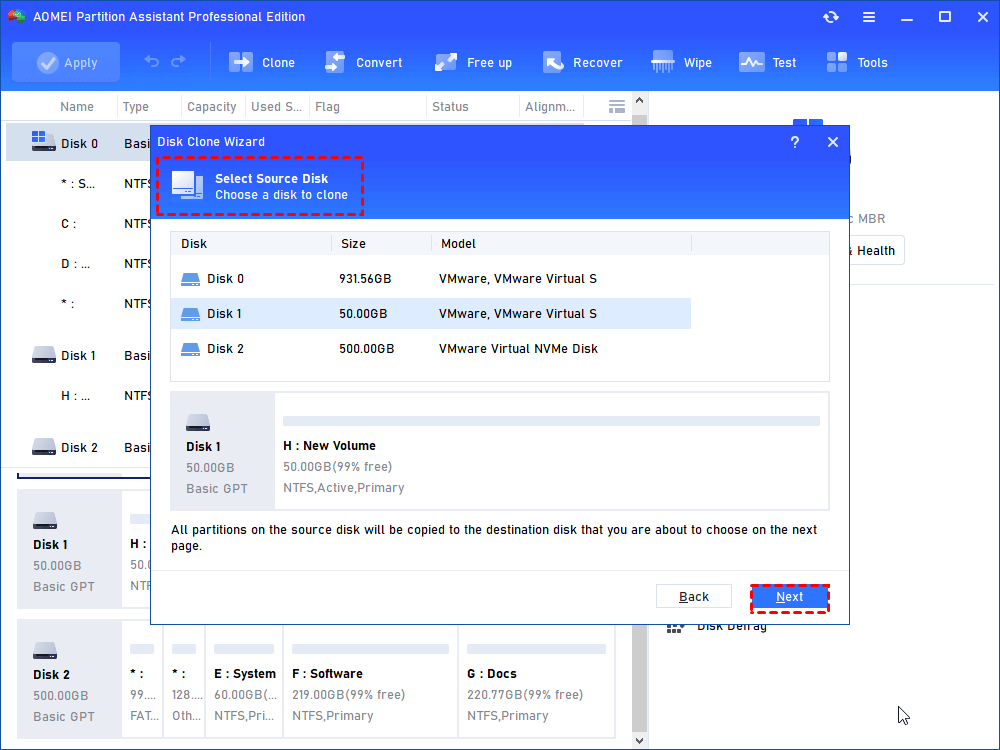
3. Select the Windows system disk as the source disk and hit on “Next”.
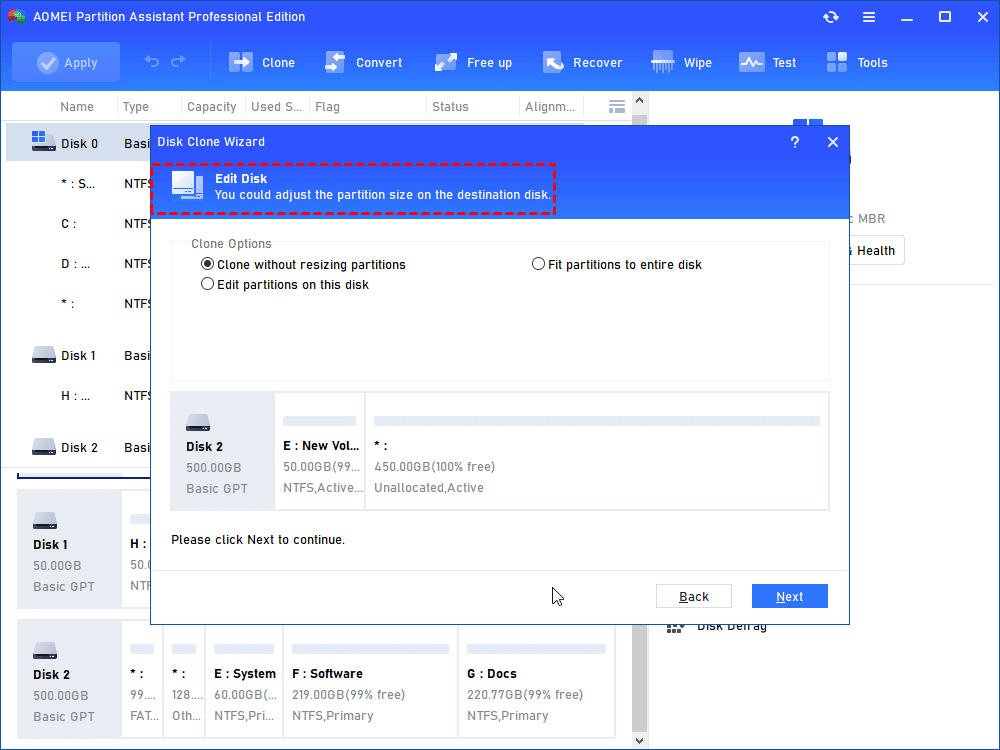
4. Then select the SSD drive as the destination disk and click “Next”.

5. Now, you can also resize partition just being created on SSD drive.
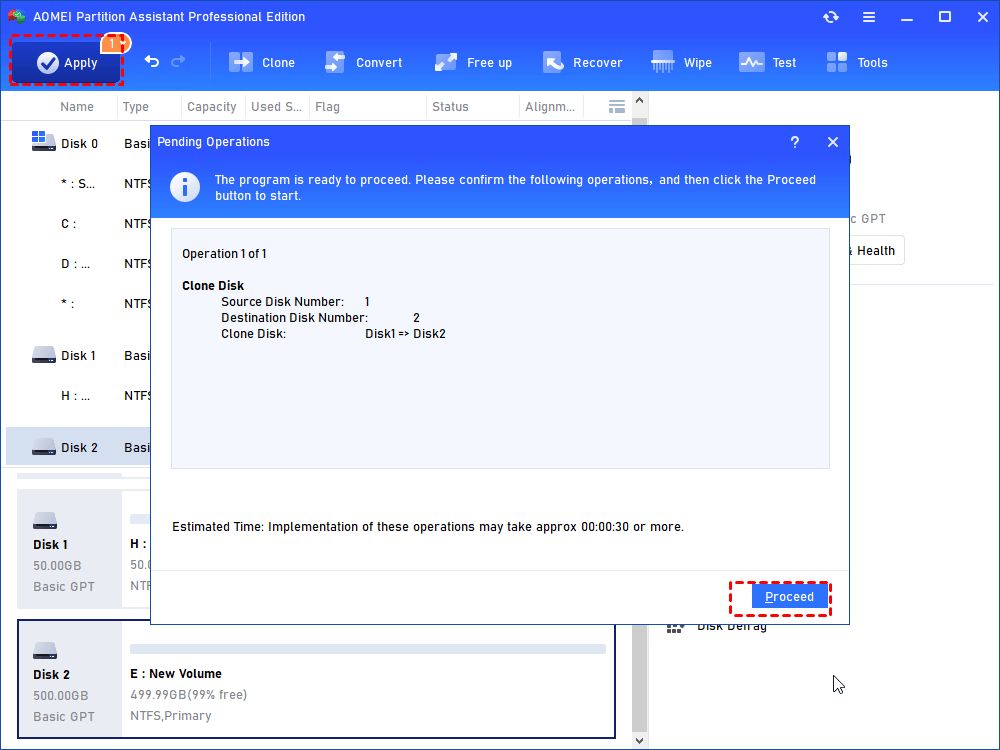
6. Read the subsequent boot note, click “Finish” and then click “Apply” to execute the pending operation.
How to boot from the SSD drive after clone?
After you have cloned Windows system to SSD drive successfully with either method, now you need to change the boot order in BIOS menu to boot Windows 10/8/7 from SSD.
1. Restart computer and constantly press F2 key (or other keys like Del, F8, F12) to access the BIOS menu.
2. Use the arrow key to select the Boot tab. System devices will appear in order of priority.
3. To give the cloned SSD a boot priority over other hard drives, move it to the first position in the list.
4. Save the changes and exit the BIOS setup utility. The computer will restart from the SSD successfully.
Further tip: If you are cloning Windows system drive or disk from MBR to GPT, or GPT to MBR disk, you will also need to change BIOS boot mode to UEFI , or UEFI to BIOS.
Summary
With AOMEI Partition Assistant Professional, you can easily clone Windows system to SSD and then successfully boot from the cloned SSD drive. Besides, if you want to copy Windows system to USB as a portable Windows device to take everywhere, its “Windows To Go Creator” can satisfy you best. To clone Windows Server operating system drive or disk to another HDD/SSD, please try AOMEI Partition Assistant Server.


