- Как использовать Clonezilla для клонирования жесткого диска Windows
- Что такое Clonezilla?
- Шаг 1: Загрузите Clonezilla
- Шаг 2. Создание загрузочного USB-накопителя с Rufus
- Шаг 3: перезагрузка в режим выбора загрузки
- Доступ к меню выбора загрузки с помощью функциональной клавиши
- Доступ к меню выбора загрузки через расширенный запуск Windows 10
- Шаг 4: Настройте Clonezilla
- Шаг 5: клонируйте ваш диск на локальный диск
- How to Use Clonezilla to Clone Windows 10 to SSD/HDD?
- About Clonezilla for Windows 10В
- How to clone Windows 10 to a smaller drive via Clonezilla?
- Step 1. Shrink partition
- Step 2. Download Clonezilla and prepare boot media
- Step 3. Connect the target drive
- Step 4. Clone Windows 10 via Clonezilla
- Limitations of cloning Windows 10 with Clonezilla
- Clone Windows 10 to SSD/HDD via Clonezilla alternativeВ
- Conclusion
Как использовать Clonezilla для клонирования жесткого диска Windows
Когда вы покупаете новый компьютер, вы должны переместить свои старые файлы в новую систему. Копирование папки за папкой, файл за файлом утомительно. К счастью, вы можете использовать Clonezilla для клонирования всего вашего диска на новый диск. Клонирование дисков с помощью Clonezilla — это быстро, просто и, что самое главное, совершенно бесплатно.
Вот как вы клонируете свой диск Windows 10 с помощью Clonezilla и USB-накопителя.
Что такое Clonezilla?
Clonezilla — бесплатная программа с открытым исходным кодом для клонирования образов дисков. Вы можете использовать Clonezilla для резервного копирования системы, полных клонов дисков, развертывания системы и многого другого. Кроме того, он поддерживает огромный спектр файловых систем, а также несколько загрузчиков, шифрование и многое другое.
Обратите внимание, что для клонирования диска Windows 10 ваш второй диск должен иметь такую же или большую емкость по сравнению с вашим текущим хранилищем. Например, если вы хотите клонировать диск, который использует 60 ГБ памяти, на диске получателя также должно быть не менее 60 ГБ для полного клонирования.
Шаг 1: Загрузите Clonezilla
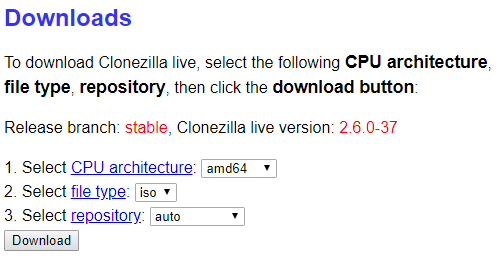
Во-первых, вам нужна копия Clonezilla.
- Перейдите на страницу загрузки Clonezilla. Переключите «Выберите тип файла» на ISO.
- Нажмите Скачать.
- Установите его как любую другую программу.
Шаг 2. Создание загрузочного USB-накопителя с Rufus
Чтобы создать загрузочную USB-флешку Clonezilla, вам понадобится 1 ГБ USB-флеш-накопитель (или больше). Вам также понадобится удобный маленький загрузочный USB-накопитель Rufus.
Обратите внимание, что создание загрузочной флешки Clonezilla полностью сотрет все существующие данные на вашем диске.
Вот что вам нужно сделать:
- Перейдите на домашнюю страницу Руфуса. Загрузите и установите последнюю версию.
- После установки откройте Руфус. Обязательно вставьте флэш-накопитель USB.
- Выберите USB-накопитель в разделе «Устройство».
- В разделе Boot selection нажмите SELECT. Перейдите в папку загрузки Clonezilla ISO и нажмите «Открыть». Rufus автоматически введет правильные параметры для создания загрузочной флешки. Измените метку тома на что-то более запоминающееся, если хотите.
- Когда будете готовы, нажмите START.
- Руфус обнаружит «ISOHybrid» изображение. Продолжайте запись в режиме ISO-образа.
Clonezilla — это маленькая ISO. Поэтому процесс создания загрузочного USB-накопителя не займет много времени.
На этом этапе вам следует подключить второй жесткий диск к вашей системе и убедиться, что он работает с вашей системой. Вы не хотите вмешиваться в процесс Clonezilla и понимать, что он не функционирует.
Шаг 3: перезагрузка в режим выбора загрузки
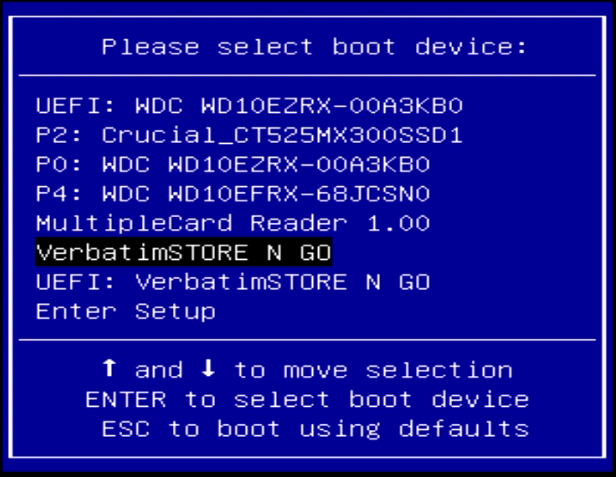
Теперь вам нужно перезагрузить систему в режиме выбора загрузки. Самый простой способ сделать это — перезагрузить систему, а затем нажать кнопку выбора меню загрузки для вашего типа оборудования.
Доступ к меню выбора загрузки с помощью функциональной клавиши
Не уверены, какую кнопку нажать? Вы можете найти свой бренд оборудования в этом главном списке загрузочного меню.
После перезагрузки системы коснитесь определенной клавиши. Например, на моей материнской плате Gigabyte я нажимаю F12 после перезагрузки, чтобы получить доступ к меню выбора загрузки.
Зайдя в меню, вы можете прокрутить вниз и выбрать загрузочную флешку Clonezilla USB.
Доступ к меню выбора загрузки через расширенный запуск Windows 10
Некоторые системы UEFI не позволяют вам получить доступ к выбору загрузки вручную, чтобы обеспечить вам безопасность. Вместо этого вы можете получить доступ к меню выбора загрузки из меню прошивки UEFI.
Нажмите и удерживайте клавишу Shift и нажмите «Перезагрузить» в меню «Пуск». Эта комбинация открывает Расширенное меню запуска. Отсюда вы можете выбрать «Устранение неполадок» → «Дополнительные параметры» → «Параметры прошивки UEFI».
Когда откроется меню прошивки UEFI, вам нужно найти параметры загрузки.
Отсюда я могу изменить порядок загрузки, чтобы моя материнская плата загружала USB-накопитель Clonezilla перед моей обычной установкой Windows 10.
Шаг 4: Настройте Clonezilla
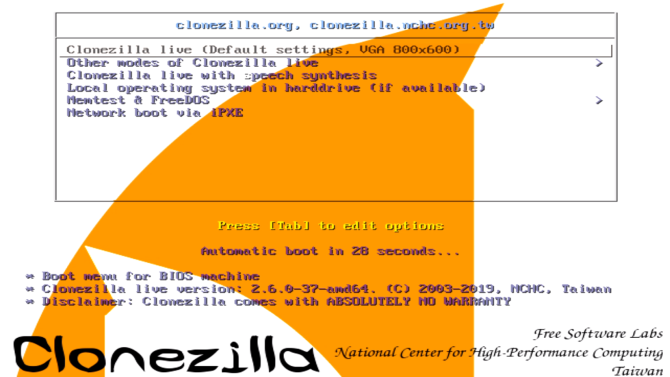
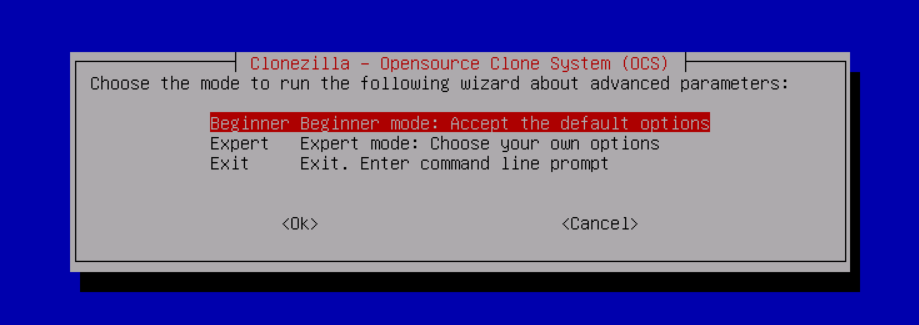
После загрузки Clonezilla у вас есть несколько вариантов. Выберите Clonezilla Live (Настройки по умолчанию, VGA 800 × 600). Теперь подождите, пока загрузится среда Clonezilla. Вам придется выбрать язык клавиатуры и раскладку. Когда вы дойдете до экрана «Запустить Clonezilla», выберите «Запустить Clonezilla».
Теперь у вас есть экран настроек Clonezilla. На данный момент вам нужно знать только два из шести вариантов:
- device-image: сделайте копию устройства (например, вашего жесткого диска) на образ диска.
- device-device: работайте напрямую с вашим устройством (например, с жестким диском), чтобы сделать копию непосредственно в другой форме хранения.
Первый вариант помогает вам создать образ диска хранилища устройства, с которым вы сейчас работаете. Второй вариант помогает вам сделать клон хранилища устройства, с которым вы сейчас работаете, скопировав его непосредственно в другую форму хранилища.
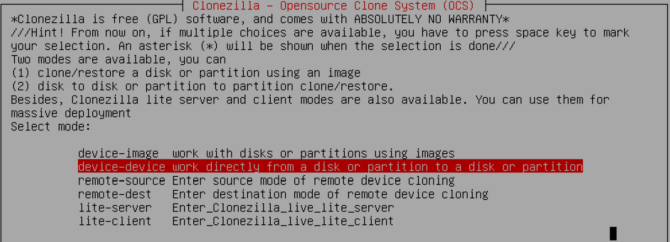
Поскольку мы клонируем диск, выберите второй вариант, device-device , а затем режим «Начинающий». Другие параметры позволяют вам определить дополнительные параметры. Вам не нужны эти опции в настоящее время.
Теперь у вас есть еще два варианта на выбор:
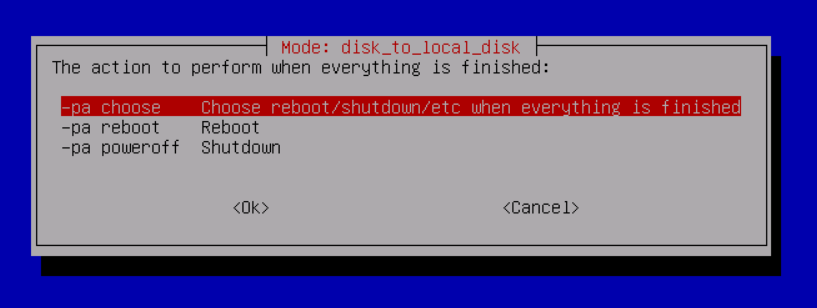
- disk to local disk: клонируйте текущий диск на другой локальный диск (например, второй жесткий диск).
- part to local part: клонируйте раздел диска на другой раздел локального диска (процесс, который также использует ваш второй жесткий диск).
Опять же, когда вы клонируете весь диск, выберите первый вариант. Второй вариант, клонирование раздела, позволяет вам сделать копию части хранилища вашего устройства.
Шаг 5: клонируйте ваш диск на локальный диск
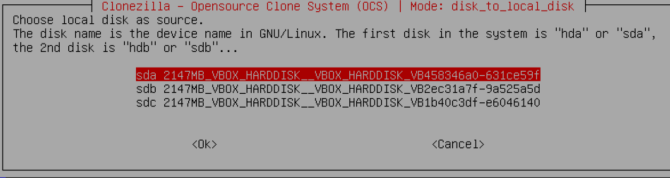
Теперь вы вводите, какие диски Clonezilla должен клонировать.
Clonezilla — это утилита для Linux, поэтому диски используют соглашение об именах Linux. Это означает, что ваш основной раздел — это ваше основное хранилище — будет использовать имя «sda», ваш второй диск — «sdb» и так далее. Вы также можете сделать перекрестные ссылки на диски, используя их размер.
На втором экране выберите хранилище, в которое вы хотите скопировать. Помните, что локальный диск, который вы копируете, должен иметь меньший размер, чем второй диск.
Теперь выберите, что вы хотите, чтобы Clonezilla делала после завершения процесса клонирования. У вас есть три варианта:
- choose: Сохранить Clonezilla в рабочем состоянии после завершения процесса.
- reboot: перезагрузите Clonezilla после завершения процесса.
- poweroff: выключите Clonezilla, как только процесс завершится.
Последний выбор — скопировать загрузчик локального диска. Если вы делаете копию диска с Windows 10 и хотите, чтобы он загрузился, введите Y и нажмите Enter.
Хотите знать, как вы восстанавливаете свой диск после клонирования? Следуйте инструкциям в руководстве, но скопируйте клонированный диск на целевой диск, обязательно скопировав загрузчик еще раз.
Клонирование Windows 10 при использовании Clonezilla: успех!
Теперь вы можете клонировать диск Windows 10 с помощью Clonezilla. Вы также можете восстановить этот клон диска, используя тот же процесс. Прелесть использования Clonezilla в том, что вы берете клон всего диска, ничего не оставляя. Пока у вас достаточно места на диске, Clonezilla всегда будет делать эту работу.
How to Use Clonezilla to Clone Windows 10 to SSD/HDD?
This guide will tell you how to clone Windows 10 via Clonezilla to SSD/HDD. Also an alternative way is provided to help you make things easier.

By AOMEI  / Last Updated April 1, 2021
Quick Navigation:
About Clonezilla for Windows 10В
Clonezilla is aВ free disk cloning software, supporting to clone a single drive or even a single partition within a drive and then recover that drive later. It is available in three versions: Clonezilla live, Clonezilla lite server and Clonezilla SE. Clonezilla live supports single machine backup and restore, while Clonezilla lite server or SE allows you to clone many computers simultaneously over the network. The tool supports various system including Linux, Mac OS, Windows, FreeBSD, NetBSD, OpenBSD, and more.
When you want to upgrade hard drive to make Windows 10 computer perform better, you can use Clonezilla disk to disk cloneВ feature to clone everything to the new SSD or HDD. Just see the following words to get more details on how to use Clonezilla to clone Windows 10 to SSD/HDD.
How to clone Windows 10 to a smaller drive via Clonezilla?
Here in this part, we will guide you to download and useВ ClonezillaВ to clone Windows 10. All the steps you need are included.
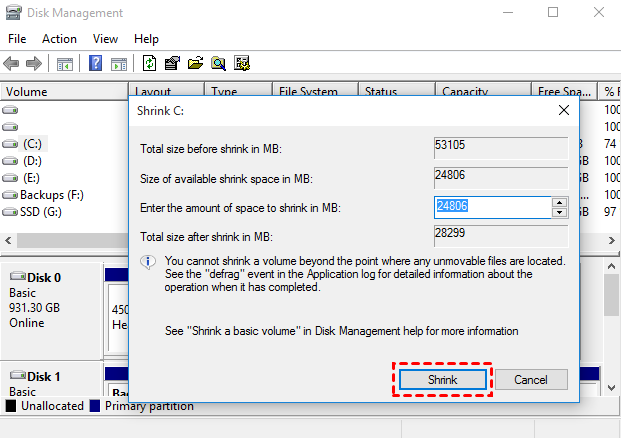
Step 1. Shrink partition
If you want to clone Windows 10 to smaller SSD or HDD, you need to shrink the source partition to fit the destination partition. Just skip this operation if the destination drive is the same size or larger than the source drive.
1.В Go to the search box and type Disk ManagementВ and click the top result to open it.
2.В Right-click the main volume (C:) > choose Shrink VolumeВ option.
3.В Click the ShrinkВ button to reduce the size of the volume as much as possible.
When it gets done, move on to the next steps.
Step 2. Download Clonezilla and prepare boot media
Go to Clonezilla download page to downloadВ Clonezilla. You need to select the CPU architecture, file type and repository to download the right version for Windows 10 cloning.В
For example, the file type of “zip” could be used to install Clonezilla to USB stick, and “iso” could be burnt to a DVD. If you want to make a bootable Clonezilla live USB flash drive, click here to learn how.
Step 3. Connect the target drive
Now connect your new hard drive to the computer. Connect the new drive via a USB adapter if there is a single room for disk in your laptop.
Step 4. Clone Windows 10 via Clonezilla
1.В Boot the Clonezilla.
Start your computer via the bootable media. When Clonezilla first loads, press Enter to accept the default settings.
2.В Start the wizard.
Select your language from the list. Then, select Don’t touch keymapВ and Start Clonezilla.
3.В Select mode.
Select the device_deviceВ optionВ > choose Beginner modeВ to accept the default options. Then select the disk_to_local_disk local_disk_to_local_disk_cloneВ option and press Enter.
4.В Choose the source drive.
5.В Choose the destination drive.
You can choose to check the source file system, or you can just choose to “Skip checking/repairing source file system”.
6.В Select what to do after cloning.
Choose the action to perform after the cloning. The default option is Choose reboot/shutdown/etc when everything is finished.
7.В Confirm the operation.
Type YВ and press Enter to confirm the cloning process.
Type YВ and press Enter again to re-confirm that the data will be erased on the target drive.
Type YВ and press Enter to close the boot loader. It will make the Windows 10 drive bootable.
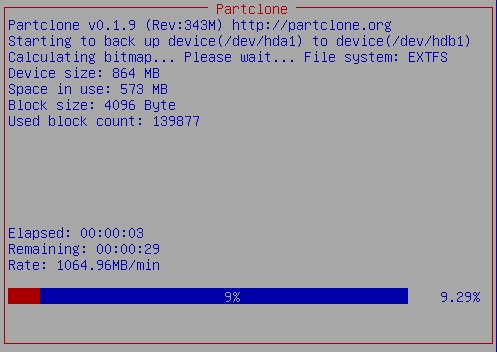
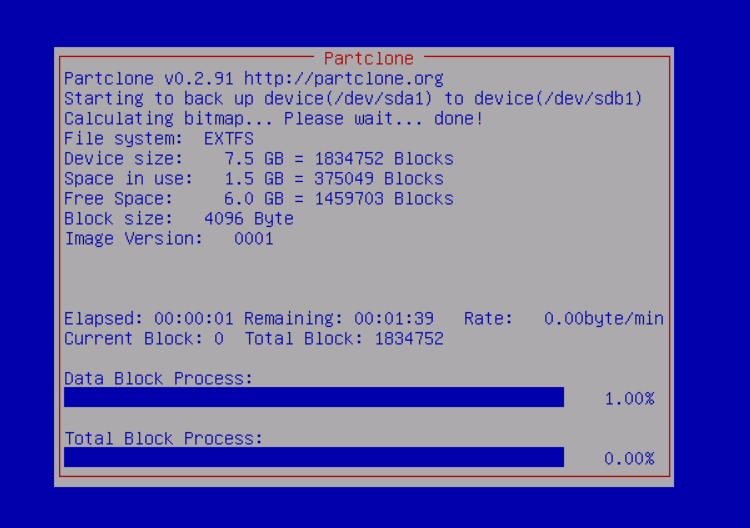
8.В Start cloning.
Clonezilla will proceed to clone the data from the source disk to the target disk.
9.В Disk is cloned.
Clonezilla will either prompt you to shut down or restart or do it automatically depending on the settings you chose in the previous step.
вњЌ Note:
If you are cloning Windows 10 to a larger drive, you may meet the issue “cloned hard drive unallocated space left”. In this case, you can expand volume as follows:
1.В Go to the search box and type Disk ManagementВ and click the top result to open it.
2.В Right-click the volume next to unallocated space > choose Extend VolumeВ option.
3.В Click the Next button > Select the disk with space that you want to allocate (usually the default settings) > click Next > click Finish.
Now you know how to clone Windows 10 via Clonezilla.
Limitations of cloning Windows 10 with Clonezilla
However, there are some limitations you should knowВ about Clonezilla.
As you can see, the whole Clonezilla disk to disk clone process is complicated and time-consuming. Cloning disk with Clonezilla needs lots of steps which may make you confused.
If you want to use Clonezilla to clone Windows 10 to smaller SSD, shrinkingВ the source partition is required to fit the destination partition.
There is a chance that Clonezilla failed to cloneВ when there is a bad sector on the drive.
It does not have a user-friendly GUI.
If you prefer an easier way to clone Windows 10 to SSD/HDD, you have to turn to other cloning software for help. Fortunately, there’s one easy-to-use Clonezilla alternative for Windows 10 can help you clone Windows 10 to new hard drive, even to a smaller SSD.
Clone Windows 10 to SSD/HDD via Clonezilla alternativeВ
As the best free Clonezilla alternative, AOMEI Backupper StandardВ is not only aВ free disk cloning software but also the backup and restoreВ software for Windows users. Works for all Windows OS including Windows 10/8/7. It can help you clone Windows 10 hard drive to another one directly. Compared to Clonezilla disk to disk clone, AOMEI Backupper can provide you a more wonderful performance.
в—€ It lets you clone larger drive to smaller drive directly as long as the smaller disk can hold all the data from the source disk.
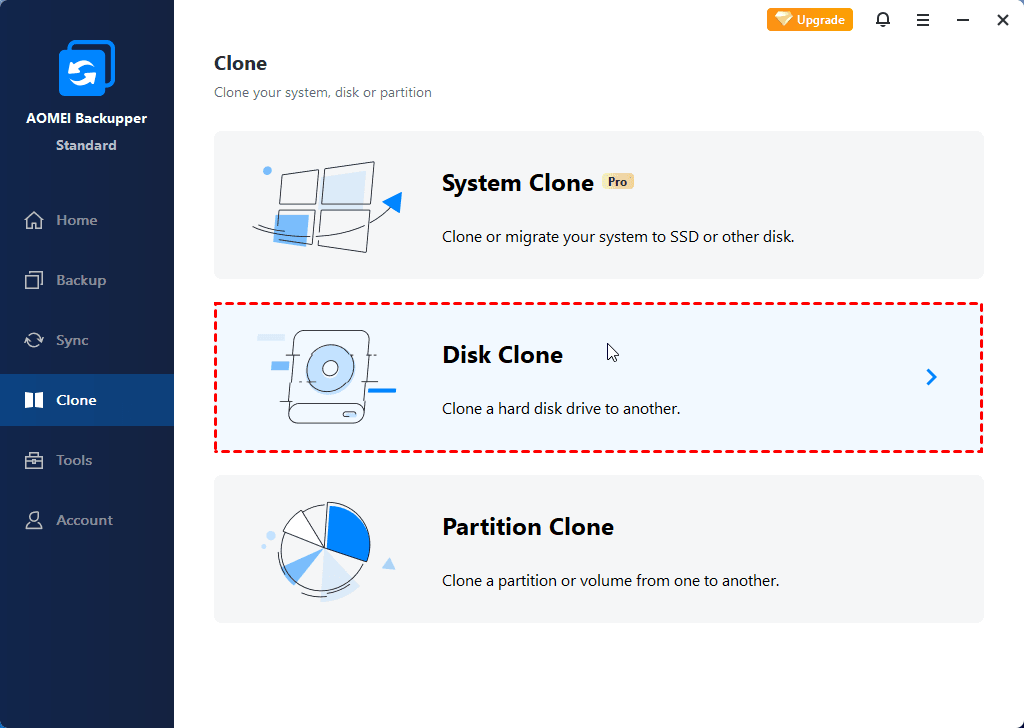
в—€ It provides 2 different cloning solutions: Disk Clone and Partition Clone. If you want to clone OS only via System Clone, you need toВ upgradeВ to AOMEI Backupper Professional.
в—€ It allows you to mount backup image to restore individual files.
◈ It has a user-friendly GUI compared to Clonezilla’s text-based interface. It’s simple enough to achieve the clone job.
в—€ It will ignore bad sectors by default while cloning to ensure a successful clone.
What’s more, the cloning process will run in the background, so you can use the computer for other things during the process. Check the following steps to see how to clone Windows 10 hard disk with this powerful disk clone software.
Steps to clone Windows 10 to new hard drive :
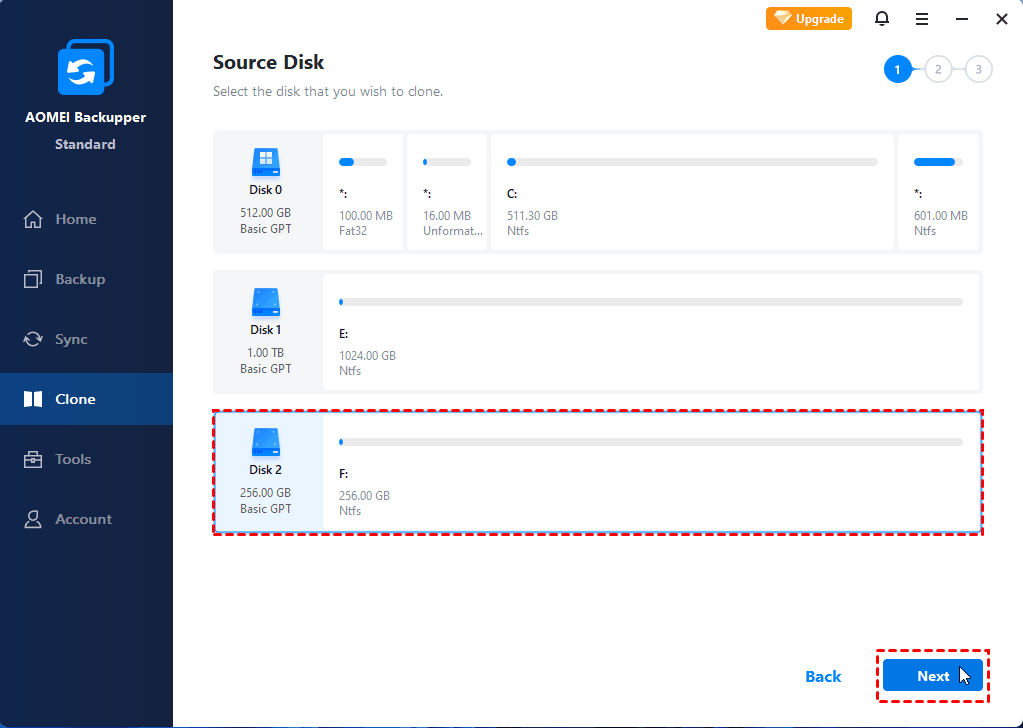
Step 1.В Download, install and launch AOMEI Backupper Standard. Click Clone and then select Disk Clone.
Step 2. Select the Windows 10 hard drive as the source disk.
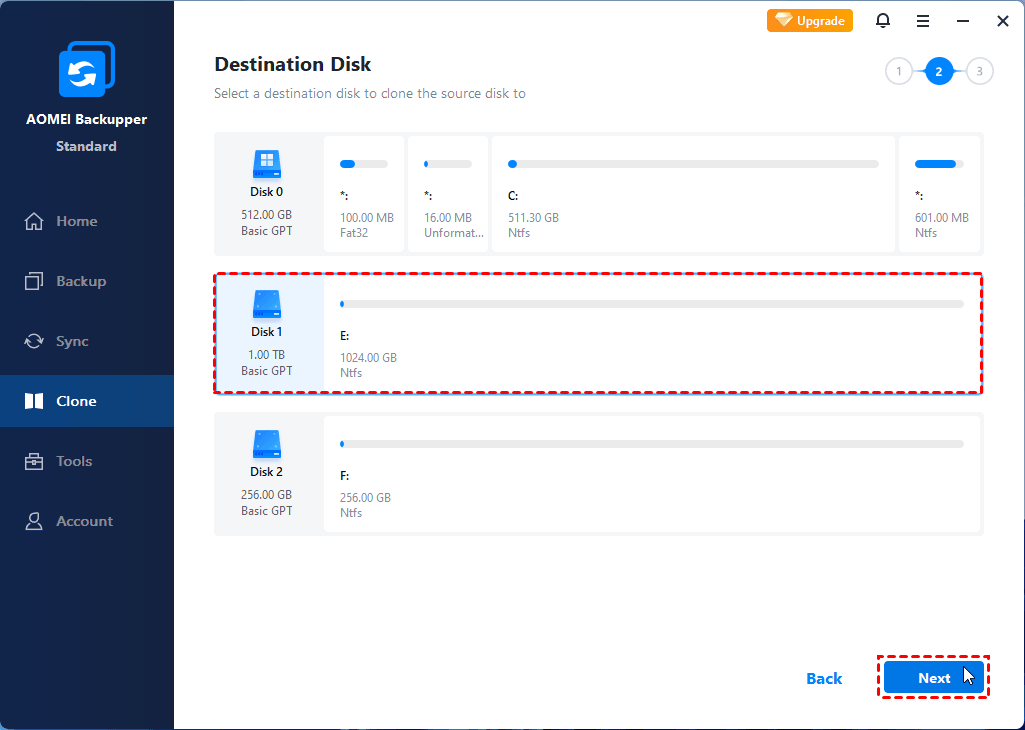
Step 3. Select your new SSD/HDD as the destination disk.
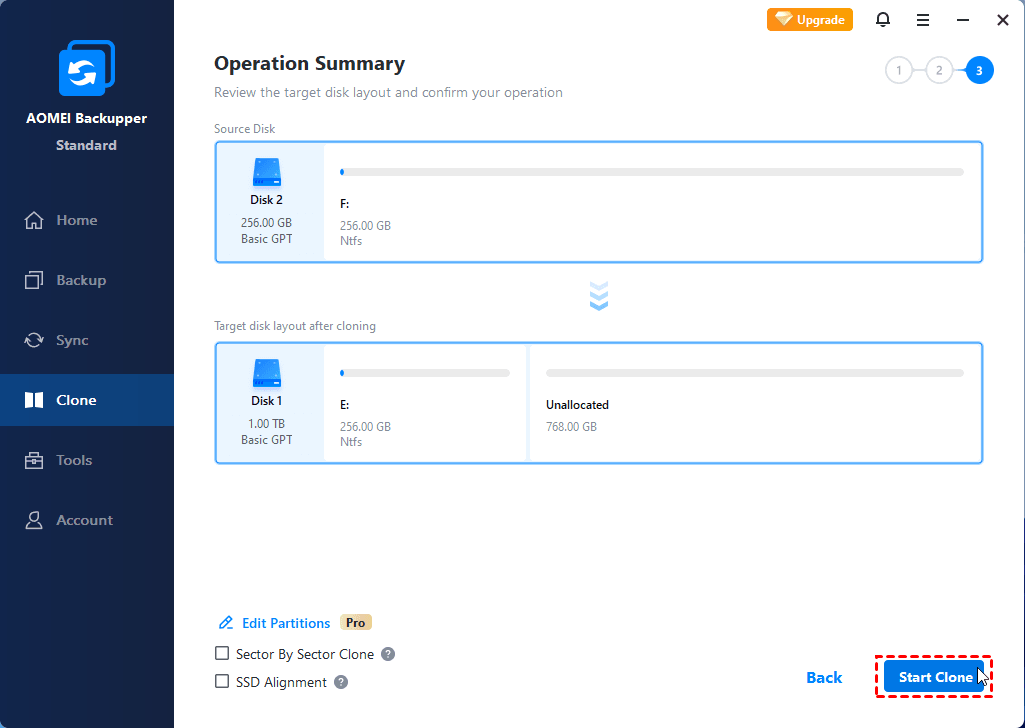
Step 4. Check the operation summary and click Start Clone.
Tips:
If there are bad sectors on the source disk, it is advised to uncheckВ Sector by sector cloneВ box since it will clone every sector including bad sectors to the target disk.
If the target disk is an SSD, checkВ SSD AlignmentВ to improve the speed of reading and writing as well as prolong the service life of SSD.
It supports cloning even between MBR disk and GPT disk. Both GPT disks and MBR disks are supported as source disk or destination disk. To clone a disk containing OS from MBR to GPT disk,В GPT to MBR disk or GPT to GPT disk, you may upgrade to the higher editions.
Conclusion
Now you know how to clone Windows 10 via Clonezilla and AOMEI Backupper. Obviously, AOMEI Backupper is much easier and it’s the best Clonezilla alternative because it supports you to clone disk, partition, system as you want in Windows 10/8/7/Vista/XP.
Besides, it is more than an alternative to Clonezilla for Windows 10, it has many other features to safeguard your data. For example, it enables you toВ create system backup image, restore computer to an earlier date when you need,В create bootable discВ in case of boot failed, etc.


