- Close All Windows in a Mac App with a Keystroke
- Command + Option + W will close ALL windows on a Mac
- Force Quit on a Mac: 3 Easy Ways to Close Frozen Applications
- Is it Safe to Force Quit?
- 1. Force Quit Using the Apple Menu
- 2. Force Quit with Mac Shortcut
- 3. Close Application from Activity Monitor (Ctrl+Alt+Del Alternative)
- What to Do If Force Quit Isn’t Working?
- What’s the Solution?
- Getting Mac OS X applications to close after last window closed
- 6 Answers 6
- Работа с несколькими пространствами Spaces на Mac
- Создать область
- Перемещение между пространствами
- Перенос окна приложения из одной области в другую
- Назначение пространств для приложений
- Удаление области
Close All Windows in a Mac App with a Keystroke
 Most Mac users know that hitting the Command+W keyboard shortcut will close the currently active window, but with a slight modification and by adding an additional key press, you can close all windows in just about any Mac OS X app or the Mac Finder.
What is this super excellent keyboard shortcut for closing everything?
It’s easy to remember, just add Option to the traditional close shortcut making it this: Command + Option + W
Command + Option + W will close ALL windows on a Mac
Hitting Command+Option+W will close all windows in the currently active Mac application, or the Finder of Mac OS X. If the window is open, it will close after hitting that keystroke combination.
Not into keyboard shortcuts? You can also access the “Close All Windows” option from File menu options in either the Finder or just about any Mac application, but it’s invisible by default until you hold down the “Option” key when choosing the File menu. This transforms “Close” into “Close All” as shown in this screen shot:
The short video below demonstrates this trick as well:
The windows close rapidly, if you want to quickly try this out yourself an easy place to start is in the Mac OS X Finder. Just open a bunch of new Finder windows (by hitting Command+N in modern versions of Mac OS X a bunch) and then hit Command+Option+W to close them all out. Or you can try it in another app by opening a bunch of documents in something like TextEdit or Preview and closing those all out together too. Close All is best used in applications when auto-save is left enabled, otherwise the window closing process will halt as a save dialog box is summoned and waiting for an action. If you happened to turn off auto-save in Mac OS X at some point, just turn it back on to get uninterrupted use out of this keystroke.
Note how this is very different from closing windows on quit, which closes all the windows when the application is quitting, thereby preventing the auto-restore function of Mac OS X from relaunching those windows. This trick closes the active windows, but does not quit the app or discard the windows from restore.
The Command+W keystroke for closing a single window has been around on the Mac since the earliest days of the operating system, and the Option modifier has been around for ages as well, but despite that, few Mac users seem to be aware of it. Learn this trick, you’ll surely use it often.
Источник
Force Quit on a Mac: 3 Easy Ways to Close Frozen Applications
Ok, I get it. There is no equivalent to the PC’s Ctrl+Alt+Del shortcut on a Mac® to force quit an application. So how do I quit that annoying program that’s not responding?
Luckily, Apple® has you covered and gives you multiple options. The shortcut actually exists, and moreover, there are a few other extremely convenient ways to fight buggy apps. Today I’m going to list three easy ways to force-quit an application on a Mac, without harming the system.
Is it Safe to Force Quit?
Forcing a frozen application to quit is the same as killing the symptoms when we get sick versus curing the virus. We need to see the bigger picture and understand what causes the problem and how to cure it while understanding how to avoid it from happening again.
The number one reason we have a problem with frozen applications in a Mac is insufficient RAM—or, in other words, a lack of computer memory to operate the system compared to the number of applications you usually open (including those numerous open tabs in a browser). So anytime your system utilizes all of its existing resourses to run the task, it becomes unresponsive. Think of RAM like a physical workbench. The more space (memory) you have to work, the more projects you can have out to work on. Less space? Less ability to work on multiple things at once.
Forcing Mac to quit the application does resolve the problem but may have downsides. When you close an application in the traditional manner, it will clean everything it runs in the background and alert you to save the work. When you force close on Mac, you may end up losing files and data, or mess things up on the drive. Although the effect will only be related to that one particular application that got stuck, sometimes it can hurt.
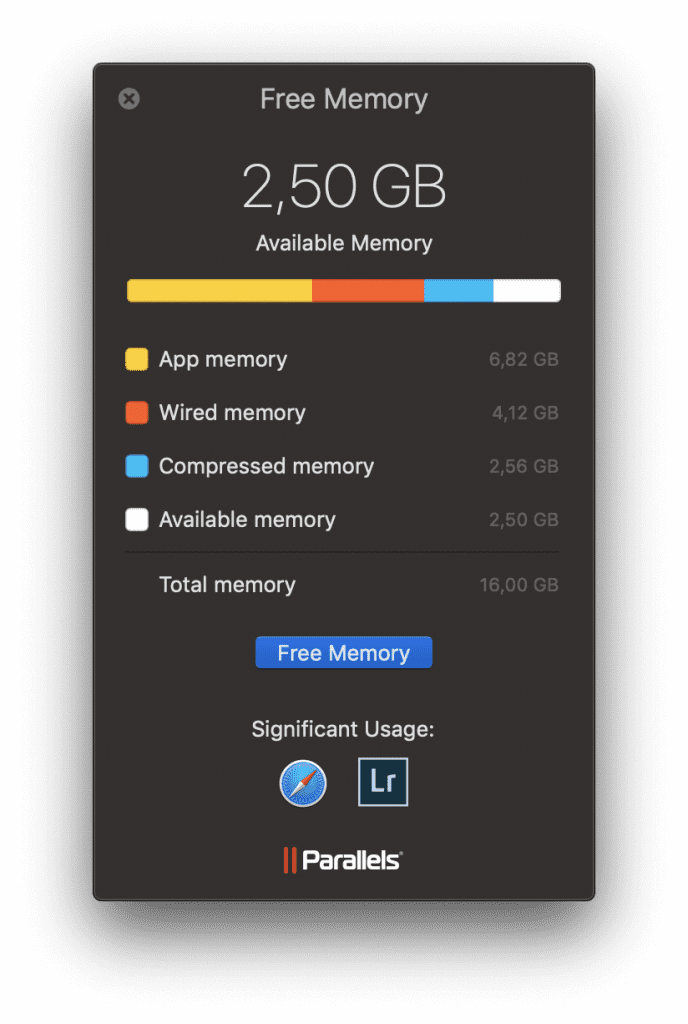
Using a smart app like Parallels Toolbox can help you to free up unused memory on the fly and prevent the applications from getting frozen over and over again. The package includes over 30+ useful apps for everyday needs that any Mac user will benefit from, including downloading videos and music from sites like YouTube, taking screenshot or record videos, optimize your Mac performance, free up extra space and so much more.
You can download Toolbox and try it out for free here (no registration needed).
1. Force Quit Using the Apple Menu
The most conventional and effective way to close frozen programs is to go to the macOS® menu bar, located along the top of the screen in the Finder menu.
To force quit an application, simply do the following:
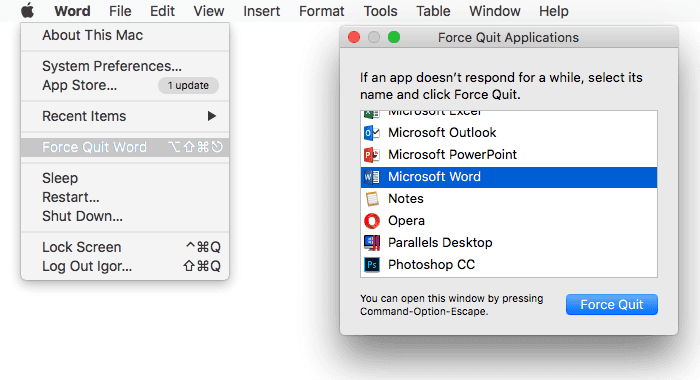
- Click on the black apple icon in the upper-left corner.
- From the drop-down menu, select “Force Quit…”. You will be directed to the new window named “Force Quit Application” where all the magic happens.
- Now all you have to do is select the application you want to close and choose “Force Quit.”
If you don’t know which application is stuck, pay attention to the ones that have the note “Not Responding.” This usually appears next to frozen applications.
2. Force Quit with Mac Shortcut
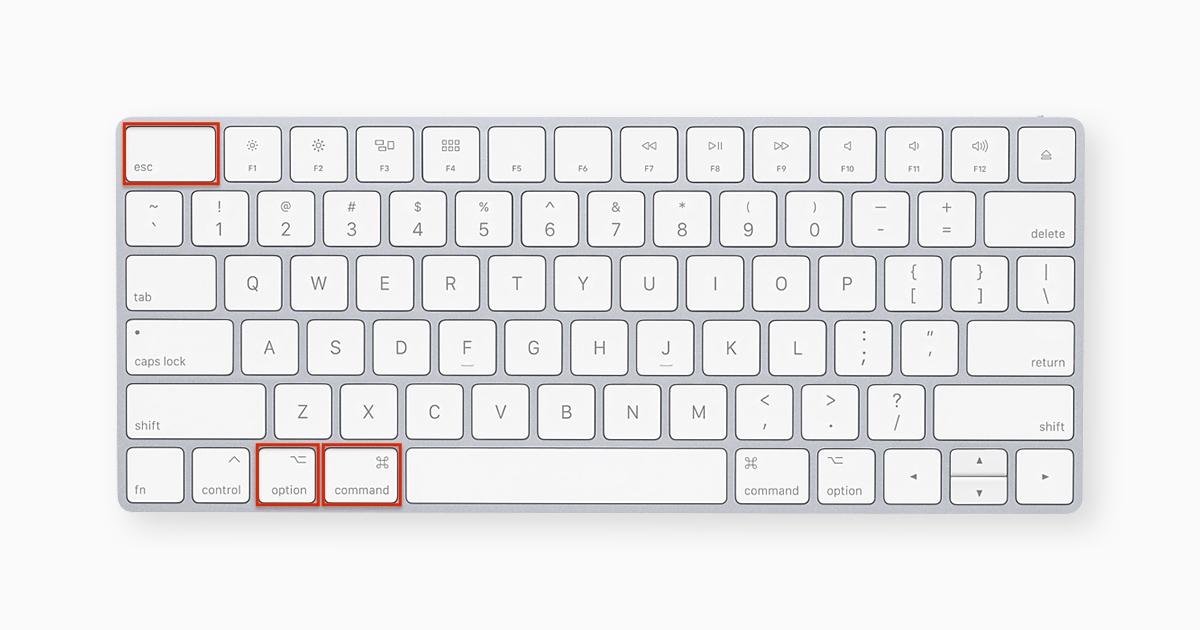
To do the same thing but faster, use Mac shortcut keys to close frozen applications.
- On your keyboard, press and hold Command + Option + Esc. It will immediately bring up a “Force Quit Application” window.
- Select the frozen application from the dialogue box and select “Force Quit.”
This could be your go-to method if the mouse or trackpad is lagging.
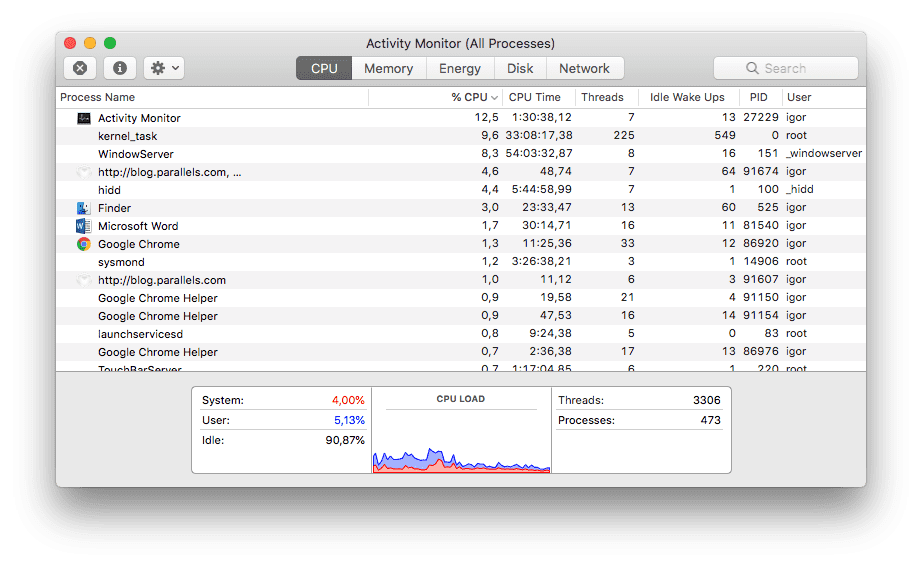
3. Close Application from Activity Monitor (Ctrl+Alt+Del Alternative)
Here’s the pinnacle of this article.
Very few Apple owners know that macOS provides an almost identical alternative to the traditional PC Control+Alt+Delete shortcut—and does it better. Yes, we all know that in Windows that keyboard shortcut is often used to open the Task Manager window. (To be honest, it’s needed too often, which is why we’re on a Mac.) From Task Manager, you can track applications, services, performance, and processes, and kill some of them when they’re unresponsive.
You can easily do all of that and more on the macOS native application called Activity Monitor.
To kill an application using Activity Monitor, do the following.
1. On your keyboard, press Command + Space, or click on Spotlight in the top-right corner of the screen.
2. In the “Spotlight Search” window, start typing “Activity Monitor.”

3. Once Activity Monitor is highlighted, hit Enter.
4. In the Activity Monitor processes list, select the application you want to quit and click “Force a process to quit” in the left corner.
What to Do If Force Quit Isn’t Working?
If all the applications stop responding and you can’t quit them using one of the methods described above, you can force your Mac to restart. To do so, press and hold the Control+Command+Power buttons.
Alternatively, you can force Mac to shut down by pressing and holding the power button, or use one of the many other shortcuts.
What’s the Solution?
Since your Mac doesn’t have enough space to run all those applications you need, the most obvious step would be to increase the RAM. If you own an iMac® or the older generation of MacBook Pro®, you can simply buy memory and upgrade your existing computer. With the new Mac generation, you don’t have that option anymore because the RAM is glued and soldered to the motherboard. You either buy a new computer or struggle.
Alternatively, you can clean your memory to free up space using Parallels® Toolbox. Parallels designed a tool set for macOS and PC users to efficiently manage their computer with just a few clicks—without any professional knowledge needed. Within the application (which is available to try for free), you can easily free up unused computer memory, clean your drive, and help your Mac run at max speed with a dozen other useful utilities.
If you’re interested in learning how easily one click can save precious disk space, check out how much space I took back with the Parallels Toolbox tool Clean Drive:
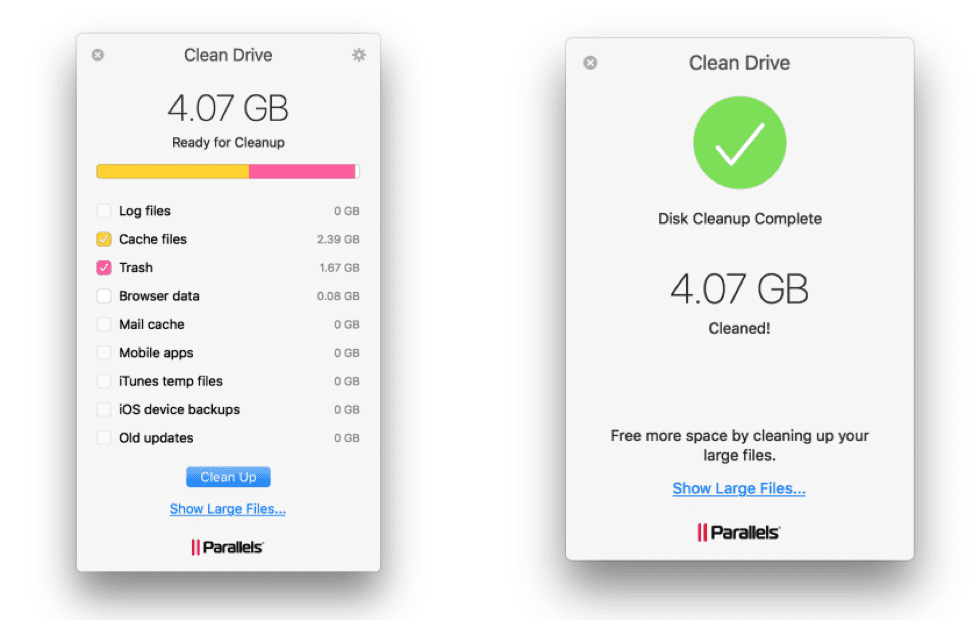
In one click (and about 10 seconds), I successfully removed 4 GB of clutter and reclaimed space on my hard drive.
So there you have it. Take care of your Mac with those quick tips, and remember to always save your work!
Источник
Getting Mac OS X applications to close after last window closed
I know it’s just a pet peeve, but I hate it that Mac OS X’s Preview.app stays open when it has no windows open. Is there any way to make it close when its last window is closed?
Since I don’t see any option inside Preview to make that happen, I imagine that the answer might be applicable to other programs that have similar … idiosyncrasies.
I realize that this is not outside the OS’s interface guidelines. That is, I recognize that this isn’t a bug that will be fixed. I’m wondering if there is some way to automatically close selected GUI applications that have no windows open.
6 Answers 6
RedQuits is there to help if you have ever tried to close an application with its red button and wondered why it is still open. With RedQuits, all programs now quit when there’s only one window left for that program. If you want to quit and close all open windows of a program, just uncheck «Quit only when 1 window is left for that app.» in the preferences.
—Answer stops here. Everything following is just my attempt to explain why.
What you are experiencing is the Mac philosophy of how applications should behave. Those who are closed after the last window dissapears are not behaving to Mac Interface Guidelines (though there are a lot out there). // Edit: This is not entirely correct, see posts below.
It has been that way since the very first Mac System (in 1984). I guess it’ll stay with us for another 25 years to come. Maybe app devs will allow us to set that in the preferences.
Until then it helps getting used to Command-Q (the Apple key and q) to quit each and every app — and Command-W for just the active window.
I wrote an AppleScript application to do this for you.
In brief, it checks what applications are open, gives you the option to whitelist apps to be excluded from auto-quit, then every 60 seconds, quits all applications (that it can, due to limitations).
To alter the whitelist while it’s running, click the icon in the dock for the selection dialog to reappear.
To quit, right click the Dock icon and choose «Quit»
The automatic termination feature introduced in 10.7 partially addresses that for some applications.
If you open Preview, open at least one window in it, close all windows, and switch to another application, Preview is hidden from the Dock and application switcher. If you look at Activity Monitor, the process is still running and uses memory, but there might be some changes in how the process is managed.
The Mac App Programming Guide says that processes are actually terminated, so there might be something I’m missing.
- Automatic termination eliminates the need for users to quit an app. Instead, the system manages app termination transparently behind the scenes, terminating apps that are not in use to reclaim needed resources such as memory.
Automatic termination transfers the job of managing processes from the user to the system, which is better equipped to handle the job. Users do not need to manage processes manually anyway. All they really need is to run apps and have those apps available when they need them. Automatic termination makes that possible while ensuring that system performance is not adversely affected.
Источник
Работа с несколькими пространствами Spaces на Mac
Если при открытии приложений беспорядок на рабочем столе Mac растет, можно использовать Mission Control для создания дополнительных рабочих столов, которые называются пространствами. Когда Вы работаете в области Spaces, Вы видите только те окна, которые находятся в этой области Spaces.
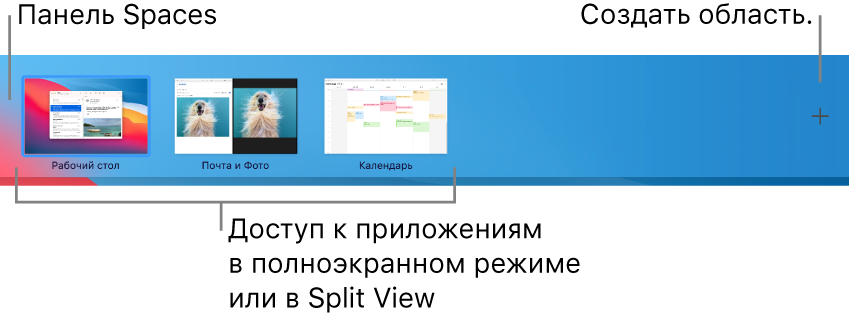
Создать область
Если Вы работаете с приложениями в полноэкранном режиме или Split View, миниатюры приложений отображаются в панели Spaces.
В панели Spaces нажмите кнопку добавления  .
.
Система поддерживает до 16 пространств.
Закончив, нажмите миниатюру пространства, чтобы открыть его.
Совет. Сделайте каждое пространство уникальным, назначив всем пространствам разные картинки рабочего стола. Для этого назначьте всем рабочим столам Системные настройки (см. информацию о назначении приложений ниже) и измените картинку рабочего стола в каждом из пространств.
Перемещение между пространствами
На Mac можно сделать следующее.
При использовании трекпада смахните влево или вправо тремя или четырьмя пальцами. На Magic Mouse смахните двумя пальцами.
Нажмите клавишу Control и клавишу со стрелкой вправо или влево.
Войдите в Mission Control, переместите указатель к верхнему краю экрана, затем нажмите пространство в панели Spaces.
Если у Вашего Mac есть панель Touch Bar, можно включить показ пространств в панели Touch Bar, используя раздел настроек «Клавиатура». Затем можно будет просто коснуться пространства в панели Touch Bar, чтобы его открыть.
Перенос окна приложения из одной области в другую
На Mac можно сделать следующее.
Перетяните окно приложения, которое хотите переместить, к краю экрана. Через короткое время окно перемещается в следующую область.
Перейдите в пространство, в котором находится окно для переноса, войдите в Mission Control, затем перетяните окно вверх в пространство, которое хотите использовать.
Перетянув окно на приложение в полноэкранном режиме в панели Spaces, можно использовать приложения в режиме Split View.
Назначение пространств для приложений
Если Вы используете две области или более, Вы можете назначить приложение (или Системные настройки) определенной области, чтобы оно всегда открывалось в этой области.
На Mac нажмите значок приложения в Dock, удерживая клавишу Control.
Возможно, Вам придется сначала открыть приложение, чтобы увидеть его значок в панели Dock.
В появившемся контекстном меню выберите «Параметры», затем выберите один из следующих вариантов.
Все Рабочие столы. Приложение открывается во всех областях.
Этот Рабочий стол. Приложение открывается только в текущей области. Если Вы используете приложение в полноэкранном режиме, оно отображается в своей собственной области.
Рабочий стол на дисплее [номер]. Приложение открывается в текущей области на определенном дисплее (если доступно несколько дисплеев).
Нет. Приложение открывается в той области, в которой Вы работаете в данный момент.
По умолчанию при переходе к приложению автоматически отображается пространство, в котором находятся открытые окна этого приложения. Например, если Вы создаете новый документ TextEdit на рабочем столе 3, однако окна TextEdit уже открыты на рабочем столе 2, новый документ открывается на рабочем столе 2. Чтобы изменить эту настройку, откройте меню «Apple»

> «Системные настройки», нажмите «Mission Control» и снимите флажок переключения.
Удаление области
На Mac войдите в Mission Control, затем переместите указатель к верхнему краю экрана.
В панели Spaces наведите указатель на область, которую хотите удалить, затем нажмите появившуюся кнопку «Удалить»  .
.
Если в области есть открытые окна, они будут перемещены в другую область.
Чтобы быстро выйти из полноэкранного режима приложения или режима Split View, наведите указатель на миниатюру в панели Space, а затем нажмите появившуюся кнопку «Выход»  .
.
Источник


