- Clover Configurator
- Clover Configurator easy to install for generating Clover EFI configuration files
- Effortlessly modify the parameters of your Clover EFI configuration file
- Create your own Clover EFI config files via a streamlined and well organized graphical user interface
- Clover configurator для windows
- Clover 3.5.2
- Аналоги программы
- Clover configurator для windows
- About
Clover Configurator
Clover Configurator designed to help you create custom configuration files for the Clover EFI bootloader via a streamlined graphical interface.
Clover Configurator easy to install for generating Clover EFI configuration files
Upon launch, Clover Configurator will check to see if there are already available configuration files, and enables you to view their content. In addition, Clover Configurator can check for the latest Clover EFI revision, and helps you download and install the bootloader.
The Clover Configurator app is organized around two major functionalities: you can use the available tools to perform certain tasks, or you can customize certain parameters associated with the Clover EFI configuration file.
Effortlessly modify the parameters of your Clover EFI configuration file
This utility keeps the Clover EFI parameters organized into various sections: you can start by modifying the ACPI parameters, you can personalize the boot mode, adjust the CPU performance, disable certain drivers, and so on.
The utility also streamlines certain tasks: you can mount the EFI drive, you can view and save the boot.log file, you can preview and change the Clover theme, or you can install 32bit, 64bit, or 64bit UEFI drivers.
When you are satisfied with your settings, navigate to the built in generator to create a config file that will provide an almost complete configuration file for your Clover EFI bootloader.
Create your own Clover EFI config files via a streamlined and well organized graphical user interface
Thanks to its intuitive design, finding your way around the Clover Configurator application is quite easy: simply navigate to the available sections and adjust specific parameters.
As a result, Clover Configurator is a great tool to have around if you want to have a better control over your Clover EFI bootloader, without having to deal with complex commands and workflows.
Clover configurator для windows

- UEFI bios:
- Скидываем все настройки в default.
- AHCI — enable;
- Vt-d: Disable (+ в Clover дропнуть DMAR таблицу)
- Vt-x: Enable (только для 10.13 и если используете виртуальные машины)
- Intel Virtualization Technology — Enable
- Serial-port: Disable
- XHCI Hand-off: Disable (рекомендуеться)
- XHCI Hand-off: Enabled (только если что то не работает в режиме Disable )
- IOAPIC 24-119 Entries: Enabled (подмечено что у многих с этим пунктом паникует, поэтому тестируйте)
- CSM: Disable (по возможности)
- Fasboot: Disable
- Secure boot: Disable or Other OS
Legacy bios:
. .
[i]Примечание:
- HDD должен быть подключен к SATA-0, контролер Intel.
- . [/i]
Для установки потребуется флешка не менее 8Гб.
- ПК на ОС Windows XP/7/8.
- Скачать утилиту Boot Disk Utility с страницы разработчика cvad или с форума applelife.ru со страницы посвящённой данной утилите.
- Установить по инструкции
- Зайти на флешку в папку EFI\CLOVER\ и удалить папку OEM и файл config-sample (не путать с config.plist).
- Зайти на https://github.com/aci…pleSupportPkg/releases скачать ApfsDriverLoader.efi и скопировать его в папку EFI\CLOVER\drivers64UEFI (необходимо для macOs 10.13 и выше!)
- Добавить в EFI\CLOVER\Kext\Other https://github.com/acidanthera/Lilu/releases
- Добавить в EFI\CLOVER\Kext\Other https://github.com/aci…WhateverGreen/releases
- Скачать образ Mac OS X по указанным ссылкам:
Нажми и качай! - Развернуть скаченный образ на подготовленную флешку.
- Инструкция с applelife.ru пункт «Заливка дистрибутива macOS на второй том загрузочного USB Flash drive:«:
- Перед распаковкой образа необходимо нажать кнопку ^Format disk^.
- В основном окне программы -> Destination Disk — выбираем наш USB Flash Drive -> Part2.
- Нажимаем кнопку «Restore Partition».
- В открывшемся окне проводника выбираем распакованный файл с расширением *.hfs.
- Тем, кто устанавливает на ноутбук (или имеет PS/2 мышь или клавиатуру) , обязательно скачать
 VoodooPS2Controller.kext.zip ( 97,46 КБ )
, новая версия:VoodooPS2Controller.kext.zip ( 93,86 КБ )
положить в папку EFI/CLOVER/KEXT/10.X или Other - Всё, установочная флешка готова, можно приступать к установке.
 VoodooPS2Controller.kext.zip ( 97,46 КБ )
За данный споcоб установки благодарим cvad и Skvo
Данная инструкция написана по материалам с applelife.ru
Установить один из загрузчиков на диск (если он не входит в состав сборки) :
— Загрузчик №1 — Clover (рекомендуется для большинства пользователей);
Как это сделать: UEFI, Legacy BIOS.
— Загрузчик №2 — OpenCore (для опытных пользователей)
— Загрузчик №3 — Chameleon (на данный момент существует для очень старых систем и особых случаев);
*загрузчик устанавливаем только один, на ваш выбор
После входа в macOS первое, что делаем:
- Устанавливаем кекст для сетевой карты;
- Настраиваем SMbios;
- «Заводим» видео-карту (разрешение должно быть правильным, и верхняя строка прозрачная);
- Поднимаем «нативное управление питанием» процессора;
- Поднимаем звук через AppleALC или VoodooHDA
.
21. Ставим програмулинки и «рюшечки».
Clover 3.5.2

Clover – это простая, но очень полезная программа, которая упростит и улучшит работу операционной системы Windows. Речь идет о вкладках, которые станут доступны пользователям при работе с файлами и папками.

Стандартная ОС открывает несколько папок под одним ярлыком, из-за чего пользователям приходится регулярно переключать их мышкой, либо при помощи комбинации на клавиатуре. Причем интерфейс в этом случае достаточно сложный и неудобный, из-за чего пользователи просто теряются среди этих папок.
Пароль ко всем архивам: 1progs
С программой Clover все станет гораздо удобнее, ведь теперь вкладки будут открываться в системном меню, и при этом каждая из них будет отдельно подписана. Данная система практически идентична с вкладками в браузерах, при использовании сети интернет.
Основными преимуществами программы являются:
- Управление папками в одном системном меню;
- Подписание каждой отдельной папки;
- Возможность управления при помощи комбинаций;
- Легкий и удобный интерфейс;

Скачать данную утилиту для Windows 10 вы можете на нашем сайте, перейдя по ссылке, которая размещена в верхней части активной страницы. Сразу после клика по ней, начнется прямая загрузка установочного файла программы.
Битая ссылка или обновилась версия программы? Напишите об этом в комментариях, обязательно обновим!
Если не подходит пароль к архиву или после извлечения не все файлы в архиве — смотрите раздел Помощь
Аналоги программы
Похожие программы смотрите в наших подборках программ
Clover configurator для windows

Clover Configurator Pro Download here
A full configurator for Clover V2 bootloader. Made with latest Swift 5, has its own parser (each entry will remains sorted as you leave it before closing the file). All the code comes from me, with the only exception of the handy Sparkle.framenwork to keep the app up-to date (and off course Clover), so that giving credit is pretty easy unlike my competitors that have the bad habit of silently include third party software in their application w/o mention them (use class-dump and take a look). Run in macOS 10.11 +
p.s. (I use «competitors» word here to underline what I think my «competitors» think of me, but this app doesn’t even have a donate button)
Why this name? Ok, «Clover» is an opensource bootloader, whould say also that my name is among the Clover’s credit (at boot time push the info button) because I wrote the MatchOS set of functions (and other minor things here and there in the build system), unlike my competitors. «Configurator» is a common word, «Pro» stand for «Professional» since this is a real Plist Editor like Xcode has or any other commercial app. but this is totally free!
Seem strange anyway? Take a look here. . it seems that all this is continued, copying a lot of my ideas (also descriptions about any ha ha.. just they was in Pandora’s Box): Hey, but me too I’m able to copy LoL! So now.. copy this if you can! (consider that PXSourceList is now 4 years old and cannot be used to write a plist editor. Forgot that you should also give credit to the following (used class-dump): Alamofire, CNSplitView, NoodleKit, DockProgressBar, NSTextView+JSDExtensions,
I forgot something? where are their Copyright notice?? some infrigment? Ok understood, same story! )
Special thanks to the Sparkle project that keeps Clover Configurator Pro.app up-to-date .
App icon by Mirone.
Clover Configurator Pro is a professional Plist editor and is totally free! True, but what if you don’t want all the Clover facilities to show up? go to the Preferences and mark as active the following: 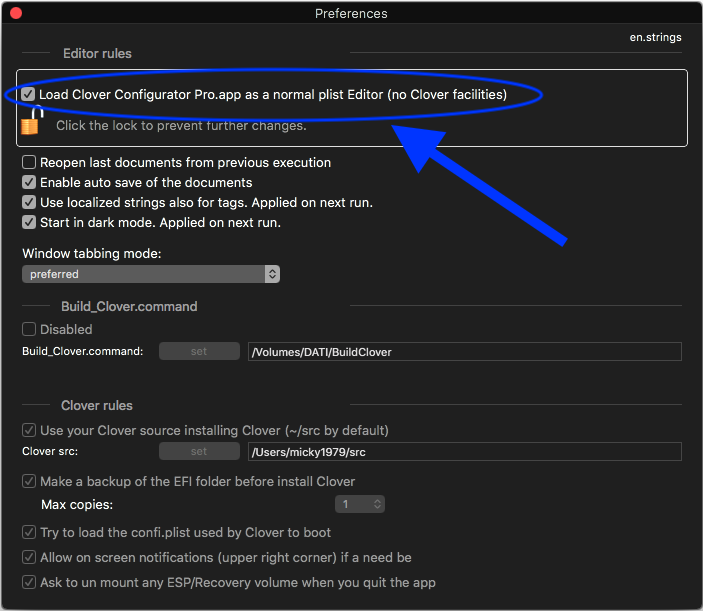
from now on, Clover Configurator Pro is only a Plist Editor!
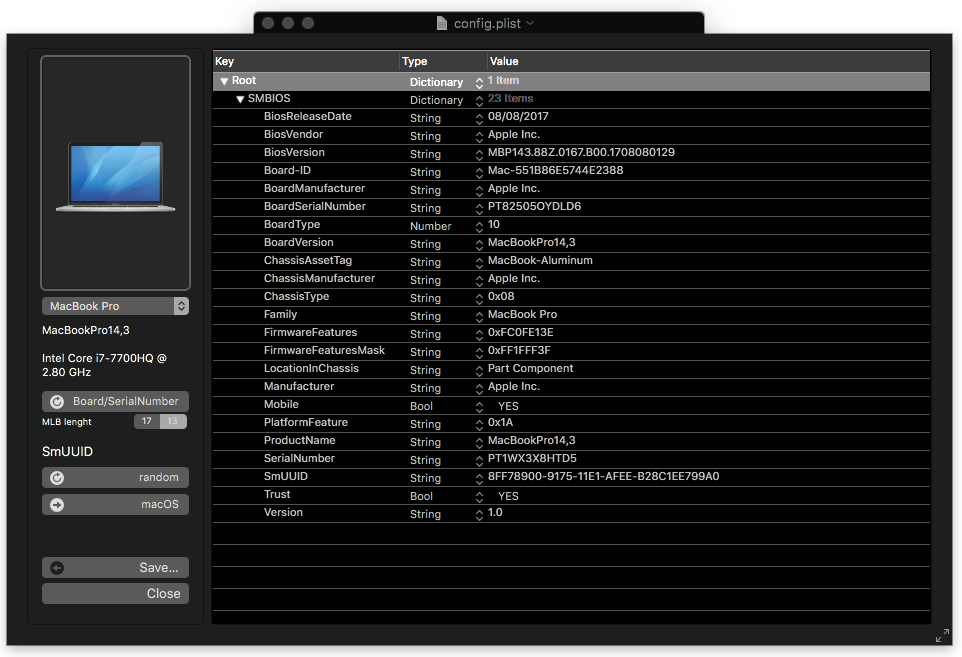
Editing the config.plist
Clover Configurator Pro can automatically load the config.plist used to boot the OS automatically, just ensure this option is enabled in the Preferences: 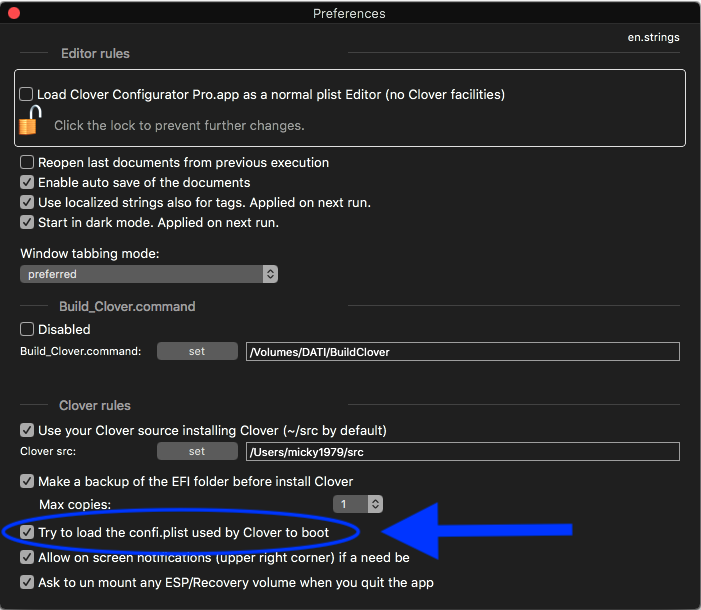
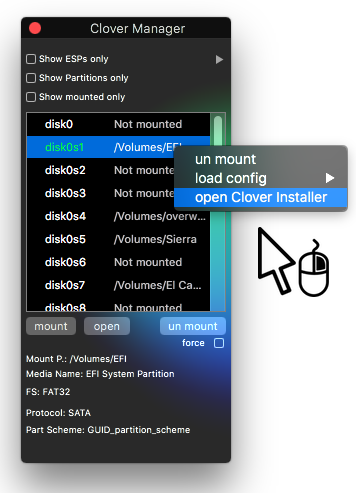
What if you want to load another one? Simple, open the «Clover Manager» under the «View» menu: 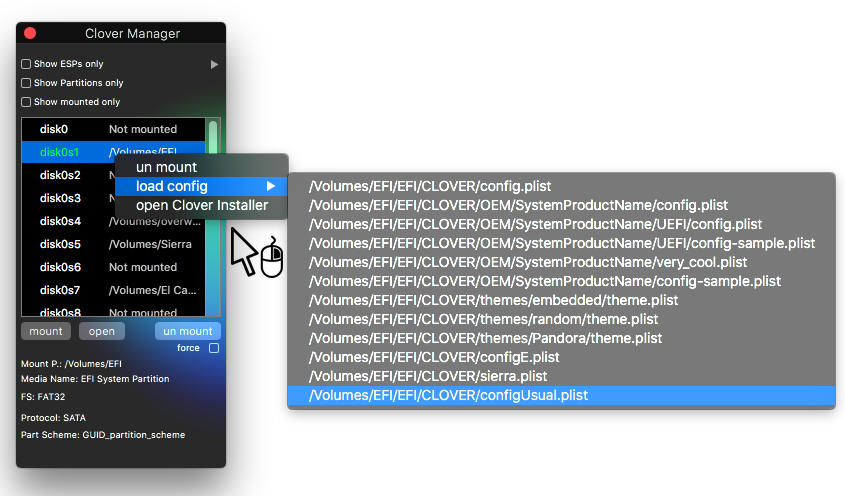
right click on the desired disk and choose one (boot partition is green colored on dark appearance, red otherwise). The partition must be mounted. Or if the file is elsewhere just drag it to the applications icon, or right clik on the file you want to open.
How to edit something for Clover? Well, that is the easy part, just right click with the mouse over any entry of the config.plist:
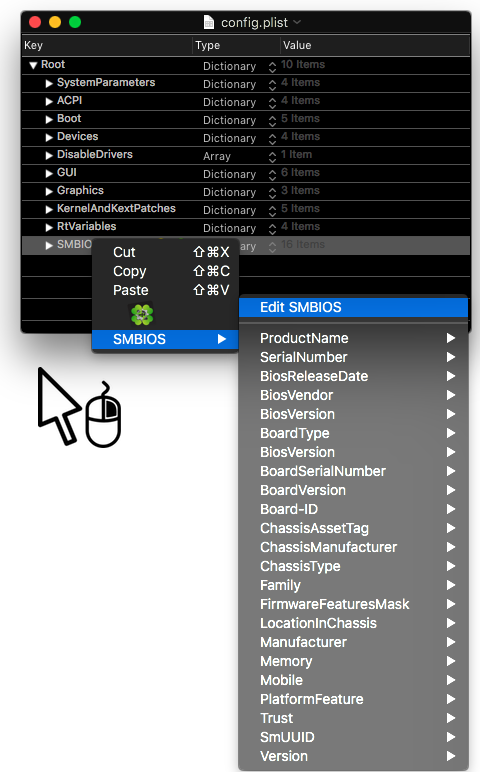
if a key does not yet exist or your is a new empty document just right click on the root 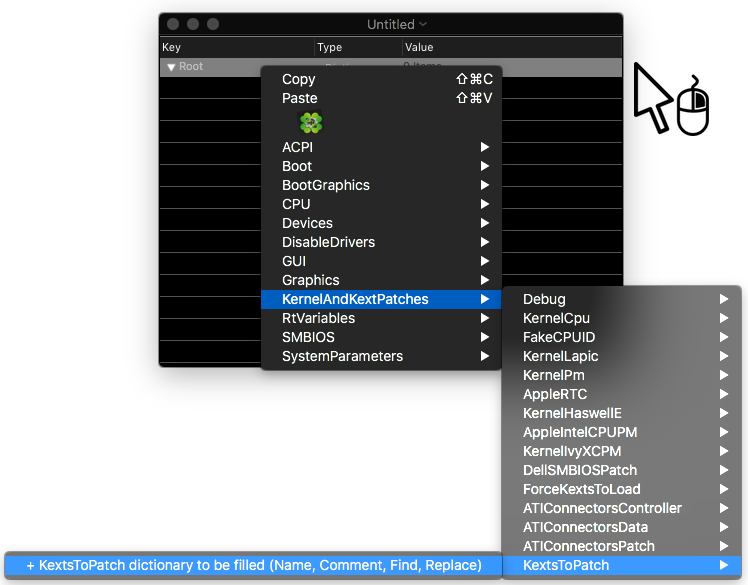
Depending on what’s on your Preferences, you have two way:
1 — Download a precompiled binaries (default).
2 — Use Clover source code by specifying the path to the src folder (
/src by default) and mark as active the relative option in the Preferences.
Open the «Clover Manager» under the «View» menu:
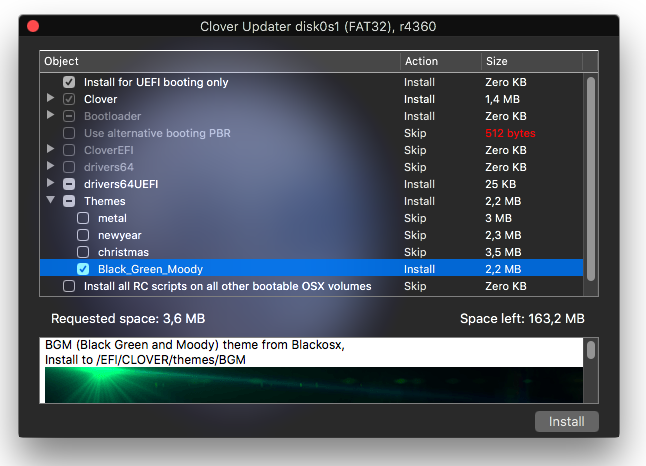
Clover is out of date?
Clover Configurator Pro keeps Build_Clover.command always up to date and you can use it to download and build always the latest Clover revision available. To do that take a look at the «Build_Clover» menu. Mind that Xcode must be installed and its clt selected.
Wants some info about your disks or partitions?
The Clover Manager is expandable:
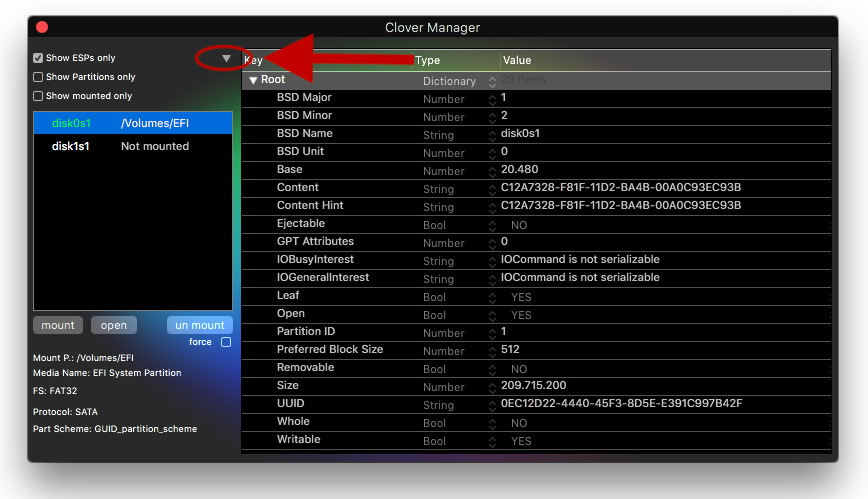
all the info you wants are there. You can also apply filters for slices (partitions), mounted or ESPs if you have more than one.
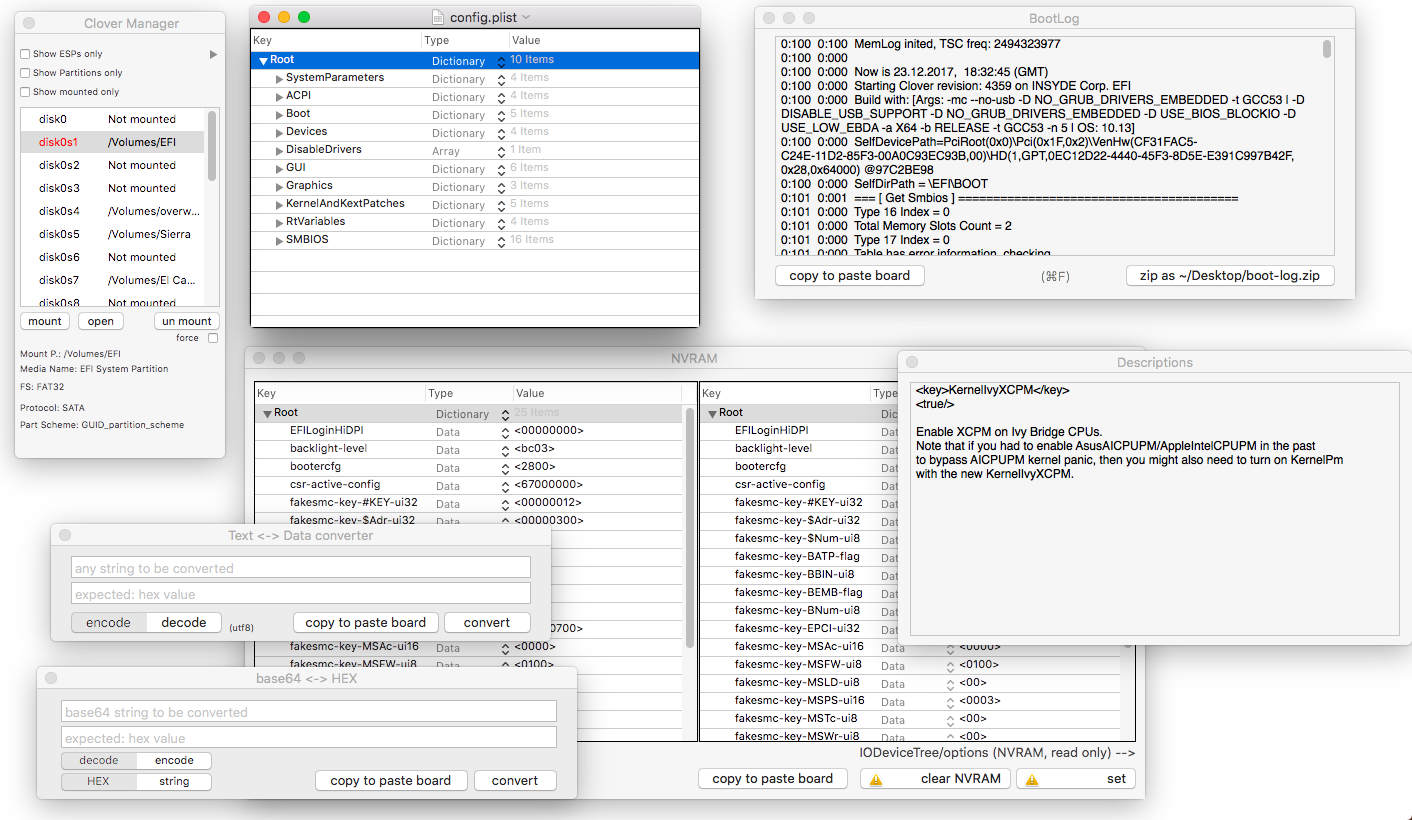
Under the view menu you will find confortable having a text to data encoder/decoder, a hex to base64 encoder/decoder The boot-log viewer and the NVRAM editor The NVRAM editor is cool and can help you editing or understand your NVRAM in a clear way.
Clover Configurator Pro has a Dark appearance?
Did not like it? Go to the Preferences and disable «Start in dark mode. Applied on next run.», restart the app, and everything will be different:
How to translate
Clover Configurator Pro is multi language : actually Italian and English are available at 100%, Portoguese is at 90% (thanks to Mirone), but you can translate it easily by making a copy of Base.strings into your locale identifier suggested directly by Clover Configurator Pro in the upper right corner of the Preferences: 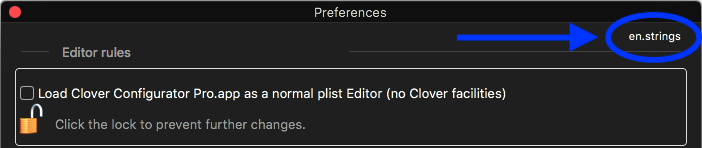
You can find localization files at this dedicated repository here, Fork it edit the file, or as I said make a new one naming it as CCP suggested you. Open a pull request at the CCP-Locale-Bundle repository with the translated file, so that We can keep track of changes
adding more functionalities after a good debugging.
For any possible bug open an issue here on github, I’ll be happy to solve it
About
A free Plist Editor with some optional facilities for Clover UEFI boot loader


