- GTK 3 Code::Blocks Tutorial
- Part 27 of GTK 3 Programming with C and Glade Tutorial
- Context of this GTK 3 Code::Blocks Tutorial
- Installed Software
- Template Files
- Easier GTK 3 Debugging in Code::Blocks
- Fast GTK 3 Project Creation in Code::Blocks
- 1. Install Code::Blocks IDE
- 2. Make User Templates in Code::Blocks
- 2.1 Create a New GTK+ Project in Code::Blocks
- 2.1.1 Start Code::Blocks
- 2.1.2 Start a New GTK+ Project
- 2.2 Convert the GTK 2 Project to GTK 3
- 2.2.1 Open the main.c Source File
- 2.2.2 Build the Project
- 2.2.3 Convert the Project from GTK 2 to GTK 3 Glade
- 2.2.4 Build the Project Again
- 2.3 Create the Simple Template
- 2.3.1 Replace the C Code in main.c
- 2.3.2 Add the Glade File to the Project
- 2.3.3 Associate the Glade file with Glade
- 2.3.4 Create the Simple User Template
- 2.4 Create the Widget Structure Template
- 2.4.1 Modify the main.c File
- 2.4.2 Create the Widget Structure User Template
- 2.5 How to Delete User Templates
- 3. Create a New Project from a User Template
- 4. Debugging in Code::Blocks
- One thought on “GTK 3 Code::Blocks Tutorial”
- Установка библиотеки GTK+ в среде Code::Blocks под Windows
- GTK / C++ проект в Code::Blocks под Windows
GTK 3 Code::Blocks Tutorial
How to make GTK 3 projects using the Code::Blocks IDE. The Code::Blocks IDE adds debugging capabilities to any C language GTK 3 project in this tutorial. How to make user templates in the Code::Blocks IDE for GTK 3 projects that use Glade. This GTK 3 Code::Blocks tutorial show how to set up the Code::Blocks IDE for making GTK 3 Glade projects that use the C programming language.
The following image shows the Code::Blocks IDE with a GTK Glade project open.
The Code::Blocks IDE is available in the Linux Mint repositories. We install it from the repositories in this tutorial.
Part 27 of GTK 3 Programming with C and Glade Tutorial
Context of this GTK 3 Code::Blocks Tutorial
This tutorial is part 27 of a GTK 3 Glade C language tutorial series. It assumes that you have been following the tutorial series. If you have been following the tutorial series, you will have certain software installed. In addition you will have made two sets of template files to help start new projects. The tutorial series is presented using Linux Mint as the development operating system.
The following elaborates on the above. It describes what must be in place before continuing with this tutorial. Also included are the reasons for using the Code::Blocks IDE with GTK 3 Glade projects.
Installed Software
It is assumed that you installed the following software for developing GTK 3 applications using Glade.
Template Files
It is assumed that you have made the two sets of template files from part 4 (simple template) and from part 24 (widget structure template).
Easier GTK 3 Debugging in Code::Blocks
By using the Code::Blocks IDE, easier debugging capabilities are added to each GTK project. The IDE makes it easier to debug software, rather than using GDB from the command line.
Fast GTK 3 Project Creation in Code::Blocks
By creating custom user templates in the Code::Blocks IDE, new GTK 3 Glade projects can be quickly and easily started.
1. Install Code::Blocks IDE
From a terminal window, enter the following to install Code::Blocks. This has been tested on Linux Mint 19.2, but should work on other versions of Linux Mint. It should also work on other Debian and Ubuntu based Linux distributions.
A terminal application called xterm must also be installed, as it is used by Code::Blocks. Install xterm using the following command from a terminal window.
If xterm is not installed, an error message appears in Code::Blocks when attempting to run a program from within Code::Blocks. An error message such as the following is displayed.
2. Make User Templates in Code::Blocks
We must create two user templates in Code::Blocks. The first user template is based on the simple template from part 4 of this tutorial series. The second user template is based on the template from part 24 and includes a widget structure. First we must create a new GTK project in the Code::Blocks IDE.
2.1 Create a New GTK+ Project in Code::Blocks
Before making new user templates in Code::Blocks, we must create a new GTK+ project and then modify it.
2.1.1 Start Code::Blocks
In Linux Mint start Code::Blocks by clicking the main Linux Mint menu, then going to the Programming category. Now click the Code::Blocks IDE menu item.
2.1.2 Start a New GTK+ Project
Start a new project in Code::Blocks by clicking the Create a new project link in the default Start here window. Alternatively, select File → New → Project… form the top menu.
In the New from template dialog box that pops up, click the GTK+ project item. You may have to scroll to find it. See the following image.
Click the GO button in the dialog box to continue. The next dialog box step is just an information screen. Click the Next button.
In the next dialog box step, give the project a title and navigate to the desired folder to save the project in. As this project is the start of a user template, call it gtk_template_simple, as shown in the following image.
Click the Next button. In the next step, leave the defaults. Click the Finish button to finish creating the project.
2.2 Convert the GTK 2 Project to GTK 3
By default, when creating a new GTK+ project in Code::Blocks, a GTK+ 2 project is created (at least this is the case with Code::Blocks 16.01, which is the version from the Linux Mint 19.2 repository). We must convert it to a GTK+ 3 project for use with this tutorial series. Follow the steps below to convert the project.
2.2.1 Open the main.c Source File
With the new GTK project created in the previous section open in Code::Blocks, click the + sign at the left of Sources in the left pane of Code::Blocks. This expands the Sources folder and shows the main.c source file.
Double-click the main.c file to open it. The image below shows what the Code::Blocks IDE looks like at this stage.
2.2.2 Build the Project
Build the project using the build button from the top toolbar, as shown in the previous image. By default, the project will not build. The following message is displayed at the bottom of the Code::Blocks IDE instead.
The reason for this error is because the GTK 2 development library package is not installed on the system. Of course if it happens to be installed on the system, the project will build.
2.2.3 Convert the Project from GTK 2 to GTK 3 Glade
To convert the project from GTK 2 to GTK 3 with Glade, the build options in Code::Blocks must be accessed and modified.
Open the project build options in Code::Blocks. Using the top menu, select Project → Build options…
In the Project build options dialog box that opens, click the project name in the top left pane. This makes sure that changes made apply to both the debug and release versions of the project.
Change Linker Settings
Under the Linker settings tab, find the Other linker options pane at the right of the dialog box. Change it from:
Change the Compiler Settings
In the Project build options dialog box, click the Compiler settings tab. Click the Other compiler options tab.
Change the following line from:
Click the OK button. This applies the new build options to the project.
2.2.4 Build the Project Again
Build the project again using the Build button on the top toolbar. The project will build and can be run, but will display some warnings during the build. The warnings are because the code in main.c is older GTK 2 code that calls functions that are deprecated in GTK 3.
Use the Run button on the top toolbar to run the code.
2.3 Create the Simple Template
We can now create the simple template based on part 4 of this tutorial series. The user template that we create is based on the project that we just created and converted to GTK 3. Follow the steps below to make the simple template in Code::Blocks.
2.3.1 Replace the C Code in main.c
With the Code::Blocks GTK 3 project still open, replace the code in main.c with the following. It is the main.c source code from part 4 of this series.
main.c
2.3.2 Add the Glade File to the Project
Copy the glade folder that contains the window_main.glade folder from the template files from part 4 of this tutorial series. Paste the folder into the root folder of the gtk_template_simple Code::Blocks project. The project folder now contains the following.
The Glade file must now be added to the Code::Blocks project from within the IDE so that it gets copied as part of the template.
In the left pane of Code::Blocks, right click the project name gtk_template_simple under Workspace. On the menu that pops up, click the Add files… item. In the dialog box that opens, open the glade folder and select the window_main.glade file. Click the Open button. In the next dialog box, leave the defaults and click the OK button.
The Glade file is now part of the project. It is found in the left pane of Code::Blocks. Expand the Others item and then glade to see it.
2.3.3 Associate the Glade file with Glade
In Code::Blocks, double-click window_main.glade. In the dialog box that opens, click the Open it with the associated application item and then click the OK button. This ensures that the Glade file opens in the Glade editor whenever it is double-clicked.
2.3.4 Create the Simple User Template
Save the project that we just edited by clicking the Save all files button on the top toolbar.
On the top menu, click File → Save project as template…
In the dialog box that opens, leave the title as gtk_template_simple and then click the OK button. Click the OK button in the next dialog box.
2.4 Create the Widget Structure Template
The widget structure version of the template is quickly created from the previous template project. Follow the steps below to make it.
2.4.1 Modify the main.c File
With the previous project still open in Code::Blocks, open the main.c file. Replace the code in main.c with the following. The following code is from part 24 of this GTK Glade C tutorial series.
main.c
Save the main.c file.
2.4.2 Create the Widget Structure User Template
After making the above changes to the template project, select File → Save project as template…
In the dialog box that opens, change the title to gtk_template_widget_struct. Click the OK button. Click the OK button in the next dialog box.
2.5 How to Delete User Templates
If you made a mistake when making a user template, it can be deleted. A new template can then be made.
Find Code::Blocks user templates in your home folder. They are in a hidden sub-folder. When using the default Nemo file manager in Linux Mint Cinnamon, navigate to your home folder. Press Ctrl + H in Nemo to show hidden files and folders. Navigate to .config/codeblocks/UserTemplates which contains the user templates. Delete unwanted templates from this folder.
3. Create a New Project from a User Template
To start a new project using either the simple template or the widget structure template, do the following.
- Start the Code::Blocks IDE.
- Start a new project: Click Create a new project
- Select User templates in the left pane of the dialog box that opens.
- Select the desired template in the dialog box.
- Click the Go button.
- In the next dialog box, navigate to the desired destination folder.
- Use the Create Folder button in the dialog box to create a new project folder with the desired folder name.
- Navigate into the new folder.
- Click the Open button.
- In the next dialog box give the project its new name.
- Click the OK button.
After following the above steps, the new project is ready for use. If in doubt about any of the above steps, watch the video embedded near the top of this page.
4. Debugging in Code::Blocks
Debugging GTK Glade C programs is easy with a project made from a template in the Code::Blocks IDE. Place a breakpoint on the desired line of code. Add variables to a watch window. See the video embedded near the top of this page for more details.
One thought on “GTK 3 Code::Blocks Tutorial”
wouldn’t you need
sudo apt-get install glade libgtk-3-dev
Установка библиотеки GTK+ в среде Code::Blocks под Windows
Скачайте и установите Code::Blocks. Для установки удобно выбрать пакет с уже интегрированным компилятором MinGW (но не обязательно, MinGW можно установить отдельно). Скачайте библиотеку GTK+. Поскольку структура каталогов библиотеки совпадает со структурой MinGW, имеет смысл их объединить, т.е. произвести разархивирование в тот же каталог, куда установлен MinGW.
Для того чтобы Code::Blocks подхватил компилятор GCC из пакета MinGW достаточно прописать в системной переменной окружения PATH дополнительные пути.
Например, если MinGW установлен в корень диска C:, то пути следующие
в переменной PATH их необходимо дописать в конец существующей записи через символ «;», т.е. вот так:
Панель управления -> Система -> Дополнительные параметры среды -> Дополнительно -> Переменные среды -> Системные переменные PATH -> Значение переменной
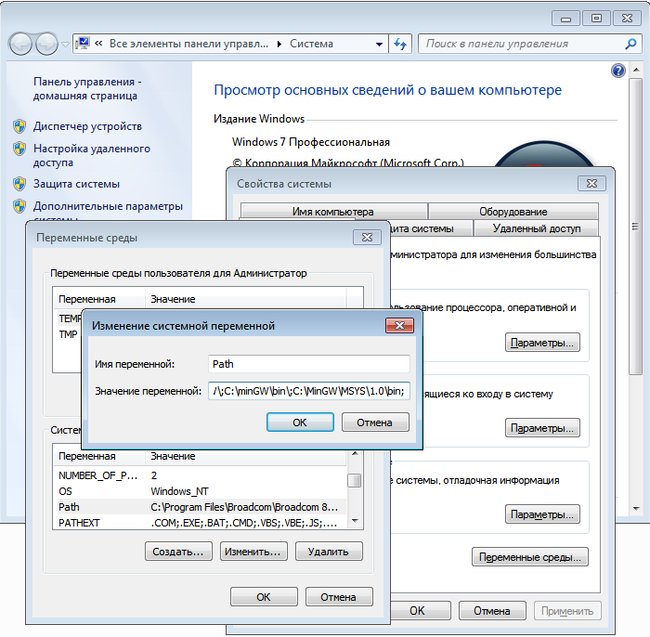
Поскольку библиотека GTK+ была разархивирована в папку MinGW, этих записей будет достаточно, в противном случае, необходимо добавить в PATH пути к библиотеке GTK+.
Следующим шагом настраиваем среду Code::Blocks на корректную работу с библиотекой GTK+.
В меню Settings -> Compiler
в диалоговом окне выбираем вкладку Compiler Settings -> Other Options
и вписываем команду
Затем в этом же диалоговом окне переходим на вкладку Linker Settings -> Other linker options:
и вписываем команду
Нажимаем кнопку «OK». Настройка завершена. Можно создать первый свой проект на С с использованием библиотеки GTK+.
Выберите File -> New -> Projects -> Console Application
Пройдите все шаги мастера, правильно выбирая и вписывая значения. В готовом файле main.c напишите следующую программу:
GTK / C++ проект в Code::Blocks под Windows
Библиотека GTK позволяет довольно быстро и просто делать графические приложения под разные операционные системы, к тому же она бесплатная и у нее открытый исходный код. Недостаток ее в том, что по ее настройке в Windows очень мало информации, отчего у новичков возникают сложности с ее освоением. В отличной книге A.Krause об этом тоже ничего нет, но.
В Code::Blocks есть визард «File->new->project->GTK+ project», создающий шаблон GTK проекта, который сразу работает, и сделать на его основе что угодно, однако, этот проект сможет использовать только C-файлы, а в его настройках будут хранится абсолютные пути к каталогам библиотек GTK, их довольно много. Исчезает возможность использования языка С++, что огорчает, а при «переезде» библиотеки GTK в другое место, или при переезде самого проекта на другой компьютер, его нужно будет перенастраивать. Есть способ убить этих двух зайцев — создать с нуля свой универсальный шаблон для GTK/C++ проекта.
1) Загружаем и устанавливаем последний Code::Blocks со встроенным компилятором и отладчиком.
(Вообще GTK не привязана именно к Code::Blocks, но мне эта среда больше всех нравится.)
2) Загружаем архив «GTK all-in-one bundle» и распаковываем его, например в папку «C:\GTK».
3) В Code::Blocks создаем новый проект «console-application». Осталось подключить библиотеки GTK, а их там полно. Конечно, можно прописывать пути вручную, как это делает шаблон Code::Blocks, но лучше использовать для этого поставляемую с GTK утилиту pkg-config, она лежит в папке . GTK\bin.
4) Использовать утилиту в Code::Blocks надо так: Заходим в меню «Projects->Build options». Выбираем параметры сразу для Debug и Release конфигурации.
во вкладке «Compiler settings->Other options» добавляем строку:
`pkg-config gtk+-2.0 —cflags`
во вкладке «Linker settings->Other options» добавляем строку:
`pkg-config gtk+-2.0 —libs`
ВНИМАНИЕ! Кавычки должны быть косые! (Там где на клавиатуре — буква Ё).
5) Чтобы компилятор нашел утилиту pkg-config, в системную переменную Path надо вписать путь к ней. У меня это «С:\GTK\bin».
6) Проверяем работоспособность. Для чего загружаем в файл main.cpp содержимое из файла main.c шаблона «GTK+ project» от Code::Blocks (который с двумя кнопками и сообщением Hello world), и, если все работает, сохраняем проект как шаблон «File->Save project as template».
Новый GTK/C++ проект легко создается командой «File->new->from template» и выбором нашего шаблона из списка ранее созданных.


