- Экспорт в ProRes
- ProRes Converter: легко конвертировать видео в Apple ProRes
- Краткое введение в кодек Apple ProRes
- Легко конвертируйте любое видео в Apple ProRes 422/Apple ProRes 4444
- # Шаг 1.Загрузите и установите VideoSolo Free Video Converter
- # Шаг 2.Запустите ProRes Converter и Добавить файлы
- # Шаг 3.Выберите формат вывода видео и папку вывода
- # Шаг 4.Отредактируйте видео с начальным и конечным заголовком
- # Шаг 5.Начните преобразование видео в Apple ProRes
- About Apple ProRes
- Apple ProRes 4444 XQ*
- Apple ProRes 4444*
- Apple ProRes 422 HQ
- Apple ProRes 422
- Apple ProRes 422 LT
- Apple ProRes 422 Proxy
- ProRes Codec for Windows: How to Export ProRes on Windows
- Part 1. What Is ProRes
- Part 2. How to Download ProRes Codec for Windows
- Part 3. Convert ProRes Codec for Windows in Easy Steps
- Wondershare UniConverter — Best Video to ProRes Converter
- Step 1 Click the Add Files Icon and Import a ProRes Media.
- Step 2 Pick a Windows Compatible Format.
- Step 3 Click Convert.
- Part 4. Bonus Part: Convert Any Format to ProRes on Mac
Экспорт в ProRes
Как вывести видео в формат ProRes из программы Adobe Premiere Pro CC 2018 на платформе Windows? Нам поможет бесплатный на данный момент плагин: Voukoder for Premiere Pro.
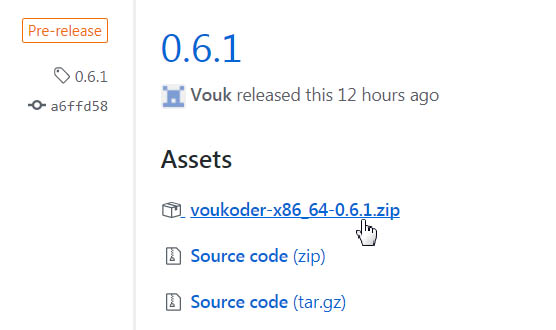
Качаем его здесь:
https://github.com/Vouk/voukoder/releases
Открываем скачанный архив:

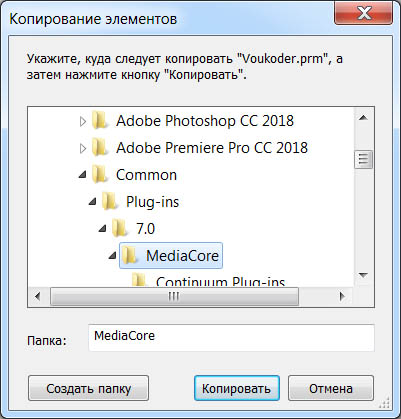
И плагин Voukoder.prm из открытого архива, копируем (для Adobe Premiere Pro CC) в следующую директорию:
C:\Program Files\Adobe\Common\Plug-ins\7.0\MediaCore
Для более старых программ:
C:\Program Files\Adobe\Common\Plug-ins\CS6\MediaCore
Для Adobe Premiere Elements:
C:\Program Files\Adobe\Adobe Premiere Elements 15\Plug-Ins\Common
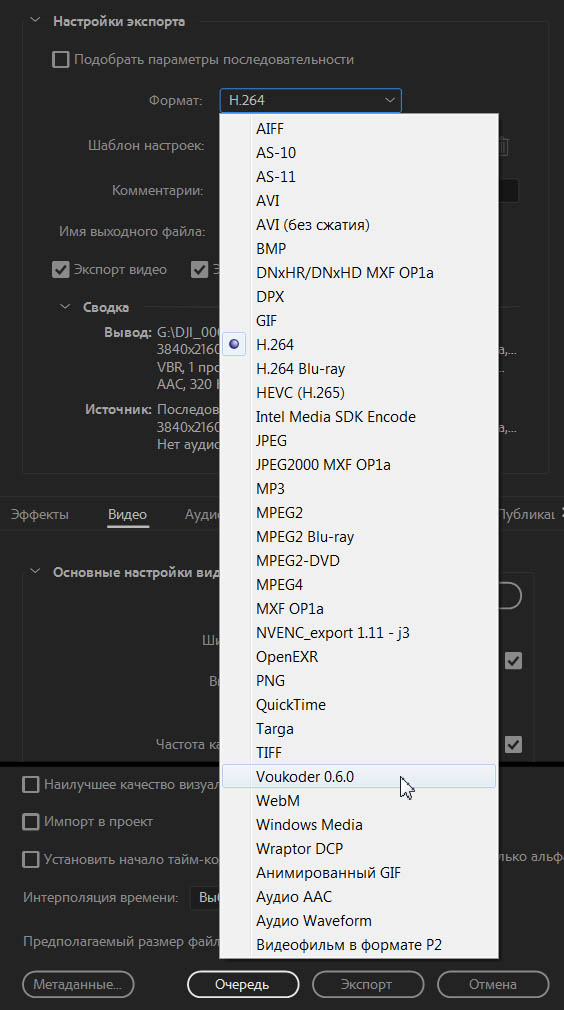
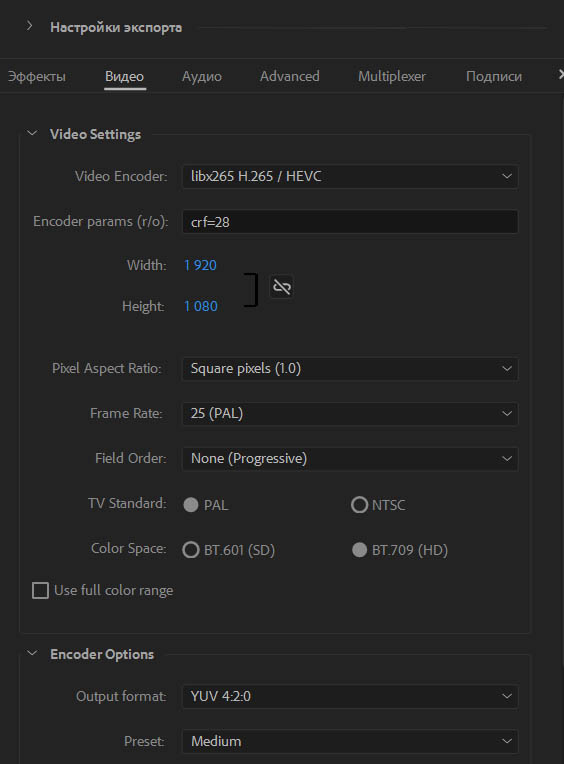
Запускаем программу Adobe Premiere Pro CC 2018 и в Настройках экспорта, выбираем из выпадающего списка — Формат: Voukoder 0.6.0.
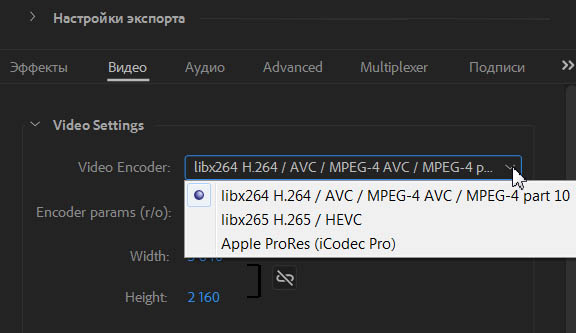
Идем в закладку: Видео и в разделе Video Settings для кодека x264 (формат по-умолчанию) видим следующие настройки.
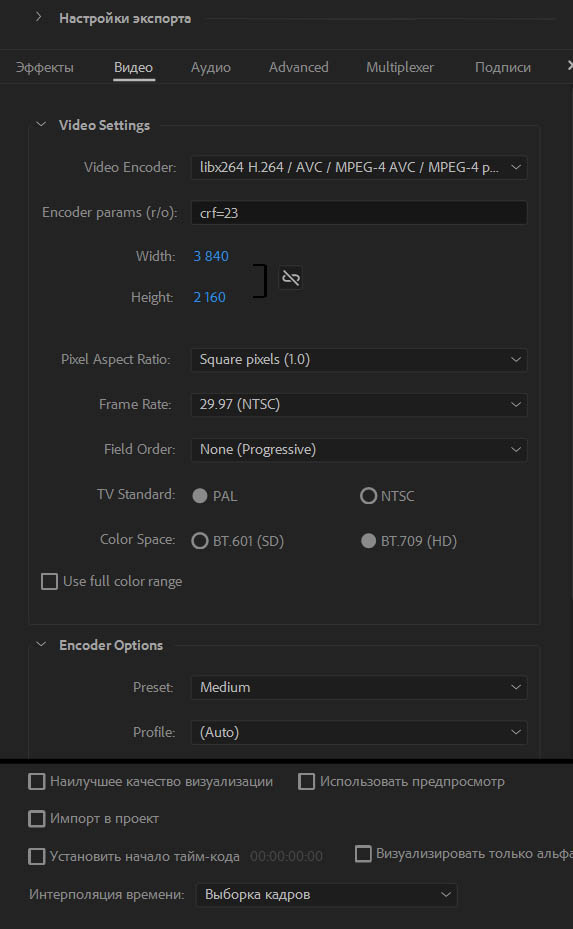
В выпадающем списке Video Codec, можно выбрать следующие варианты: x264 (libx264 H.264 / AVC / MPEG-4 AVC / MPEG-4 part 10), x265 (libx265 H.265 / HEVC), Apple ProRes (iCodec Pro) и при наличии в системе видеокарты с поддержкой NVENC, доступны еще два варинта: NVIDIA NVENC H.264 encoder и NVIDIA NVENC hevc encoder.
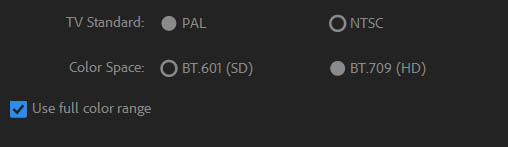
В наличии галка: Use full color range, для вывода видео с полным диапазоном 0-255.
Раздел: Encoder Options.
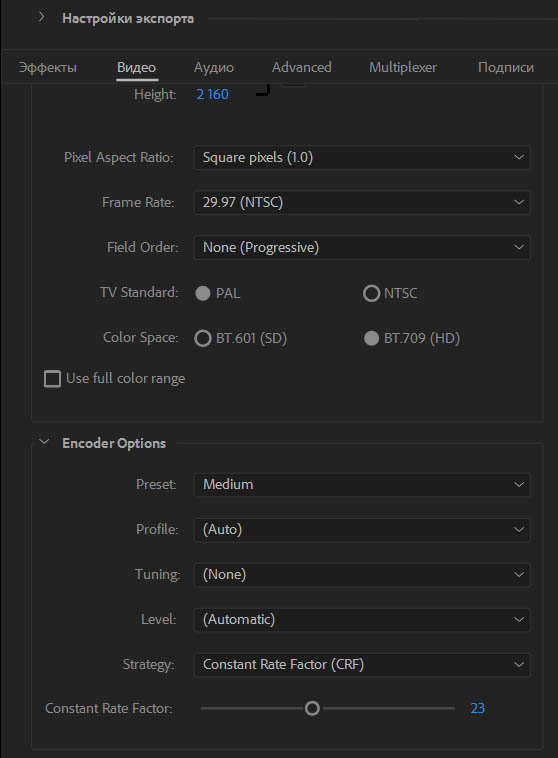
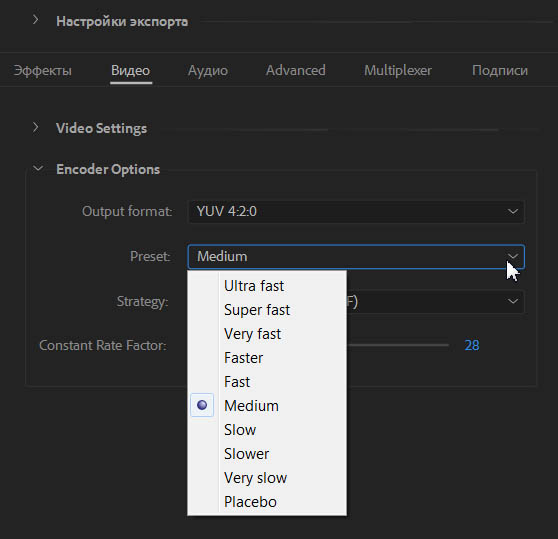
Там можно выбрать Preset (подробнее о них читаем здесь).

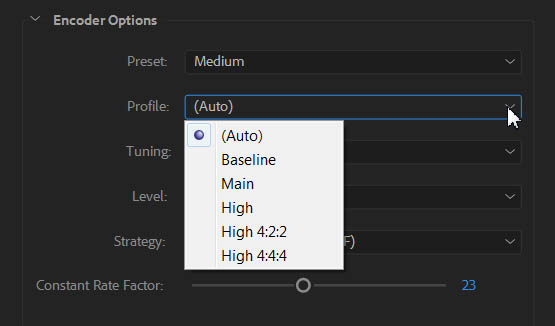
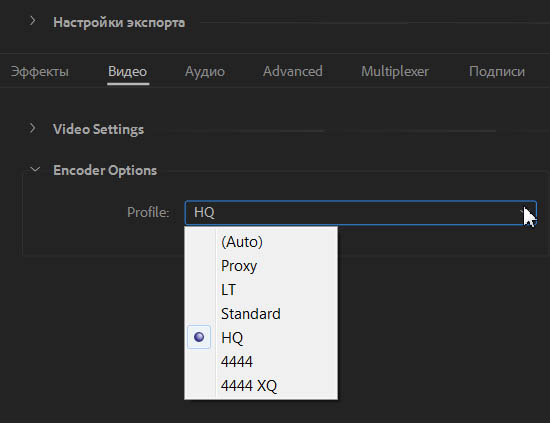
Выпадающий список Profile:
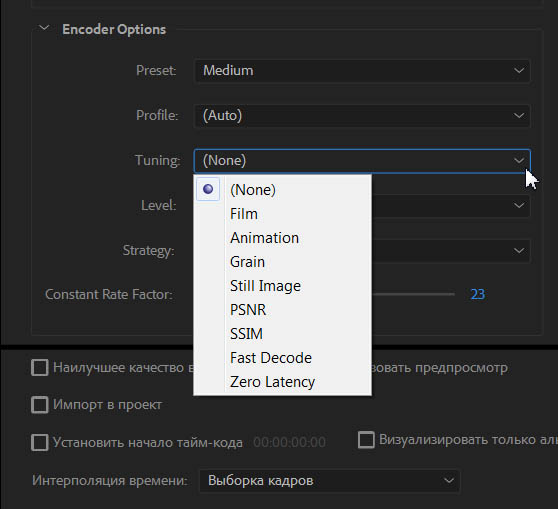
Выпадающий список Tuning:
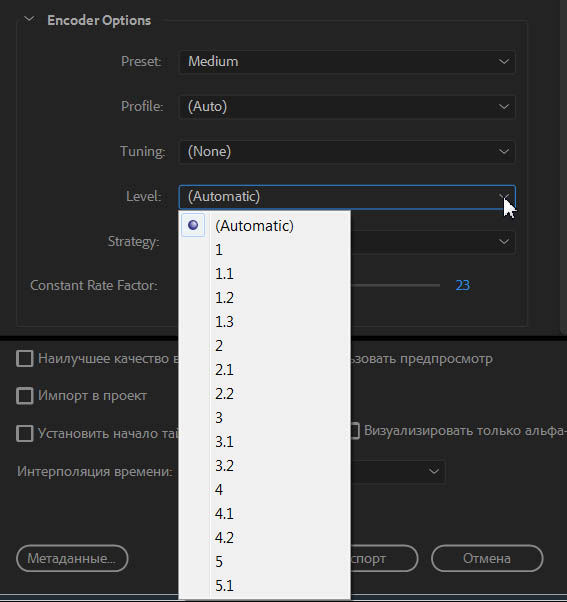
Доступные уровни Levels:
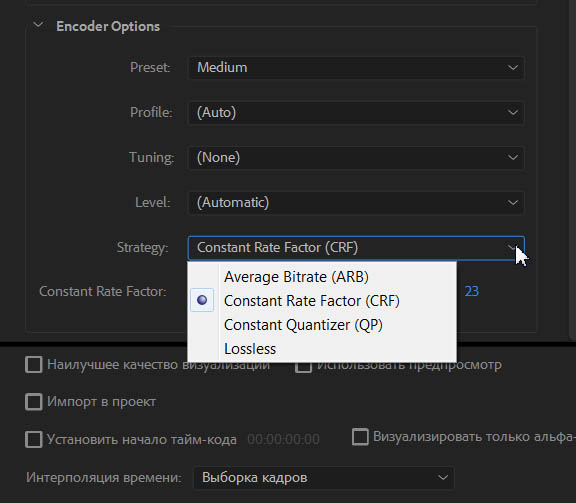
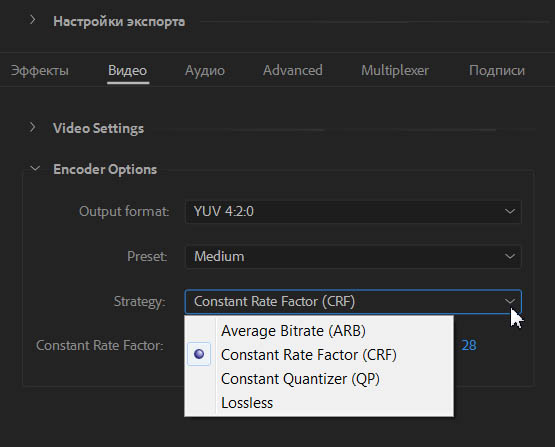
Выпадающий список Strategy:
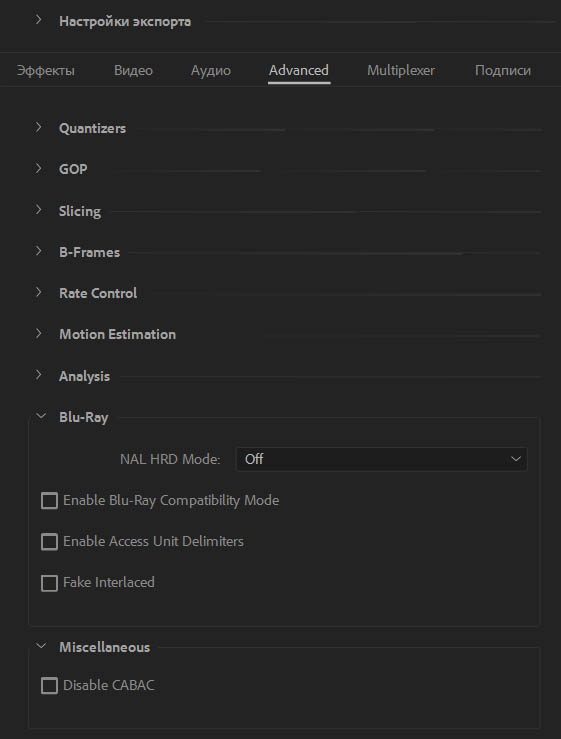
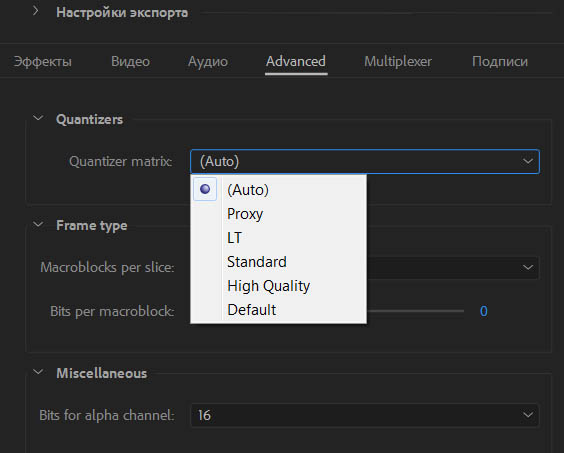
Все дополнительные настройки спрятались в закладке: Advanced.
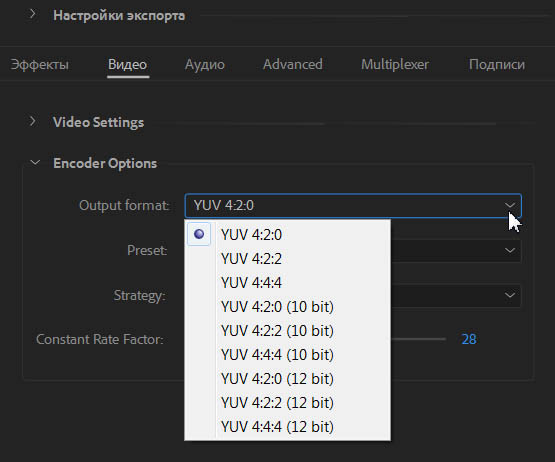
Video Settings > Video Encoder: libx265 H.265 / HEVC.
Encoder Options > Output Format. Субдискретизация (Subsamplings) — 420, 422, 444 в 8, 10 и 12-бит.
Выпадающий список Preset:
Выпадающий список Strategy:
Video Settings > Video Encoder: Apple ProRes (iCodec Pro).
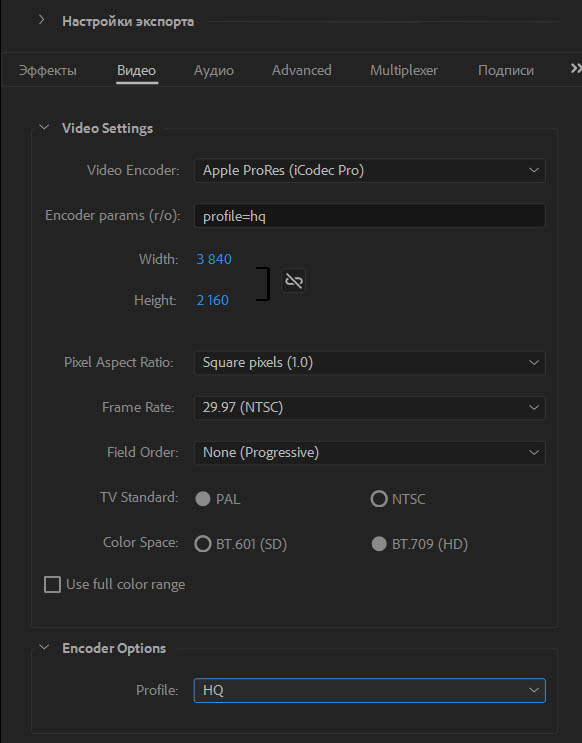
Раздел: Encoder Options. Выбираем Profile: HQ.
Нажимаем на кнопку: Экспорт (Экспорт с текущими настройками).

И получаем ошибку: Средство импорта файлов обнаружило несоответствие в структуре файла. Чтение и запись метаданных (XMP) этого файла отключены (File importer detected an inconsistency in the file structure of xxx.mp4. Reading and writing this file’s metadata (XMP) has been disabled).

В панели: События.
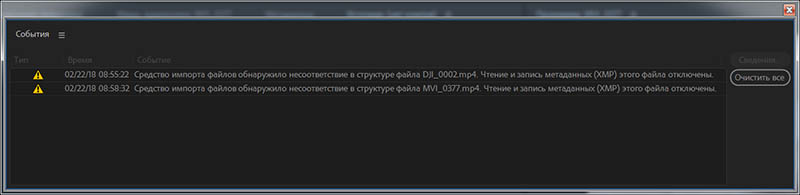
В новом обновлении плагина Voukoder for Premiere Pro v0.6.1 добавлена поддержка Unicode для кириллицы и соответственно решена проблема с ошибкой: Средство импорта файлов обнаружило несоответствие в структуре файла.
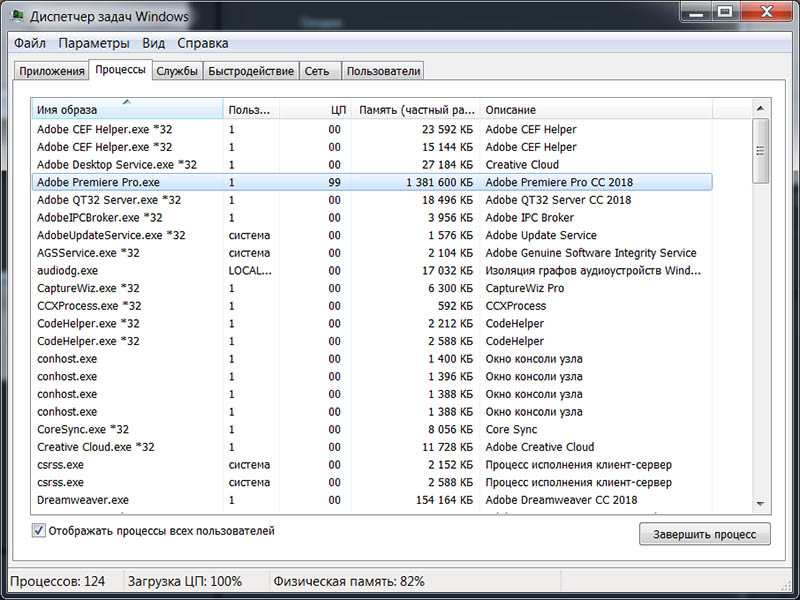
При кодировании Full HD видео в кодек Apple ProRes (iCodec Pro), загрузка четырехъядерного процессора: 100%.
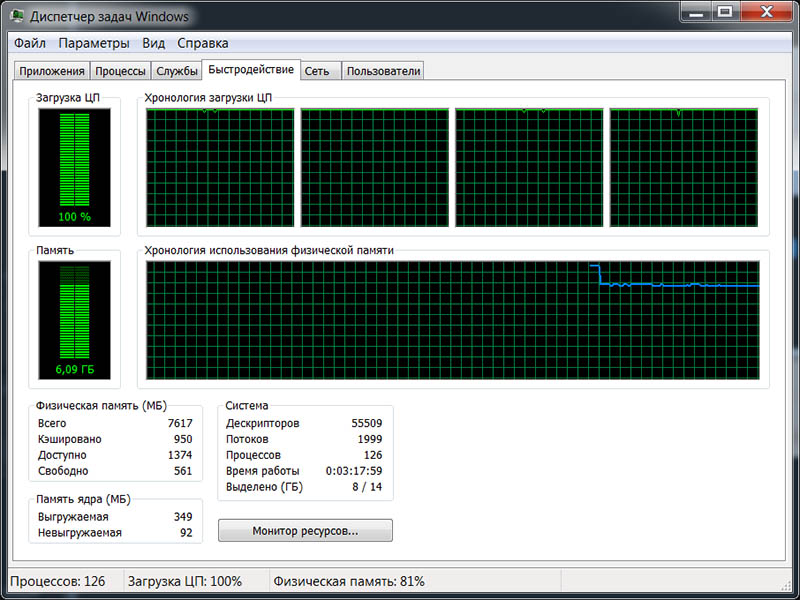
Процесс Adobe Premiere Pro.exe грузит центральный процессор на 99% и утилизирует 1.4 Гбайта оперативной памяти.
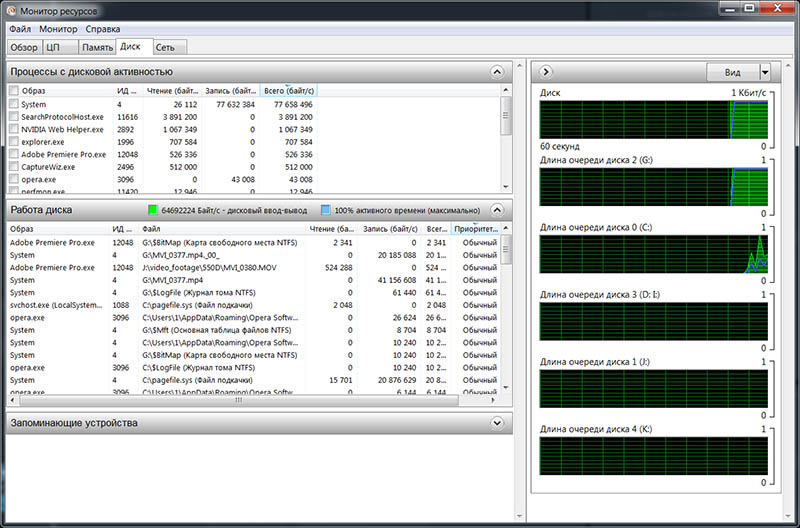
На 100% у нас рендеринг зависает, так как ProRes тяжелое видео, и после рендеринга, запускается процесс Multiplexer.

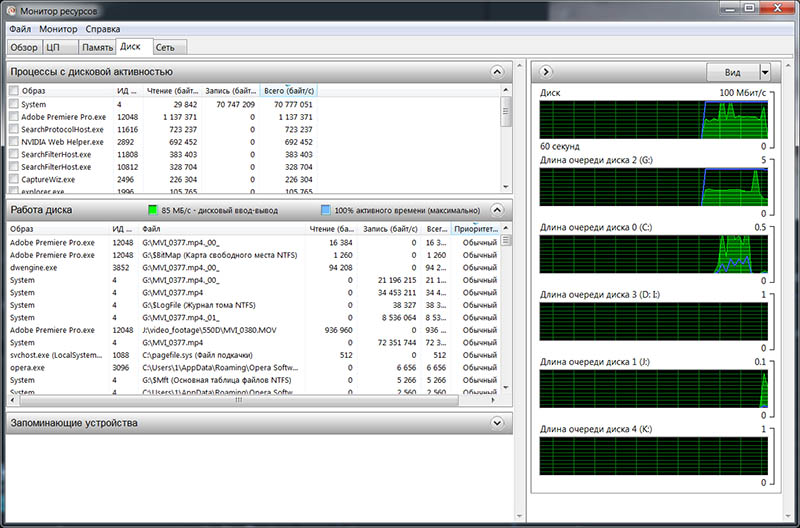
Монитор ресурсов, 100% загрузка диска на котором происходит процесс мультиплекса, еще и активно работает и файл подкачки.
На этом скрине, видим цифру в 85Мб/с, и это для файла длительностью 53 секунды и объемом 1.4Гбайта.
Информация о полученном после экспорта видео, от Media Info:
ProRes Converter: легко конвертировать видео в Apple ProRes
Кодек Apple ProRes-лучший видеокодек для редактирования в Final Cut Pro X, Final Cut Pro 7/6, Adobe Premiere Pro и других программах для редактирования на платформе Mac.По этой причине вам может потребоваться преобразовать видео в Apple ProRes для дальнейшего редактирования.И сегодня мы расскажем о лучшем конвертере Apple ProRes Converter, который поможет вам бесплатно конвертировать видео в Apple ProRes 422 или ProRes 4444.
Если вам нужно напрямую получить этот бесплатный полезный конвертер ProRes, перейдите к Части 2.Чтобы узнать больше о кодеке ProRes, начните с Части 1.
Краткое введение в кодек Apple ProRes
Кодек Apple ProRes, являясь одним из самых популярных видеоформатов в профессиональном видеопроизводстве и пост-продакшене, в полной мере использует преимущества многоядерной обработки и поддерживает режимы быстрого декодирования с пониженным разрешением.Семейство ProRes включает шесть членов: Apple ProRes 422, Apple ProRes 422 HQ, Apple ProRes 422 Proxy, Apple ProRes 422 LT, Apple ProRes 4444 и Apple ProRes 4444 XQ.Для онлайн-редактирования на мощном компьютере рекомендуется ProRes 422 HQ или ProRes 422; для автономного редактирования на медленном компьютере рекомендуются ProRes 422 Proxy и ProRes 422 LT.
Легко конвертируйте любое видео в Apple ProRes 422/Apple ProRes 4444
Если у вас есть видео, которые нельзя импортировать в Final Cut Pro, iMovie или Adobe Premiere, потребуется конвертер ProRes.
На самом деле видеоконвертеров, поддерживающих кодек Apple ProRes, не так уж и много.Чтобы сэкономить ваше время, я хотел бы представить бесплатный конвертер ProRes Converter-VideoSolo Free Video Converter.Этот конвертер позволяет кодировать/декодировать различные форматы видео в/из ProRes в Mac OS и Windows OS.Он также поддерживает преобразование пакетных файлов в Apple ProRes, а также легко редактирует файлы.Более того, преобразование совершенно бесплатно.С помощью этого конвертера мы можем легко конвертировать видео в Apple ProRes без дополнительной платы.
Вот пошаговое руководство по конвертации видео в ProRes с помощью бесплатного видео конвертера VideoSolo.
# Шаг 1.Загрузите и установите VideoSolo Free Video Converter
Загрузите программное обеспечение и установите его на свой компьютер, следуя инструкциям.
# Шаг 2.Запустите ProRes Converter и Добавить файлы
Запустите VideoSolo Free Video Converter, нажмите «Добавить файлы», чтобы выбрать видео, которые вы хотите преобразовать.Обратите внимание, что вы можете выбрать несколько файлов для одновременного преобразования.

# Шаг 3.Выберите формат вывода видео и папку вывода
Выберите нужный формат вывода, вы можете выбрать различные форматы.Чтобы быстрее найти Apple ProRes, вы можете выполнить поиск прямо в окне «Формат вывода».
Вы также можете изменить путь к папке вывода, чтобы сохранить преобразованные видеофайлы.

# Шаг 4.Отредактируйте видео с начальным и конечным заголовком
Выберите один видеофайл и откройте панель редактирования, щелкнув значок «Редактировать».Теперь выберите понравившуюся тему из разных шаблонов.Перейдите к следующему шагу, чтобы отредактировать слова с названием, автором, временем и т.Д., Чтобы определить собственное видео.Наконец, вы можете предварительно просмотреть свои изменения на панели.

# Шаг 5.Начните преобразование видео в Apple ProRes
Нажмите кнопку «Конвертировать», чтобы начать процесс преобразования, вы также можете выбрать такие действия, как выключение компьютера после завершения преобразования. 
С помощью бесплатного конвертера видео VideoSolo мы можем конвертировать видео в ProRes легко.Кроме того, у него есть версия Pro, которая поддерживает технологию ускорения графического процессора, которая может конвертировать видео в 6 раз быстрее, чем обычно.Конечно, профессиональная версия-VideoSolo Video Converter Ultimate имеет более мощную функцию и стабильную производительность при конвертации видео.
Как мы уже говорили, не все видеоконвертеры поддерживают кодек Apple ProRes.Не тратьте время на практику с этими конвертерами, мы уже выбрали для вас лучший выбор.Освоить этапы конвертации очень легко.Если вам нужно изменить формат видео на кодек Apple ProRes, не стесняйтесь попробовать VideoSolo Free Video Converter!
About Apple ProRes
Apple ProRes codecs provide an unparalleled combination of multistream, real-time editing performance, impressive image quality, and reduced storage rates. Apple ProRes codecs take full advantage of multicore processing and feature fast, reduced-resolution decoding modes.
All Apple ProRes codecs support all frame sizes (including SD, HD, 2K, 4K, and 5K) at full resolution. The data rates vary based on codec type, image content, frame size, and frame rate. Apple ProRes includes the following formats.
To bring the same performance, quality, and ease of use introduced by Apple ProRes to raw media, use Apple ProRes RAW. Learn more about ProRes RAW.
Apple ProRes 4444 XQ*
Apple ProRes 4444 XQ is the highest-quality version of Apple ProRes for 4:4:4:4 image sources (including alpha channels). This format has a very high data rate to preserve the detail in high-dynamic-range imagery generated by today’s highest-quality digital image sensors. Apple ProRes 4444 XQ preserves dynamic ranges several times greater than the dynamic range of Rec. 709 imagery. This holds true even against the rigors of extreme visual effects processing in which tone-scale blacks or highlights are stretched significantly. Like standard Apple ProRes 4444, this codec supports up to 12 bits per image channel and up to 16 bits for the alpha channel. Apple ProRes 4444 XQ features a target data rate of approximately 500 Mbps for 4:4:4 sources at 1920×1080 and 29.97 fps.
ProRes 4444 XQ is supported on OS X Mountain Lion v10.8 or later.
Apple ProRes 4444*
Apple ProRes 4444 is an extremely high-quality version of Apple ProRes for 4:4:4:4 image sources (including alpha channels). This codec features full-resolution, mastering-quality 4:4:4:4 RGBA color, and visual fidelity that is perceptually indistinguishable from the original material. Apple ProRes 4444 is a high-quality solution for storing and exchanging motion graphics and composites, with excellent multigeneration performance and a mathematically lossless alpha channel of up to 16 bits. This codec features a remarkably low data rate compared to uncompressed 4:4:4 HD. It has a target data rate of approximately 330 Mbps for 4:4:4 sources at 1920×1080 and 29.97 fps. It also offers direct encoding of and decoding to both RGB and Y’CBCR pixel formats.
Apple ProRes 422 HQ
Apple ProRes 422 HQ is a higher-data-rate version of Apple ProRes 422 that preserves visual quality at the same high level as Apple ProRes 4444 but for 4:2:2 image sources. With widespread adoption across the video post-production industry, Apple ProRes 422 HQ offers visually lossless preservation of the highest-quality professional HD video that a single-link HD-SDI signal can carry. This codec supports full-width, 4:2:2 video sources at 10-bit pixel depths, while remaining visually lossless through many generations of decoding and reencoding. The target data rate is approximately 220 Mbps at 1920×1080 and 29.97 fps.
Apple ProRes 422
Apple ProRes 422 is a high-quality compressed codec offering nearly all the benefits of Apple ProRes 422 HQ, but at 66 percent of the data rate for even better multistream, real-time editing performance. The target data rate is approximately 147 Mbps at 1920×1080 and 29.97 fps.
Apple ProRes 422 LT
Apple ProRes 422 LT is a more highly compressed codec than Apple ProRes 422, with roughly 70 percent of the data rate and 30 percent smaller file sizes. This codec is perfect for environments where storage capacity and data rate are at a premium. The target data rate is approximately 102 Mbps at 1920×1080 and 29.97 fps.
Apple ProRes 422 Proxy
Apple ProRes 422 Proxy is an even more highly compressed codec than Apple ProRes 422 LT, intended for use in offline workflows that require low data rates but full-resolution video. The target data rate is approximately 45 Mbps at 1920×1080 and 29.97 fps.
* Apple ProRes 4444 and Apple ProRes 4444 XQ are ideal for the exchange of motion graphics media because they are virtually lossless. They are also the only Apple ProRes codecs that support alpha channels.
ProRes Codec for Windows: How to Export ProRes on Windows
by Christine Smith • 2021-03-25 19:06:49 • Proven solutions
Are you searching for a ProRes codec for Windows? If so, here you will learn everything about the ProRes family, such all its variants, its advantages, and disadvantages, how to get an Apple ProRes Windows computer can use, and most importantly, why do you need a ProRes file in the first place. After reading this, you will have the answers to all the questions mentioned above, along with the process of converting ProRes codec for Windows that can be used for post-production tasks.
Part 1. What Is ProRes
Developed and released by Apple Inc. in the year 2007, ProRes is a codec that loosely compresses the videos using the I-frame approach. Unlike H.264, I-frame (that stands for вЂindividual frame’) individually compresses each frame. Although it reduces the overall size of a video, the file remains quite large as compared to other formats like MP4, M4V, etc.
“Why ProRes?” In layman’s language, since ProRes compresses each frame individually, the processor and the GPU don’t have to put extra efforts to decompress before sending them to the display unit. This method comes in handy to avoid lagging during the post-production process where the RAW footages are edited to remove unwanted information, add effects, etc., and the professionals need regular manual movements (technically called вЂscrubbing’) of the Timeline bar (called the вЂSkimmer’). Whether it is a ProRes codec for Windows or otherwise, the family has a couple of members that are useful in one way or the other. Some of the most common ones are briefly discussed below in their ascending order in context with their data rate:
ProRes 422 Proxy – ProRes 422 Proxy is the most compressed form of ProRes videos and is used when you need a smaller size with a reduced data rate but still want to retain the high picture resolution. With ProRes 422 Proxy, you get 1920 x 1080 resolution at a data rate of up to 45Mbps with around 29.97fps (frames per second).
ProRes 422 LT – ProRes 422 LT compresses the frames a bit loosely as compared to ProRes 422 Proxy with the data rate of around 102Mpbs at 29.97fps where the resolution remains 1920 x 1080.
ProRes 422 – The professionals in post-production studios widely use this one as it maintains a proper balance between the data rate, picture resolution, and the size of the video file. ProRes 422 files have around 147Mbps on 1920 x 1080 resolution with 29.97fps.
ProRes 422 HQ – This version of ProRes supports pixel depth of 10-bit, thus offers more room for color grading while maintaining the optimum file size. ProRes 422 HQ retains visually lossless picture quality and provides a 220Mbps data rate for 1920 x 1080 resolution at 29.97 fps.
ProRes 4444 – What distinguishes ProRes 4444 from ProRes 422 is that the former supports up to 16-bit alpha channel, and the picture quality is virtually lossless. Even though the files are significantly gigantic, ProRes 4444 can accommodate more colors and offers a data rate of around 330Mbps for 1920 x 1080 resolution at 29.97fps.
ProRes 4444 XQ – The highest and most advanced version of ProRes with extremely lossless picture quality, ProRes 4444 XQ, offers around 500Mbps data rate on 1920 x 1080 resolution at 29.97fps.
Note: The figures given for the ProRes variants are for comparison purposes. Practically, every member of the ProRes family supports all resolution types, i.e., SD, HD, 2K, 4K, and 5K, at the time of this writing.
Part 2. How to Download ProRes Codec for Windows
Being a proprietary product of Apple, unfortunately, at the time of this writing, there is no way you can download a ProRes codec for Windows platform as no such thing has been developed, at least not yet. However, since ProRes files offer great advantages over other codecs, especially in post-production environments, several tools can help you re-encode your footages in a way that they can virtually work as the files that have been compressed using ProRes codec for Windows.
Furthermore, recently Adobe joined hand with Apple, and some of its products like Adobe Premiere Pro, Adobe After Effects, and Adobe Media Encoder now support Apple ProRes codec. Also, with the support of Apple ProRes Codec Premiere Pro can convert your video clips (MP4 for example) to ProRes right on your Windows PC.
Part 3. Convert ProRes Codec for Windows in Easy Steps
Despite several tools available to do the job, including some post-production giants such as Adobe Premiere Pro, one program that stands out among all of them due to its ease of access, being lightweight, and extremely fast rendering is UniConverter by Wondershare. Wondershare UniConverter (originally Wondershare Video Converter Ultimate) can not only recognize and convert ProRes codec for Windows, but its Mac version is also capable of transcoding any video to Apple ProRes. Such videos can then be imported to programs like Final Cut Pro X, Adobe Premiere Pro, etc. for professional-level editing and modifications.
Wondershare UniConverter — Best Video to ProRes Converter

- Convert videos to ProRes codec and other 1000+ video formats like MP4, MOV, AVI, etc.
- Convert video files with optimized presets for Final Cut Pro, iMovie, iPhone, iPad, and more devices.
- 30X faster conversion speed than any conventional converters.
- Edit video files with trimming, cropping, cutting, merging, adding subtitles, etc.
- Burn videos to DVD with customized free DVD menu templates.
- Download or record videos from 10,000+ video sharing sites.
- Industry-leading APEXTRANS technology converts videos with zero quality loss or video compression.
- Versatile toolbox combines video metadata editor, GIF maker, video compressor, and screen recorder.
- Supported OS: Windows 10/8/7/XP/Vista, macOS 11 Big Sur, 10.15 (Catalina), 10.14, 10.13, 10.12, 10.11, 10.10, 10.9, 10.8, 10.7, 10.6.
You can follow the steps given below to learn how to convert ProRes codec for Windows using Wondershare UniConverter:
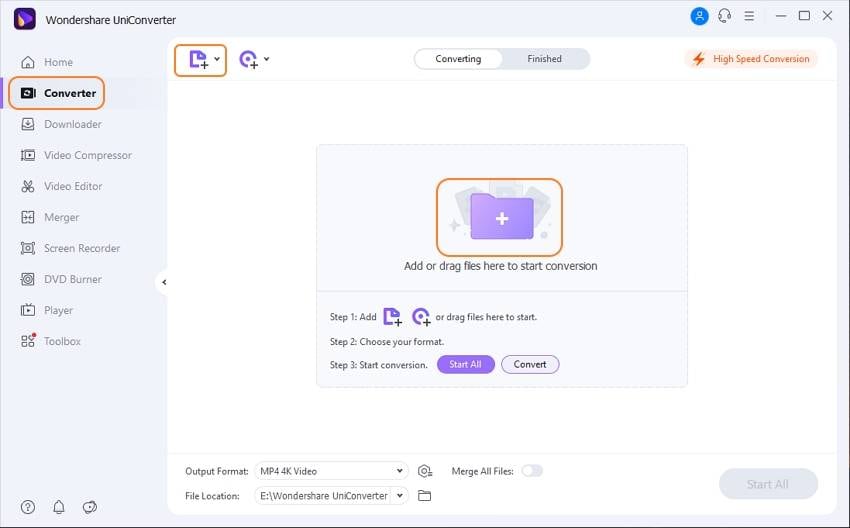
Step 1 Click the Add Files Icon and Import a ProRes Media.
Launch Wondershare UniConverter on your Windows or Mac computer (Windows version of UniConverter is used here for demonstration), click the Document icon from the Video Converter tab, and use the Open box to import the ProRes file you want to be converted using virtual ProRes codec for Windows.
Step 2 Pick a Windows Compatible Format.
Open the Setting menu from the target, go to the Video tab from the top of the menu, select your preferred format from the left pane ( MP4 for this example), and choose a resolution from the right ( Same as source here).
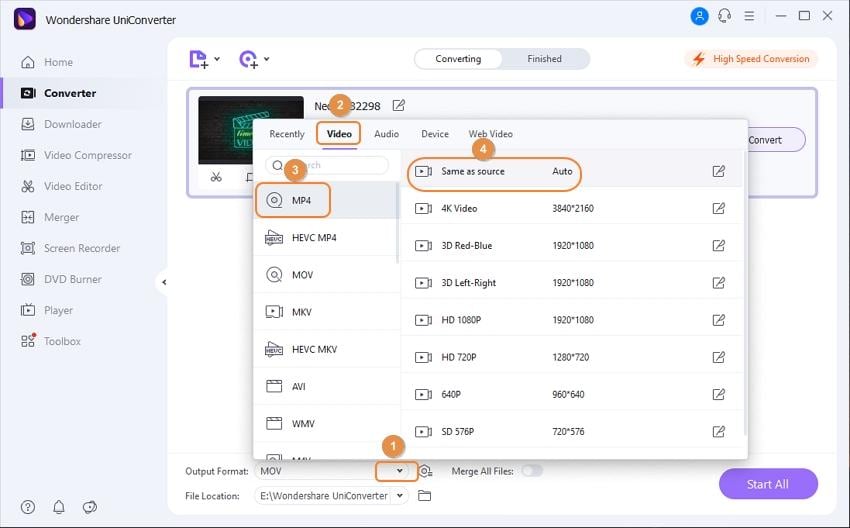

If you need to edit the videos, just move to Edit Videos Easily with Trim/Cut/Merge/Crop Easily >> to learn more.
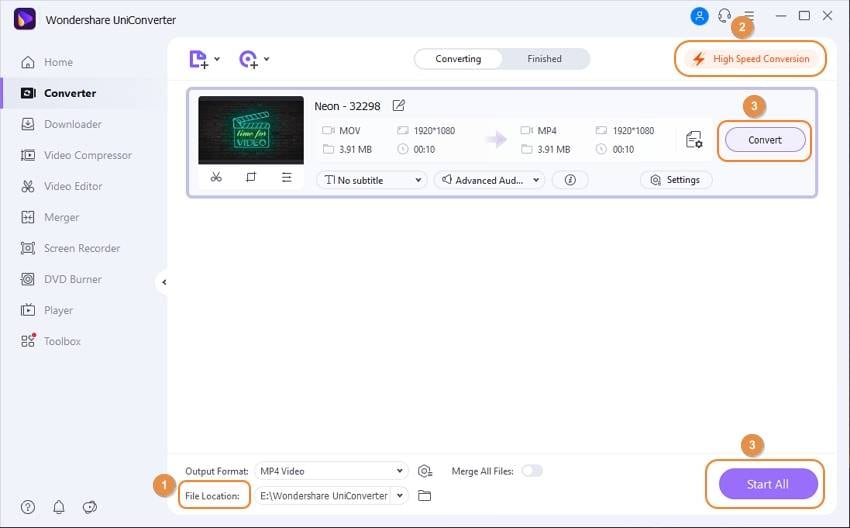
Step 3 Click Convert.
Select a destination folder for the converted file in the File Location field at the bottom, and click Convert to convert the video using virtual ProRes codec for Windows.
Part 4. Bonus Part: Convert Any Format to ProRes on Mac
Where converting a ProRes file to a Windows-compatible format can be done on both Mac and Windows PCs, reversing the process, i.e., to convert a video file to ProRes can be done only on the Mac variant of Wondershare UniConverter.
The steps are given below explain how to convert the footage to ProRes on Mac:
Step 1: Click Add Files and Import a Video.
Launch Wondershare UniConverter on your Mac, ensure from the top that you are on the Video Converter tile, and click the Add Files symbol. Use the next box that appears to locate and select a video file you want to convert to ProRes, and click Load to import the footage to Wondershare UniConverter.
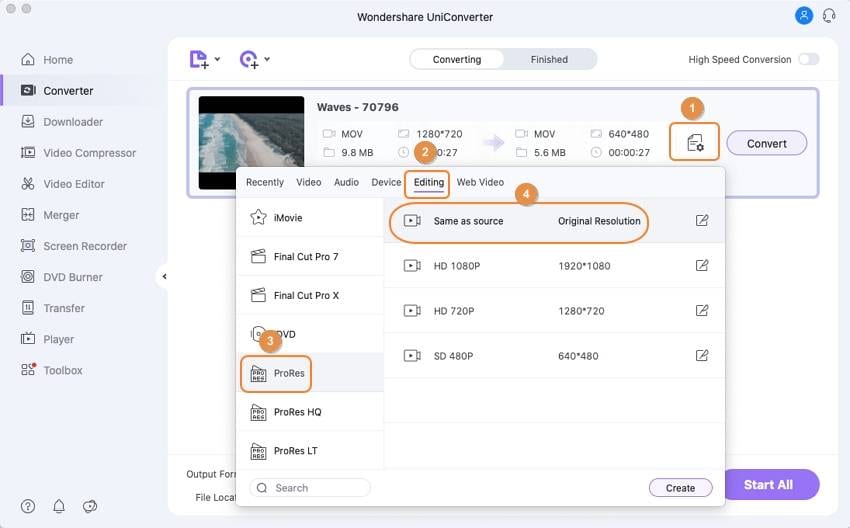
Step 2: Go to Editing and Select ProRes.
Click and open the Setting menu, and go to the Editing tab from the top. Choose your preferred ProRes version from the left pane ( ProRes here), and select a resolution from the right ( Same as source for this example).
Step 3: Select a Destination and Convert to ProRes.
Choose a destination folder in the File Location field at the bottom, and click Convert to transcode the video to ProRes codec on your Mac.


