- Tutorial: Set up Powerline in Windows Terminal
- Prerequisites
- Install a Powerline font
- Set up Powerline in PowerShell
- PowerShell prerequisites
- Customize your PowerShell prompt
- Set Cascadia Code PL as your font
- Set up Powerline in WSL Ubuntu
- WSL Ubuntu prerequisites
- Customize your Ubuntu prompt
- PowerShell PowerShell
- Использование PowerShell.exe Using PowerShell.exe
- Комментарии Remarks
- Руководство по Windows PowerShell для начинающих
- Руководство по Windows PowerShell для начинающих
- Написание и запуск скриптов
- Командлеты
- Параметры
- Использование Visual Studio Code для разработки в PowerShell Using Visual Studio Code for PowerShell Development
- Начало работы Getting started
- Редактирование с помощью Visual Studio Code Editing with Visual Studio Code
- Установка расширения PowerShell в системах с ограниченным доступом Installing the PowerShell Extension on Restricted Systems
- Выбор версии PowerShell для использования с расширением Choosing a version of PowerShell to use with the extension
- Параметры конфигурации для Visual Studio Code Configuration settings for Visual Studio Code
- Добавление собственных путей PowerShell в меню сеансов Adding your own PowerShell paths to the session menu
- Использование более ранней версии расширения PowerShell для Windows PowerShell версий 3 и 4 Using an older version of the PowerShell Extension for Windows PowerShell v3 and v4
- Отладка с помощью Visual Studio Code Debugging with Visual Studio Code
- Отладка без рабочей области No-workspace debugging
- Отладка с рабочей областью Workspace debugging
- Устранение проблем с расширением PowerShell для Visual Studio Code. Troubleshooting the PowerShell extension for Visual Studio Code
- Полезные ресурсы Useful resources
- Видео Videos
- Записи блога Blog posts
- Исходный код проекта расширения PowerShell PowerShell extension project source code
Tutorial: Set up Powerline in Windows Terminal
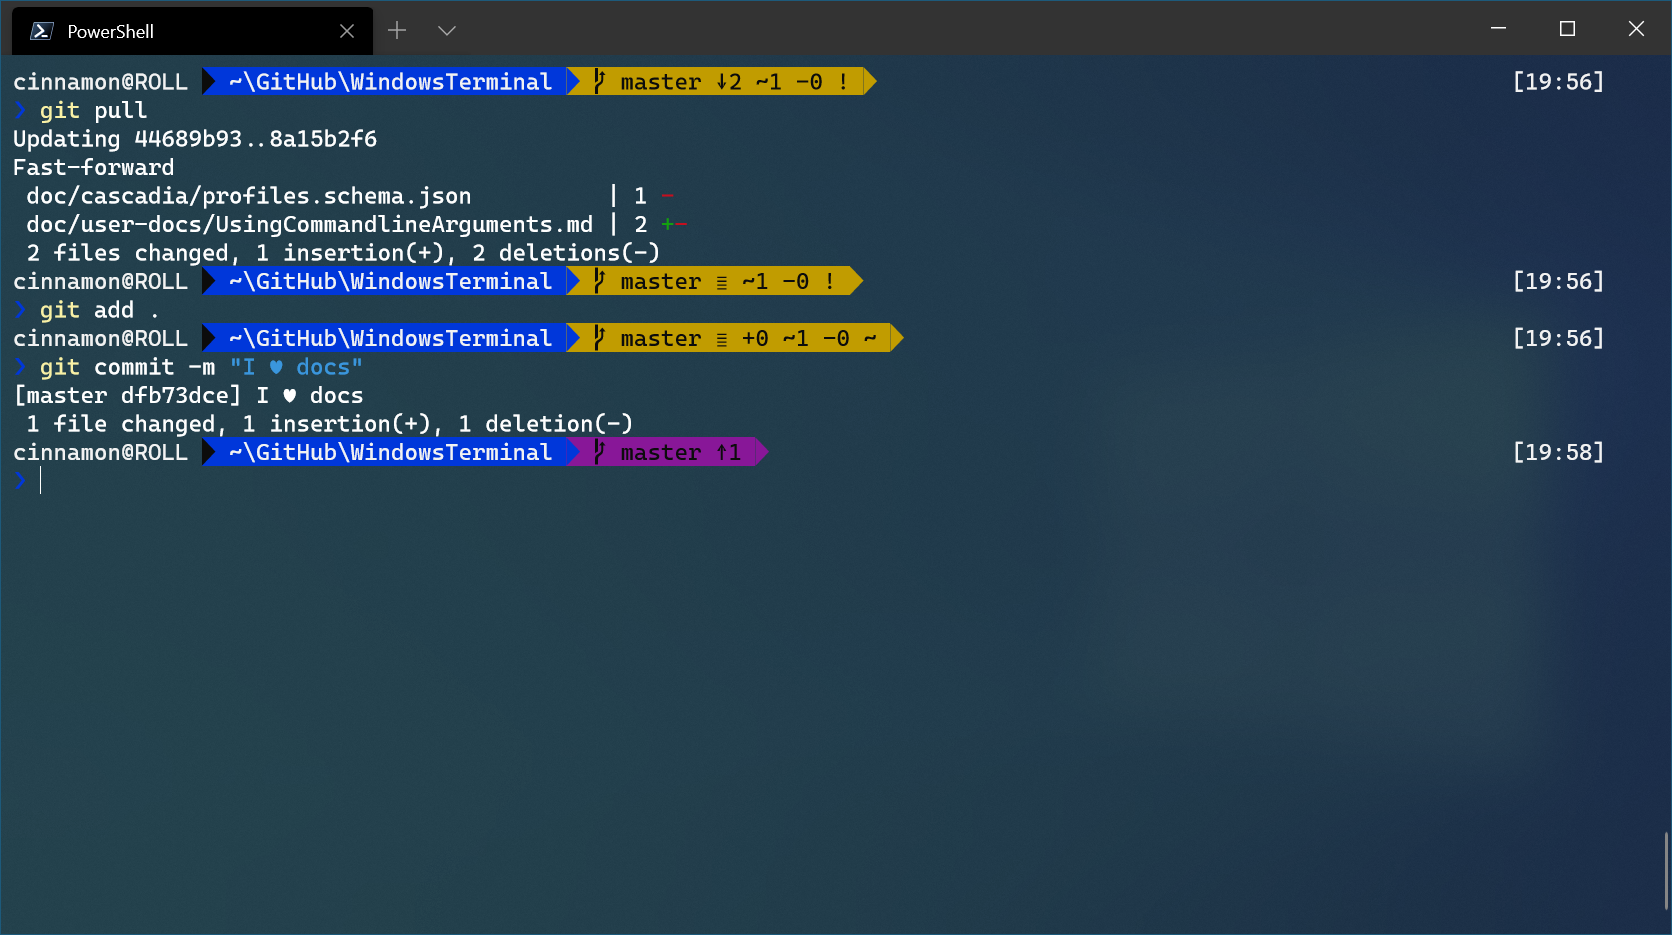
Powerline provides a customized command prompt experience providing Git status color-coding and prompts.
In this tutorial, you learn how to:
- Set up Powerline in PowerShell
- Set up Powerline in Ubuntu/WSL
- Add missing Powerline glyphs
Prerequisites
Install a Powerline font
Powerline uses glyphs in order to style the prompt. If your font does not include Powerline glyphs, you may see several Unicode replacement characters ‘в–Ї’ throughout your prompt. Though Cascadia Mono does not include Powerline glyphs, you can install Cascadia Code PL or Cascadia Mono PL, which have the Powerline glyphs included. These fonts can be installed from the Cascadia Code GitHub releases page.
Set up Powerline in PowerShell
PowerShell prerequisites
If you don’t already have it, install Git for Windows.
Using PowerShell, install Posh-Git and Oh-My-Posh:
You may need to install NuGet if you don’t already have it. Your PowerShell command line will ask if you want to install NuGet if this is the case. Select [Y] Yes. You may also need to approve that you are installing modules from PSGallery, an ‘untrusted repository’. Select [Y] Yes.
Posh-Git adds Git status information to your prompt as well as tab-completion for Git commands, parameters, remotes, and branch names. Oh-My-Posh provides theme capabilities for your PowerShell prompt.
If you are using PowerShell Core, install PSReadline:
PSReadline lets you customize the command line editing environment in PowerShell.
Customize your PowerShell prompt
Open your PowerShell profile with notepad $PROFILE or the text editor of your choice. This is not your Windows Terminal profile. Your PowerShell profile is a script that runs every time PowerShell starts. Learn more about PowerShell profiles.
In your PowerShell profile, add the following to the end of the file:
Now, each new instance starts by importing Posh-Git and Oh-My-Posh, then setting the Paradox theme from Oh-My-Posh. Oh-My-Posh comes with several built-in themes. If you decide to use Cascadia Code PL as a font, oh-my-posh themes that contain minimal function without the need for additional icons. You can also create a custom theme to match the font of your choice.
Script execution policy must be set to either RemoteSigned or Unrestricted in order for the profile script to run. Run this command to see your current execution policy Get-ExecutionPolicy . Learn more about Execution Policies
Set Cascadia Code PL as your font
To set the Cascadia Code PL font for use with PowerLine (after downloading, unzipping, and installing on your system), you will need to open your profile settings in your settings.json file by selecting Settings (Ctrl+,) from your Windows Terminal dropdown menu. This can also be done using the settings UI if you have it enabled.
Once your settings.json file opens, find the Windows PowerShell profile and add: «fontFace»: «Cascadia Code PL» to designate Cascadia Code PL as the font. This will provide those nice Cascadia Code Powerline glyphs. You should notice the change in your terminal as soon as you select Save in your editor.
Your Windows PowerShell profile settings.json file should now look like this:
For Powerline to work with the integrated terminal in Visual Studio Code, add «terminal.integrated.fontFamily»: «Cascadia Code PL» to your Visual Studio Code settings. For Visual Studio 2019, set the terminal font via Options > Font and Colors and choose Terminal in the dropdown menu. You can then select the Cascadia Code PL font to make sure Powerline works there, too.
Set up Powerline in WSL Ubuntu
WSL Ubuntu prerequisites
Ubuntu has several Powerline options to install from. This tutorial will be using oh-my-posh for Linux:
First, install oh-my-posh:
The second step is optonal. Oh-my-posh can use the same theme config regardless of the shell or evironment, so if you’re already using it on Windows Powershell for example, you can reuse that theme configuration rather than download the themes. If you plan to use it within Ubuntu WSL only, fetch the themes so you can get started right away:
If you’re using Ubuntu 18.04 or 16.04, you’ll need to first install the correct version of golang:
Customize your Ubuntu prompt
/.bashrc file with nano
/.bashrc or the text editor of your choice. This is a bash script that runs every time bash starts. Add the following (change the theme to the one you like):
PowerShell PowerShell
Windows PowerShell — это оболочка командной строки на основе задач и язык сценариев, разработанный специально для администрирования системы. Windows PowerShell is a task-based command-line shell and scripting language designed especially for system administration. Созданная на основе .NET Framework служба Windows PowerShell помогает ИТ-специалистам и опытным пользователям в управлении и автоматизации администрирования операционной системы Windows, а также приложений, работающих под управлением Windows. Built on the .NET Framework, Windows PowerShell helps IT professionals and power users control and automate the administration of the Windows operating system and applications that run on Windows.
Использование PowerShell.exe Using PowerShell.exe
Программа командной строки PowerShell.exe запускает сеанс Windows PowerShell в окне командной строки. The PowerShell.exe command-line tool starts a Windows PowerShell session in a Command Prompt window. При использовании PowerShell.exe можно использовать его необязательные параметры для настройки сеанса. When you use PowerShell.exe, you can use its optional parameters to customize the session. Например, можно запустить сеанс, в котором используется конкретная политика выполнения или одна из которых исключает профиль Windows PowerShell. For example, you can start a session that uses a particular execution policy or one that excludes a Windows PowerShell profile. В противном случае сеанс будет таким же, как и любой сеанс, запущенный в консоли Windows PowerShell. Otherwise, the session is the same as any session that is started in the Windows PowerShell console.
Чтобы запустить сеанс Windows PowerShell в окне командной строки, введите команду PowerShell . To start a Windows PowerShell session in a Command Prompt window, type PowerShell . В командную строку добавляется префикс PS , указывающий, что вы используете сеанс Windows PowerShell. A PS prefix is added to the command prompt to indicate that you are in a Windows PowerShell session.
Чтобы запустить сеанс с определенной политикой выполнения, используйте параметр ExecutionPolicy и введите: To start a session with a particular execution policy, use the ExecutionPolicy parameter, and type:
Чтобы запустить сеанс Windows PowerShell без профилей Windows PowerShell, используйте параметр- Profile и введите: To start a Windows PowerShell session without your Windows PowerShell profiles, use the NoProfile parameter, and type:
Чтобы начать сеанс, используйте параметр ExecutionPolicy и введите: To start a session , use the ExecutionPolicy parameter, and type:
Чтобы просмотреть файл справки PowerShell.exe, введите: To see the PowerShell.exe help file, type:
Чтобы завершить сеанс Windows PowerShell в окне командной строки, введите команду exit . To end a Windows PowerShell session in a Command Prompt window, type exit . Типичная Командная строка возвращает. The typical command prompt returns.
Комментарии Remarks
Полный список параметров командной строки PowerShell.exe см. в разделе about_PowerShell.Exe. For a complete list of the PowerShell.exe command-line parameters, see about_PowerShell.Exe.
Дополнительные сведения о других способах запуска Windows PowerShell см. в разделе Запуск Windows PowerShell. For information about other ways to start Windows PowerShell, see Starting Windows PowerShell.
Windows PowerShell выполняется в варианте установки Server Core в операционных системах Windows Server. Windows PowerShell runs on the Server Core installation option of Windows Server operating systems. Тем не менее функции, требующие графического пользовательского интерфейса, такие как Интегрированная среда сценариев Windows PowerShell (ISE), и командлеты Out-GridView и for -Command , не выполняются в установках Server Core. However, features that require a graphic user interface, such as the Windows PowerShell Integrated Scripting Environment (ISE), and the Out-GridView and Show-Command cmdlets, don’t run on Server Core installations.
Руководство по Windows PowerShell для начинающих
Руководство по Windows PowerShell для начинающих
В этой статье про PowerShell для начинающих мы посмотрим, как писать скрипты, которые помогают оптимизировать управление Windows-окружением.
PowerShell — это объектно-ориентированный программный движок и скриптовый язык с интерфейсом командной строки, предоставляющий широкие возможности для конфигурирования операционных систем семейства MS Windows. Он предлагает как чисто консольный интерфейс, так и полноценную среду разработки PowerShell ISE (Integrated Scripting Environment, встроенное скриптовое окружение) для скриптов.
Для запуска интерфейса командной строки введите powershell в меню «Выполнить» (WinKey + R). PowerShell ISE запускается с помощью команды «PowerShell ISE» в том же меню. ISE более предпочтительно, так как предоставляет более широкие возможности разработчику благодаря подсветке синтаксиса, функции автозаполнения кода и другим особенностям, присущим многим «большим» IDE.
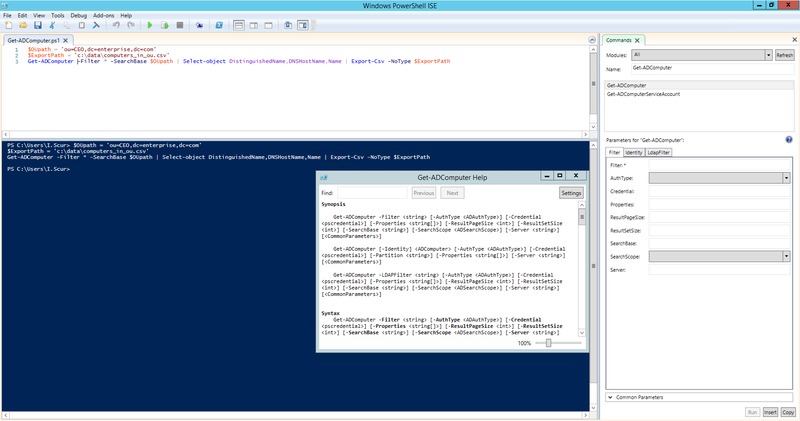
Среда разработки Windows PowerShell ISE
Написание и запуск скриптов
Скрипты сохраняются в виде файлов с расширением .ps1 . Несмотря на то, что PowerShell уже давно является нативной частью ОС Windows, вы не сможете запустить его скрипты простым двойным щелчком. Для этого надо кликнуть правой кнопкой по скрипту и выбрать «Запустить в PowerShell».
Также существуют системные политики, ограничивающие выполнение скриптов. Можно проверить текущие параметры политики, введя команду Get-ExecutionPolicy . Результатом будет одно из следующих значений:
- Restricted — выполнение скриптов запрещено. Стандартная конфигурация;
- AllSigned — можно запускать скрипты, подписанные доверенным разработчиком; перед запуском скрипта PowerShell запросит у вас подтверждение;
- RemoteSigned — можно запускать собственные скрипты или те, что подписаны доверенным разработчиком;
- Unrestricted — можно запускать любые скрипты.
Для начала работы необходимо изменить настройку политики запуска на RemoteSigned, используя команду Set-ExecutionPolicy :

После выполнения команды можно будет запускать свои скрипты
Командлеты
Командлеты — это команды с предопределённой функцией, подобные условным операторам в языках программирования. У них есть несколько ключевых особенностей:
- существуют системные, пользовательские и опциональные командлеты;
- результатом выполнения командлета будет объект или массив объектов;
- командлеты могут обрабатывать данные и передавать их другим командлетам с помощью конвейеров;
- командлеты нечувствительны к регистру, так что нет никакой разницы между Get-ADUser , get-aduser и gEt-AdUsEr ;
- в качестве разделителя используется символ ; .
Каждый командлет содержит в себе глагол и существительное, разделяемые дефисом. Например:
- Get-Process — отобразить текущие процессы, запущенные на компьютере;
- Get-Service — отобразить список служб и их статус;
- Get-Content — отобразить содержимое указанного файла, например Get-Content C:\Windows\System32\drivers\etc\hosts .
При необходимости список всех доступных командлетов можно вывести с помощью Get-Help-Category. Запомните эту команду — она крайне важна для тех, кто изучает PowerShell с нуля, так как помогает быстрее начать ориентироваться в его возможностях.
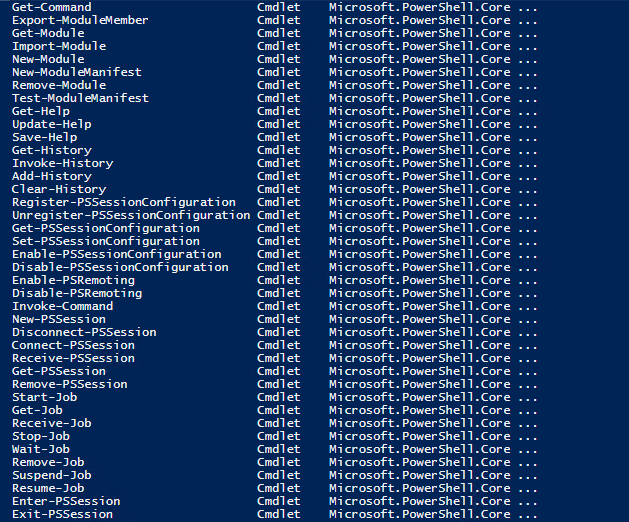
Результат выполнения команды Get-Help-Category
Также можно создавать свои командлеты, но эта тема выходит за рамки нашего руководства по PowerShell для начинающих.
Параметры
У каждого командлета есть несколько параметров, определяющих его работу. PowerShell ISE автоматически предлагает все доступные параметры с отображением их типа. Например, Get-Service-NameW* выводит список служб, у которых имя начинается с W . Если вы забыли, какие параметры у введённого командлета, воспользуйтесь Get-Member .
Использование Visual Studio Code для разработки в PowerShell Using Visual Studio Code for PowerShell Development
Visual Studio Code — это кросс-платформенный редактор скриптов, созданный корпорацией Майкрософт. Visual Studio Code is a cross-platform script editor by Microsoft. Наряду с расширением PowerShell он предоставляет широкие интерактивные возможности редактирования скриптов, упрощая написание надежных скриптов PowerShell. Together with the PowerShell extension, it provides a rich and interactive script editing experience, making it easier to write reliable PowerShell scripts. Редактор Visual Studio Code с расширением PowerShell рекомендуется использовать для написания сценариев PowerShell. Visual Studio Code with the PowerShell extension is the recommended editor for writing PowerShell scripts.
Он поддерживает следующие версии PowerShell: It supports the following PowerShell versions:
- PowerShell 7 и последующие версии (Windows, macOS и Linux); PowerShell 7 and up (Windows, macOS, and Linux)
- PowerShell Core 6 (Windows, macOS и Linux); PowerShell Core 6 (Windows, macOS, and Linux)
- Windows PowerShell 5.1 (только для Windows). Windows PowerShell 5.1 (Windows-only)
Visual Studio Code отличается от Visual Studio. Visual Studio Code is not the same as Visual Studio.
Начало работы Getting started
Перед запуском убедитесь, что оболочка PowerShell установлена в системе. Before you begin, make sure PowerShell exists on your system. Сведения о современных рабочих нагрузках для Windows, macOS и Linux см. по следующим ссылкам: For modern workloads on Windows, macOS, and Linux, see the following links:
Сведения о традиционных рабочих нагрузках Windows PowerShell см. в разделе Установка Windows PowerShell. For traditional Windows PowerShell workloads, see Installing Windows PowerShell.
Интегрированная среда сценариев Windows PowerShell по-прежнему доступна для Windows, The Windows PowerShell ISE is still available for Windows. но функции для нее больше не разрабатываются. However, it is no longer in active feature development. Интегрированная среда сценариев не работает с PowerShell 6 и более поздних версий. The ISE does not work with PowerShell 6 and higher. Как компонент Windows эта среда по-прежнему официально поддерживается для внесения критически важных исправлений, связанных с безопасностью и обслуживанием. As a component of Windows, it continues to be officially supported for security and high-priority servicing fixes. Пока что мы не планируем удалять ее из Windows. We have no plans to remove the ISE from Windows.
Редактирование с помощью Visual Studio Code Editing with Visual Studio Code
Установите Visual Studio Code. Install Visual Studio Code. Дополнительные сведения см. в статье Setting up Visual Studio Code (Настройка Visual Studio Code). For more information, see the overview Setting up Visual Studio Code.
Доступны инструкции по установке на каждой платформе: There are installation instructions for each platform:
- Windows: следуйте инструкциям по установке на странице Запуск Visual Studio Code в Windows. Windows: follow the installation instructions on the Running Visual Studio Code on Windows page.
- macOS: следуйте инструкциям по установке на странице Запуск Visual Studio Code в macOS. macOS: follow the installation instructions on the Running Visual Studio Code on macOS page.
- Linux: следуйте инструкциям по установке на странице Запуск Visual Studio Code в Linux. Linux: follow the installation instructions on the Running Visual Studio Code on Linux page.
Установите расширение PowerShell. Install the PowerShell Extension.
Запустите приложение Visual Studio Code, введя code в консоли или code-insiders , если вы установили Visual Studio Code Insiders. Launch the Visual Studio Code app by typing code in a console or code-insiders if you installed Visual Studio Code Insiders.
Запустите Quick Open в Windows или Linux, нажав клавиши CTRL + P . Launch Quick Open on Windows or Linux by pressing Ctrl + P . В macOS нажмите клавиши CMD + P . On macOS, press Cmd + P .
В Quick Open введите ext install powershell и нажмите клавишу ВВОД. In Quick Open, type ext install powershell and press Enter.
На боковой панели открывается представление Расширения. The Extensions view opens on the Side Bar. Выберите расширение PowerShell корпорации Майкрософт. Select the PowerShell extension from Microsoft. Откроется примерно следующий экран Visual Studio Code: You should see a Visual Studio Code screen similar to the following image:

Нажмите кнопку Установить для расширения PowerShell корпорации Майкрософт. Click the Install button on the PowerShell extension from Microsoft.
После установки кнопка Установить изменяется на Reload (Перезагрузить). Нажмите кнопку Reload (Перезагрузить). After the install, if you see the Install button turn into Reload, Click on Reload.
После перезагрузки Visual Studio Code можно приступать к редактированию. After Visual Studio Code has reloaded, you’re ready for editing.
Например, чтобы создать файл, выберите Файл > Создать. For example, to create a new file, click File > New. Чтобы сохранить его, выберите Файл > Сохранить и укажите имя файла, например HelloWorld.ps1 . To save it, click File > Save and then provide a file name, such as HelloWorld.ps1 . Чтобы закрыть файл, щелкните X рядом с его именем. To close the file, click the X next to the file name. Чтобы завершить работу с Visual Studio Code, выберите элементы Файл > Выйти. To exit Visual Studio Code, File > Exit.
Установка расширения PowerShell в системах с ограниченным доступом Installing the PowerShell Extension on Restricted Systems
Некоторые системы настроены так, что требуют проверки всех подписей кода. Some systems are set up to require validation of all code signatures. Может появиться следующее сообщение об ошибке: You may receive the following error:
Эта проблема может возникать, когда политика выполнения PowerShell задается групповой политикой Windows. This problem can occur when PowerShell’s execution policy is set by Windows Group Policy. Чтобы вручную утвердить службы редактора PowerShell и, следовательно, расширение PowerShell для Visual Studio Code, откройте командную строку PowerShell и выполните следующую команду: To manually approve PowerShell Editor Services and the PowerShell extension for Visual Studio Code, open a PowerShell prompt and run the following command:
Вы увидите подсказку Не удается проверить издателя. Вы действительно хотите запустить эту программу? You’re prompted with Do you want to run software from this untrusted publisher? Введите A для запуска файла. Type A to run the file. Затем откройте Visual Studio Code и убедитесь, что расширение PowerShell работает правильно. Then, open Visual Studio Code and check that the PowerShell extension is functioning properly. Если у вас все еще есть проблемы с началом работы, сообщите нам об этом на Раздел с описанием проблем на GitHub. If you still have problems getting started, let us know on GitHub issues.
Расширение PowerShell для Visual Studio Code не поддерживает запуск в ограниченном языковом режиме. The PowerShell extension for Visual Studio Code does not support running in constrained language mode. Дополнительные сведения см. в описании ошибки № 606 на GitHub. For more information, see GitHub issue #606.
Выбор версии PowerShell для использования с расширением Choosing a version of PowerShell to use with the extension
Благодаря одновременной установке PowerShell Core и Windows PowerShell теперь можно использовать определенную версию PowerShell с расширением PowerShell. With PowerShell Core installing side-by-side with Windows PowerShell, it’s now possible to use a specific version of PowerShell with the PowerShell extension. Этот компонент проверяет несколько известных расположений в разных операционных системах, чтобы найти установки PowerShell. This feature looks at a few well-known paths on different operating systems to discover installations of PowerShell.
Выберите версию, сделав следующее: Use the following steps to choose the version:
- Откройте палитру команд в Windows и Linux ( CTRL + SHIFT + P ). Open the Command Palette on Windows or Linux with Ctrl + Shift + P . В macOS нажмите клавиши CMD + SHIFT + P . On macOS, use Cmd + Shift + P .
- Выполните поиск по слову Сеанс. Search for Session.
- Щелкните PowerShell: Show Session Menu (PowerShell: показать меню сеансов). Click on PowerShell: Show Session Menu.
- Выберите версию PowerShell, которую хотите использовать, из списка, например PowerShell Core. Choose the version of PowerShell you want to use from the list, for example: PowerShell Core.
Если вы установили PowerShell в нетипичном расположении, оно может первоначально не отобразиться в меню сеансов. If you installed PowerShell to a non-typical location, it might not show up initially in the Session Menu. Вы можете расширить меню сеансов, добавив собственные пользовательские пути, как описано ниже. You can extend the session menu by adding your own custom paths as described below.
Меню сеансов PowerShell также можно открыть, щелкнув номер версии, The PowerShell session menu can also be accessed from the green version number in the bottom right corner of status bar. который показан зеленым шрифтом в правом нижнем углу строки состояния. Clicking this version number opens the session menu.
Параметры конфигурации для Visual Studio Code Configuration settings for Visual Studio Code
Прежде всего, если вы не знаете, как изменить параметры в Visual Studio Code, мы рекомендуем ознакомиться с документацией по параметрам Visual Studio Code. First, if you’re not familiar with how to change settings in Visual Studio Code, we recommend reading Visual Studio Code’s settings documentation.
После этого вы сможете добавить параметры конфигурации в settings.json . After reading the documentation, you can add configuration settings in settings.json .
Если вы не хотите, чтобы эти параметры влияли на файлы всех типов, Visual Studio Code также позволяет задавать конфигурации для каждого языка отдельно. If you don’t want these settings to affect all files types, Visual Studio Code also allows per-language configurations. Создать параметр для конкретного языка можно, поместив параметры в поле [ ] . Create a language-specific setting by putting settings in a [ ] field. Пример: For example:
Дополнительные сведения о кодировке файлов в Visual Studio Code см. в статье Основные сведения о кодировке файлов в VSCode и PowerShell. For more information about file encoding in Visual Studio Code, see Understanding file encoding.
Также ознакомьтесь со статьей Репликация функций интегрированной среды скриптов в Visual Studio Code, в которой даны рекомендации по настройке Visual Studio Code для редактирования в PowerShell. Also, check out How to replicate the ISE experience in Visual Studio Code for other tips on how to configure Visual Studio Code for PowerShell editing.
Добавление собственных путей PowerShell в меню сеансов Adding your own PowerShell paths to the session menu
В меню сеанса можно добавить другие пути к исполнимому файлу PowerShell с помощью параметра Visual Studio Code: powershell.powerShellAdditionalExePaths . You can add other PowerShell executable paths to the session menu through the Visual Studio Code setting: powershell.powerShellAdditionalExePaths .
Добавьте элемент в список powershell.powerShellAdditionalExePaths или создайте список, если его нет в settings.json : Add an item to the list powershell.powerShellAdditionalExePaths or create the list if it doesn’t exist in your settings.json :
Каждый элемент должен иметь следующее: Each item must have:
- exePath : Путь к исполняемому файлу pwsh или powershell . exePath : The path to the pwsh or powershell executable.
- versionName : Текст, который будет отображаться в меню сеансов. versionName : The text that will show up in the session menu.
Вы можете задать используемую версию PowerShell по умолчанию, задав параметр powershell.powerShellDefaultVersion для текста, отображаемого в меню сеансов ( versionName в последнем параметре): To set the default PowerShell version, set the value powershell.powerShellDefaultVersion to the text displayed in the session menu (also known as the versionName ):
Задав этот параметр, перезапустите Visual Studio Code или перезагрузите текущее окно Visual Studio Code через Палитру команд, введя Разработчик: Reload Window (Разработчик: перезагрузить окно). After you’ve configured this setting, restart Visual Studio Code or to reload the current Visual Studio Code window from the Command Palette, type Developer: Reload Window.
Открыв меню сеансов, вы увидите дополнительные версии PowerShell. If you open the session menu, you now see your additional PowerShell versions!
Если вы создаете PowerShell из исходного кода, это отличный способ протестировать локальную сборку PowerShell. If you build PowerShell from source, this is a great way to test out your local build of PowerShell.
Использование более ранней версии расширения PowerShell для Windows PowerShell версий 3 и 4 Using an older version of the PowerShell Extension for Windows PowerShell v3 and v4
Хотя текущее расширение PowerShell не поддерживает работу с PowerShell версии 3 и 4, The current PowerShell extension doesn’t support PowerShell v3 and v4. вы можете использовать последнюю версию расширения, которая поддерживает работу с третьей и четвертой версией. However, you can use the last version of the extension that supports PowerShell v3 and v4.
Дополнительные исправления для этой старой версии расширения не будут внесены. There will be no additional fixes to this older version of the extension. Она предоставляется без изменений, но доступна для вас, если вы все еще используете Windows PowerShell версии 3 или 4. It’s provided «AS IS» but is available for you if you are still using Windows PowerShell v3 and Windows PowerShell v4.
Сначала откройте панель расширений и найдите PowerShell . First, open the Extension pane and search for PowerShell . Затем щелкните значок шестеренки и выберите команду Install another version. (Установить другую версию. ). Then click the gear and select Install another version. .

Затем выберите версию 2020.1.0. Then select the 2020.1.0 version. Эта версия расширения — последняя версия, которую поддерживает Windows PowerShell версий 3 и 4. This version of the extension was the last version to support v3 and v4. Обязательно добавьте следующий параметр, чтобы версия расширения не обновлялась автоматически: Be sure to add the following setting so that your extension version doesn’t update automatically:
Версия 2020.1.0 будет актуальной в ближайшем будущем, Version 2020.1.0 will work for the foreseeable future. но в Visual Studio Code может появиться изменение, которое приведет к прекращению поддержки этой версии расширения. However, Visual Studio Code could implement a change that breaks this version of the extension. Учитывая это, а также отсутствие поддержки, мы рекомендуем: Because of this, and lack of support, we recommend:
- выполнить обновление до Windows PowerShell 5.1. Upgrading to Windows PowerShell 5.1
- установить среду PowerShell 7, которая доступна для параллельной установки с другими версиями Windows PowerShell и наилучшим образом подходит для расширения PowerShell. Install PowerShell 7, which is a side-by-side install to Windows PowerShell and works the best with the PowerShell extension
Отладка с помощью Visual Studio Code Debugging with Visual Studio Code
Отладка без рабочей области No-workspace debugging
Начиная с версии Visual Studio Code 1.9, вы можете отлаживать скрипты PowerShell, не открывая папку со скриптом PowerShell. In Visual Studio Code version 1.9 (or higher), you can debug PowerShell scripts without opening the folder that contains the PowerShell script.
- Откройте файл скрипта PowerShell с помощью команды Файл > Открыть файл. Open the PowerShell script file with File > Open File.
- Установите точку останова на строке и нажмите клавишу F9 . Set a breakpoint — select a line then press F9
- Нажмите клавишу F5 , чтобы запустить отладку. Press F5 to start debugging
Откроется панель действий отладки, позволяющая прервать работу отладчика, возобновить отладку, выполнить ее пошагово или остановить. You should see the Debug actions pane appear which allows you to break into the debugger, step, resume, and stop debugging.
Отладка с рабочей областью Workspace debugging
Отладка с рабочей областью обозначает отладку в контексте папки, которую вы открыли с помощью команды Открыть папку из меню Файл. Открытая папка обычно является папкой проекта PowerShell или корнем репозитория Git. Workspace debugging refers to debugging in the context of a folder that you’ve opened from the File menu using Open Folder. . The folder you open is typically your PowerShell project folder or the root of your Git repository. Отладка с рабочей областью позволяет задать несколько конфигураций отладки, а не просто выполнить отладку открытого файла. Workspace debugging allows you to define multiple debug configurations other than just debugging the currently open file.
Выполните следующие действия, чтобы создать файл конфигурации отладки: Follow these steps to create a debug configuration file:
Откройте представление Отладка в Windows или Linux ( CTRL + SHIFT + D ). Open the Debug view on Windows or Linux by pressing Ctrl + Shift + D . В macOS нажмите клавиши CMD + SHIFT + D . On macOS, press Cmd + Shift + D .
Щелкните ссылку create a launch.json file (Создать файл launch.json). Click the create a launch.json file link.
В окне запроса Select Environment (Выбор среды) выберите PowerShell. From the Select Environment prompt, choose PowerShell.
Выберите тип отладки, который хотите использовать: Choose the type of debugging you’d like to use:
- Launch Current File (Запуск текущего файла) — запуск и отладка файла в текущем активном окне редактора. Launch Current File — Launch and debug the file in the currently active editor window
- Launch Script (Запуск скрипта) — запуск и отладка указанного файла или команды. Launch Script — Launch and debug the specified file or command
- Interactive Session (Интерактивный сеанс) — команды отладки, выполняемые из интегрированной консоли. Interactive Session — Debug commands executed from the Integrated Console
- Attach (Подключение) — подключение отладчика к выполняемому хост-процессу PowerShell. Attach — Attach the debugger to a running PowerShell Host Process
Visual Studio Code создаст каталог и файл .vscode\launch.json в корневой папке рабочей области, где будет храниться конфигурация отладки. Visual Studio Code creates a directory and a file .vscode\launch.json in the root of your workspace folder to store the debug configuration. Если ваши файлы хранятся в репозитории Git, скорее всего, вы захотите зафиксировать файл launch.json . If your files are in a Git repository, you typically want to commit the launch.json file. Содержимое файла launch.json : The contents of the launch.json file are:
Этот файл представляет типичные сценарии отладки. This file represents the common debug scenarios. При открытии его в редакторе отображается кнопка Добавить конфигурацию. When you open this file in the editor, you see an Add Configuration. button. Можете нажать ее, чтобы добавить дополнительные конфигурации отладки PowerShell. You can click this button to add more PowerShell debug configurations. Одной из полезных конфигураций является PowerShell: Launch Script (Запустить сценарий). One useful configuration to add is PowerShell: Launch Script. С помощью этой конфигурации можно указать файл с дополнительными аргументами, которые используются при каждом нажатии клавиши F5 , независимо от того, какой файл активен в редакторе. With this configuration, you can specify a file containing optional arguments that are used whenever you press F5 no matter which file is active in the editor.
После задания конфигурации отладки вы можете указать конфигурацию, используемую во время сеанса отладки, After the debug configuration is established, you can select which configuration you want to use during a debug session. выбрав ее в раскрывающемся списке конфигураций отладки на панели инструментов представления Отладка. Select a configuration from the debug configuration drop-down in the Debug view’s toolbar.
Устранение проблем с расширением PowerShell для Visual Studio Code. Troubleshooting the PowerShell extension for Visual Studio Code
Если у вас возникли проблемы с использованием Visual Studio Code для разработки скриптов PowerShell, ознакомьтесь с руководством по устранению неполадок на сайте GitHub. If you experience any issues using Visual Studio Code for PowerShell script development, see the troubleshooting guide on GitHub.
Полезные ресурсы Useful resources
Существует несколько видео и записей блогов, которые могут оказаться полезными при начале работы с расширением PowerShell для Visual Studio Code: There are a few videos and blog posts that may be helpful to get you started using the PowerShell extension for Visual Studio Code:
Видео Videos
Записи блога Blog posts
Исходный код проекта расширения PowerShell PowerShell extension project source code
Исходный код расширения PowerShell доступен на GitHub. The PowerShell extension’s source code can be found on GitHub.
Если вы хотите принять участие в проекте в качестве разработчика, отправьте запрос на вытягивание. If you’re interested in contributing, Pull Requests are greatly appreciated. Чтобы приступить к работе, следуйте указаниям из документации для разработчиков на сайте GitHub. Follow along with the developer documentation on GitHub to get started.


