Colasoft packet builder linux
Colasoft Packet Builder is useful tool used for creating custom network packets, you can use this tool to check your network protection against attacks and intruders. Colasoft Packet Builder provides you very powerful editing feature, besides common HEX editing raw data, it featuring a Decoding Editor which allows you edit specific protocol field value much easier. In addition to building packets, Colasoft Packet Builder also supports saving packets to packet files and sending packets to network.
There are three ways to invoke Colasoft Ping Tool:
- Click the Colasoft Packet Builder command in the Tools menu.
- Open the Start button of Windows and choose All Programs. Click the Colasoft Packet Builder from the Colasoft Capsa application.
- Choose the Run… command from the Start button of Windows, input PktBuilder.exe command and click the Enter key.
You can select one of the provided templates and change the parameters in the decoder editor, hexadecimal editor and ASCII editor to create a packet. Any changes are immediately displayed in the other two windows.
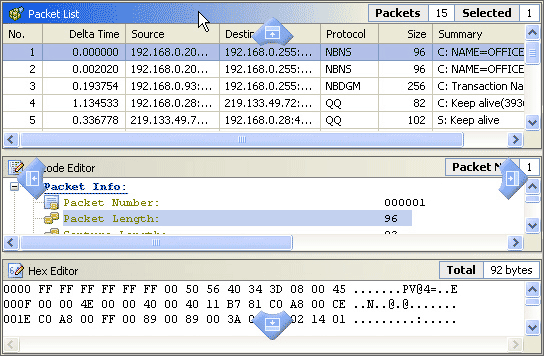
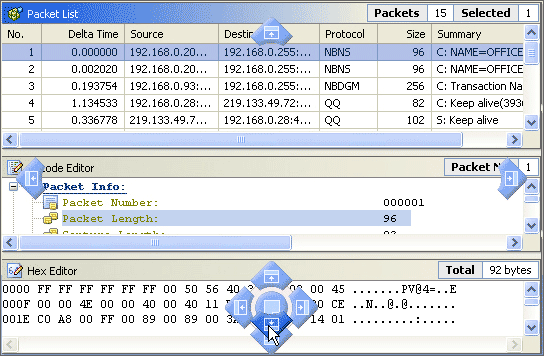
To custom the layout of the three windows, please click the window header, hold on mouse and move it.

Hold on and drag your mouse to the position displayed in the below figure.

Then you will see the Packet List window move to the bottom.
Источник
Colasoft packet builder linux
Colasoft Packet Builder is useful tool used for creating custom network packets, you can use this tool to check your network protection against attacks and intruders. Colasoft Packet Builder provides you very powerful editing feature, besides common HEX editing raw data, it featuring a Decoding Editor which allows you edit specific protocol field value much easier. In addition to building packets, Colasoft Packet Builder also supports saving packets to packet files and sending packets to network.
There are three ways to invoke Colasoft Ping Tool:
- Click the Colasoft Packet Builder command in the Tools menu.
- Open the Start button of Windows and choose All Programs. Click the Colasoft Packet Builder from the Colasoft Capsa application.
- Choose the Run… command from the Start button of Windows, input PktBuilder.exe command and click the Enter key.
You can select one of the provided templates and change the parameters in the decoder editor, hexadecimal editor and ASCII editor to create a packet. Any changes are immediately displayed in the other two windows.
To custom the layout of the three windows, please click the window header, hold on mouse and move it.
Hold on and drag your mouse to the position displayed in the below figure.
Then you will see the Packet List window move to the bottom.
Источник
Colasoft Packet Builder
Colasoft Packet Builder is useful tool used for creating custom network packets, you can use this tool to check your network protection against attacks and intruders. Colasoft Packet Builder provides you very powerful editing feature, besides common HEX editing raw data, it featuring a Decoding Editor which allows you edit specific protocol field value much easier. In addition to building packets, Colasoft Packet Builder also supports saving packets to packet files and sending packets to network.
To start Colasoft Packet Builder, do one of the followings:
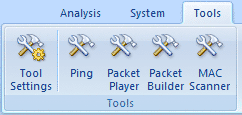
Click Packet Builder icon in Tools tab of the Ribbon (figure below).
Choose Start > All Programs > Colasoft Capsa 7.1 > Capsa 7.0 Toolset > Packet Builder.
Choose Start > Run, enter «pktbuilder» and click OK.
The Colasoft Packet Builder window appears.
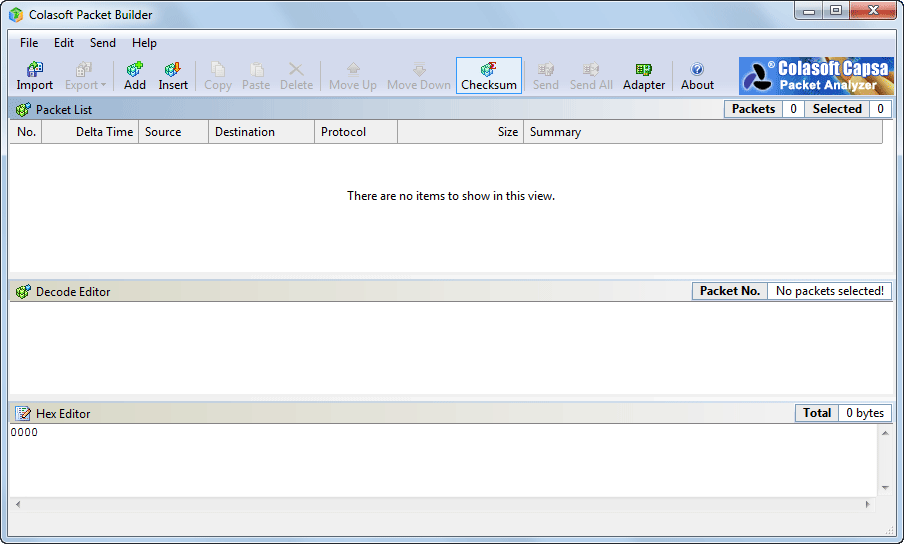
Colasoft Packet Builder contains three panes in main view.
The last two panes collaborate with the Packet List pane. Once a packet selected, Decode Editor and Hex Editor decode the packet and you can just edit the packet in these two panes.
To customize the layout of the three panes, just drag their heads to move.
You can use Colasoft Packet Builder to:
Add or insert new packets
Simply you can add or insert packets from Packet tab of Colasoft Capsa or packet templete (ARP, IP, TCP and UDP).
Edit packets
Just click the item or digit to edit packets in Decode Editor pane and Hex Editor pane.
Send packets
Click the Send or Send All button on toolbar to tramsmit the created packets to network.
 Save your packets to disk is also important. You can click Export to save selected packets or all packets to your machine. Now only *.cscpkt format files is supported.
Источник
Hacking Articles
Raj Chandel’s Blog
DOS Attack with Packet Crafting using Colasoft
In our previous article we had discussed “packet crafting using Colasoft Packet builder” and today you will DOS attack using colasoft Packet builder. In DOS penetration testing part 1 we had used Hping3 in Kali Linux for generating TCP, UDP, SYN, FIN and RST traffic Flood for DOS attack on target’s network. Similarly, we are going to use colasoft for all those attacks by making a change in their data size of packets and time elapse between packets.
Let’s start.
TCP DOS Attack
You can download it from given link, once it gets downloaded then run the application as an administrator to begin the DOS attack.
Click on ADD given in menu bar.

A small window will pop up to select the mode of attack here we are going to choose TCP packet for generating TCP packet flood on the target’s network. Well if you will notice given below image then you will observe that I had set delta time 0.1 sec as time elapses for the flow of traffic for all packets. This is because as much as the time elapsed will be smaller as much as packet will be sent faster on the target’s network.

in the window are categories into three phases as Decode Editor, Hex Editor, and packet List. From the given image you can observe the following information which I had edited for TCP packet
Decode Editor: This section contains packet information such as protocol, Time to live and etc. Here you need to add source address responsible for sending a packet and then add destination address which is responsible for receiving incoming packet traffic.
- Source address: 192.168.1.102
- Destination address: 192.168.1.107
Hex Editor: This section displays the raw information (Hexadecimal) related to the data size of the packet. By typing a random string you can increase the data length of the packet.
Packet size: 112 bytes

Packet List: It displays complete information of your packet which contains a source address and destination address, time to live and other information which we had edited.

Click on Adapter given in menu bar to select specific adapter for DOS attack. From given below image you can observe it showing adapter status: LAN Operational.
Note: It is only available when you have run the application as administrator.

Click on Send option from the menu bar and enable the checkbox for “Burst Mode” and “Loop sending” and adjust its size according to your wish.
Then click on start to launch the TCP packet for DOS attack.

Using Wireshark we can capture packet and traffic between source and destination. So here you can perceive that infinite TCP packet is being transferred on target’s network after some time it will demolish the victim’s machine so that victim could not able to reply any legitimate request of other users.

TCP SYN DOS Attack
Again repeat the same to choose TCP packet for generating TCP SYN flood on target’s network. Well if you will notice given below image again then you will observe that I had set same delta time 0.1 sec.

You, people, must aware of TCP-SYN Flood attack so in order to generate only SYN packet traffic, activate the TCP flag for synchronizing sequence by changing bit form 0 to 1.
Hence this time I had set below information in decoder Editor and Hex editor.
- Source address: 192.168.1.102
- Destination address: 192.168.1.107
- Flag: SYN
- Packet size: 115 bytes

And repeat above step of TCP flood to begin the attack.
Click on Send option from the menu bar and enable the checkbox for “Burst Mode” and “Loop sending” and adjust its size according to your wish.
Then click on start to launch the TCP packet for DOS attack.

You can clearly observe the flow of traffic of SYN packet from attacker network to targets network after some time it will demolish the victim’s machine so that victim could not able to reply any legitimate request of other users.

TCP RST DOS Attack
Again repeat the same to choose TCP packet for generating TCP Reset flood on target’s network. If you will notice given below image then you will observe that again I had set delta time 0.1 sec this is because as much as the time elapsed will be smaller as much as packet will be sent faster on target’s network.

You, people, must aware of TCP-RST Flood attack so in order to generate only Reset packet traffic, activate the TCP flag for Reset the connection by changing bit form 0 to 1.
Hence this time I had set below information in decoder Editor and Hex editor.
- Source address: 192.168.1.102
- Destination address: 192.168.1.107
- Flag: Reset
- Packet size: 104 bytes

After then repeat the above step to begin the attack.
Click on Send option from the menu bar and enable the checkbox for “Burst Mode” and “Loop sending” and adjust its size according to your wish.
Then click on start to launch the TCP packet for DOS attack.

You can clearly observe the flow of traffic of RST packet from attacker network to targets network after some time it will demolish the victim’s machine so that victim could not able to reply any legitimate request of other users.

UDP DOS Attack
Again repeat the same to choose UDP packet for generating TCP flood on the target’s network. If you will notice given below image then you will observe that again I had set delta time 0.1 sec as time elapses for the flow of traffic for all packets.

This time I had set below information in decoder Editor and Hex editor.
- Source address: 192.168.1.102
- Destination address: 192.168.1.107
- Source port: 80
- Packet size: 113bytes

After editing your packet information verifies that changes through packet list are given on the right side of the window before launching an attack.

Click on Adapter to select specific adapter for DOS attack. From given below image you can observe it showing adapter status: LAN Operational.

Click on Send option from the menu bar and enable the checkbox for “Burst Mode” and “Loop sending” and adjust its size according to your wish.
Then click on start to launch UDP packet for DOS attack.

You can clearly observe in given below image the flow of traffic of UDP packets from attacker network to targets network after some time it will demolish the victim’s machine so that victim could not able to reply any legitimate request of other users.

Author: Rahul Virmani is a Certified Ethical Hacker and the researcher in the field of network Penetration Testing (CYBERSECURITY). Contact Here
Источник


