- The NET.TCP Port Sharing service failed to start on Windows 10
- The NET.TCP Port Sharing service failed to start
- 1] Disable IPV6
- 2] Set the NET.TCP Port Sharing Service to automatic startup
- 3] Re-enable the .NET Framework 3.5 Dependency
- 4] Reset Winsock
- 5] Perform System Restore
- CIFS over SSH штатными средствами Windows 10
- На стороне WINDOWS
- Шаг 1. Настройка сетевого адаптера
- Шаг 2. Ключ и рабочий скрипт
- Шаг 3. Ярлык или задача в планировщике
- Настройка Linux сервера
- How to share COM port between applications?
- Table of contents:
- Serial Port Splitter: What it is and how it works
- Split serial port between applications
- Virtual Serial Port Driver PRO
- How to share COM ports between applications?
- VSPD PRO benefits beyond simply splitting serial port
The NET.TCP Port Sharing service failed to start on Windows 10
One of the numerous Windows Services that run on the Windows 10 OS is the NET.TCP Port Sharing service. This particular service allows multiple users to share the TCP ports over the net.tcp protocol in a more secure way. In some cases, this service may fail to start even though you have set it up to automatically start on your Windows 10 device. This post identifies the potential cause, as well as provide the most suitable solutions to the error message The NetTcpPortSharing service failed to start on Windows 10.
When you encounter this issue, you’ll receive the following similar error message in the Event Viewer:
The NET.TCP Port Sharing service failed to start due to the following error:
The service did not respond to the start or control request in a timely fashion.
The following are the potential culprits to this error:
- Glitched or Disabled Net.TCP Port Sharing Service.
- Inconsistent or corrupted TCP / IP data.
- .NET Framework 3.5 is disabled.
- Recent critical system change – mostly Windows update
- System file corruption.
The NET.TCP Port Sharing service failed to start
If you’re faced with this issue, you can try our recommended solutions below in no particular order and see if that helps to resolve the issue.
- Disable IPv6
- Set the NET.TCP Port Sharing Service to automatic startup
- Re-enable the .NET Framework 3.5 Dependency
- Reset Winsock
- Perform System Restore
Let’s take a look at the description of the process involved concerning each of the listed solutions.
1] Disable IPV6
Disabling IPv6 on your Windows 10 device could fix the NET.TCP Port Sharing Service Failed To Start issue.
2] Set the NET.TCP Port Sharing Service to automatic startup
You may encounter this error due to a Windows 10 glitch, that will force the NET.TCP Port Sharing Service to be stuck in a state where it can neither be opened nor be closed. In this case, you need to restart the service automatically. Here’s how:
- Press Windows key + R to invoke the Run dialog.
- In the Run dialog box, type services.msc and hit Enter to open Services.
- In the Services window, scroll and locate the NET.TCP Port Sharing Service.
- Double-click on the entry to edit it’s properties.
- Make sure that the option under the Startup type menu in the service’s properties window is set to Automatic. Confirm any dialog boxes which may appear when changing the startup type.
Note: In case the service is already set to Automatic, then you may need to click the Stop button under Service status section, and then enable it again by clicking the Start button.
- Click Apply >OK to save changes.
- Exit Services console.
- Restart computer.
If the issue persists, try the next solution.
3] Re-enable the .NET Framework 3.5 Dependency
This solution requires you to enable the .NET Framework 3.5 dependency from the Windows Features applet. Here’s how:
- Invoke the Run dialog box.
- In the Run dialog box, type appwiz.cpl and hit Enter to open the Programs and Features window.
- In the window that opens, on the left pane, click the Turn Windows Features On or Off link.
- In the Windows Features applet that pops up, check the .NET Framework 3.5 box and then click the + sign to expand the section.
- Now, check both the Windows Communication Foundation HTTP Activation and Windows Communication Foundation Non-HTTP Activation box.
- Click OK to save changes.
Note: In case you find both options are already enabled, then uncheck to disable them temporarily, restart your PC. Then once your PC boots, check both options to enable them again.
- Restart computer.
4] Reset Winsock
Since this error might be network adapter-related, resetting Winsock will help you solve the errors pertaining to the Transmission Control Protocol and Internet Protocols.
5] Perform System Restore
A System Restore is basically a snapshot of the Windows System files and other installed application files on your system at a specific point in time. Performing a system restore helps the files to be restored to a previous state when the OS was working fine without issue.
If System Restore fails to fix the issue, you can try Reset This PC, or Cloud Reset, or In-place Upgrade Repair to resolve the issue.
CIFS over SSH штатными средствами Windows 10
Я ленивый и потому люблю когда все организовано удобно, без лишних телодвижений. Иногда перебарываю лень, для того чтобы сделать удобно.
Однажды потребовалось мне организовать доступ к серверу по протоколу SMB и в поиске решения я наткнулся на следующую статью: Mounting your Nikhef home directory using SSH for Windows 8. Это было простое и удобное решение, которое использовало Putty. Чуть позже мне пришлось настраивать это решение на другом компьютере и я понял, что Putty тут лишний с тех пор как в Windows 10 появился встроенный ssh-клиент на основе OpenSSH.
Под катом — идентичная схема, только с использованием OpenSSH под Windows 10.
У меня схема организована следующим образом:
- На сервере запущена Samba, от имени пользователя www-data расшарена корневая папка с сайтами. Доступ к серверу только через ssh с авторизацией по ключу. Сервер за NATом, порт проброшен только для ssh.
- В процессе входа в аккаунт на домашней машине на Windows 10 через встроенный в систему OpenSSH устанавливается соединение с сервером с авторизацией по ключу.
- Туннелируется порт 445 удаленной машины на локальный порт 44445 сетевого loopback-адаптера доступного по адресу 10.255.255.1
- На loopback-адаптере 10.255.255.1 порт 44445 проксируется на локальный 445. Таким образом при подключении к \\10.255.255.1\ открывается удаленная шара с файлами (которая, при необходимости монтируется как сетевой диск).
Всё это автоматом – лень торжествует. Безопасно, быстро и нативно выглядит. Любым редактором могу открывать и править файлы на удаленном сервере как у себя на локальном — без проблем с загрузкой правленых файлов и установкой им необходимых разрешений. При этом нет проблем с безопасностью Samba.
Итак – сперва по шагам:
На стороне WINDOWS
Должен быть установлены OpenSSH. В Windows 10 и Windows Server 2019 появился встроенный SSH клиент на основе OpenSSH. Им мы и воспользуемся. Сначала убедимся что он установлен – наберем в командной строке
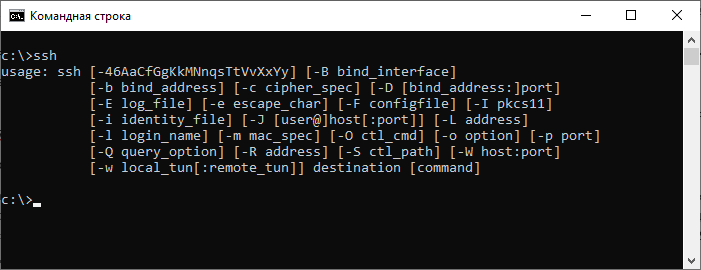
Если видим исполнение команды — все «Ок», клиент присутствует в системе.
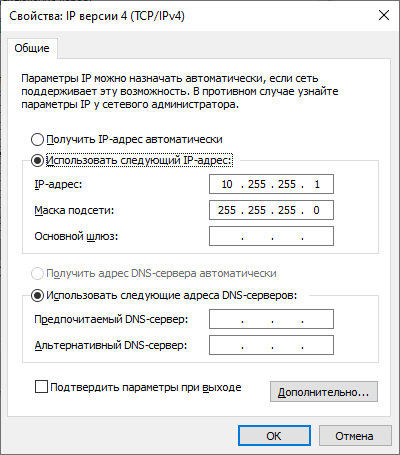
Шаг 1. Настройка сетевого адаптера
Устанавливаем loopback-адаптер в системе. Мы будем обращаться по адресу к локальному адаптеру.
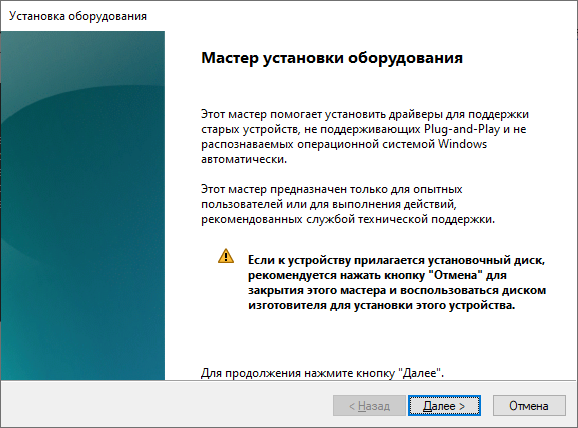
Запустится «Мастер установки оборудования» (Здесь я пользуюсь русской Windows 10 Pro).
«Далее» -> «Установка оборудования, выбранного из списка вручную» -> «Сетевые адаптеры» -> «Microsoft –> Адаптер замыкания на себя Microsoft KM-Test» -> «Далее»
Уверен, что эти шаги можно сделать из командной строки, но не нашел способ установки драйвера без devcon.exe, потому и не стал заморачиваться с автоматизацией этого шага.
Далее уже в CMD (от имени Администратора).
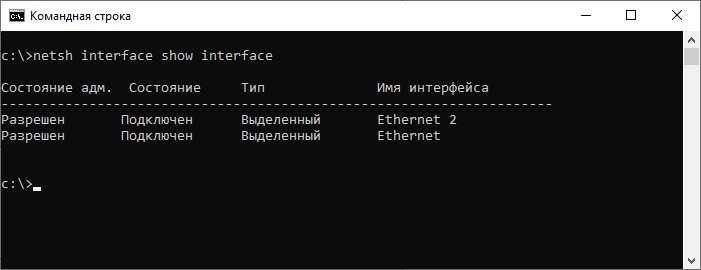
Видим появился второй адаптер. У меня он называется Ethernet 2.
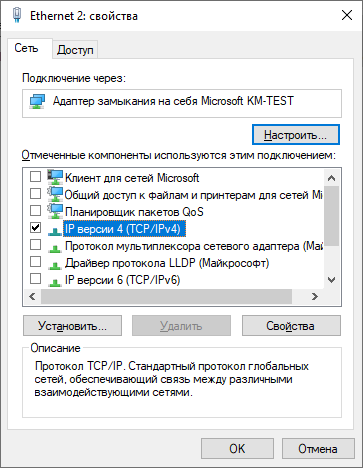
Теперь настроим адрес для этого адаптера
Или из командной строки:
В результате у нас появился адаптер локально доступный по адресу 10.255.255.1
Теперь проблема в том, что нам необходимо получить доступ к общей папке через TCP-порт 445, но при загрузке Windows этот порт захватывается системным драйвером lanmanserver для всех интерфейсов. Отложив запуск драйвера lanmanserver и установив правило portproxy, мы можем обойти это.
Далее в командной строке от имени администратора меняем режим запуска сетевых служб (пробел после «start=» обязателен. ):
и настраиваем для адаптера с адресом 10.255.255.1 проксирование порта 44445 на локальный порт 445
Теперь необходимо перезагрузиться, чтобы схема перехвата порта у службы lanmanserver сработала.
Проверяем что прослушивание порта осуществляется нашим loopback-адаптером, просмотрев открытые в системе порты
значит все в порядке и порт прослушивается на нужном адресе. Если же мы видим «0.0.0.0:445» — значит в нашей схеме что-то не сработало правильно. Проверить правила переадресации портов можно командой
Шаг 2. Ключ и рабочий скрипт
Создаем папку для вспомогательных файлов. Встроим, так сказать в систему наш способ.
Генерируем ключ для ssh-авторизации (назовем его, например: cifsoversshkey)
В результате будет сгенерирована пара открытого и закрытого ключа. Для того, чтобы OpenSSH не выдавал сообщение UNPROTECTED PRIVATE KEY FILE! нужно изменить права на файл ключа. Задачу мы будем запускать для одного пользователя, от имени которого мы собираемся работать в Windows. Можно через GUI, но мне показалось что картинок уже достаточно. В Windows это сделаем следующей командой:
В результате текущий пользователь будет назначен владельцем, отключено наследование и удалены унаследованные права. Проверить мы это сможем командой
Должны быть права только для текущего пользователя, иначе файл ключа не будет принят программой OpenSSH и соединение не будет подниматься!
Создадим в текущей папке пакетный файл cifsoverssh.cmd следующего содержания:
Где:
user@111.111.111.111 – пользователь на стороне linux сервера @ адрес удаленного сервера
Шаг 3. Ярлык или задача в планировщике
Создаем ярлык для следующей команды: powershell -nologo -noninteractive -windowStyle hidden -command «%APPDATA%\CIFSoverSSH\cifsoversshkey.cmd»
Это позволит запускать наш пакетный файл через powershell без открытия окна. Если запускать его через CMD будет открываться черное окно терминала и будет висеть все время, пока соединение будет установлено, а это неудобно и некрасиво.
Для автоматизации запуска при входе в систему можно создать задачу в планировщике:
На стороне клиентского компьютера Windows все приготовления были закончены.
Настройка Linux сервера
Предполагается, что ssh-сервер был предварительно настроен и включена авторизация по ключу.
Подключаемся по ssh из командной строки на windows-машине
В домашней папке пользователя, от имени которого мы будем авторизовываться при создании туннеля ищем файл
/.ssh/authorized_keys (если файл отсутствует – создадим его).
Теперь необходимо в этот файл вставить содержимое нашего файла публичного ключа, созданного на нашей windows-машине (файл %APPDATA%\CIFSoverSSH\cifsoversshkey.pub). Откроем его в любом редакторе и вставим цепочку ключа с новой строки. Если есть другие ключи, просто вставим его с новой строки.
Устанавливаем Samba (на примере Debian)
Переименовываем старый файл настроек и создаем новый файл
Открываем пустой файл настроек и приводим его к следующему виду:
В последней секции мы настраиваем непосредственно шару. В названии секции указываем имя шары ShareName. Path = путь к файлам, которые мы хотим расшарить. В параметрах force user и force group указываем linux-пользователя, от имени которого будут сохраняться файлы при изменении и создании в шаре. Так как у меня там лежат файлы для веб-сервера – у меня пользователь www-data
Отключаемся и выходим в командную строку Windows
Всё готово. Теперь остается только запустить наш ярлык или выйти из профиля пользователя windows и снова войти (если вы создали задачу в планировщике).
После этого ваша удаленная шара будет доступна по адресу \\10.255.255.1\ShareName — Можно даже монтировать её как сетевой диск.
How to share COM port between applications?
Table of contents:
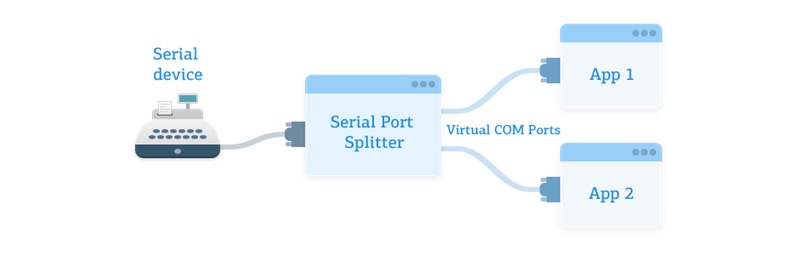
Serial Port Splitter: What it is and how it works
Splitting a serial port means to share the interface with more than one application simultaneously. All attached applications get the same data flow from the serial port. There are both hardware and software solutions that can be employed to allow you to share a COM port.
Serial Port Splitter, also known as Virtual Serial Port Driver PRO (VSPD PRO) is a software tool developed by Eltima software that is designed to enable the user to create an unlimited number of virtual COM ports that emulate and behave as if they were actual physical ports. The ability to create these virtual serial ports in any number allows you to share real COM ports between applications. This excellent application also offers a simple method to split serial port data without the need for additional hardware.
Split serial port between applications

Virtual Serial Port Driver PRO
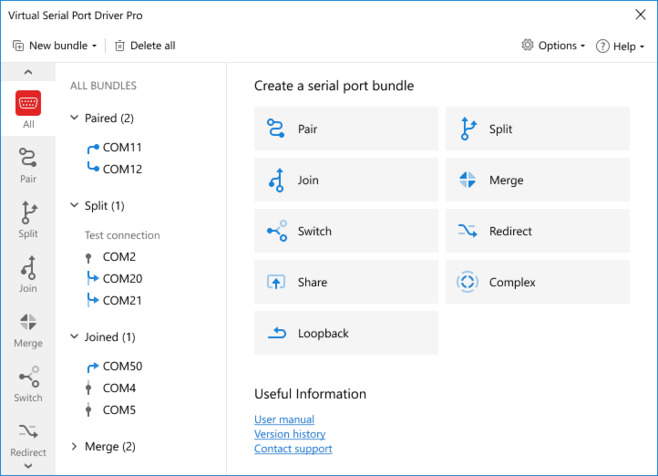
Serial data splitter software works by taking a single serial port, say COM1, and sharing it into several virtual ports (COM2, COM3, COM4, etc.). Each of these newly created virtual ports will appear in your device manager as if they were actual hardware interfaces and will emulate all of the settings of a physical port. Now, applications can be assigned to the virtual serial ports through a unique identifier, eliminating compatibility issues. You can now assign COM2, COM3, etc. where previously only one application could be assigned to COM1 at a time.
How to share COM ports between applications?
Here are step-by-step instructions on how to share COM port data between several applications using Serial Port Splitter.
- Launch VSPD Pro on your Windows machine.
- Select the serial port that you intend to share.
- Choose the applications that will be sharing access to the port and set their custom rights. You will need to specify the full path to each application and then click the “Set custom rights” button to proceed.

- Toggle the “Read”, “Write”, and “Control” option for each application.
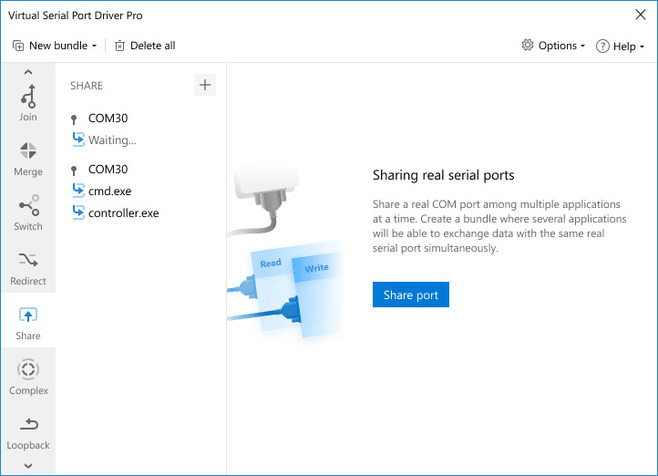
Note: Only one app can control the device, so in most cases “Read/Write” is a sufficient level of access when sharing a device or port.
VSPD PRO benefits beyond simply splitting serial port
Besides being an excellent software serial port splitter, Virtual Serial Port Driver Pro is packed with other features and capabilities that increase your productivity when working with serial protocols and interfaces. In addition to splitting serial ports, here are some of the other tasks that can be accomplished with this software application:
- Joining COM Ports — VSPD Pro lets you link multiple physical COM ports to one virtual port. A serial application connected to this virtual serial port will receive data simultaneously from all the joined real COM ports. This allows you to redirect data from multiple devices back to one application.
This can be useful for a monitoring application that may need to access many serial devices in an industrial automation setting. With a single physical connection, you can monitor as many virtual connections as your system can handle.
- Automated Port Switching — If you have an application that can only work with a limited number of ports the Switcher feature of VSPD Pro is just what you need. It allows you to combine several physical ports into one virtual one and create a switcher to the newly created virtual port in your application.
When your program needs a serial interface the switcher detects an open COM port from the list of joined ports and makes it available to the app. Your program always gains access to a port as if it was the same physical port.
- Creating Bundle Connections — Complex bundles of serial interfaces can be created and managed with this advanced feature of VSPD Pro.
It gives you the ability to transmit serial data in and out of an unlimited number of physical or virtual serial interfaces. Data received at the ‘IN’ side of the bundle will be sent to every serial interface on the ‘OUT’ side of the bundle. This transmission mode works in both directions. You can manage the hardware control lines by setting a main port for each side of the bundle. This facility can be very helpful when multiple devices or applications need to communicate with the same serial device.
- Merging COM Ports — Using this feature you can add any number of physical or virtual serial ports to a single serial port bundle not divided into ‘IN’ and ‘OUT’ sides. All data sent to one port is replicated to all other ports in the bundle. All devices and applications can now change data with multiple devices and applications at the same time.


