- Как установить инструменты командной строки в Mac OS X (без XCode) 2021
- Mac OS X Welcome Videos
- Установка инструментов командной строки в Mac OS X
- Что устанавливается с помощью инструментов командной строки и где
- Устранение ошибки «в данный момент недоступно»
- How to Install Xcode Command Line Tools on a Mac
- What are Xcode Command Line Tools?
- How to Install Xcode Command Line Tools from a Command Prompt
- How to Use Homebrew to Install Xcode Command Line Tools
- More information
- Your development environment
- How to Install Command Line Tools in Mac OS X (Without Xcode)
- Installing Command Line Tools in Mac OS X
- What Installs with Command Line Tools and Where
- Troubleshooting “not currently available” error
Как установить инструменты командной строки в Mac OS X (без XCode) 2021
Mac OS X Welcome Videos
Пакет инструментов командной строки предоставляет пользователям терминалов Mac множество часто используемых инструментов, утилит и компиляторов, включая make, GCC, clang, perl, svn, git, size, strip, strings, libtool, cpp, what и многие другие полезные команды, которые обычно находятся в стандартных установках Linux. Мы включили полный список новых двоичных файлов, доступных через инструментарий командной строки ниже, для тех, кто заинтересован, или вы можете просто убедиться в этом после установки пакета, который мы рассмотрим здесь.
Это руководство предназначено для MacOS 10.13 High Sierra, 10.12 Sierra, OS X 10.11 El Capitan, OS X 10.10 Yosemite, Mac OS X 10.9 и более новых выпусков. Пользователи Mac, работающие под управлением предыдущих версий OS X, могут продолжать устанавливать средства командной строки и gcc (без Xcode) через установщик пакетов, доступный на веб-сайте Apple Developer, как описано здесь.
Установка инструментов командной строки в Mac OS X
- Запустите Терминал, находящийся в / Applications / Utilities /
- Введите следующую командную строку:

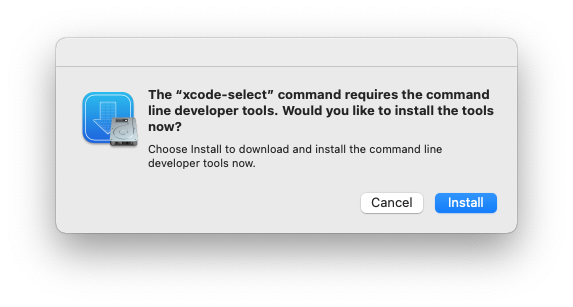
Появится всплывающее окно обновления программного обеспечения, которое спрашивает: «Команде xcode-select требуются инструменты разработчика командной строки. Хотите ли вы установить инструменты сейчас? ». Чтобы подтвердить это, нажмите« Установить », а затем при необходимости согласитесь с Условиями обслуживания (не стесняйтесь их внимательно прочитать, мы будем здесь).

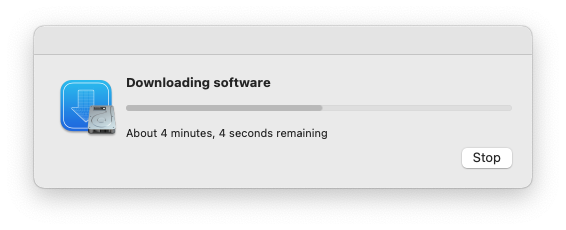
Дождитесь завершения загрузки пакета инструментов командной строки, он будет около 130 МБ и устанавливается довольно быстро, в зависимости от скорости вашего соединения

После завершения программа установки завершается самостоятельно, и вы можете подтвердить, что все работает, попытавшись использовать одну из только что установленных команд, например gcc, git, svn, rebase, make, ld, otool, nm, что бы вы ни хочу из списка ниже. Предполагая, что установка прошла непрерывно, команда будет выполнена, как и ожидалось. Это также означает, что вы можете компилировать и устанавливать вещи из исходного кода напрямую, без использования менеджера пакетов. Наслаждайтесь новым инструментарием командной строки Unix!
Что устанавливается с помощью инструментов командной строки и где
Для тех, кто интересуется подробностями того, что установлено на их Mac и куда он направляется, весь пакет инструментов командной строки помещается в следующую директорию:
Вы можете просмотреть этот каталог, если хотите, или можете просто узнать об этом на тот случай, если вы захотите изменить или настроить какой-либо пакет позже.
Обратите внимание, что каталог — это корневой каталог / библиотека Mac OS, а не пользовательский каталог
Если вы хотите увидеть 61 новую доступную вам команду, все они находятся в / Library / Developer / CommandLineTools / usr / bin /, но мы также перечислили их в алфавитном порядке ниже для удобства:
ar
as
asa
bison
BuildStrings
c++
c89
c99
cc
clang
clang++
cmpdylib
codesign_allocate
CpMac
cpp
ctags
ctf_insert
DeRez
dsymutil
dwarfdump
dyldinfo
flex
flex++
g++
gatherheaderdoc
gcc
gcov
GetFileInfo
git
git-cvsserver
git-receive-pack
git-shell
git-upload-archive
git-upload-pack
gm4
gnumake
gperf
hdxml2manxml
headerdoc2html
indent
install_name_tool
ld
lex
libtool
lipo
lldb
lorder
m4
make
MergePef
mig
mkdep
MvMac
nasm
ndisasm
nm
nmedit
otool
pagestuff
projectInfo
ranlib
rebase
redo_prebinding
ResMerger
resolveLinks
Rez
RezDet
RezWack
rpcgen
segedit
SetFile
size
SplitForks
strings
strip
svn
svnadmin
svndumpfilter
svnlook
svnrdump
svnserve
svnsync
svnversion
unifdef
unifdefall
UnRezWack
unwinddump
what
xml2man
yacc
Устранение ошибки «в данный момент недоступно»
Появляется сообщение об ошибке «Не удается установить программное обеспечение, поскольку оно недоступно на сервере обновления программного обеспечения»? Что ж, вам повезло, потому что это сообщение об ошибке, вероятно, указывает, что на Mac уже установлен Xcode.
Начиная с Mac OS X 10.9 и далее, если Xcode уже установлен в Mac OS X, то также устанавливаются и инструменты командной строки (вы можете проверить это, попытавшись запустить gcc или make из терминала). Соответственно, это руководство предназначено для пользователей, которые не хотят устанавливать более широкий пакет разработки XCode, и вместо этого предпочитают устанавливать только утилиты командной строки. Да, это означает, что вы можете удалить все приложение XCode и установить только инструменты командной строки, если хотите, поскольку для многих пользователей и системных администраторов это единственная причина, по которой они установили XCode для начала.
Источник
How to Install Xcode Command Line Tools on a Mac
Developers need to install Xcode Command Line Tools before they can develop software on a Mac.
Apple provides a complete development environment for programmers named Xcode. If you are developing software for macOS, iOS, tvOS, and watchOS, you must install the full Xcode application.
It’s not pre-installed, but you can install it from the Apple developer website or the App Store on your Mac.
What are Xcode Command Line Tools?
If you’re not developing software for an Apple device, you won’t need the full Xcode application (it requires over 40GB of disk space!).
Instead, you’ll install Xcode Command Line Tools. It’s a smaller package for software developers with tools that run on the command line, that is, in the Terminal application.
Programmers have used these tools on Unix operating systems since computing’s beginnings, and they serve as the foundation of almost all software development.
Luckily, the Xcode Command Line Tools package only requires 1.2GB of space on your disk.
You have three choices to install Xcode Command Line Tools on a Mac:
- install the full Xcode package
- install Xcode Command Line Tools when triggered by a command
- install Xcode Command Line Tools as part of a Homebrew installation.
I don’t recommend installing the full Xcode package unless you’re developing software for an Apple device. The download will take too long and it will consume unnecessary disk space. Instead, try either of two faster methods.
How to Install Xcode Command Line Tools from a Command Prompt
Apple has made it easy to install Xcode Command Line Tools because certain commands will prompt you to begin installation.
Here are examples of commands that will trigger a prompt to install Xcode Command Line Tools:
- clang – a compiler that turns source code into an executable program
- gcc – the GNU compiler
- git – the save-as-you-go version control system
Running any of these commands in the terminal will bring up a prompt to install Xcode Command Line Tools. I’ve written elsewhere about How to Open Terminal on MacOS – just click the Spotlight icon in the menu bar and type “terminal.”
You can also enter the command xcode-select —install in the terminal to begin the installation process. You’ll see a panel that asks you to install Xcode Command Line Tools.
Click ‘Install’ to begin the download and installation process.
Installation takes 8 minutes on a 2021 Mac M1 Mini, with a 100Mbps Internet connection. It’s significantly slower on Mac Intel over a slow Internet connection.
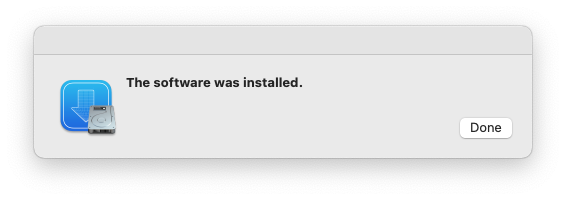
You’ll see a confirmation message when installation is complete.
Verify that you’ve successfully installed Xcode Command Line Tools:
You should see the following:
How to Use Homebrew to Install Xcode Command Line Tools
As easy as it is to use the command prompt to install Xcode Command Line Tools, I recommend an even easier method: using Homebrew.
This option was only recently added to Homebrew, so many developers are not aware of it.
Homebrew is the popular Mac package manager. Most developers need programming languages and utilities that don’t come installed on macOS and are not included in the Xcode Command Line Tools package. Homebrew can install almost any open-source tool for developers.
Since you’ll probably need Homebrew, you might as well let Homebrew install Xcode Command Line Tools for you.
First, check if Homebrew is already installed.
If Homebrew is not installed, you will see:
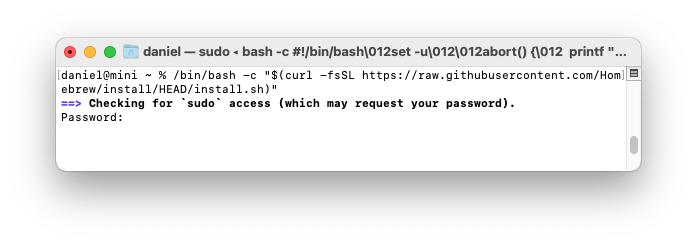
Homebrew provides an installation script you can run with a single command (check that it hasn’t changed at the Homebrew site).
The Homebrew installation script will ask you to enter your Mac user password. This is the password you use to sign in to your Mac.
You won’t see the characters as you type. Press enter when you are done.
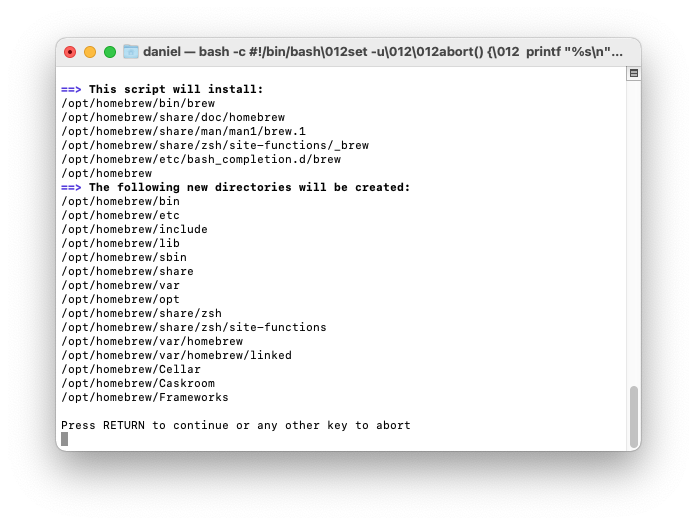
If you haven’t already installed Xcode Command Line Tools, you’ll see a message that «The Xcode Command Line Tools will be installed.» Press return to continue when prompted by the Homebrew installation script.
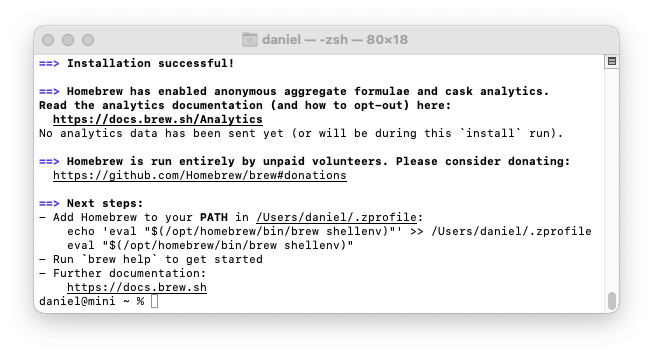
You’ll see diagnostic and progress messages. Homebrew installation takes 2 to 15 minutes on a 2021 Mac M1 Mini, with a 100Mbps Internet connection. It’s significantly slower on Mac Intel over a slow Internet connection.
On Mac Intel machines, that’s all you need to do – Homebrew is ready to use. On Mac Intel, Homebrew installs itself into the /usr/local/bin directory, which is already configured for access by the shell with the macOS default $PATH .
On Apple Silicon machines, there’s one more step. Homebrew files are installed into the /opt/homebrew folder. But the folder is not part of the default $PATH . Follow Homebrew’s advice and create a
/.zprofile file that contains a command which sets up Homebrew. Homebrew shows instructions at the end of the installation process:
After you’ve installed Homebrew, check that Homebrew is installed properly.
You should see this:
If Homebrew is successfully installed, there will be Homebrew files in /usr/local (for macOS Intel) or /opt/homebrew (for Apple Silicon).
Now you have both Xcode Command Line Tools and Homebrew installed. If you want to learn more about adding Homebrew packages to set up your development environment, see Install a Homebrew Package.
More information
I’ve written an in-depth guide to Install Xcode Command Line Tools that goes beyond these basics.
There’s also a complete guide to Install Homebrew for Mac that explains how to Update Homebrew, Uninstall Homebrew, and keep up with other Housekeeping for Homebrew.
Your development environment
MacOS is the most popular platform for software development because the operating system is based on Unix, the longtime standard for software development.
With Xcode Command Line Tools installed, you’ll have a solid foundation for adding almost any open source development tool.
Add Homebrew and you have a package manager that can install version managers, programming languages, and almost any other tool you may need.
Combined with a text editor and terminal application, you’ll be prepared for any tutorial you’ll find on freeCodeCamp.
Author of the book «Learn Ruby on Rails.” Now at Yax.com, building websites without frameworks or build tools. Past founder of the RailsApps open source project.
If you read this far, tweet to the author to show them you care. Tweet a thanks
Learn to code for free. freeCodeCamp’s open source curriculum has helped more than 40,000 people get jobs as developers. Get started
freeCodeCamp is a donor-supported tax-exempt 501(c)(3) nonprofit organization (United States Federal Tax Identification Number: 82-0779546)
Our mission: to help people learn to code for free. We accomplish this by creating thousands of videos, articles, and interactive coding lessons — all freely available to the public. We also have thousands of freeCodeCamp study groups around the world.
Donations to freeCodeCamp go toward our education initiatives and help pay for servers, services, and staff.
Источник
How to Install Command Line Tools in Mac OS X (Without Xcode)
 Mac users who prefer to have a more traditional Unix toolkit accessible to them through the Terminal may wish to install the optional Command Line Tools subsection of the Xcode IDE. From MacOS Monterey, Big Sur, Catalina, Mojave, High Sierra, Sierra, OS X El Capitan, Yosemite, Mavericks onward, this is now easily possible directly and without installing the entire Xcode package first, no developer account is required either.
The Command Line Tool package gives Mac terminal users many commonly used tools, utilities, and compilers, including make, GCC, clang, perl, svn, git, size, strip, strings, libtool, cpp, what, and many other useful commands that are usually found in default linux installations. We’ve included the full list of new binaries available through the command line toolkit below for those interested, or you can just see for yourself after you have installed the package, which we’ll walk through here.
This guide is geared towards MacOS Monterey 12, macOS Big Sur 11, macOS Catalina, macOS Mojave 10.14.x, 10.13 High Sierra, 10.12 Sierra, OS X 10.11 El Capitan, OS X 10.10 Yosemite, and Mac OS X 10.9, and newer releases. Mac users running prior versions of Mac OS X can continue to directly install Command Line Tools and gcc (without Xcode) through a package installer available through the Apple Developer website as described here.
Installing Command Line Tools in Mac OS X
- Launch the Terminal, found in /Applications/Utilities/
- Type the following command string:
xcode-select —install
A software update popup window will appear that asks: “The xcode-select command requires the command line developer tools. Would you like to install the tools now?” choose to confirm this by clicking “Install”, then agree to the Terms of Service when requested (feel free to read them thoroughly, we’ll be here)
Wait for the Command Line Tools package download to complete, it’ll be about 130MB and installs fairly quickly depending on your connection speed
The installer goes away on its own when complete, and you can then confirm everything is working by trying to use one of the commands that were just installed, like gcc, git, svn, rebase, make, ld, otool, nm, whatever you want from the list below. Assuming the installation went uninterrupted, the command will execute as expected. This also means you can compile and install things from source code directly without having to use a package manager. Enjoy your new unix command line toolkit!
What Installs with Command Line Tools and Where
For those interested in knowing the details of what is installed on their Mac and where it’s going, the entire command line toolkit package gets placed in the following directory:
You can browse through that directory if you want to, or you can just have awareness of it just in case you want to modify or adjust any of the package at a later time.
Note that directory is the root /Library of Mac OS, not a user
If you want to see the 61 new commands available to you, they’re all in /Library/Developer/CommandLineTools/usr/bin/ but we have also listed them alphabetically below for convenience:
ar
as
asa
bison
BuildStrings
c++
c89
c99
cc
clang
clang++
cmpdylib
codesign_allocate
CpMac
cpp
ctags
ctf_insert
DeRez
dsymutil
dwarfdump
dyldinfo
flex
flex++
g++
gatherheaderdoc
gcc
gcov
GetFileInfo
git
git-cvsserver
git-receive-pack
git-shell
git-upload-archive
git-upload-pack
gm4
gnumake
gperf
hdxml2manxml
headerdoc2html
indent
install_name_tool
ld
lex
libtool
lipo
lldb
lorder
m4
make
MergePef
mig
mkdep
MvMac
nasm
ndisasm
nm
nmedit
otool
pagestuff
projectInfo
ranlib
rebase
redo_prebinding
ResMerger
resolveLinks
Rez
RezDet
RezWack
rpcgen
segedit
SetFile
size
SplitForks
strings
strip
svn
svnadmin
svndumpfilter
svnlook
svnrdump
svnserve
svnsync
svnversion
unifdef
unifdefall
UnRezWack
unwinddump
what
xml2man
yacc
Troubleshooting “not currently available” error
Getting an error message that says “Can’t install the software because it is not currently available from the Software Update server”? Well you’re in luck, because that error message probably indicates you already have Xcode installed on the Mac.
From Mac OS X 10.9 onward, if Xcode is already installed in Mac OS X then Command Line Tools becomes installed as well (you can check this by trying to run gcc or make from the terminal). Accordingly, this tutorial is aimed at users who do not want to install the broader Xcode development package, and would rather only have the command line utilities installed instead. Yes, that means you can uninstall the entire Xcode app and only install the command line tools if you want to, since for many users and sysadmins that’s the only reason they installed Xcode to begin with.
Источник


