- How to manage Linux permissions for users, groups, and others
- Linux security
- Setting up a playground
- How do I create directories and files?
- How do I manage ownership and groups?
- How do I manage permissions?
- How do I use absolute mode?
- More Linux resources
- How do I use symbolic mode?
- Special permissions and Access Control Lists
- Wrap up
- How to Manage File and Folder Permissions in Linux
- Command line: File permissions
- Command line: File ownership
- GUI: File permissions
- GUI: Change ownership
How to manage Linux permissions for users, groups, and others

Photo by Min An from Pexels
Managing access to resources is a fundamental task for sysadmins. This responsibility consists of three components: identities, resources, and permissions. This article covers several user, group, and file management commands to control access to resources. The article uses a «How do I…?» format, and it assumes you have a few resources to work with. Specifically, I cover the following topics:
- Creating directories and files
- Managing ownership and associated groups
- Setting permissions with absolute and symbolic modes
Linux security
Setting up a playground
I’ve been in IT for about 25 years, and most of that time was spent as a technical trainer. That means that the things that I write are usually structured as some sort of lab or other hands-on opportunity. It’s just how I cover material. With that in mind, I’ll assume you have a couple of identities and resources to experiment with as you read the rest of the article. You can use the following commands to set up a playground. It’s best to do this on a virtual machine rather than your personal Linux box, but these tasks are relatively harmless.
Create two new users and two new groups to work with. Note that you do not need to configure passwords for the users in this exercise, as you won’t log on with those accounts.
Note: You would use the passwd user01 command to set the user’s password.
In your home directory, create a new directory named playground :
Change into the
/playground directory by using the cd command. You are ready to work with the commands and concepts below.
When you’ve completed the article and learned the techniques I’ve covered, delete the two user accounts, the groups, and the playground directory. Use rm -fR /playground , userdel user01 , and groupdel groupA to remove the resources.
How do I create directories and files?
Use the mkdir command to create directories. The touch command is one of many ways to create files.
How do I create a directory named Resources ?
How do I create a directory path (a series of directories that don’t yet exist)?
Note: The goal here is to create the 2020data directory, but the given path’s data directory does not yet exist. The -p option creates parent directories as needed to complete the path.
How do I create a file named file1 ?
How do I create several files at once?
How do I manage ownership and groups?
In the playground directory, display the current owner and group associated with the Resources directory and the files.
How do I display permission, owners, and groups?
The ls -l command displays directory contents in long format. The long format contains both permissions and ownership. You can see that the user account that created the resources also owns those resources. The group association is also that user’s primary group.
How do I change the user/owner associated with file1 ?
How do I change the group associated with file1 ?
How do I change the owner and group at the same time for file2 ?
There is a specific chgrp command, but I prefer only to memorize one command ( chown ) and apply it to both functions (user and group associations) rather than chown for the user and then have to recall chgrp for the group.
So how do I use chgrp ?
How do I change the user/group for a directory and all of its contents?
The above task provides a recursive configuration. Technically, recursive commands are repeated on each specified object. Effectively, recursive means «this and everything in it.» In the above example, you are configuring the related user/group for the Resources directory and everything in it. Without the -R option, you would only affect the Resources directory itself, but not its contents.
How do I manage permissions?
The change mode or chmod command sets permissions. The syntax is straight-forward:
Here are two examples of manipulating permissions for file2 :
But wait! Those appear to be radically different examples (they’re not, actually). What are all those letters and numbers?
We need to discuss absolute mode and symbolic mode.
How do I use absolute mode?
Absolute mode is one of two ways of specifying permissions. I’ve seen this mode referred to as octal or numeric mode, but the term I learned was absolute. That term also makes the most sense to me because it’s an absolute statement of the desired permissions. I always told my students that this seemed like the most complex of the two modes but is actually the simplest. Usually, they agreed.
Each access level (read, write, execute) has an octal value:
| Access level | Octal value |
| Read | 4 |
| Write | 2 |
| Execute | 1 |
Each identity (user, group, others) has a position:
| Identity | Position |
| User | First or left-most |
| Group | Middle |
| Others | Last or right-most |
More Linux resources
The absolute mode syntax states the desired permissions from left to right.
How do I grant the user (owner) read, write, and execute, the group read-only, and all others no access to file2 by using absolute mode?
The three permissions values are associated with identities:
ugo
740
- The 7 is assigned to the user and is the sum of 4+2+1 or read+write+execute (full access)
- The 4 is assigned to the group and is the sum of 4+0+0 (read-only)
- The 0 is assigned to others and is the sum of 0+0+0 (no access)
In this example, the user has rwx, the group has r only, and all others have no access to file2 .
Let’s look at one more example.
How do I grant the user (owner) read and write, the group read-only, and all others read-only to file2 ?
- The user has 6 (read and write)
- The group has 4 (read-only)
- All others have 4 (read-only)
I find this easier because there are no calculations involved. I’m not concerned with adding or subtracting specific permissions based on the current settings. Instead, I say, «set the permissions to be this,» and that’s the end result I get. It’s an absolute statement.
How do I set permissions for the Resources directory and all of its contents by using absolute mode?
How do I use symbolic mode?
Symbolic mode uses more symbols, but the symbols are simpler to understand. That’s attractive to sysadmins that are new to standard Linux permissions.
Each access level has a symbol:
| Access level | Symbol |
| Read | r |
| Write | w |
| Execute | x |
Each identity has a symbol:
| Identity | Symbol |
| User | u |
| Group | g |
| Others | o |
There are also operators to manipulate the permissions:
| Task | Operator |
| Grant a level of access | + |
| Remove a level of access | — |
| Set a level of access | = |
The general chmod command syntax is the same:
Here is an example:
How do I remove the read permissions from others for file2 by using symbolic mode?
This example removes ( — ) the read ( r ) permission from others ( o ) for file2 .
Here’s another simple example:
How do I grant the read and write permissions to the group for file2 ?
This one gives ( + ) read and write ( rw ) to the group ( g ) for file2 .
How do I set permissions for a directory and all of its contents by using symbolic mode?
Special permissions and Access Control Lists
The above discussion covers standard Linux permissions—applying rwx to the user, group, and all others. Linux has far more flexibility, however. Special permissions permit users to run applications with other credentials, control the inheritance of group associations, and keep files from being changed accidentally. Check out this great article on special permissions.
Linux also has a way of enforcing different permissions for different users and groups. Access Control Lists (ACLs) permit sysadmins to define permissions for more than just one user and one group, which adds a great deal more flexibility to standard permissions. For example, user01 can be granted rw- to file1 , while user02 can be granted r— to file1 . Here is a great article on ACLs.
Wrap up
Creating resources, managing users, and setting permissions are fundamental tasks for Linux users. My goal was to provide a quick and easy guide based on common questions or tasks that we must all accomplish regularly. If you’re new to Linux, having a solid grasp of the eight commands discussed above will make your sysadmin life much easier.
Источник
How to Manage File and Folder Permissions in Linux
For many users of Linux, getting used to file permissions and ownership can be a bit of a challenge. It is commonly assumed, to get into this level of usage, the command line is a must. Although there is always far more power and flexibility to be had, running seemingly complicated command isn’t alwaysa necessity. With the help of some of the most user-friendly desktop interfaces available, you can get away with little to no command line usage. Even with file permission and ownership.
That’s right, much to the surprise of many a new user, managing files and folders can be done from within the file managers. But before we get to the GUI, it’s always best to have a solid understanding of what it’s doing. So, we’ll start with the command line first.
Command line: File permissions
The commands for modifying file permissions and ownership are:
chmod – change permissions
chown – change ownership.
Neither command is difficult to use. It is important, however, that you understand the only user that can actually modify the permissions or ownership of a file is either the current owner or the root user. So, if you are user Bethany, you cannot make changes to files and folders owned by Jacob without the help of root (or sudo). For example:
A new folder was created on a data partition called /DATA/SHARE. Both users Bethany and Jacob need read and write access to this folder. There are a number of ways this can be done (one of which would be to join the users to a special group – we’ll go over managing groups in another post). If Bethany and Jacob are the only users on the system (and you know your network is safe – very important), you can change the permissions of the folder to give them access. One way to do this would be to issue the command:
The breakdown of the above command looks like:
sudo – this is used to gain admin rights for the command on any system that makes use of sudo (otherwise you’d have to ‘su’ to root and run the above command without ‘sudo’)
chmod – the command to modify permissions
-R – this modifies the permission of the parent folder and the child objects within
ugo+rw – this gives User, Group, and Other read and write access.
As you can probably surmise, this command opens wide the SHARE folder such that anyone on the system can have access to that folder. As I mentioned earlier, a more secure method would be to use groups. But we’re just using this for the purpose of demonstration.
The breakdown of permissions looks like this:
The ‘other’ entry is the dangerous one, as it effectively gives everyone permission for the folder/file. The permissions you can give to a file or folder are:
Using the -R switch is important. If you have a number of sub-folders and files within the SHARE directory, and you want the permissions to apply from the parent object (the containing folder) to the child objects (the sub-folders and files), you must use the -R (recursive) switch so the same permissions are applied all the way to the deepest folder, contained within the parent.
Command line: File ownership
Changing the ownership of a file or folder is equally as simple. Say Jacob moved a folder for Bethany into the SHARE directory – but Jacob still has ownership. This can be changed with a simple command:
Let’s break this down.
sudo – admin rights must be used since we are dealing with a folder that belongs to another user
chown – the command for changing ownership
-R – the recursive switch to make sure all child objects get the same ownership changes
bethany – the new owner of the folder
/DATA/SHARE – the directory to be modified
Should Bethany send the folder back to Jacob, the ownership would need to again be changed (again, this will be simplified with the use of groups).
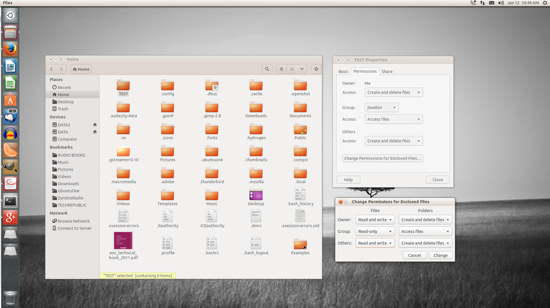
GUI: File permissions
I’m going to demonstrate changing file permissions using the Nautilus file manager on an Ubuntu 13.10 system.
Let’s say you need to allow everyone to gain read/write permissions to the folder TEST. To do this, within the Nautilus file manager, follow these steps:
- Open Nautilus
- Navigate to the target file or folder
- Right click the file or folder
- Select Properties
- Click on the Permissions tab
- Click on the Access files in the Others section
- Select “Create and delete files”
- Click Change Permissions for Enclosed Files
- In the resulting window, Select Read and Write under Files and Create and delete files under Folders (Figure A)
- Click Change
- Click Close.
The trick comes when you need to change the permissions of a folder which does not belong to you. It can be done, but Nautilus must be started with admin access. To do this, follow these steps:
Open up a terminal window
Issue the command sudo -i
Issue the command nautilus
The sudo -i command gives you persistent access to sudo, until you enter the exit command to remove that access. Once Nautilus is open, you can change the permissions of the folder or file as described above – even if you are not the owner of the folder or file.
NOTE: If you’re using a distribution that doesn’t use sudo, alter the above instructions to:
Open up a terminal window
Issue the command su
Type your root password and hit Enter
Issue the command nautilus.
After you’ve completed the task, close the Nautilus window and then the terminal window.
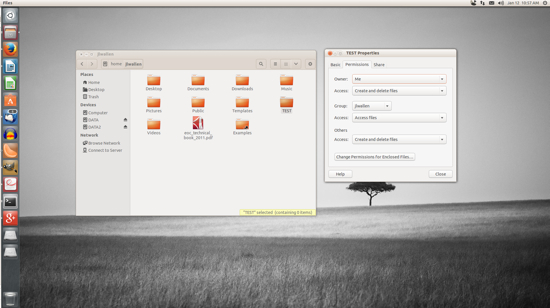
GUI: Change ownership
Changing the ownership of a file or folder will most often require the use of admin rights. So for this, you’ll need to start Nautilus in the method described above.
For changing ownership of a folder or file through Nautilus, do the following:
In the Nautilus window (opened with admin rights), locate the folder or file in question
Right click the folder (or file)
Click on the Permissions tab
Select the new owner from the Owner drop-down (below)
That’s all there is to it. At this point you shouldn’t have any problems changing permissions or ownership for a file or folder with either the command line or the GUI. The use of groups will empower you to alter permission and ownership with more power and security – we’ll cover that soon. Until then, enjoy modifying your files and folders!
Источник


