- How to Install Windows 10 from Command Prompt? (2 Methods)
- Need to install Windows 10 from Command Prompt
- How to install Windows 10 with Command Prompt?
- Method 1. Install Windows 10 directly from the ISO files
- Method 2. Install Windows 10 from a bootable USB
- Best time to backup your system for protectionВ
- Verdict
- How to Install the Windows Support Tools from a Command Prompt
- Summary
- More Information
- Typical Installation
- Complete Installation
- How to Open Command Prompt
- Open Command Prompt to Execute Commands in Windows 10, 8, 7, Vista, & XP
- Open Command Prompt in Windows 10
- Open Command Prompt Through the Start Menu
- Open Command Prompt Using Power User Menu
- Open Command Prompt in Windows 8 or 8.1
- Open Command Prompt in Windows 7, Vista, or XP
- Other Ways to Open Command Prompt
- Elevated Command Prompts and Old Windows Versions
How to Install Windows 10 from Command Prompt? (2 Methods)
If you want to upgrade Windows or get rid of system issues, installing Windows 10 from Command Prompt is a good solution. Let’s see how to do it, and don’t forget to backup your system just in case.

By AOMEI  / Last Updated April 8, 2021
Content of this article:
Need to install Windows 10 from Command Prompt
Windows 7 has reaches its end of life January 14, 2020, thus it’s urgent for users toВ upgrade to Windows 10В . Because Microsoft will not provide any technical support and the Microsoft customer service, Related services and device will be disconnected in the near future by 2023 at the latest.В
Microsoft users are given many ways to perform a system upgrade, but these methods usually don’t work correctly, and they may bring unwanted files, settings and apps to the new system.
Just to be on the safe side, a clean installation can be your best choice. Additionally, when your computer is having system and other issues, you can quickly resolve them via a system installation, as it will remove everything from the hard drive and start from scratch. Meanwhile users can get rid of viruses and improve battery life.
How to install Windows 10 with Command Prompt?
For many users, system installation involves a complex process. However, Command Prompt makes your operations easier. The following two methods will show you how to use Command Prompt to install Windows 10.
Before you try any method below, please make some preparations in advance.
- DownloadВ Windows 10 ISO files from Microsoft.
- Mounted the ISO image and assign a drive letter for it, here take G: as an example. You can navigate to the ISO image file, then right click it andВ choose Mount from the drop-down menu.В
Method 1. Install Windows 10 directly from the ISO files
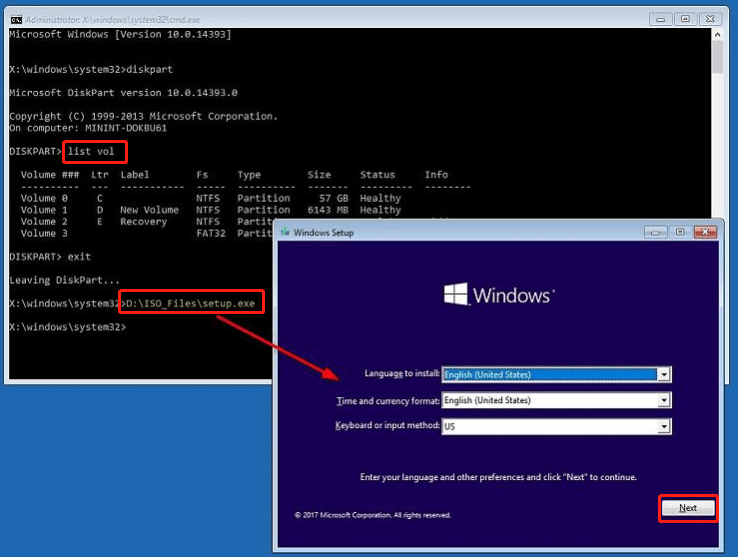
Step 1. Press Windows logo key + R at the same time. Type diskpart in the Run box and then click OK.
Step 2. Type list vol and then press Enter to find the partition containing the ISO files.
Step 3. Type G:\ISO_Files\setup.exe and then press Enter (G represents the number of the volume in which the ISO image is stored).
Step 4. The Windows Setup page appears. Make the selections you prefer and then click Next.
Step 5. Click Install now to continue.
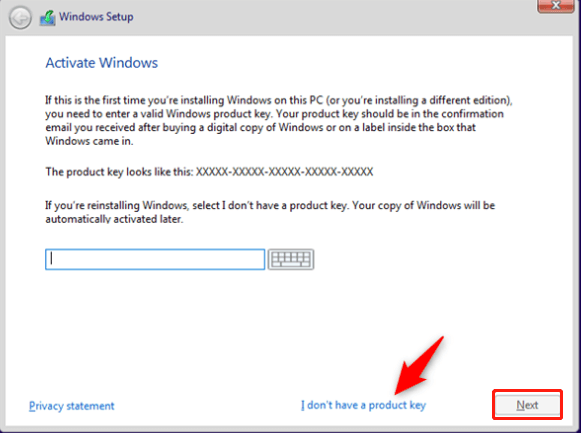
Step 6. If you’re installing Windows 10 for the first time, you must enter a genuine product key. If you’re reinstalling Windows 10, just click I don’t have a product key. Then click Next.
Step 7. Select an edition of Windows 10. Then click Next.
Step 8. Tick the I accept the license terms checkbox and then click Next.
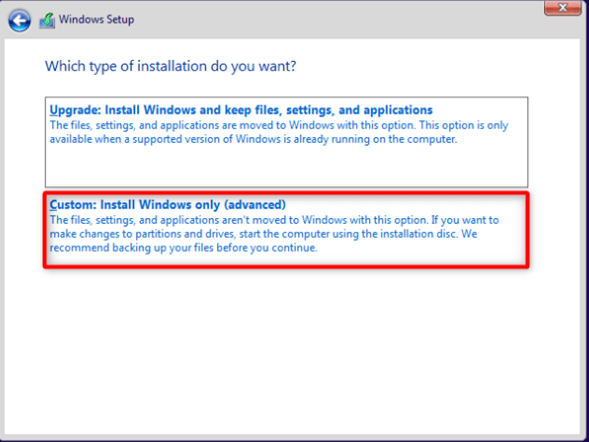
Step 9. Select Custom: Install Windows only (Advanced) from the list.
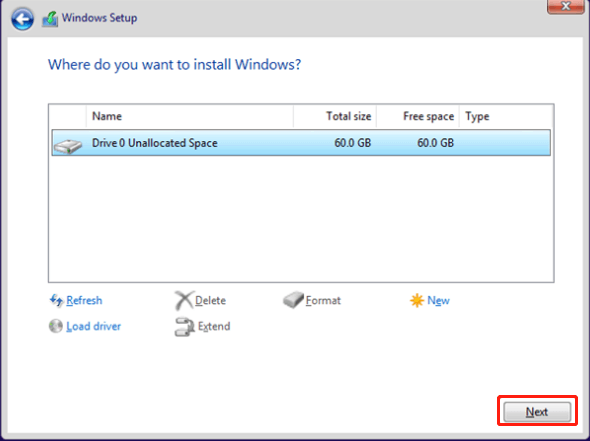
Step 10. You will be asked where you want to install Windows. Choose the drive or partition that you want to use for Windows 10.Then click Next.
Step 11. Once the installation is done, you need to restart your computer by clicking Restart now.

Method 2. Install Windows 10 from a bootable USB
Installing Windows 10 with a bootable USB can greatly reduce installation time. To create a bootable USB flash drive with the installation files, you can insert a USB (at least 4GB in size) to your computer and then follow these steps:
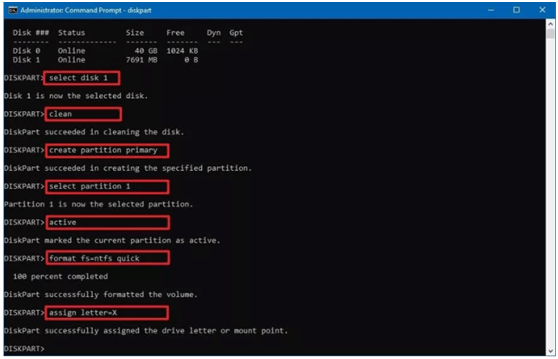
Step 1. Press Windows logo key + R at the same time. Type diskpart in the Run box and then click OK.
Step 2. Type the following commands one at a time and press Enter after each command:
list disk
select disk 1
cleanВ
create partition primary
select partition 1
active
format fs=ntfs quick (or format fs=fat32 quick)В
assign letter=X
Notes:
* The clean command marks all the data on the drive as deleted and it will become invisible. Please be sure you want to do this!В
* Remember to replace 1 with the number of the USB flash drive and change X for any available letter you want to use for your USB flash drive. They are just an example here.
Step 3. Type exit and then press Enter to quit the diskpart tool.
Step 4. Navigate to the boot folder of the Windows 10 ISO files and make it bootable. To do this, type the commands below one at a time and press Enter after each command:
G:
cd boot
bootsect /nt60 X:
xcopy G:\*.* X:\ /E /F /H
Notes:
*Replace G В with the drive letter of your mount drive as it appears in File Explorer. It contains the Windows 10 ISO image file.В
*ReplaceВ X with the correct drive letters forВ USB flash drive.
Step 5. Once that’s done, you can get a bootable USB flash drive.
Step 6. Then, plug the bootable USB flash drive into the device you wish to install Windows 10 and boot from it. As soon as the computer boots, press any key to get into the Windows Setup page.
Step 7. Repeat Step 4 to Step 11 mentioned in Method 1 to install Windows 10.
Note: The installation process will erase everything on the primary hard drive of your computer. If you have some important files on it, you’d better backup files to an external hard drive in advance.
Best time to backup your system for protectionВ
After installing Windows10В from Command Prompt, your computer is a complete fresh version, it only has the operating system and boot partition(s) or system files required to start Windows.В If you create a system image for it right now, it’sВ totally a factory image that can help you repair your computer at any time.
Also, if you don’t want to reinstall programs or lose your files in the event of a disaster, you can choose to install all the programs you will use in the near future first and sync files you want to protect to the fresh version of computer, then backup all of them together.
To make it, you need a Windows 10 backup utility. Many usersВ choose to use the built-in tool in the begining, but later they are disappointed to find that Windows Backup keeps failing. Thus, it’s suggested to use a third-party free backup software like AOMEI Backupper Standard, whichВ enables you to backup system to internal/external hard drives, cloud drives, NAS devices and network with ease.
And it has more advanced features such as schedule automaticВ backup based on daily, weekly and monthly, incremental and differential backup and so on. Windows 10/8.1/8/7Vista/XP are supported. Download this freeware now andВ follow the steps below to backup your system.
Step 1. Install and open this freeware.
Step 2. Click System Backup under Backup tab.

Step 3. The Task Name can be modified by your needs. The related system partitions are selected by default. Select the destination path (here is F:\) to store the system image.

Step 4. Click Schedule and OK to enable daily incremental backup(the default option), or change them per your needs. Confirm your operations and then click Start Backup.

Notes:
Options: click it to comment this backup task and enable email notification.
Schedule: set the backup task to run automatically. Daily, Weekly and Monthly are supported. To enjoy Event triggers, andВ USB plug inВ modes, you need to do an edition upgrade.
Scheme: it deletes the older backups automatically. This feature is available in AOMEI Backupper Professional.
You can visit Home > the system backup task > Restore to restore Windows 10 system image to new hard driveВ or other locations.
Verdict
Two efficient methods are described here to assist you to install Windows 10 from Command Prompt. You can choose one of them based on your own situations. After installing, don’t forget to protect your system by using AOMEI Backupper Standard.В
After a fresh install, it’s the best time to create a factory image and you can set a scheduled backup task to track changes you made later. In addition, you still can use this freeware to backup files, partition, or entire disk. Also, it’s a professional disk clone software, so you can clone disk to larger disk, clone larger HDD to smaller SSD, clone only OS, etc.В
How to Install the Windows Support Tools from a Command Prompt
Summary
This article describes how to use the Msiexec.exe tool to install the Windows Support Tools from a command prompt.
More Information
Support personnel and network administrators can use the Support Tools to manage their networks and to troubleshoot problems. Because the Support Tools are not installed with the Windows operating system, you must install them separately from the \Support\Tools\SupTools.msi file on the Windows CD-ROM.
Typical Installation
When you use the Msiexec.exe tool, you can run a quiet unattended installation of Suptools.msi by using the msiexec /i x:\support\tools\suptools.msi /q command at a command prompt, where x is the location of the Support folder on a CD-ROM or local drive. This command performs a typical installation of the Support Tools, and it installs 57 tools. The installation uses 4.84 megabytes (MB) of space in the Program Files\Support Tools folder.
Complete Installation
To install the complete version of the Support Tools, use the addlocal=all switch. This switch instructs the Msiexec.exe tool to install all the available features locally. To use the
addlocal=all switch, use the msiexec /i x:\support\tools\suptools.msi /q addlocal=all command. This command performs a complete installation of the Support Tools, and it installs all 103 tools. The installation uses 11.4 MB of space in the Program Files\Support Tools folder.
You can run Windows Installer packages (.msi packages) either by double-clicking the .msi file or by calling it with the Msiexec.exe tool from a command prompt.
For additional information about how to install the support tools, click the following article number to view the article in the Microsoft Knowledge Base:
306794 How to Install the Support Tools from the Windows XP CD-ROM
For additional information about command-line switches for the Microsoft Windows Installer Tool, click the following article number to view the article in the Microsoft Knowledge Base:
314881 Command-Line Switches for the Microsoft Windows Installer Tool
Note If you use either the connstat or topchk commands after you install the support tools, you receive the following error message:
Can’t open perl script «C:\Program»: No such file or directory.
This issue occurs because these scripts do not work correctly if a space is in the path. To work around this issue, copy the Support Tools folder to the root folder, and then rename the Support Tools folder to SupportTools (all one word).
How to Open Command Prompt
Open Command Prompt to Execute Commands in Windows 10, 8, 7, Vista, & XP
:max_bytes(150000):strip_icc()/tim-fisher-5820c8345f9b581c0b5a63cf.jpg)
Some popular Command Prompt commands you might have heard of include ping, netstat, tracert, shutdown, and attrib, but there are many more. We have a complete list here.
:max_bytes(150000):strip_icc()/005_how-to-open-command-prompt-2618089-5c646b8bc9e77c00010a5064-f0b29b12d5354d0d8733f5089fa917bb.jpg)
While Command Prompt probably isn’t a tool most of you will use on a regular basis, it can really come in handy now and then, maybe to troubleshoot a specific Windows problem or to automate some kind of task.
How you open Command Prompt differs between Windows versions, so you’ll find steps below for Windows 10, Windows 8 or Windows 8.1, and Windows 7, Windows Vista, and Windows XP. See What Version of Windows Do I Have? if you’re not sure.
Open Command Prompt in Windows 10
Select the Start button.
Type cmd.
:max_bytes(150000):strip_icc()/001_how-to-open-command-prompt-2618089-5c6467a046e0fb00017c2778.jpg)
Select Command Prompt from the list.
:max_bytes(150000):strip_icc()/002_how-to-open-command-prompt-2618089-5c6467fbc9e77c0001566ec6.jpg)
Open Command Prompt Through the Start Menu
Another way to open Command Prompt in Windows 10 is to look in its Start menu folder:
Select the Start button.
Select the Windows System folder from the list.
Choose Command Prompt from the folder group.
:max_bytes(150000):strip_icc()/003_how-to-open-command-prompt-2618089-5c6468a146e0fb0001f25667.jpg)
Open Command Prompt Using Power User Menu
One more method in Windows 10 is through the Power User Menu. If you’re using a keyboard or mouse, choose Command Prompt from the menu that appears after pressing Win+X or right-clicking the Start button.
:max_bytes(150000):strip_icc()/004_how-to-open-command-prompt-2618089-5c646ad746e0fb0001dcd81a.jpg)
You might see Windows PowerShell options in the Power User Menu instead of Command Prompt. In more recent versions of Windows 10, Command Prompt has been replaced by PowerShell, but you can still access it from the Power User Menu by editing the taskbar settings.
Open Command Prompt in Windows 8 or 8.1
Select the Start button and then swipe up to show the Apps screen. You can accomplish the same thing with a mouse by selecting the down arrow icon at the bottom of the screen.
Prior to the Windows 8.1 update, the Apps screen can be accessed from the Start screen by swiping up from the bottom of the screen, or right-clicking anywhere, and then choosing All apps.
If you’re using a keyboard or mouse, a really quick way to open a Command Prompt window in Windows 8 is through the Power User Menu—just hold the WIN and X keys down together, or right-click the Start button, and choose Command Prompt.
Swipe or scroll to the right on the Apps screen to locate the Windows System section heading.
Select Command Prompt. You can now execute whatever command you needed to run.
See our List of Windows 8 Command Prompt Commands for a complete list of the commands available through Command Prompt in Windows 8, including short descriptions and links to more in-depth information if we have it.
Open Command Prompt in Windows 7, Vista, or XP
Open the Start menu from the bottom-left corner of the screen.
In Windows 7 and Windows Vista, it’s a bit faster to enter command in the search box at the bottom of the Start menu and then choose Command Prompt when it appears in the results.
Go to All Programs > Accessories.
Choose Command Prompt from the list of programs.
Here’s our List of Windows 7 Commands and List of Windows XP Commands if you need a command reference for any of those versions of Windows.
Other Ways to Open Command Prompt
Command Prompt in Windows XP through Windows 10 can also be opened with a command. This is especially helpful if you like using the Run dialog box or if Windows Explorer has crashed and the Start menu is inaccessible (and thus the directions above don’t work).
To do this, enter cmd into the command-line interface. This can be in the Run dialog box (WIN+R) or Task Manager’s File > Run new task menu.
:max_bytes(150000):strip_icc()/cmd-command-task-manager-f43663f7b4994a729926123ab61b7a42.png)
Elevated Command Prompts and Old Windows Versions
In versions of Windows released before Windows XP, like Windows 98 and Windows 95, Command Prompt doesn’t exist. However, the older and very similar MS-DOS Prompt does. This program is located in the Start menu and can be opened with the command run command.
Some commands, like the sfc command that’s used to repair Windows files, require that Command Prompt be opened as an administrator before they can be executed. You’ll know if this is the case if you get a message like one of these after trying to execute the command:
- check that you have administrative rights
- . command can only be executed from an elevated command prompt
- you must be an administrator
:max_bytes(150000):strip_icc()/sfc-scannow-administrator-command-prompt-775fe2bfbdd54342813261652a3de86f.png)
See How to Open an Elevated Command Prompt for help starting Command Prompt as an administrator, a process that’s a bit more complicated than what’s outlined above.


