- Первый коммит в Github
- Руководство по созданию первого коммита в свой репозиторий на Github
- Основы
- Установка Git
- Для Linux:
- Для macOS:
- Для Windows, (для macOS и Linux — альтернатива):
- Создание и настройка локального репозитория
- Добавление файлов в локальный репозиторий
- Создание версии проекта
- Создание репозитория на Github
- Полезные ресурсы
- Committing and reviewing changes to your project
- In this article
- About commits
- 1. Choosing a branch and making changes
- 2. Selecting changes to include in a commit
- Creating a partial commit
- 3. Discarding changes
- Discarding changes in one or more files
- Discarding changes in one or more lines
- 4. Write a commit message and push your changes
- Help us make these docs great!
- Git Guides
- Get started with git and GitHub
Первый коммит в Github
Руководство по созданию первого коммита в свой репозиторий на Github
В этом мануале представлены основные сведения об инструментах контроля версий программного обеспечения и рассмотрен алгоритм создания локального репозитория, связанного с удалённым.
- Github нужен для взаимодействия между разработчиками при совместной работе над проектами (может использоваться в течении всего жизненного цикла ПО).
- Работа в Github организуется посредством предоставления определенного доступа через интернет каждому из членов команды к рабочим директориям проекта, истории изменений, а также к задачам и документации проекта, с возможностью изменять файлы и отслеживать историю их редактирования.
Основы
GitHub — онлайн-хостинг репозиториев, обладающий всеми функциями системы контроля версий и функциональностью управления (в него входит всё то, что поддерживает Git). Вместе с Git он даёт разработчикам возможность сохранять их код онлайн, а затем взаимодействовать с другими разработчиками в разных проектах.
Git — это инструмент, позволяющий реализовать распределённую систему контроля версий.
GitHub — это сервис для проектов, использующих Git.
Создать коммит (commit) значит зафиксировать изменения любых файлов, входящих в репозиторий.
Репозиторий — каталог файловой системы, в котором могут находится: файлы журналов конфигураций и операций, выполняемых над репозиторием, а также сами контролируемые файлы.
Репозиторий бывает:
- локальный (расположен непосредственно в памяти компьютера разработчика, в нем происходит разработка и фиксация изменений, после чего можно отправить на удалённый репозиторий)
- удалённый (находится на сервере, может быть приватным – доступным ограниченному числу лиц, и публичным – open source)
В GitHub входит:
- система контроля доступа
- багтрекинг (отслеживание истории действий над файлами и, при необходимости, переход на более ранние версии)
- возможность управлять задачами и справками для проектов
К проекту, загруженному на GitHub, можно получить доступ с помощью интерфейса командной строки и Git-команд, сайта https://github.com/, или с помощью приложения Github — desktop для Windows или macOS.
Для первого коммита на Github необходимо установить Git, создать локальный репозиторий, добавить в него файлы, сделать коммит, подключиться к удалённому репозиторию и отправить в него изменения.
Установка Git
Для Linux:
1. Откройте терминал и перейдите в желаемую директорию для установки.
2. Введите: sudo apt-get install git
Для macOS:
1. Воспользуемся homebrew
2. Вводим в терминале: brew install git
Для Windows, (для macOS и Linux — альтернатива):
1. Перейдите по ссылке: http://git-scm.com/downloads
2. Выберите нужный пакет и следуйте дальнейшим инструкциям.
Далее работа с Git будет выполняться в терминале Bash, который станет доступен на любой ОС после установки Git. Так вы будете лучше понимать устройство работы с системами контроля версий и возможности графического клиента ограничены по сравнению с консольным.
Создание и настройка локального репозитория
1. Открываем Bash
Пусть наш проект имеет путь в файловой системе Users/Public/Project. Перед созданием локального репозитория желательно удалить все ненужные, временные файлы в папке проекта.
2. Настроим имя пользователя и адрес электронной почты:
(где Name – логин пользователя, email@mail.ru — почта)
Теперь каждое наше действие будет отмечено именем и почтой, это вносит порядок в историю изменений.
tree – команда для просмотра древовидной структуры файловой системы, в которой мы находимся.
find – удаление файлов со специфичным суффиксом.
3. Переходим в папку с проектом Users/Public/Project:
4. Создадим локальный репозиторий в папке с проектом:
Командная строка должна вернуть что-то вроде:
Добавление файлов в локальный репозиторий
1. Теперь создадим любой файл в нашей директории, например, first.txt
2. Добавим его в систему управления версиями:
3. Если нужно добавить все файлы в директории, то используем:
4. Проверить текущее состояние:
Можно отменить добавление файла командой:
Создание версии проекта
После добавления нужного файла в staging area (область подготовленных файлов) можно создать версию проекта.
1. Введем команду:
Ключ –m означает создание пользователем описания этого коммита.
Для удаления всеx файлов в папке, не относящихся к проекту, и не сохраненных в репозитории, можно воспользоваться командой:
Создание репозитория на Github
Все действия до этого раздела производились над локальным репозиторием, который находится у вас на компьютере. Если мы хотим сохранить проект в Интернете, и предоставить к нему доступ, то создадим репозиторий на Github.
1. Регистрируемся на сайте: github.com под именем nikname (может быть любым другим).
2. Нажимаем кнопочку «+» и вводим название репозитория.
3. Выбираем тип Public (Private доступен только в платной версии).
4. Нажимаем Create.
В результате создан репозиторий в Github (на экране видим инструкцию, по соедининению локального репозитория со вновь созданным).
5. Добавляем удаленный репозиторий (по протоколу SSH) под именем origin (желательно использовать его, но можно любое другое, главное – не master – оно используется в момент релиза версии).
Результат можно увидеть с помощью команды:
Если все правильно сделано, то увидим:
Для отмены регистрации удаленного репозитария, введите:
Этой командой вносятся все изменения, которые были сделаны в локальном репозитории на Github:
-u ключ установления связи между удаленным репозиторием github и веткой master. Все дальнейшие изменения переносятся на удаленный репозиторий следующей командой: git push
Полезные ресурсы
Данная статья не подлежит комментированию, поскольку её автор ещё не является полноправным участником сообщества. Вы сможете связаться с автором только после того, как он получит приглашение от кого-либо из участников сообщества. До этого момента его username будет скрыт псевдонимом.
Committing and reviewing changes to your project
GitHub Desktop tracks all changes to all files as you edit them. You can decide how to group the changes to create meaningful commits.
In this article
About commits
Similar to saving a file that’s been edited, a commit records changes to one or more files in your branch. Git assigns each commit a unique ID, called a SHA or hash, that identifies:
- The specific changes
- When the changes were made
- Who created the changes
When you make a commit, you must include a commit message that briefly describes the changes. You can also add a co-author on any commits you collaborate on.
If the commits you make in GitHub Desktop are associated with the wrong account on GitHub, update the email address in your Git configuration using GitHub Desktop. For more information, see «Configuring Git for GitHub Desktop.»
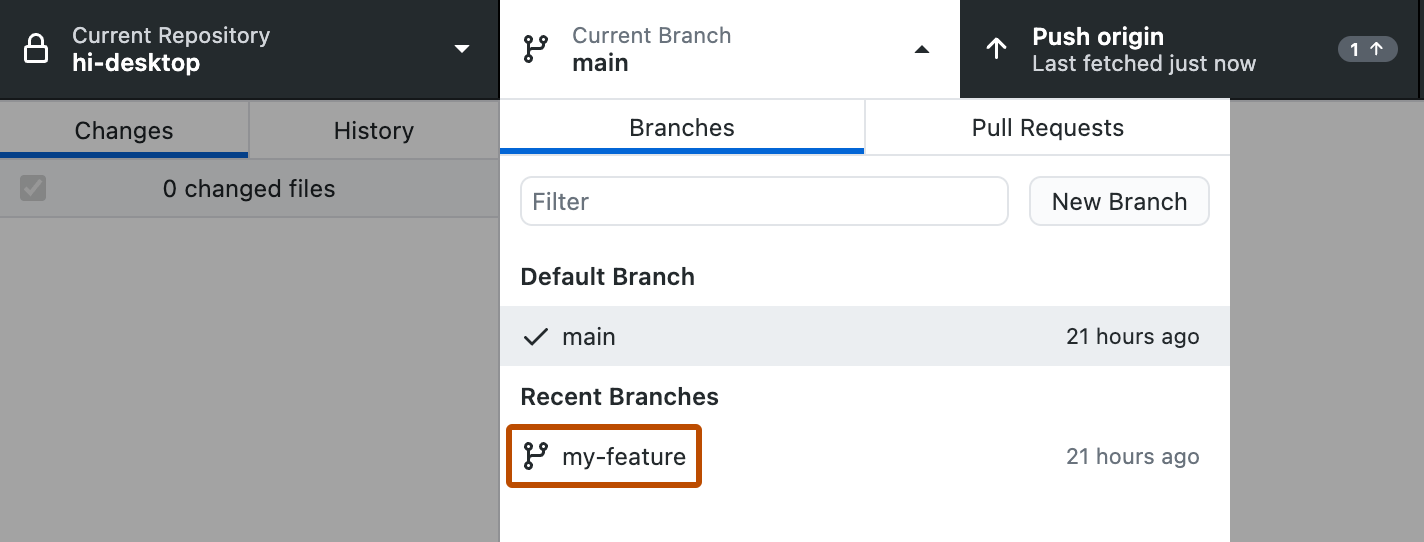
1. Choosing a branch and making changes
Create a new branch, or select an existing branch by clicking
Current Branch on the toolbar and selecting the branch from the list.
Using your favorite text editor, such as Atom, make the necessary changes to files in your project.
2. Selecting changes to include in a commit
As you make changes to files in your text editor and save them locally, you will also see the changes in GitHub Desktop.
icon indicates removed files.
icon indicates modified files.
icon indicates added files.
To access stashed changes, click Stashed Changes.

To add all changes in all files to a single commit, keep the checkbox at the top of the list selected.

To add all changes in one or more files to a single commit, unselect the checkboxes next to the files you don’t want included, leaving only the files you want in the commit. You can toggle the checkbox with the Spacebar or Enter keys after selecting a file.

Creating a partial commit
If one file contains multiple changes, but you only want some of those changes to be included in a commit, you can create a partial commit. The rest of your changes will remain intact, so that you can make additional modifications and commits. This allows you to make separate, meaningful commits, such as keeping line break changes in a commit separate from code or prose changes.
Note: Split diff displays are currently in beta and subject to change.
To choose how your changes are displayed, in the top-right corner of the changed file, use
to select Unified or Split.

To exclude changed lines from your commit, click one or more changed lines so the blue disappears. The lines that are still highlighted in blue will be included in the commit.

3. Discarding changes
If you have uncommitted changes that you don’t want to keep, you can discard the changes. This will remove the changes from the files on your computer. You can discard all uncommitted changes in one or more files, or you can discard specific lines you added.
Discarded changes are saved in a dated file in the Trash. You can recover discarded changes until the Trash is emptied.
Discarding changes in one or more files
In the list of changed files, select the files where you want to discard the changes since the last commit. To select multiple files, click shift and click on the range of files you want to discard changes from.

Click Discard Changes or Discard Selected Changes to discard changes to one or more files, or Discard All Changes to discard changes to all files since the last commit.

To confirm the changes, review the files affected and click Discard Changes.

Discarding changes in one or more lines
You can discard one or more changed lines that are uncommitted.
Note: Discarding single lines is disabled in a group of changes that adds and removes lines.
To discard one added line, in the list of changed lines, right click on the line you want to discard and select Discard added line.

To discard a group of changed lines, right click the vertical bar to the right of the line numbers for the lines you want to discard, then select Discard added lines.

4. Write a commit message and push your changes
Once you’re satisfied with the changes you’ve chosen to include in your commit, write your commit message and push your changes. If you’ve collaborated on a commit, you can also attribute a commit to more than one author.
Note: By default, GitHub Desktop will push the tag that you create to your repository with the associated commit. For more information, see «Managing tags.»
At the bottom of the list of changes, in the Summary field, type a short, meaningful commit message. Optionally, you can add more information about the change in the Description field.

Optionally, to attribute a commit to another author, click the add co-authors icon and type the username(s) you want to include.

Under the Description field, click Commit to BRANCH.
If the branch you’re trying to commit to is protected, Desktop will warn you.
- To move your changes, click switch branches.
- To commit your changes to the protected branch, click Commit to BRANCH.
For more information about protected branches, see «About protected branches».

Click Push origin to push your local changes to the remote repository.
Help us make these docs great!
All GitHub docs are open source. See something that’s wrong or unclear? Submit a pull request.
Git Guides

git commit creates a commit, which is like a snapshot of your repository. These commits are snapshots of your entire repository at specific times. You should make new commits often, based around logical units of change. Over time, commits should tell a story of the history of your repository and how it came to be the way that it currently is. Commits include lots of metadata in addition to the contents and message, like the author, timestamp, and more.
How Git Commit Works
Commits are the building blocks of «save points» within Git’s version control.
Commits shape history
By using commits, you’re able to craft history intentionally and safely. You can make commits to different branches, and specify exactly what changes you want to include. Commits are created on the branch that you’re currently checked out to (wherever HEAD is pointing) so it’s always a good idea to run git status before making a commit, to check that you’re checked-out to the branch that you intend to be. Before you commit, you will need to stage any new changes that you’d like to include in the commit using git add [file] .
Commits are lightweight SHA hashes, objects within Git. As long as you’re working with text files, you won’t need to worry about how many files you have, how big they are, or how many commits you make. Git can handle it!
Committing in two phases
Commits have two phases to help you craft commits properly. Commits should be logical, atomic units of change that represent a specific idea. But, not all humans work that way. You may get carried away and end up solving two or three problems before you remember to commit! That’s OK — Git can handle that. Once you’re ready to craft your commits, you’ll use git add to specify the files that you’d like to «stage» for commit. Without adding any files, the command git commit won’t work. Git only looks to the staging area to find out what to commit. Staging, or adding, files, is possible through the command line, and also possible with most Git interfaces like GitHub Desktop by selecting the lines or files that you’d like to stage.
You can also use a handy command, git add -p , to walk through the changes and separate them out, even if they’re in the same file.
How to Use Git Commit
Common usages and options for Git Commit
- git commit : This starts the commit process, but since it doesn’t include a -m flag for the message, your default text editor will be opened for you to create the commit message. If you haven’t configured anything, there’s a good chance this will be VI or Vim. (To get out, press esc, then :w , and then Enter. :wink:)
- git commit -m «descriptive commit message» : This starts the commit process, and allows you to include the commit message at the same time.
- git commit -am «descriptive commit message» : In addition to including the commit message, this option allows you to skip the staging phase. The addition of -a will automatically stage any files that are already being tracked by Git (changes to files that you’ve committed before).
- git commit —amend : Replaces the most recent commit with a new commit. (More on this later!)
To see all of the possible options you have with git commit , check out Git’s documentation.
How to Undo Commits in Git
Sometimes, you may need to change history. You may need to undo a commit. If you find yourself in this situation, there are a few very important things to remember:
- If you are «undoing» a commit that exists on the remote, you could create big problems for your collaborators
- Undoing a commit on work that you only have locally is much safer
What can go wrong while changing history?
Changing history for collaborators can be problematic in a few ways. Imagine — You and another collaborator have the same repository, with the same history. But, they make a change that deletes the most recent commit. They continue new commits from the commit directly before that. Meanwhile, you keep working with the commit that the collaborator tried to delete. When they push, they’ll have to ‘force push’, which should show to them that they’re changing history. What do you think will happen when you try to push?
In dramatic cases, Git may decide that the histories are too different and the projects are no longer related. This is uncommon, but a big problem.
The most common result is that your git push would return the «deleted» commit to shared history. (First, you would git pull if you were working on the same branch, and then merge, but the results would be the same.) This means that whatever was so important to delete is now back in the repository. A password, token, or large binary file may return without ever alerting you.
git revert is the safest way to change history with Git. Instead of deleting existing commits, git revert looks at the changes introduced in a specific commit, then applies the inverse of those changes in a new commit. It functions as an «undo commit» command, without sacrificing the integrity of your repository’s history. git revert is always the recommended way to change history when it’s possible.
Sometimes, a commit includes sensitive information and needs to actually be deleted. git reset is a very powerful command that may cause you to lose work. By resetting, you move the HEAD pointer and the branch pointer to another point in time — maybe making it seem like the commits in between never happened! Before using git reset :
- Make sure to talk with your team about any shared commits
- Research the three types of reset to see which is right for you (—soft, —mixed, —hard)
- Commit any work that you don’t want to be lost intentionally — work that is committed can be gotten back, but uncommitted work cannot
If you’re changing history and undoing commits, you should know about git reflog . If you get into trouble, the reflog could get you out of trouble. The reflog is a log of every commit that HEAD has pointed to. So, for example, if you use git reset and unintentionally lose commits, you can find and access them with git reflog .
Updating Commits With Git Commit Amend
While git commit —amend does change history, it only changes the most recent commit on your current branch. This can be an extremely useful command for commits that:
- Haven’t been pushed to the remote yet
- Have a spelling error in the commit message
- Don’t contain the changes that you’d like to contain
Examples of Git Commit
Once you’ve staged the files that you want to include in your commit, you’re ready. Whether you commit in a tool like GitHub Desktop, or through your command line, the commit message is important. Commit messages should be short and descriptive of your change. If you are looking through your repository’s history, you’ll be guided by the commit messages, so they should tell a story. Commits in the command line can include the message with the following format:
- git commit -m «git commit message example»
Commit messages should be present tense and directive, like the following examples:
- git commit -m «create file structure for Git guides»
- git commit -m «translate Git cheat sheet into German»
- git commit -m «update broken URL to Git resources»
If you’d like to include more context in your commit messages, you can also include an extended commit message.
- git add [file] : Snapshots the file in preparation for versioning, adding it to the staging area.
- git status : Always a good idea, this command shows you what branch you’re on, what files are in the working or staging directory, and any other important information.
- git push : Uploads all local branch commits to the remote.
- git log : Browse and inspect the evolution of project files.
Get started with git and GitHub
Review code, manage projects, and build software alongside 40 million developers.


