- How to manually configure OpenVPN for ProtonVPN in Linux
- We strongly recommend downloading the official ProtonVPN Linux app, which offers advanced features and makes it easy to connect on Linux machines.
- How to manually setup OpenVPN for Linux
- 1. Install the necessary packages:
- 2. Get the ProtonVPN config files:
- 3. Find your OpenVPN credentials
- How to use ProtonVPN with manual setup
- Using NetworkManager
- Using Terminal
- Cómo crear tú propio servidor VPN en Ubuntu, Debian y CentOS
- ¿Qué es el script de configuración de servidor?
- Características del script de configuración de servidor VPN sobre IPsec
- Requisitos del script de configuración de servidor VPN sobre IPsec
- Instalación del script de configuración de servidor VPN sobre IPsec
- Instalación del script de configuración de servidor VPN sobre IPsec en Ubuntu y Debian
- Instalación del script de configuración de servidor VPN sobre IPsec en Centos
- Conclusiones sobre el script de configuración de servidor VPN sobre IPsec
How to manually configure OpenVPN for ProtonVPN in Linux
ProtonVPN offers both an official Linux app with graphical user interface and an official Linux CLI . We strongly recommend using one of these tools in Linux.
It is also possible to manually configure OpenVPN for ProtonVPN in Linux. In this article, we explain how.
You can set-up a VPN for Linux by using the openvpn package using the appropriate config files for ProtonVPN servers. The example manual Linux VPN setup guide below shows how to configure a connection on Ubuntu 16.04LTS.
Note: To address frequent DNS leaks on Linux, we’ve updated this guide with new Linux specific config files and new instructions to connect via CLI (see option B below)
We strongly recommend downloading the official ProtonVPN Linux app, which offers advanced features and makes it easy to connect on Linux machines.
How to manually setup OpenVPN for Linux
1. Install the necessary packages:
Install the OpenVPN package by opening a terminal (press Ctrl + Alt + T) and entering:
sudo apt-get install openvpn

Note: if you do not have administrator privileges on your machine, please contact your system administrator and ask them to perform the installation for you.
Install the network-manager-openvpn-gnome package, for easier use and compatibility with the Ubuntu Network Manager GUI, by entering:
sudo apt-get install network-manager-openvpn-gnome
And pressing Y and then Enter to confirm the installation.

Also, ensure that the resolvconf is installed:
sudo apt install resolvconf

2. Get the ProtonVPN config files:
- Download the desired configuration files.
- Log into your ProtonVPN dashboard at account.protonvpn.com. If you don’t yet have an account, sign up for a Free plan for Linux.
- Select Downloads on in the left navigation bar.
- Find the OpenVPN configuration files section and chose:
Platform: Linux, Protocol: UDP (recommended. TCP uses port 443. Use it if you experience slow VPN speeds or your VPN connection is dropped)
- Click the download icons for the server you wish to download.
- If you selected “Download All configurations”, extract the zip file to your desired location.

3. Find your OpenVPN credentials
For increased security, ProtonVPN is set-up with two separate credentials to authenticate a connection.
Log in to the ProtonVPN dashboard and click on Account tab. Here you will see your two type of credentials.
The credentials ProtonVPN Login are used in our apps. OpenVPN / IKEv2 Username is used on manual connections. So please configure the OpenVPN credentials to your preference as you will need to use them to establish a Linux VPN connection. Note: to use our NetShield DNS filtering feature, append the suffix +f1 to your username to block malware, or +f2 to block malware, ads, and trackers (for example 123456789+f2).

How to use ProtonVPN with manual setup
Using NetworkManager
Attention: At this point, there is a known issue with DNS Leaks on distributions up to Ubuntu 16.04LTS (and its dependencies and parents). If you find that you too are affected by DNS leaks, we recommend you to use Option B below.
1. Add a new connection
Click on your connection symbol, in the system menu on the top right and select Edit connections…

Click Add to create a new connection. Select Import a saved VPN configuration… in the drop-down menu and click Create…
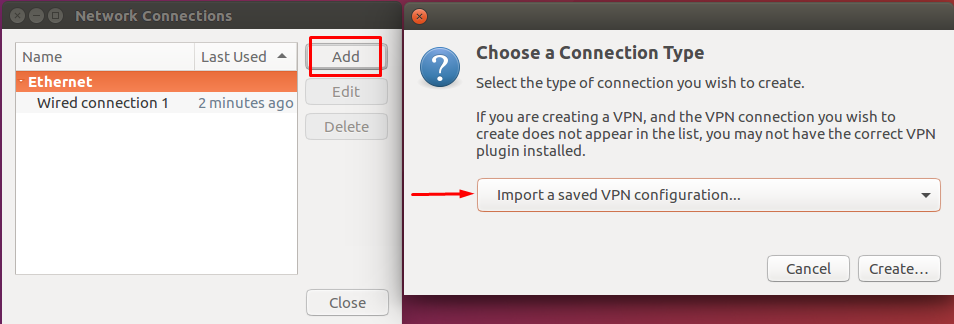
Import the config file of the server you want to connect to, by navigating to the location where you downloaded the configuration file or extracted the ProtonVPN_config.zip and selecting the desired file.

The files are named with a two-letter abbreviation of the destination country and a number to show which server in that country. For example: de-01 is the first server in Germany; ca-04 is the fourth server in Canada. You can check the ProtonVPN servers page and find the abbreviations there. Files with two country abbreviations are secure core servers, for example: is-us-01 is the secure core connection over Iceland to the USA. Learn more about our Secure Core feature.
Enter the OpenVPN credentials from step 3 in the User Name‘ and Password fields of the new window and click Save.

For Ubuntu 14.04 LTS: there is an issue specific to 14.04 where importing the configuration that does not read all settings automatically. If you are experiencing issues with the auto-import feature with the network manager, please drop us a line at this link for further instructions.
2. Establish the Linux VPN connection
Click on the Networks icon in your task bar. Select VPN Connections, click the entry of your newly added config, and it will automatically connect to your chosen ProtonVPN server.

You will see a popup confirming the VPN connection has been established and a lock next to your Network icon. Congratulations, you’ve just successfully connected to ProtonVPN!

3 Add more connections (optional)
To add another connection (no limit), ,simply repeat step 1 with a different configuration file.
Using Terminal
Note: if you do not have administrator privileges on your machine, please contact your system administrator and ask them to perform the connection for you
Please ensure that the resolv-conf script is properly downloaded on your device by using the following commands:
sudo chmod +x «/etc/openvpn/update-resolv-conf»
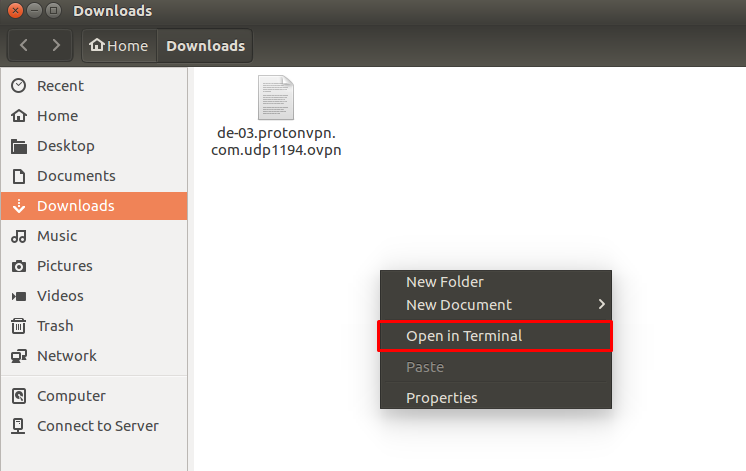
Open a terminal (press Ctrl+Alt+T) and navigate to the folder where you unzipped the config files using cd
. In our example, they are located in
/Downloads so we enter:

If you find it hard to navigate using CD command line, you can open the folder that the file is located in using any file manager and right click → Open in terminal
Enter the following to initialize a new connection:
Where is the config file name of the server you want to connect to, e.g. de-03.protonvpn.com.udp1194.ovpn for Germany #3 server. Enter your PC’s administrator password to execute ( openvpn will modify your network adapters and needs root privileges)

You will then be prompted for your OpenVPN credentials (see above).

You have finished the Linux VPN setup and successfully connected to the ProtonVPN servers once you see Initialization Sequence Completed
Keep this Terminal window open to stay connected to ProtonVPN. If you close it, the VPN connection will disconnect.

Click here to ensure that the connection is successfully established and there are no leaks.

To disconnect your Linux VPN connection, press Ctrl+C and/or close the Terminal window.
Источник
Cómo crear tú propio servidor VPN en Ubuntu, Debian y CentOS
Con los cambios constante de ciudad y país que he tenido últimamente, me ha tocado utilizar mucho redes wifi libres (incluso ahora estoy conectado desde una wifi que conseguí la clave gracias a Aircrack-ng, Airmon-ng, airdump-ng, aireplay-ng los cuáles ya venían instalado en Kali Linux) , el problema es que estás conexiones pueden llegar a comprometer mi información y no sabemos quién puedes estar conectado y hacer que se yo en la red. Una solución para este problema es la planteada hace tiempo por usemoslinux en Cómo navegar seguro en las redes wifi abiertas, pero también existe la posibilidad de solucionarlo utilizando una VPN, las cuáles existen muchas libres y pagas de fácil uso e instalación, cada una con sus pro y contras, pero también podemos crear nuestro propio servidor VPN en Ubuntu, Debian y Centos.
Buscando la solución a este problema y priorizando utilizar una VPN que me diera otras ventajas, logre dar con un script que nos permite construir un servidor VPN de manera automática con poca interacción con el usuario.

¿Qué es el script de configuración de servidor?
Es un script shell que permite configurar de manera automática un servidor VPN sobre IPsec en Ubuntu, Debian y CentOS de manera rápida y fácil, además soporta los protocolos IPsec/L2TP y Cisco IPsec. El usuario sólo debe proporcionar sus propias credenciales de VPN y dejar que el script se encargue del resto.
El servidor VPN sobre IPsec encripta el tráfico de la red, para que los datos no puedan ser espiado mientras haya comunicación entre el usuario y el servidor VPN. Esto es especialmente útil cuando se utilizan redes no seguras, por ejemplo, en cafeterías, aeropuertos o habitaciones de hotel.
El script utiliza Libreswan que es una implementación de IPsec para Linux y xl2tpd que es un proveedor L2TP.
El script puede ser utilizado en cualquier servidor dedicado o Virtual Private Server (VPS). Además, se puede utilizar directamente como «datos de usuario» de Amazon EC2 para el lanzamiento de una nueva instancia, esta característica lo hace ideal porque me permite tener un VPN andando en cualquier momento y me ayuda a aprovecharme de la oferta de Amazon de un año gratis de sus VPS.
Características del script de configuración de servidor VPN sobre IPsec
- Configuración de un servidor VPN sobre IPsec totalmente automatizado, sin intervención del usuario
- Soporta el protocolo más rapido IPsec/XAuth («Cisco IPsec»)
- Está disponible Docker image del servidor VPN
- Encapsula todo el trafico de la VPN en UDP – no es necesario el protocolo ESP
- Puede ser utilizado directamente como «data de usuario» para nuevas instancias de Amazon EC2
- Determina automáticamente la IP Pública y la IP Privada del servidor
- Incluye reglas de IPTables básicas y permite ajustar el sysctl.conf
- Probado en Ubuntu 16.04/14.04/12.04, Debian 8 y CentOS 6 & 7
Requisitos del script de configuración de servidor VPN sobre IPsec
Se requiere un Servidor Dedicado o un Virtual Private Server (VPS), aunque se recomienda usar una instancia de Amazon EC2, usando uno de estos AMI:
Instalación del script de configuración de servidor VPN sobre IPsec
Instalación del script de configuración de servidor VPN sobre IPsec en Ubuntu y Debian
Lo primero que debes hacer es actualizar su sistema, para ello ejecute los siguientes comandos apt-get update && apt-get dist-upgrade y reinicie.
Para instalar la VPN, por favor seleccione una de las siguientes opciones:
Opción 1: Generar las credenciales VPN al azar, las cuáles podrán ser visualizadas cuando se concluya la instalación
Opción 2: Editar el script y proporcionar sus propias credenciales VPN
Option 3: Definir las credenciales VPN como variables de entorno
Instalación del script de configuración de servidor VPN sobre IPsec en Centos
Lo primero que debes hacer es actualizar su sistema, para ello ejecute los siguientes comandos yum update y reinicie.
Siga los mismos pasos que en ubuntu y Debian, pero sustituyendo https://git.io/vpnsetup por https://git.io/vpnsetup-centos .
Conclusiones sobre el script de configuración de servidor VPN sobre IPsec
Bueno una vez tengamos instalado nuestra VPN debemos conectarnos a ella mediante algún cliente VPN yo recomiendo que usemos OpenVPN, el cuál podemos instalar con el gestor de paquetes de nuestra distribución. Que en el caso de Debian y derivados podemos hacerlo de la siguiente manera:
Está es una solución bastante elegante para conectarnos al internet de una manera segura y tener nuestro propio VPN el cuál tambien nos puede servir para
- Acceder a una red de trabajo o del hogar cuando se está de viaje.
- Esconde los datos de navegación.
- Entrar en sitios con bloqueo geográfico.
- Y muchos otros usos
Y esto es todo chicos espero que lo disfruten y lo pongan en marcha. Si todo esto te ha parecido complicado y prefieres tirar a lo sencillo, siempre puedes contratar un VPN como Hidemyass, que además de tener buenas opiniones, ofrece ofertas muy buenas para nuevos usuarios.
El contenido del artículo se adhiere a nuestros principios de ética editorial. Para notificar un error pincha aquí.
Ruta completa hacia el artículo: Desde Linux » GNU/Linux » Cómo crear tú propio servidor VPN en Ubuntu, Debian y CentOS
Источник


