- Embedded Linux по-русски
- Об этой записи
- Поиск
- Последние записи
- Рубрики
- Архив
- RSS подписка
- Загрузка базового образа с Compact Flash
- комментариев 8 к “Загрузка базового образа с Compact Flash”
- Прокоментировать
- Compact flash boot linux
- Advantages and Disadvantages
- Prolonging CF Life Span by Reducing Write/Erase Cycles
- Redirecting Log Output for CF OS Installation
- Redirecting Log Output to an NFS Share
- Redirecting Log Output Over the Network Using syslog
- Moving /tmp to tmpfs for an OS Installation on CF
- To Move /tmp to tmpfs
- Managing Swap Space for an OS Installation on CF
- Swap Options
- Configuring Swap to External Storage Post-Installation
- To Configure Swap to External Storage Post-Installation
- Tuning the File System for an OS Installation on CF
- Disabling Swap
- To Disable Swap by Editing the vfstab File
- To Disable Swap using the swap Command
- Using a Dedicated Dump Device
- To Configure a Dedicated Dump Device
- Moving Temporary Files to RAMdisk
- To Move Temporary Files to RAMdisk
- Disabling File System Access Time Updates
- To Disable File System Access Time Updates for ZFS
- To Disable File System Access Time Updates for UFS
- Configuring Remote Logging
- To Configure Remote Logging
Embedded Linux по-русски
Об этой записи
| openembedded-ru |
| Перейти в эту группу |
Поиск
Последние записи
Рубрики
Архив
RSS подписка
Загрузка базового образа с Compact Flash
Надеюсь у вас получилось загрузить базовый образ в эмуляторе. Самое время попробовать запуститься на реальном железе. Для этого я воспользуюсь Compact Flash: 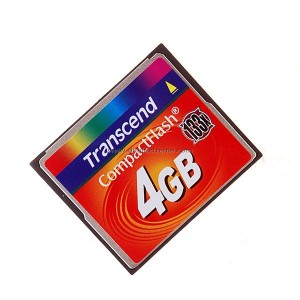
И переходником Compact Flash в IDE: 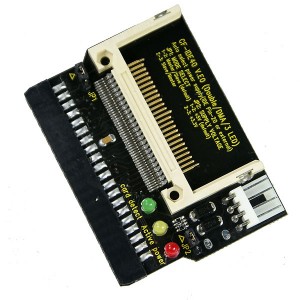
Если первое воткнуть во второе, затем воткнуть конструкцию в IDE, то в для компьютера это будет выглядеть как небольшой жесткий диск. Чтобы система могла грузиться с него необходимо записать на CF загрузчик. Для этого подключим CF к компьютеру при помощи cardreader и проверисм появилась ли она:
У меня CF определился как sdf и на нем имеется один первичный раздел sdf1. Далее необходимо проверить какой тип файловой системы имеет раздел. Для этого запустите fdisk и введите p в качестве команды:
У моего CF это FAT32. Но linux хотя и умеет использовать эту файловую систему для корневой системы, но делать это не рекомендуется. Для изменения типа раздела введите следующие команды:
- 1 — выбор номера раздела
- 83 — выбор типа раздела
Теперь записываем изменения:
Как видите теперь основной раздел имеет тип Linux.
Форматируем его под ext2:
В результате CF будет смонтирован в каталог /mnt/cf.
Теперь необходимо изменить конфигурацию ядра. Ранее в Здравствуй мир! Запуск. я уже описывал как заменить стандартный файл конфигурации. Делаем все тоже самое, но конфигурационный файл берем отсюда. В этом файле включены все стандартные IDE контроллеры. Далее необходимо пересобрать ядро и образ файлвой системы. Для этого запускаем следующие команды:
В результате у вас будет собрано новое ядро и новый образ с включающий его. Далее распаковываем образ точно так же как описано в
Базовый образ как точка старта, только вместо каталога /var/lib/nfsroot используем каталог /mnt/cf. После этого изменяем /mnt/cf/etc/fstab, так как в этот раз загрузка будет производиться не из сети. И вместо
В fstab должно быть:
Учтите что hda это первый IDE диск. Если ваш подопытный компьютер имеет еще и SATA контроллер, рекомендуется выключить его на время экспериментов.
Далее удалите файл /mnt/cf/etc/rcS.d/S03udev и добавьте grub точно так же как добавлялся nfs-utils. В результате у вас должна получиться готовая к работе система. Осталось прописать загрузчик. Перед этим отмонтируйте /mnt/cf:
Затем запустите grub
Появится интерактивное приглашение. Теперь настраиваем grub и прописываем его в mbr при помощи следующих команд:
Первая команда указывает grub рассматривать /dev/sdf устройство как hd0, следующая указывает, что в качестве корня используется первый раздел hd0 (sdf1), а setup устанавливает загрузчик в mbr. Если все прошло успешно введите quit и подождите пока загрузчик закончит свою работу.
Далее можно вынуть CF подключить его к CF-IDE и пробовать загружаться на реальном железе, но перед этим вы можете попробовать загрузиться при помощи kvm:
В результате вы должны будете увидеть приглашение системы: 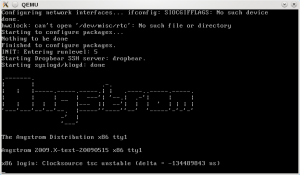
комментариев 8 к “Загрузка базового образа с Compact Flash”
Здраствуйте, проделал все по анологии только для диска SATA sdb. Возможно должен быть другой файл конфигурации ядра или я где то ошибся. Вообщем Grub выдаёт Error 2.
1. grub-install —root-directory=/path/to/new/linux/partition /dev/hda делает у меня все одной строкой.
2. По поводу выключения S30udev, хочу немного раскрыть тему.
По какой-то причине поддержка udev cache в Angstrom 2009.1 глючная. Выключается она в /etc/default/udev. Если это не сделать, система виснет при старте S30udev. А так как при первой загрузке Angstrom настраивает множество пакетов, получим недополоманую систему, если выключим udev cache уже потом.
а в openembedded есть драйвера sata контроллеров? если нет, то как их туда встроить
OpenEmbedded это репозиторий. А драйвера Sata контроллеров есть в ядре. Правите конфиг ядра и будет вам SATA.
а где нибудь есть мануал по настройке ядра? и как вставить в образ свою программу?
Знаете с такими вопросами вам бы сначала с десктопным линуксом разобраться.
в десктопном линухе я ядро настраиваю через menuconfig. А настройка через conf фаил совсем другой колинкор)
Тут ровно тоже самое. Если внимательно почитаете увидите, что обычно выложен уже подготовленный .config ядра. Надо только его заменить на нужный и все.
Прокоментировать
© 2017 Embedded Linux по-русски | Тема Blass создана 1000ff
Источник
Compact flash boot linux
This chapter contains an overview on using a compact flash (CF) card as a bootable device, and covers the advantages and disadvantages of using CF for booting an operating system (OS). It also contains procedures for prolonging the life span of your CF card through optimization. Both the Solaris and Linux operating systems support booting from CF. The procedures for optimizing each are slightly different. The sections included in this chapter are:
Your Sun server can be equipped with an internal compact flash (CF) card, on which you can install and boot supported versions of the Solaris or Linux operating system (OS).
Advantages and Disadvantages
As a boot device, the main advantages of CF over a hard drive (HD) are its very low power consumption, its fast access speeds, and its size. A CF card requires no power to maintain its data, because it is solid-state non-volatile memory. It has no moving parts, no seek time, no latency period, and no spin-up, so compared to a HD, both the time required to read and write and the total package size of a CF card is significantly reduced. The advantages CF provide improved power and cooling, performance, and space efficiencies.
A disadvantage of CF is its limited life span. The card’s life span is dependent upon the number of write/erase cycles it receives. A block of memory on a CF card can only sustain a limited number of write/erase cycles before it degrades, and the card becomes unusable (reading does not degrade CF). In this respect, an OS can place a high demand on a CF card, because it performs numerous write-intensive tasks such as logging and swapping.
Prolonging CF Life Span by Reducing Write/Erase Cycles
Reading from CF does not cause degradation, so, to optimize CF for booting an OS, it is important to reduce the number write and erase cycles. You can prolong the usability of the CF card by configuring the OS to redirect and relocate the more write-intensive tasks off CF and on to other devices, such as an external HD or RAM. Some of the things you can do to reduce write/erase cycles and prolong the usability of CF as a boot device include:
Always use a high-grade CF card
Redirect log output by:
Mounting to an NFS share
Logging over the network using syslog
Relocate the /tmp directory to tmpfs or to a external storage
Eliminate swap or swap to external storage
Manage the location of system dumps
Defer or eliminate file metadata updates
The above options are discussed in the following Linux and Solaris OS-specific sections:
The procedures in this section detail how to prolong CF life span by reducing OS write/erase cycles. After you have installed an OS to the server’s CF card, it is recommended that you implement as many of the following procedures as possible:
Redirecting Log Output for CF OS Installation
This section contains two procedures that you can use to redirect log output from the CF card. These procedures will help to reduce OS write/erase cycles and prolong the life span of the CF card:
Redirecting Log Output to an NFS Share
This procedure details how to mount /var over NFS at boot time to redirect system log output off the CF card and onto an NFS share drive. Performing this procedure reduces the OS write/erase cycles and prolongs the life span of the CF card.
| Note — If you have multiple servers logging to the NFS server, each server should have a separate directory. This will reduce file-locking related problems and simplify log analysis. |
 To Redirect Log Output to an NFS Share
1. To mount /var over NFS at boot time, add the following entry to the /etc/fstab file:
server : /path/to/dir /var nfs sync 0 0
server The NFS server.
/path/to/dir The path to the directory to mount as /var .
2. Save and close the /etc/fstab file.
You will now need to make an entry in the /etc/exports file on the log server to authorize the client to mount and write to the share.
3. To authorize the client to mount and write to the share drive, add the following entry to the /etc/exports file on the log server:
/path/to/logs/client host name client_IP (rw,no_root_squash,no_subtree_check)
/path/to/logs/ The path to the log directory.
client host name The host name of the client (recommended for multiple server logging).
client_IP The IP address of the client.
4. Save and close the /etc/exports file.
Since you made changes to the /etc/exports file, you should now refresh the NFS server.
5. To refresh the NFS server, enter the following command:
Redirecting Log Output Over the Network Using syslog
This procedure details how to redirect system log output from the CF card and over the network using syslog . Performing this procedure reduces the OS write/erase cycles and prolongs the life span of the CF card.
| Note — There are some security implications when logging over a network with syslog , especially over an untrusted network, because syslog uses UDP to send log messages. If this is an issue in your implementation, consider replacing syslog with syslog-ng . syslog-ng can do remote logging via TCP and you can use it over an SSH tunnel or VPN. |
| Tip — You might also want to implement firewall rules to restrict which hosts are allowed to log to your log server. |
To Redirect Log Output Over the Network Using syslogd
| Note — The remote log server must have syslogd running with the -r flag. |
 To configure syslogd to log to a remote server edit the /etc/syslog.conf file by performing the following modification:
Change:
kern.*; /var/log/messages
To:
*.*; @host.domain.com
The above modification redirects all kernel related messages from the /var/log/messages directory to host.domain.com. The following is an example of a sample /etc/syslog.conf file that sends messages to a remote system:
The above sample sends all log messages to host.domain.com. Additionally, the following line saves a copy of error and emergency level messages:
To tune your system even further, comment out this line. Comment lines are preceded by the # character:
| Tip — Since many daemons can be configured to redirect their logging output to syslog, you can tune your system further by redirecting many of the other log files that are generated on your system. |
| Note — If you receive errors when trying to log to a remote server, ensure that your Linux distribution has started syslog after the network was brought up. |
Moving /tmp to tmpfs for an OS Installation on CF
This procedure details how to mount /tmp as a tmpfs RAMdisk. Performing this procedure reduces the OS write/erase cycles and prolongs the life span of the CF card.
 | Caution — A RAMdisk uses volatile memory. Information stored in a RAMdisk will not survive a reboot or power outage. Additionally, RAMdisks decrease the total available memory. |
| Note — Swapping to a disk that you also use for data storage can increase the number of seeks that disk performs and therefore increase latency for that disk. |
 To Configure Swap to External Storage Post-Installation
| Note — This procedure assumes that you are starting from a blank disk. |
1. Create a partition with the following command:
% parted /dev/ device_name mkpart primary Linux-swap 0 X
device_name The name of the HD.
X The size of the swap space in megabytes.
| Note — The general rule of thumb is that swap space should be 2 times your RAM size. |
2. Edit the /etc/fstab file to add the new swap device:
/dev/ device_name swap swap defaults 0 0
3. Reboot the system, or to start swapping without waiting for a reboot, enter the following command:
% swapon /dev/ device_name
Tuning the File System for an OS Installation on CF
For more information about tuning your OS to reduce write/erase cycles and increase CF card life span, see the Sun document, Prolonging Flash Life by Reducing Disk Writes .
This section contains the following information:
Disabling Swap
The Solaris OS allows the administrator to configure a swap device during installation. If the root disk of the OS is on CF, then swap should be disabled, or moved to a HD or RAM.
If this is a new machine, then relocate or disable swap. If the machine is already installed, you can disable swap by removing the swap device entry from the vfstab file or by using the swap command.
To Disable Swap by Editing the vfstab File
1. (If necessary) To identify swap devices, enter the following command:
The command returns the current swap device. For example:
device_name The name of the device used for swap.
2. Open the vfstab file in an editor, and locate the swap entry line.
The file is divided into seven fields. The swap entry line will have your swap device listed in the first field and swap listed in the fourth field. For example:
/dev/dsk/device_name — — swap — no —
3. Edit the vfstab file by changing the swap entry to a comment.
To change an entry to a comment, type the # character at the beginning of the entry line. For example, the following swap entry line has been changed to a comment:
# /dev/dsk/device_name — — swap — no —
| Note — Do not comment out the two lines in /etc/vfstab that start with the SWAP keyword, as those are for /tmp and /var/tmp , and not related to the actual swap device specification. |
4. Save and exit the file.
5. For the changes to take effect, reboot, or, if you don’t want to reboot, use the following mount command:
Refer to the mount man page for a description of options.
To Disable Swap using the swap Command
Enter the following command:
Refer to the swap man page before entering this command.
% swap -d swapname
swapname The name of the swap file.
Using a Dedicated Dump Device
By default, the Solaris OS uses the swap device as a source for kernel crash dumps. When the swap device is disabled, the swap partition is configured as a dedicated dump device. This is unsuitable for our purposes, because we want to minimize writes to the CF card. If you would like to capture crash dumps, use the following procedure to configure a different dedicated dump device.
To Configure a Dedicated Dump Device
To configure a device as a dump device, enter the following command:
# dumpadm -c kernel -d /dev/dsk/cXtYd0sZ -s savecore-dir
The above command example uses dumpadm to configure hard disk cXtYd0sZ as the dedicated dump device.
Moving Temporary Files to RAMdisk
By moving temporary files to RAM, you can further reduce I/O to the CF card. By default the Solaris OS /tmp file system is mounted using tmpfs , essentially a RAM disk. By moving /var/temp to tmpfs , you can eliminate the majority of temp files from being written to the root disk. You can do this manually, or you can move /var/temp to tmpfs by editing the vfstab file.
To Move Temporary Files to RAMdisk
1. Add the following entry to the /etc/vfstab file:
swap — /tmp tmpfs — yes —
swap — /var/tmp tmpfs — yes —
See CODE EXAMPLE 8-1 for an example of this.
2. Save and exit the file.
| Note — To manually move /var/tmp to tmpfs use the mount command: mount -F tmpfs swap/var/tmp |
3. For the changes to take effect, reboot, or, if you don’t want to reboot, use the following mount command:
Refer to the mount man page for a description of options.
Disabling File System Access Time Updates
Unix file systems are required to update file metadata each time a file is accessed. Even if the file has been read, but not written, the OS will still update the access time (or atime ). UFS and ZFS file systems allow you to disable updates to the file atimes. For ZFS, you use the set command. For UFS, you configure the noatime option in the vfstab file. Additionally, UFS offers the option to defer atime writes ( dfratime ) until the disk is accessed for a reason other than updating access times. This option is set by default. For more information, see the mount (1M) man page.
| | Caution — Disabling file atime may result in unpredictable behavior with some applications that depend on atime updates to function properly. |
| Note — In the example above, the swap line in /etc/vfstab has been commented out intentionally to disable swap. |
2. Save and exit the /etc/vfstab file.
3. For the changes to take effect, reboot, or, if you don’t want to reboot, use the following mount command:
Refer to the mount man page for a description of options.
Configuring Remote Logging
You can configure the syslog daemon to send its log messages to a remote host. To do this, you must edit the syslogd.conf file to change the destination for log messages to @loghost or @hostaname. If loghost is used, it maps to localhost in the hosts database by default. Be sure to change the loghost entry in /etc/hosts to point to the correct machine. The syslog.conf man page contains additional details about remote logging.
| Tip — If you have a machine configured to receive log messages for other hosts, consider allowing the machine with the root CF device log to this remote host. |
To Configure Remote Logging
1. Edit the syslog.conf file and redirect /var/adm/messages to @loghost or @hostname:
The code example below shows a sample syslog.conf file. In this sample, the original entry is changed to a comment, by affixing the # character to the beginning of the entry, and the new entry has been added beneath it:
2. Save and exit the syslog.conf file.
3. If necessary, define loghost by editing the /etc/hosts file.
Since the example above uses loghost , it needs to be defined in the /etc/hosts file. You define loghost using the IP address of the log machine, indicating where the OS should send the messages. The following example is an excerpt from the /etc/hosts file that has modified localhost so that it is no longer loghost:
4. Save and exit the /etc/hosts file.
| Sun Fire X4540 Server Linux and Solaris OS Installation Guide | 820-4893-13 |     |
Copyright © 2009 Sun Microsystems, Inc. All rights reserved.
Источник


