- Microsoft Build of OpenJDK ™
- Java ™ at Microsoft
- OpenJDK 11 Preview
- OpenJDK 16 EA for Windows AArch64 / ARM64
- Feedback
- How To Install OpenJDK 13 On Windows
- Download OpenJDK
- Install OpenJDK
- Set Environment Variables
- Getting started with Java — Hello World
- Сборка OpenJDK на Windows
- Compiling OpenJDK 6 from sources on Windows 7 using Windows SDK v7.1
Microsoft Build of OpenJDK ™
Free. Open Source. Freshly Brewed!
Supported on macOS, Linux, and Windows.

Java ™ at Microsoft
Java at Microsoft spans from Azure to Minecraft, across SQL Server to Visual Studio Code, and beyond! We use more Java than one can imagine.
The Microsoft Build of OpenJDK is a new no-cost long-term supported distribution and Microsoft’s new way to collaborate and contribute to the Java ecosystem.
OpenJDK 11 Preview
This is a preview release, we do not recommend its use in production environments.
| Platform | Type | Download Link | Checksum (SHA256) | Sig File |
|---|---|---|---|---|
| Linux x64 | tar.gz | microsoft-jdk-11.0.10.9-linux-x64.tar.gz | ac61525bcc693fff2a69070b363ee8789942206b7b840849b307b6997d017001 | Download |
| Linux x64 | debugsymbols | microsoft-debugsymbols-11.0.10.9-linux-x64.tar.gz | aaee3908e437eeada52163d59ce6f377cea81edb713c8f1121a1a8451620abdb | n/a |
| macOS x64 | tar.gz | microsoft-jdk-11.0.10.9-macos-x64.tar.gz | 2e97bd29ca204d7bbaf26b8c648b1d529a0339e396b1f27a71281d05fb75ab3c | Download |
| macOS x64 | pkg | microsoft-jdk-11.0.10.9-macos-x64.pkg | f74bbe4ae3aae6f80128471f3f38e66b176625c752341c642a6fc245bcf93abd | n/a |
| macOS x64 | debugsymbols | microsoft-debugsymbols-11.0.10.9-macos-x64.tar.gz | 6bf62cab8ef689c75f6c792c0c5c6e765a57dbd848948a8205b66233ffb94f0d | n/a |
| Windows x64 | zip | microsoft-jdk-11.0.10.9-windows-x64.zip | 3691b74398977965e894ae51c92890c4894a5548606e503d15c88c6b77840797 | Download |
| Windows x64 | msi | microsoft-jdk-11.0.10.9-windows-x64.msi | 4f9f6c9cd1cc9f1d6d893e59dd74ffc7711892cade528937cd3acb12e2b2dc5b | n/a |
| Windows x64 | debugsymbols | microsoft-debugsymbols-11.0.10.9-windows-x64.zip | 106e391f5a43a004729daf65331df9f000bc2062328935a0872dfef4be2affcb | n/a |
| All | sourcecode | jdk11u.tar.gz | 7b873a9c00bb66025e7810750bae7785761406f41623a76d8d08ab42865d9c08 | n/a |
The public key to verify the SIGNATURE file can be downloaded here.
Other Downloads
Linux Packages (RPM and DEB files) are available at packages.microsoft.com.
Please see the Linux Installer guide for how to get started.
Container Images
Container images are coming soon
Release Notes
Microsoft Specific Enhancements:
OpenJDK 16 EA for Windows AArch64 / ARM64
This is an early-access release, we do not recommend its use in production environments.
| Platform | Type | Download Link | Checksum (SHA256) | Sig File |
|---|---|---|---|---|
| Windows AArch64 / ARM64 | zip | microsoft-jdk-16.36-windows-aarch64.zip | 48dc4aa4b992c721f29ffae104dc71455a7ac3082336a0a77570eba67876e601 | Download |
| Windows AArch64 / ARM64 | debugsymbols | microsoft-debugsymbols-16.36-windows-aarch64.zip | ef392977f25a7b4d79f490f25ba155ed7ebb3942fb6c0798c26833b1b8441000 | n/a |
| All | sourcecode | jdk16u.tar.gz | 93ce379933bf820fe7799fadebbc7376479c9c0918a0ddcccf64f2c3798e2980 | n/a |
The public key to verify the SIGNATURE file can be downloaded here.
Feedback
Please do send us your comments, thoughts, and ideas to help us improve this. Visit our GitHub page to send us your feedback.
Java and OpenJDK are trademarks or registered trademarks of Oracle and/or its affiliates.
How To Install OpenJDK 13 On Windows
Explains all the steps required to install OpenJDK 13 on Windows and getting started with Java using Hello World example.
This tutorial explains all the steps required to install OpenJDK 13 on Windows 10. The steps to install OpenJDK 13 on other versions of Windows should be similar to the steps explained in this tutorial.
You can also follow the steps to install How To Install VSCode For Java On Windows, How To Install IntelliJ IDEA for Java on Windows, and How To Install Eclipse for Java on Windows published by Tutorials24x7. You can also follow the How To Install OpenJDK 13 On Ubuntu to install the latest OpenJDK on Ubuntu and How To Install Java 13 On Windows to install Oracle JDK.
Notes: You may follow What’s New In Java 13 to know about the new features introduced in JDK 13.
Download OpenJDK
Open the JDK 13 GA Release site and download the distribution for Windows as highlighted in Fig 1.
Since the release of OpenJDK 14, the above download link will show warning message. We can download it from the Archived OpenJDK GA Releases.
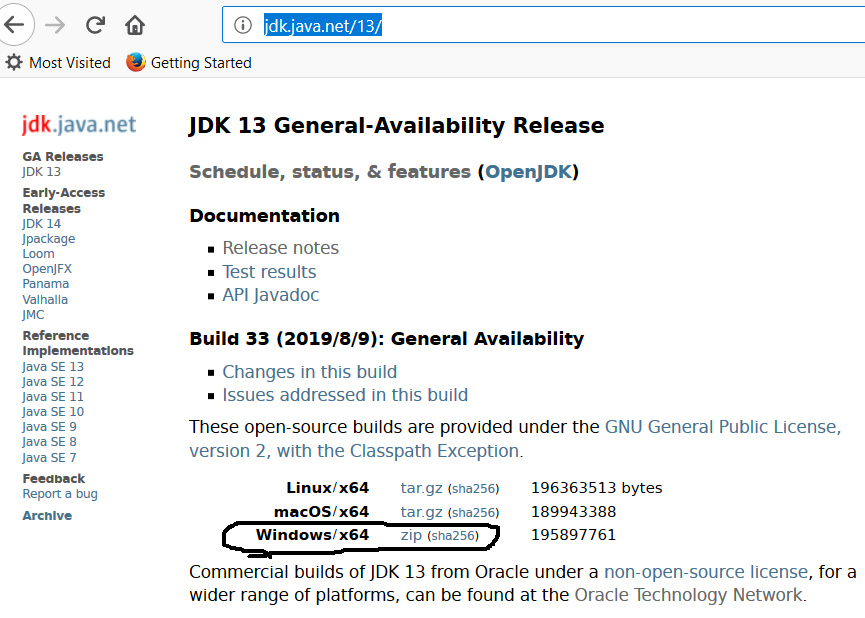
Click on the zip download link to download OpenJDK for Windows. Also, verify your download using the given sha256 checksum.
Install OpenJDK
Extract the downloaded zip to the desired location. In my case, I have extracted the downloaded zip to C:\java\java-13. The zip extractor will extract the files to C:\java\java-13\jdk-13.
This is the only step required to install OpenJDK on windows.
Set Environment Variables
In this step, we will configure the environment variables in order to use the OpenJDK from Command Prompt. Open Command Prompt and check the installed version of Java using the command java -version as shown in Fig 2.
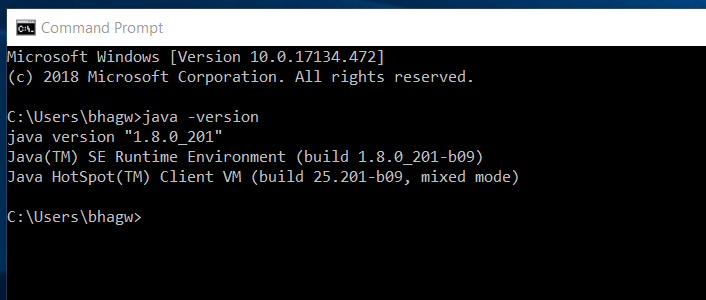
It shows the version of Java 8 since my current version of Java is 8. In your case it might show another version of the Java if it’s already installed, else it will show the message — Java is not recognized as internal or external command, operable program or batch file.
Right Click -> My Computer(This PC) -> Properties -> Advanced System Settings
The above steps will open the Windows settings panel as shown in Fig 3.
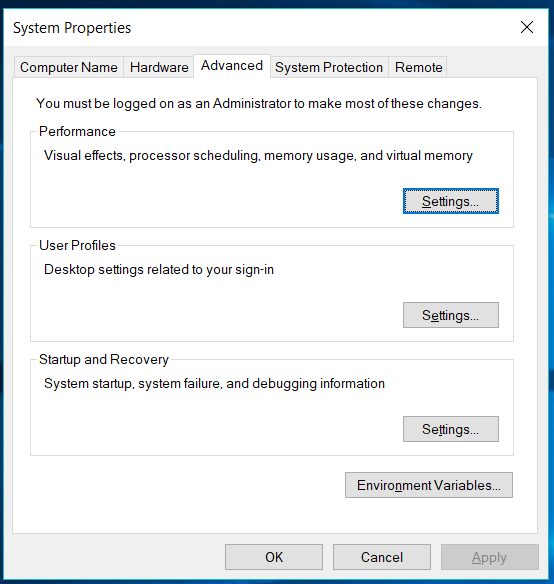
Now click on Environment Variables, select Path under System Variables section and click on Edit. We need to add the path of installed JDK to system Path.
Click on New Button and add the path to installed JDK bin which is C:\java\java-13\jdk-13\bin in our case. It should look like the one shown in Fig 4.
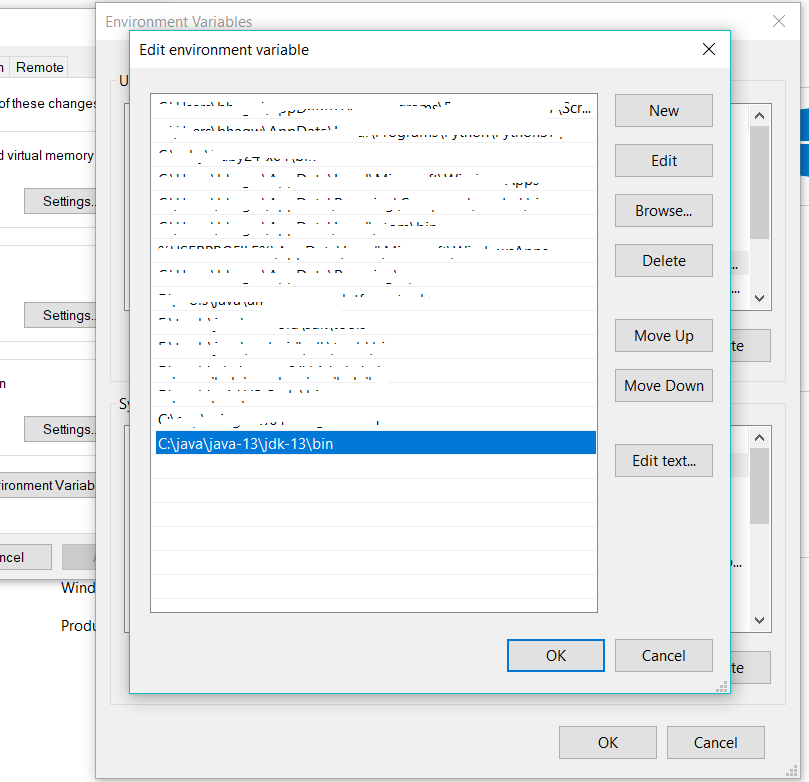
Press OK Button 3 times to close all the windows. This sets the JDK 13 on system environment variables to access the same from the console.
Notes: Remove existing PATH values specific to previously installed Java. Also update JAVA_HOME, in case it was already set.
Now again open the console and test the Java version as shown in Fig 5. Make sure to use a new console to test the version.
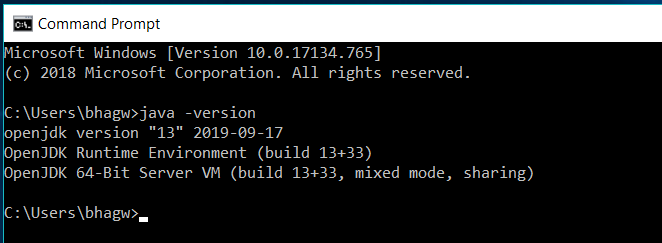
It must show the OpenJDK version as shown in Fig 5. You might need to restart the system in case it does not reflect the JDK version installed by us.
Getting started with Java — Hello World
In this step, we will write, compile, and execute our first program in Java using the standard Hello World example.
Now write the first Java program as shown below, save the program as HelloWorld.java and exit the editor. Make sure that the class name and file name are the same.
Now open the command prompt and navigate to the path where you have saved your Java program. Use the below-mentioned commands to compile and execute the program.
These are the easy to install steps required to install OpenJDK on Windows and write and execute the Java program.
Сборка OpenJDK на Windows
Ниже приведены шаги, которые я должен был сделать, чтобы это произошло. Я предполагаю, что на машине уже установлена Visual Studio 2010. У меня такое ощущение, что Express-версия должна работать просто отлично, но я не пробовал.
- Установите Cygwin. Убедитесь, что вы установили все перечисленные здесь пакеты, некоторые из них не установлены по умолчанию. На всякий случай, вот копия этой таблицы, но рекомендуется проверить с основным источником :
Двоичное имя категория пакет Описание ar.exe Devel Binutils GNU ассемблер, компоновщик и бинарные утилиты make.exe Devel делать Версия утилиты make для GNU, созданная для CYGWIN. m4.exe интерпретаторы m4 GNU реализация традиционного макропроцессора Unix cpio.exe Utils CPIO Программа для управления архивами файлов gawk.exe Utils AWK Шаблонно-ориентированный язык сканирования и обработки file.exe Utils файл Определяет тип файла, используя «магические» числа zip.exe Архив застежка-молния Упаковать и сжать (архивировать) файлы unzip.exe Архив расстегнуть молнию Извлечение сжатых файлов в ZIP-архив free.exe система Procps Отображение количества свободной и использованной памяти в системе
Не забудьте добавить папку bin в cygwin в PATH.
Итак, для начала запустите это в командной строке:
Это должно загрузить корневую папку с некоторыми вспомогательными скриптами.
Затем в cygwin перейдите в только что созданную папку «openjdk7» и запустите «get_source.sh». ‘get_source.sh’ может потерпеть неудачу или просто зависнуть (и это именно то, что случилось со мной). Если это так, то вы можете попытаться использовать флаг «–pull» (протокол извлечения метаданных). Я не совсем уверен, почему, но это помогло мне. К сожалению, сценарии написаны не очень дружелюбно, и невозможно передать какие-либо аргументы ‘hg’ в сценарий поиска источников. Поэтому вам нужно перейти к «make \ scripts \ hgforest.sh» и добавить «–pull» к каждому вызову «hg clone».
И если даже после добавления ‘-pull’ все равно не получится, ну … просто откажитесь и выполните эти команды вручную:
Надеюсь, теперь у вас есть источники и можете продолжить 🙂
Для сборки требуется несколько внешних двоичных файлов и версия make.exe, которая работает под Windows. ‘make’, которая поставляется с cygwin, на самом деле не работает, потому что имеет некоторые проблемы с буквами дисков в именах путей.
Далее нам нужно скомпилировать пару файлов. Одна из них — фиксированная версия make.exe. Другой является библиотека FreeType, которая доступна только для загрузки в качестве источника.
Если вы не заинтересованы в компиляции всего этого и хотите просто скомпилировать JDK с меньшими трудностями, я бы порекомендовал скачать бинарные файлы отсюда (это мой диск). Распакуйте make.exe в openjdk7 / bin. Обратите внимание, что ‘make.exe’ из пакета довольно старый и требует cygintl-3.dll, который не поставляется с текущим cygwin. Чтобы это исправить, просто скопируйте cygintl-8.dll -> cygintl-3.dll.
Freetype lib и dll должны быть помещены в папку, на которую ссылается переменная conf ‘ALT_FREETYPE_LIB_PATH’ (см. Шаг 13). Кроме того, некоторые заголовки Freetype по-прежнему требуются и находятся в make через переменную ALT_FREETYPE_HEADERS_PATH (см. Шаг 13). Это означает, что вам также необходимо скачать исходный код.
Если вы не ищете простое решение и хотите скомпилировать эти двоичные файлы самостоятельно, выполните следующие инструкции:
Compiling OpenJDK 6 from sources on Windows 7 using Windows SDK v7.1
I am trying to compile the OpenJDK 6 from sources on a Windows 7 machine with Windows SDK v7.1.
After some tweaks I reached a point where I really do not know what is the right thing to do.
The lines 47 and 49:
The problem is that the included file winsock2.h has the following code:
Notice how winsock2 #defines POLLIN and POLLOUT , whereas WindowsSelectorImpl.c declares them as consts. Even worse, both give different values:
OpenJDK:
WinSock2 (Windows SDK v7.1):
Obviously, the OpenJDK code is not supposed to be compiled on Windows 7.
However, I do want to compile it on Windows 7.
One of the options is installing an older Windows SDK. Another is to change the file WindowsSelectorImpl.c, the question is how? My intention is to rename the constants, but I cannot help wondering about WinSock2 #defining constants with exactly the same names, but different values.
EDIT1
On second thought, maybe I am better off conditionally using the values from WinSock2? I mean the change in values probably means a change in API.
WinSock2.h defines pollfd like this:
The former is being backward compatible with the latter (more or less, alignment aside).
So, there is a chance WinSock2 constants are the right ones for Windows 7, but then what to do with POLLCONN ? And how will the code run on Windows 2003 or XP?
EDIT2
Things are even worse, because the C implementation has a matching counterpart in java — http://hg.openjdk.java.net/jdk6/jdk6/jdk/file/tip/src/windows/classes/sun/nio/ch/WindowsSelectorImpl.java, which uses the same constants as the C code.
I do not get it. Does winsock2 on Windows 7 breaks any code written for winsock2 on Windows 2003 SP1?
EDIT3
Checked the jdk7u sources (WindowsSelectorImpl.c and AbstractPollArrayWrapper.java). It uses the rename approach, meaning even though the Windows SDK v7.1 declares POLLIN and POLLOUT with the different values, jdk7 sticks to the implementation of jdk6.
I really do not know what does it mean, but I am not going to be more catholic here than the Pope.


