- Установка Composer на Mac OS
- Установка Composer
- Как работает Composer
- Читайте также
- Introduction#
- Dependency management#
- System Requirements#
- Installation — Linux / Unix / macOS#
- Downloading the Composer Executable#
- Locally#
- Globally#
- Installation — Windows#
- Using the Installer#
- Manual Installation#
- Using Composer#
- Как установить composer на MAC
- Процесс установки
- Переименовываем php composer.phar на composer
- mv: rename composer.phar to /usr/local/bin/composer: No such file or directory
- mkdir: /usr/local/bin: Permission denied
- mv: rename composer.phar to /usr/local/bin/composer: Permission denied
- OS X Frequently Asked Questions
- Support
Установка Composer на Mac OS
Composer — пакетный менеджер для языка программирования PHP.
Установка Composer
Composer состоит из одного исполнительного файла и может понадобится, например, для установки Symfony.
Во избежание дальнейшей ошибки:
-bash: composer: command not found
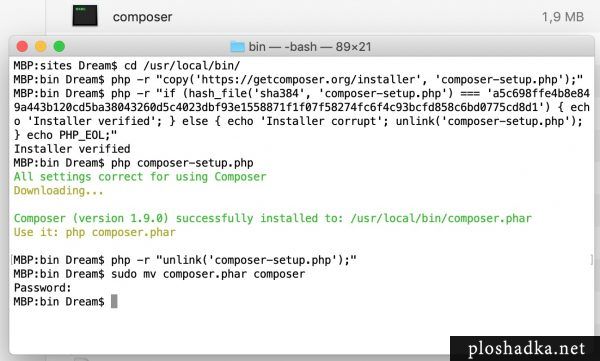
Composer будем устанавливать глобально. Для этого перейдем в общую папку исполняемых файлов на Mac OS:
На странице выше не рекомендуется копировать команды для установки, они могут поменяться от версии к версии, поэтому только для наглядности, запустить нужно эти 4 команды:

Для удобства обращения к файлу переименовываем его из composer.phar в composer:
На этом Composer установлен.
Если Composer мы установили изначально не в общую папку, то переходим в папку с composer и используем команду:
Вся процедура установки на скрине ниже:
Как работает Composer
Для работы сборщика пакетов (композера) в проекте, в котором требуется что-то с его помощью собрать, должно быть два файла: composer.json и composer.lock.
В файле composer.json хранятся настройки, куда и что должно быть установлено.
Файл composer.lock содержит всю необходимую информацию о проекте. Если его нет, он будет автоматически создан. Править его не нужно.
Например, надо установить библиотеку Guzzle. Перейдем в папку, в которой необходимо подключить библиотеки PHP. А затем вбиваем команду:
Будет сгенерированы файлы composer.json и composer.lock, а также создастся папка vendor. Внутри которой будет загружена запрашиваемая библиотека и другие необходимые.
Читайте также
Кстати, на сайте нет рекламы. У сайта нет цели самоокупаться, но если вам пригодилась информация можете задонатить мне на чашечку кофе в макдаке. Лайкнуть страницу или просто поблагодарить. Карма вам зачтется.
Источник
Introduction#
Composer is a tool for dependency management in PHP. It allows you to declare the libraries your project depends on and it will manage (install/update) them for you.
Dependency management#
Composer is not a package manager in the same sense as Yum or Apt are. Yes, it deals with «packages» or libraries, but it manages them on a per-project basis, installing them in a directory (e.g. vendor ) inside your project. By default, it does not install anything globally. Thus, it is a dependency manager. It does however support a «global» project for convenience via the global command.
This idea is not new and Composer is strongly inspired by node’s npm and ruby’s bundler.
- You have a project that depends on a number of libraries.
- Some of those libraries depend on other libraries.
- Enables you to declare the libraries you depend on.
- Finds out which versions of which packages can and need to be installed, and installs them (meaning it downloads them into your project).
- You can update all your dependencies in one command.
See the Basic usage chapter for more details on declaring dependencies.
System Requirements#
Composer requires PHP 5.3.2+ to run. A few sensitive php settings and compile flags are also required, but when using the installer you will be warned about any incompatibilities.
To install packages from sources instead of plain zip archives, you will need git, svn, fossil or hg depending on how the package is version-controlled.
Composer is multi-platform and we strive to make it run equally well on Windows, Linux and macOS.
Installation — Linux / Unix / macOS#
Downloading the Composer Executable#
Composer offers a convenient installer that you can execute directly from the command line. Feel free to download this file or review it on GitHub if you wish to know more about the inner workings of the installer. The source is plain PHP.
There are in short, two ways to install Composer. Locally as part of your project, or globally as a system wide executable.
Locally#
To install Composer locally, run the installer in your project directory. See the Download page for instructions.
The installer will check a few PHP settings and then download composer.phar to your working directory. This file is the Composer binary. It is a PHAR (PHP archive), which is an archive format for PHP which can be run on the command line, amongst other things.
Now run php composer.phar in order to run Composer.
You can install Composer to a specific directory by using the —install-dir option and additionally (re)name it as well using the —filename option. When running the installer when following the Download page instructions add the following parameters:
Now run php bin/composer in order to run Composer.
Globally#
You can place the Composer PHAR anywhere you wish. If you put it in a directory that is part of your PATH , you can access it globally. On Unix systems you can even make it executable and invoke it without directly using the php interpreter.
After running the installer following the Download page instructions you can run this to move composer.phar to a directory that is in your path:
If you like to install it only for your user and avoid requiring root permissions, you can use
/.local/bin instead which is available by default on some Linux distributions.
Note: If the above fails due to permissions, you may need to run it again with sudo.
Note: On some versions of macOS the /usr directory does not exist by default. If you receive the error «/usr/local/bin/composer: No such file or directory» then you must create the directory manually before proceeding: mkdir -p /usr/local/bin .
Note: For information on changing your PATH, please read the Wikipedia article and/or use your search engine of choice.
Now run composer in order to run Composer instead of php composer.phar .
Installation — Windows#
Using the Installer#
This is the easiest way to get Composer set up on your machine.
Download and run Composer-Setup.exe. It will install the latest Composer version and set up your PATH so that you can call composer from any directory in your command line.
Note: Close your current terminal. Test usage with a new terminal: This is important since the PATH only gets loaded when the terminal starts.
Manual Installation#
Change to a directory on your PATH and run the installer following the Download page instructions to download composer.phar .
Create a new composer.bat file alongside composer.phar :
Add the directory to your PATH environment variable if it isn’t already. For information on changing your PATH variable, please see this article and/or use your search engine of choice.
Close your current terminal. Test usage with a new terminal:
Using Composer#
Now that you’ve installed Composer, you are ready to use it! Head on over to the next chapter for a short demonstration.
Found a typo? Something is wrong in this documentation? Fork and edit it!
Composer and all content on this site are released under the MIT license.
Источник
Как установить composer на MAC
Существует два варианта установки composer: локально и глобально. Локально значит что composer будет доступен только в папке одного проекта. Глобальная установка позволяет использовать composer для каждого проекта не совершая лишний телодвежений каждый раз. Естсвенно, мы сами пользуемся композером глобально, все рекомендуем именно так устанавливать.
Процесс установки
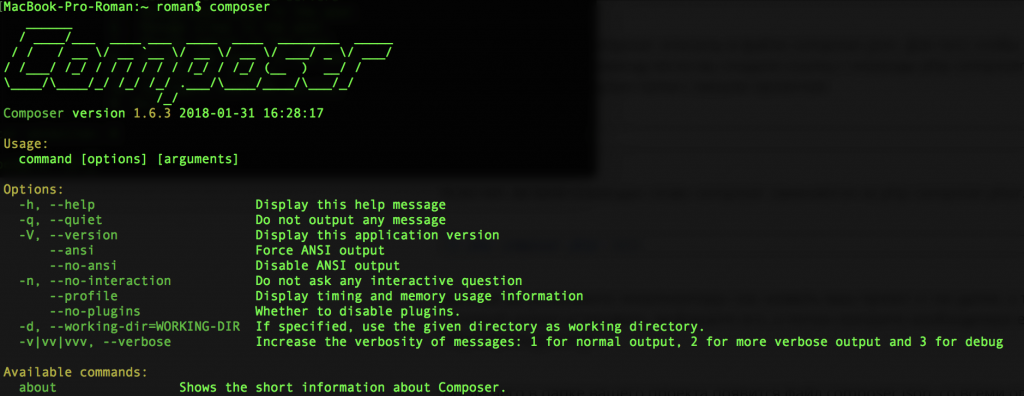
Для установки комопзера нужно ввести всего 1 команду и уже можно им пользоваться. Правда вместо обычного слова composer нужно будет писать php composer.phar. Ниже мы рассмотрим, как упростить эту команду до привычного composer.
Переименовываем php composer.phar на composer
Для этого достаточно ввести данную команду.
После мы можем проверить успешность установки введя в терминал команду composer. Если нам вывелось то, что отображено на скриншоте ниже, значит уставнока прошла успешно. Если нет, давайте рассмотрим возможные проблемы.
mv: rename composer.phar to /usr/local/bin/composer: No such file or directory
Данная ошибка возникает из-за того, что на некоторых версиях OSX по умолчанию нет директории /usr. Чтобы она появилась, нужно ее создать.
mkdir: /usr/local/bin: Permission denied
Значит что у вашего текущего пользователя нет прав на создания данной деритокрии. Чтобы обойти это, введем следующую команду, которая запросит наш пароль (его тоже надо будет ввести).
mv: rename composer.phar to /usr/local/bin/composer: Permission denied
Значит что у вас нет прав на работу с системной директорией. Для решения этой задачи, нужно ввести команду от имени супер юзера (требуется пароль).
Источник
OS X Frequently Asked Questions
- XAMPP for OS X is a native installer for OS X. It installs Apache, PHP and other XAMPP components directly on your OS X system, in the /Applications/XAMPP folder.
- XAMPP-VM is a virtual machine for OS X. It includes Apache, PHP and other XAMPP components and runs them in a Linux-based virtual machine on your OS X system.
. How do I install XAMPP for Mac OS X?
To install XAMPP, follow these steps:
- Open the DMG-Image.
- Double-click the image to start the installation process.
That’s all. XAMPP is now installed below the /Applications/XAMPP directory.
Does XAMPP include MySQL or MariaDB?
Since XAMPP 5.5.30 and 5.6.14, XAMPP ships MariaDB instead of MySQL. The commands and tools are the same for both.
How do I start XAMPP?
To start XAMPP simply open XAMPP Control and start Apache, MySQL and ProFTPD. The name of the XAMPP Control is «manager-osx».
How do I stop XAMPP?
To stop XAMPP simply open XAMPP Control and stop the servers. The name of the XAMPP Control is «manager-osx».
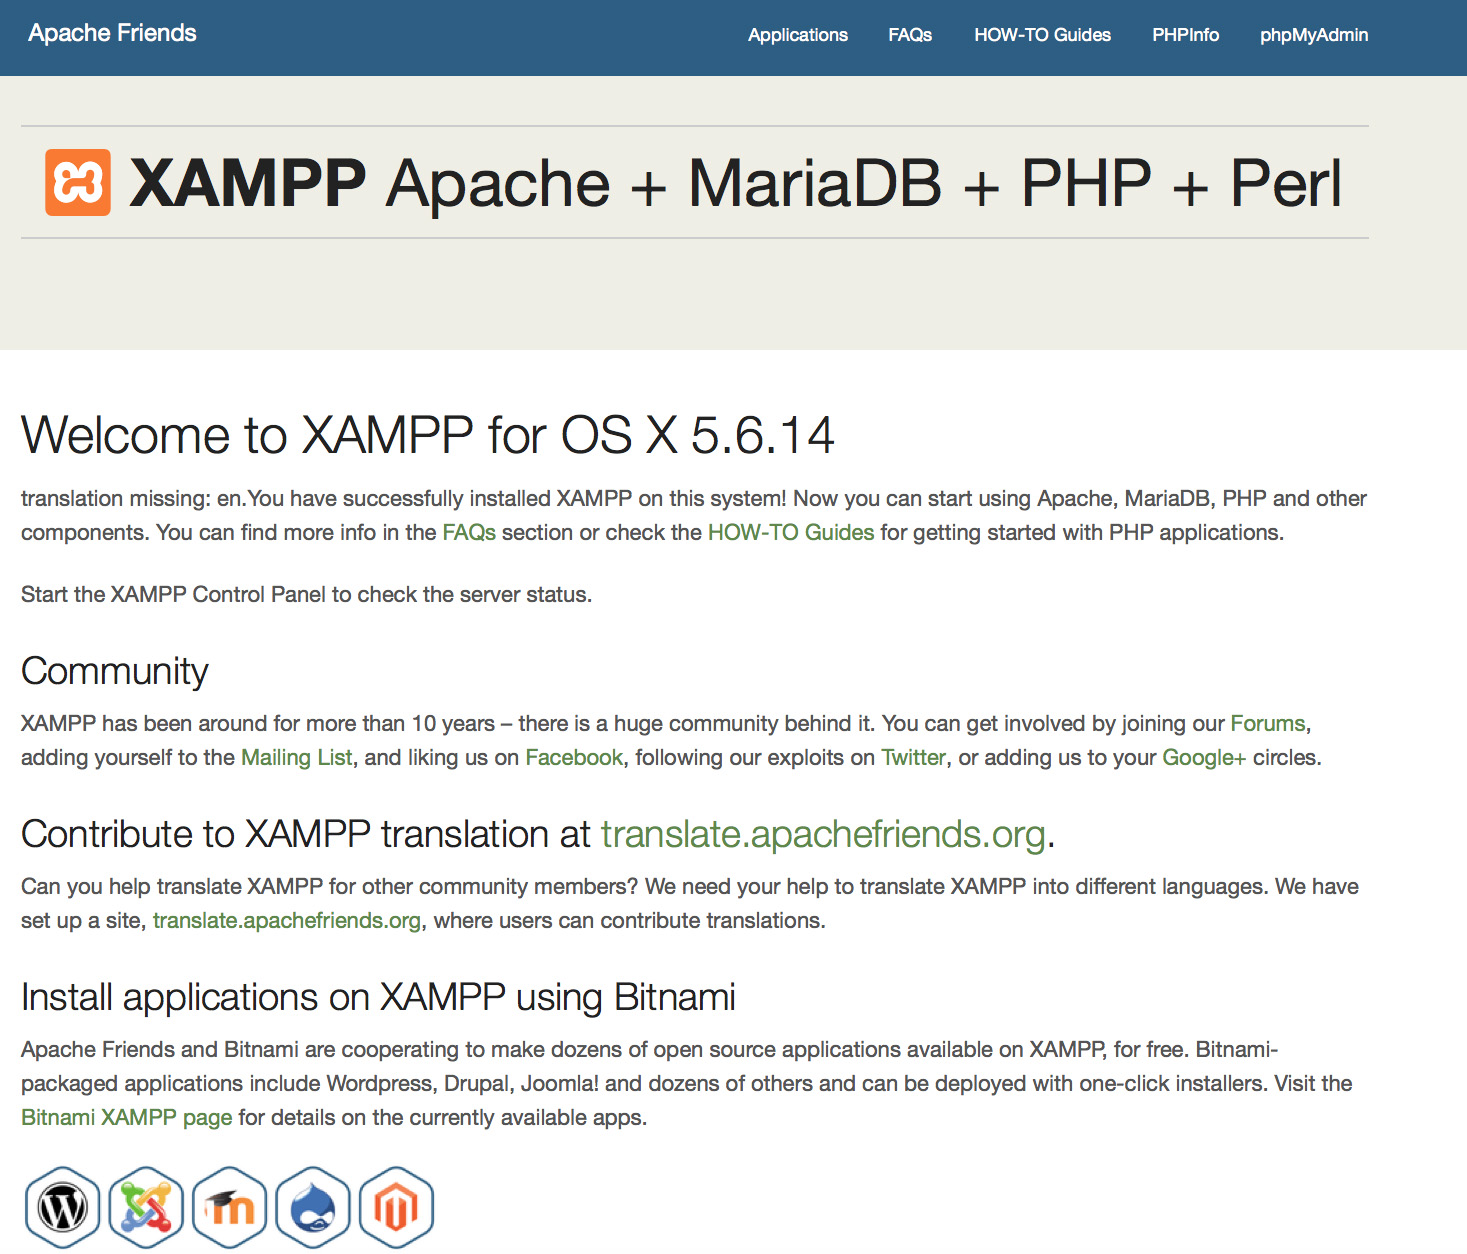
How can I test that everything worked?
Type in the following URL in a web browser:
You should see the XAMPP start page, as shown below.
 Is XAMPP production ready?
XAMPP is not meant for production use but only for development environments. XAMPP is configured to be open as possible to allow the developer anything he/she wants. For development environments, this is great but in a production environment, it could be fatal.
Here a list of missing security in XAMPP:
- The MySQL administrator (root) has no password.
- The MySQL daemon is accessible via network.
- ProFTPD uses the password «lampp» for user «daemon».
To fix most of the security weaknesses simply call the following command:
sudo /Applications/XAMPP/xamppfiles/xampp security
This will launch a small security check to make the XAMPP installation secure.
What is the meaning of the error messages I see when starting XAMPP?
You may get several error messages while starting XAMPP:
LAMPP-Apache is already running.
An Apache daemon is already running.
The LAMPP startup script did not start XAMPP-Apache because there is an Apache instance already running. To start XAMPP properly, first you have to stop this daemon.
LAMPP-MySQL is already running.
A MySQL daemon is already running.
This is mostly due to the same reasons as the above error. The LAMPP startup script found a MySQL daemon already running on your system. To start LAMPP properly, you have to stop this daemon first.
Apache doesn’t seem to start. What can I do?
This error can exist for multiple reasons. Apache displays this error under several circumstances. To find the exact reason, you have to do some research:
tail -2 /Applications/XAMPP/logs/error_log
If you get any error messages visit our community pages for help.
How can I make my XAMPP installation more secure?
By default, XAMPP has no passwords set and it is not recommended to run XAMPP with this configuration as it is accessible to others.
Simply type the following command (as root) to start a simple security check:
sudo /Applications/XAMPP/xamppfiles/xampp security
Now you should see the following dialog on your screen:
XAMPP: Quick security check. XAMPP: MySQL is accessable via network. XAMPP: Normaly that’s not recommended. Do you want me to turn it off? [yes] yes XAMPP: Turned off. XAMPP: Stopping MySQL. XAMPP: Starting MySQL. XAMPP: The MySQL/phpMyAdmin user pma has no password set. XAMPP: Do you want to set a password? [yes] yes XAMPP: Password: ****** XAMPP: Password (again): ****** XAMPP: Setting new MySQL pma password. XAMPP: Setting phpMyAdmin’s pma password to the new one. XAMPP: MySQL has no root passwort set. XAMPP: Do you want to set a password? [yes] yes XAMPP: Write the passworde somewhere down to make sure you won’t forget it. XAMPP: Password: ****** XAMPP: Password (again): ****** XAMPP: Setting new MySQL root password. XAMPP: Setting phpMyAdmin’s root password to the new one. XAMPP: The FTP password for user ‘nobody’ is still set to ‘lampp’. XAMPP: Do you want to change the password? [yes] yes XAMPP: Password: ****** XAMPP: Password (again): ****** XAMPP: Reload ProFTPD. XAMPP: Done.
(1) Setting a password will protect the XAMPP demo pages (http://localhost/xampp/) using this password. The user name is ‘lampp’!
After running this command, your XAMPP installation should be more secure.
How do I activate the OCI8/Oracle extension for PHP?
To activate the OCI8/Oracle extension for PHP please execute the following command:
sudo /Applications/XAMPP/xamppfiles/lampp oci8
The following dialog will start:
Please enter the path to your Oracle or Instant Client installation: [/Applications/XAMPP/xamppfiles/lib/instantclient-11.2.0.3.0] installing symlinks. patching php.ini. OCI8 add-on activation likely successful. LAMPP: Stopping Apache with SSL. LAMPP: Starting Apache with SSL.
The extension should now be active.
How do I enable access to phpMyAdmin from the outside?
In the basic configuration of XAMPP, phpMyAdmin is accessible only from the same host that XAMPP is running on, at http://127.0.0.1 or http://localhost.
IMPORTANT: Enabling external access for phpMyAdmin in production environments is a significant security risk. You are strongly advised to only allow access from localhost. A remote attacker could take advantage of any existing vulnerability for executing code or for modifying your data.
To enable remote access to phpMyAdmin, follow these steps:
- Edit the xamppfiles/etc/extra/httpd-xampp.conf file in your XAMPP installation directory.
- Within this file, find the lines below.
Alias /phpmyadmin «/Applications/XAMPP/xamppfiles/phpmyadmin» AllowOverride AuthConfig Require local
Then replace ‘Require local’ with ‘Require all granted’.
Alias /phpmyadmin «/Applications/XAMPP/xamppfiles/phpmyadmin» AllowOverride AuthConfig Require all granted
Where are the main XAMPP configuration files?
The main XAMPP configuration files are located as follows:
- Apache configuration file: /Applications/XAMPP/xamppfiles/etc/httpd.conf, /Applications/XAMPP/xamppfiles/etc/extra/httpd-xampp.conf
- PHP configuration file: /Applications/XAMPP/xamppfiles/etc/php.ini
- MySQL configuration file: /Applications/XAMPP/xamppfiles/etc/my.cnf
- ProFTPD configuration file: /Applications/XAMPP/xamppfiles/etc/proftpd.conf
How do I send email with XAMPP?
To send email with XAMPP, use the PEAR Mail and Net_SMTP packages, which allow you to send email using an external SMTP account (such as a Gmail account). Follow these steps:
- Install the Mail and Net_SMTP PEAR modules: pear install Net_SMTP Mail Note that if these packages are already installed in your system you see the messages below when executing that command: Ignoring installed package pear/Net_SMTP Ignoring installed package pear/Mail Nothing to install
- Create the following example script in your «htdocs» directory to send an email: $from, ‘To’ => $to,’Subject’ => $subject); $smtp = Mail::factory(‘smtp’, array (‘host’ => $host, ‘port’ => $port, ‘auth’ => true, ‘username’ => $username, ‘password’ => $password)); $mail = $smtp->send($to, $headers, $body); if (PEAR::isError($mail)) < echo($mail->getMessage()); > else < echo("Message successfully sent!\n"); >?>
Remember to replace the dummy values shown with your actual Gmail address and account password. If you don’t plan to use Gmail’s SMTP server, replace the SMTP host details with appropriate values for your organization or ISP’s SMTP server.
How do I backup/restore my XAMPP system?
WARNING: The backup and restore functionality is still under development and may not work correctly.
You can create the backup by calling:
sudo /Applications/XAMPP/xamppfiles/xampp backup
sudo /Applications/XAMPP/xamppfiles/xampp backup secret
Where «secret» is your MySQL root password. This command will create the following output:
Backing up databases. Backing up configuration, log and htdocs files. Calculating checksums. Building final backup file. Backup finished. Take care of /Applications/XAMPP/xamppfiles/backup/xampp-backup-22-01-14.sh
The file /Applications/XAMPP/xamppfiles/backup/xampp-backup-22-01-14.sh (in the example above) contains your backup data. Move or copy this file to a safe place.
On the new machine you need the same version of XAMPP as on your original/source machine.
sudo sh xampp-backup-22-01-14.sh
You should see something like this:
Checking integrity of files. Restoring configuration, log and htdocs files. Checking versions. Installed: XAMPP 1.4.2 Backup from: XAMPP 1.4.2 Restoring MySQL databases. Restoring MySQL user databases. Backup complete. Have fun! You may need to restart XAMPP to complete the restore.
That’s all. Keep in mind that it’s a beta feature.
Support
Visit our our community pages for additional help.
Источник


