- How to Optimize and Compress JPEG or PNG Images in Linux Commandline
- Compress or Optimize JPEG Images from Command Line
- Install jpegoptim in Linux
- How to Use Jpegoptim Image Optimizer
- Batch JPEG Image Compression and Optimization
- Compress or Optimize PNG Images from Command Line
- Install OptiPNG in Linux
- How to Use OptiPNG Image Optimizer
- Batch PNG Image Compression and Optimization
- Conclusion
- If You Appreciate What We Do Here On TecMint, You Should Consider:
- Best Image Compression Apps for Linux
- Convert Command
- Trimage
- Converseen
- OptiPNG
- Jpegoptim
- Conclusion
- About the author
- Nitesh Kumar
- Compressing Images On The Linux Command Line
- Installing jpegoptim and OptiPNG
- Using jpegoptim to compress JPEG files
- Using OptiPNG to optimize PNG, BMP, GIF, PNM, and TIFF files
How to Optimize and Compress JPEG or PNG Images in Linux Commandline
You have a lot of images, and want to optimize and compress the images without losing its original quality before uploading them to any cloud or local storages? There are plenty of GUI applications available which will help you to optimize the images. However, here are two simple command line utilities to optimize images and they are:
- jpegoptim – is a utility to optimize/compress JPEG files without loosing quality.
- OptiPNG – is a small program that optimize PNG images to smaller size without losing any information.
![]() Compress and Optimize JPEG and PNG Images in Linux
Compress and Optimize JPEG and PNG Images in Linux
Using these two tools, you can either optimize a single or multiple images at a time.
Compress or Optimize JPEG Images from Command Line
jpegoptim is a command line tool that can be used to optimize and compress JPEG, JPG and JFIF files without losing its actual quality. This tool supports lossless optimization, which is based on optimizing the Huffman tables.
Install jpegoptim in Linux
To install jpegoptim on your Linux systems, run the following command from your terminal.
On Debian and it’s Derivatives
On RedHat based Systems
On RPM based systems like RHEL, CentOS, Fedora etc., you need to install and enable EPEL repository or alternatively, you can install the epel repository directly from the commandline as shown:
Next install jpegoptim program from the repository as shown:
How to Use Jpegoptim Image Optimizer
The syntax of jpegoptm is:
Let’s now compress the following tecmint.jpeg image, but before optimizing the image, first find out the actual size of the image using du command as shown.
Here the actual file size is 6.2MB, now compress this file by running:
![]() Optimize JPEG Image in Linux
Optimize JPEG Image in Linux
Open the compressed image in any image viewer application, you will not find any major differences. The source and compressed images will have the same quality.
The above command optimizes the images to the maximum possible size. However, you can compress the given image to a specific size to, but it disables the lossless optimization.
For example, let us compress above the image from 5.6MB to around 250k.
![]() Optimize Image Fix Size
Optimize Image Fix Size
Batch JPEG Image Compression and Optimization
You might ask how to compress the images in the entire directory, that’s not difficult too. Go to the directory where you have the images.
And then run the following command to compress all images at once.
You can also compress multiple selected images at once:
For more details about jpegoptim tool, check out the man pages.
Compress or Optimize PNG Images from Command Line
OptiPNG is a command line tool used to optimize and compress PNG (portable network graphics) files without losing its original quality.
The installation and usage of OptiPNG is very similar to jpegoptim.
Install OptiPNG in Linux
To install OptiPNG on your Linux systems, run the following command from your terminal.
On Debian and it’s Derivatives
On RedHat based Systems
Note: You must have epel repository enabled on your RHEL/CentOS based systems to install optipng program.
How to Use OptiPNG Image Optimizer
The general syntax of optipng is:
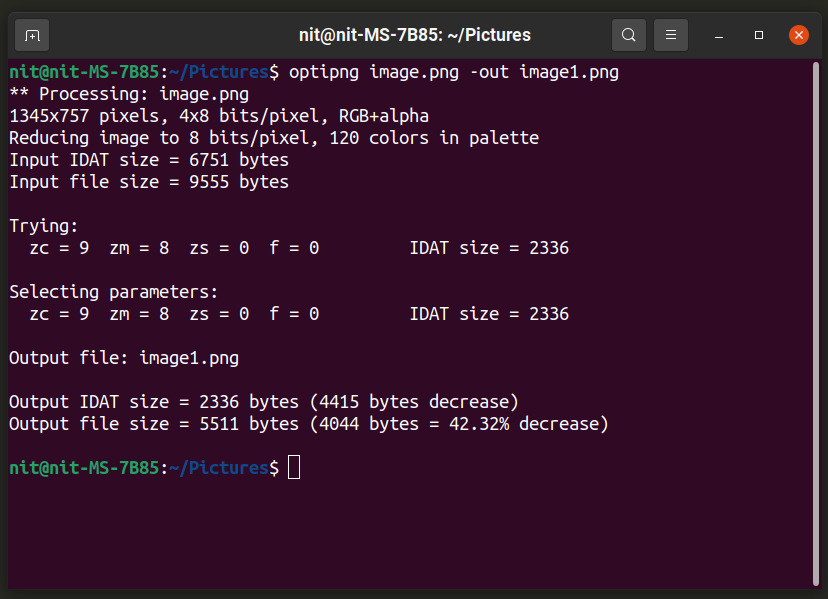
Let us compress the tecmint.png image, but before optimizing, first check the actual size of the image as shown:
Here the actual file size of above image is 350K, now compress this file by running:
As you see in the above output, the size of the tecmint.png file has been reduced up to 30.39%. Now verify the file size again using:
Open the compressed image in any image viewer application, you will not find any major differences between the original and compressed files. The source and compressed images will have the same quality.
Batch PNG Image Compression and Optimization
To compress batch or multiple PNG images at once, just go the directory where all images resides and run the following command to compress.
For more details about optipng check man pages.
Conclusion
If you’re a webmaster and wants to serve optimized images over your website or a blog, these tools can be very handy. These tools not only saves the disk space, but also the reduces the bandwidth while uploading the images.
If you know any other better way to achieve same thing, do let us know via comments and don’t forget to share this article on your social networks and support us.
If You Appreciate What We Do Here On TecMint, You Should Consider:
TecMint is the fastest growing and most trusted community site for any kind of Linux Articles, Guides and Books on the web. Millions of people visit TecMint! to search or browse the thousands of published articles available FREELY to all.
If you like what you are reading, please consider buying us a coffee ( or 2 ) as a token of appreciation.

We are thankful for your never ending support.
Источник
Best Image Compression Apps for Linux
This article will post a list of useful command line and graphical utilities that allow you to compress image files to save local or remote disk space. Some of these applications provide “lossless” options that reduce size of image files with no or minimal loss of quality. Note that image compression is not the same as resizing, rescaling or altering geometry of images to reduce size. Image compression involves manipulating quality of images using various compression algorithms. Usually, quality of colors, individual pixels and transparency is manipulated to compress images and save disk space.
Convert Command
Convert command is a part of the “imagemagick” command line tool. Imagemagick features numerous commands and utilities to convert and modify image files in many formats.
To install Imagemagick in Ubuntu, use the following command:
Imagemagick and its “convert” command can be installed from package manager in any other Linux distribution. You can also get installable packages and source code from its official website.
You can run convert command in the following format:
Replace “image.png” with your input file and “converted_image.png” with the name of output file. The “-quality” switch is used to specify the quality of resultant image. You can give it any value in the range of 1-100 to set the quality of the output file. When you reduce image quality, it affects image size so reducing quality is an effective way to compress images. Note that image quality is not directly proportional to file size. Using a quality value of 70 doesn’t necessarily mean that file size will reduce by 30%. Imagemagick uses a variety of compression algorithms and methodology depending on the file format of the output file. You can read more about “-quality” switch and compression algorithms from here.
The screenshot below shows how an image was compressed on my system after running the “convert” command:

The image size was reduced from 21474 bytes to 20697 bytes. You can also change file format to get better compression (just change the extension of output file):

To know more about “convert” command, use these commands:
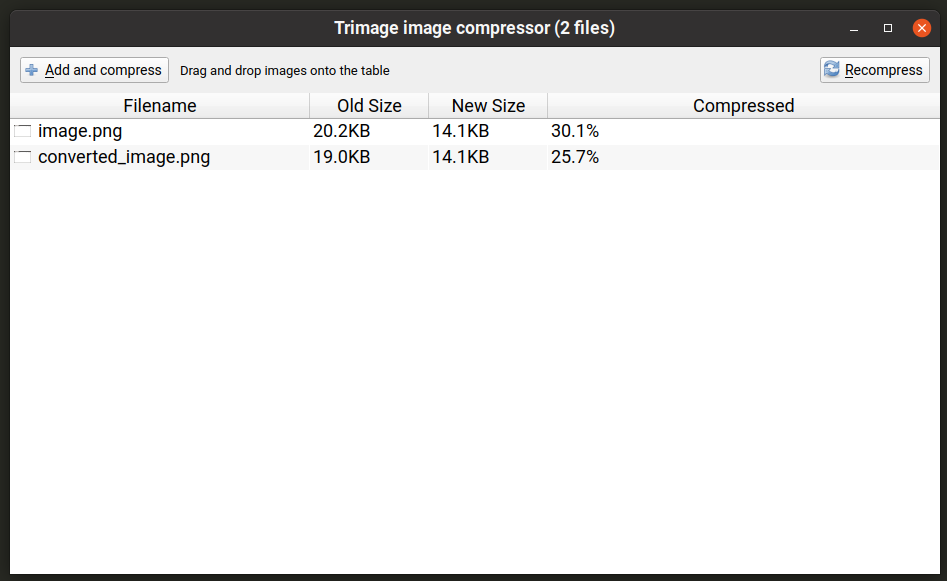
Trimage
Triage is a graphical application that supports batch compression of images. You can just drag and drop image files on the application window or add them from the file manager and they will convert automatically. Do note that Trimage compresses the original image file in-place without making a copy of it. So be careful if you want to retain the original file.
To install Trimage in Ubuntu, execute the command mentioned below:
Trimage can be installed in other Linux distributions from various repositories available in the package manager. You can also get installable packages and source code from its official website.
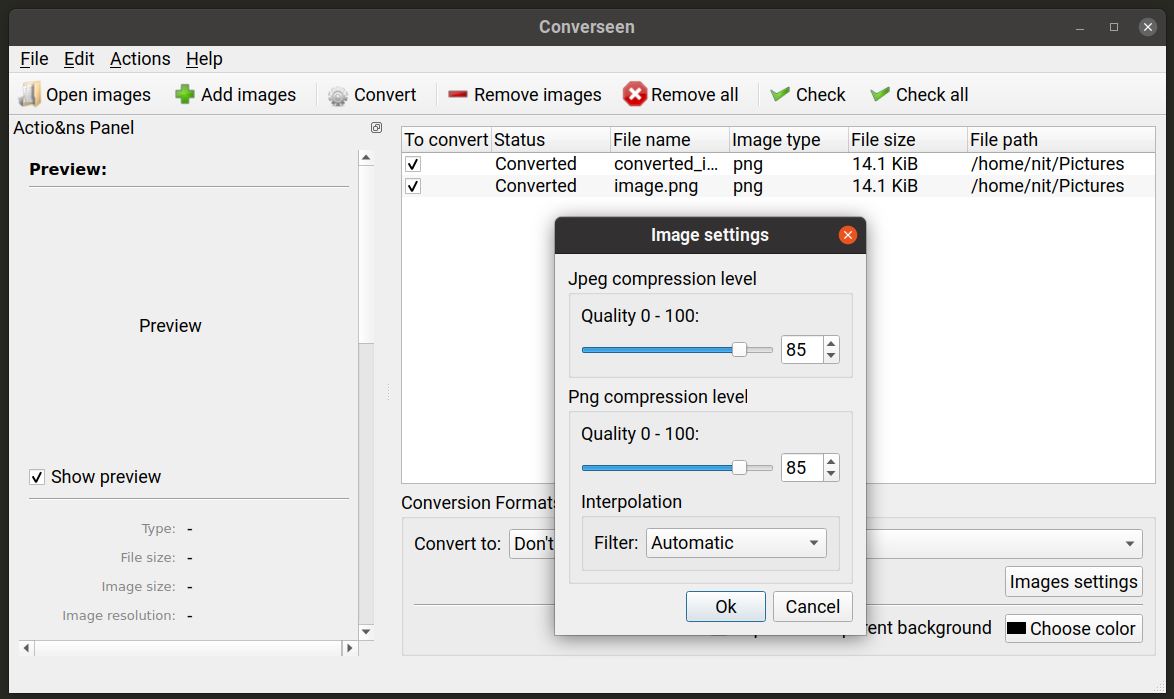
Converseen
Converseen is another batch image manipulation tool that works similar to the Trimage app mentioned above. It allows you to batch compress image files and provides options to control compression level of individual file formats. It also preserves original files and prompts you before overwriting them. By default, it saves converted images in the home folder but you can change the default output path. You can change compression levels by clicking on the “Images settings” button in the bottom right corner.
To install Converseen in Ubuntu, execute the command mentioned below:
Converseen can be installed in other Linux distributions from various repositories available in the package manager. You can also get installable packages and source code from its official website.
OptiPNG
OptiPNG is a command line utility to modify “PNG” files. It is specially designed to do lossless compression of PNG files with little or no loss of quality. By default, OptiPNG uses lossless algorithms.
To install OptiPNG in Ubuntu, use the following command:
OptiPNG can be installed from package manager in any other Linux distribution. You can also get installable packages and source code from its official website.
To compress a PNG file using OptiPNG’s default lossless algorithm, use a command in the following format:
OptiPNG doesn’t allow you to choose the quality of the output image using command line options. However, it allows you to change “optimization levels” from a range of 8 levels. Run the a command in the following format to use an optimization level:
Replace the “-o7” part with your own choice of optimization level. You can know more about these optimization levels and which appropriate option to choose by running the command below:
For further information on OptiPNG, use the following command:
Jpegoptim
Jpegoptim works similarly to OptiPNG, but it works with “JPEG” file format only. By default, it tries to do best lossless compression, but you can choose various quality levels using command line options.
To install Jpegoptim in Ubuntu, use the following command:
Jpegoptim can be installed from package manager in any other Linux distribution. You can also get installable packages and source code from its official repository.
To compress a JPEG / JPG file using its default compression algorithm, execute the following two commands:
Strangely enough, jpegoptim doesn’t allow you to specify an output file but does allow you to specify a directory where compressed files will be saved. So the first command here creates a directory named “compressed_files” while the second command compresses “image.jpg” file and stores it in “compressed_files” directory.

You can specify quality of output file by using a command in following format:
To change quality level, replace “20” with any number from 0-100.
Jpegoptim also features a “size” option that allows you to specify the target size of compressed file in percentages / kilobytes. To do so, you can use following two commands:
Replace “5k” with target file size in kilobytes and replace “30” with target file size in percentages of original file.
Conclusion
These are some of the most useful command line and graphical applications that you can use to compress image files. Image compression is most commonly used for media used in websites and web applications to save disk space and bandwidth.
About the author
![]()
Nitesh Kumar
I am a freelancer software developer and content writer who loves Linux, open source software and the free software community.
Источник
Compressing Images On The Linux Command Line
If you have a lot of high-resolution images stored on your Linux computer, you may be running out of storage due to the large amount of disk space used by your photo library. In this case, you may be looking for a solution that allows you to compress these images to conserve disk space without affecting their quality.
Further, traditional compression solutions often allow compressing image files one-by-one, which can be a rather cumbersome and time-consuming process. Therefore, compressing your images in batches may be a great idea to save time and effort.
That’s where jpegoptim and OptiPNG come in handy. Both jpegoptim and OptiPNG are command line-based utilities that can be used to optimize and compress pictures in batches without affecting their original quality (also known as lossless compression). Jpegoptim handles JPEG files while OptiPNG processes pictures in the format of PNG, BMP, GIF, PNM, and TIFF.
Let’s go over the process of installing jpegoptim and OptiPNG to compress pictures in Linux using the command line.
Note: This tutorial assumes you are using a non-root user with sudo privileges.
Installing jpegoptim and OptiPNG
On CentOS or other RPM-based Linux distributions:
On Debian or other APT-based Linux distributions:
Using jpegoptim to compress JPEG files
In this example, your original JPEG (.jpg) files are stored
a) If you want to compress a single file, let’s say example.jpg you would be using the below command:
Notice: The original example.jpg will be replaced with a compressed version by default.
b) If you want to compress all .jpg files in the source directory:
All the original files will be overwritten and replaced with the compressed version.
c) If you wish to keep the original files, you can specify a target directory to store the compressed version to as follows:
d) For more information on how to use the jpegoptim command, you can use the -h flag to view its help file:
Using OptiPNG to optimize PNG, BMP, GIF, PNM, and TIFF files
Just like jpegoptim , OptiPNG will overwrite the original files and replace then with the compressed version in the source directory by default. Meanwhile, for BMP, GIF, PNM, and TIFF files, OptiPNG will generate optimized .png version of the file with the same name, leaving the original files in tact. These file would have to be manually removed one the compression process is compelted.
Below are a few examples on how to use OptiPNG to apply lossless compression to your images:
In this example, your original JPEG (.jpg) files are stored
a) If you want to compress a single file, let’s say example.png you would be using the below command:
Notice: The original example.png file will be replaced with a optimized version.
b) Optimize a .bmp file example.bmp :
A file named example.png will be created in the source directory while the original example.bmp stays in tact.
c) If you want to compress all .png files in the source directory:
All the original files will be overwritten and replaced with the compressed version.
d) If you prefer to keep the original files in tact, you can do so by using the -keep flag as follows:
The original files will remain in tact and suffixed with a .bak . For example example.png.bak .
e) If you wish to keep the original files, you can specify a target directory to store the compressed version to as follows:
All the original files will remain in tact in the source directory while the compressed version will be saved in target directory.
f) For more information on how to use the OptiPNG command, you can use the -h flag to view its help file:
Источник


