- Zip and unzip files
- How To Compress / ZIP a File in Windows 10
- Ways of Compressing /Zipping a Single File or Folder in Windows 10:
- Method # 1: Using the “Send to” Option to Compress /ZIP a Single File or Folder
- Method # 2: Using the “Top Ribbon Menu” to Compress /ZIP a Single File or Folder
- Ways of Compressing /Zipping Multiple Files or Folders in Windows 10:
- Method # 1: Using the “Send to” Option to Compress /ZIP Multiple Files or Folders
- Method # 2: Using the “Top Ribbon Menu” to Compress /ZIP Multiple Files or Folders
- Compact : compress files from command line (CMD)
- Compress Files, Folder, Drive in Windows to save Disk Space in Windows 10
- How to compress a file or a folder
- How to compress a Drive
- File Compression Behavior
- Do Not Compress the System Drive
- How to Compress Files and Folders in Windows 10
- Compress files and folders in Windows 10 with Compact
- About Sergey Tkachenko
Zip and unzip files
Zipped (compressed) files take up less storage space and can be transferred to other computers more quickly than uncompressed files. In Windows, you work with zipped files and folders in the same way that you work with uncompressed files and folders. Combine several files into a single zipped folder to more easily share a group of files.
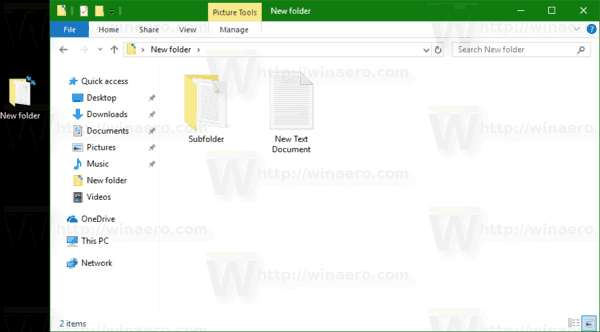
Locate the file or folder that you want to zip.
Press and hold (or right-click) the file or folder, select (or point to) Send to, and then select Compressed (zipped) folder.
A new zipped folder with the same name is created in the same location. To rename it, press and hold (or right-click) the folder, select Rename, and then type the new name.
Locate the zipped folder that you want to unzip (extract) files or folders from.
Do one of the following:
To unzip a single file or folder, open the zipped folder, then drag the file or folder from the zipped folder to a new location.
To unzip all the contents of the zipped folder, press and hold (or right-click) the folder, select Extract All, and then follow the instructions.
To add files or folders to a zipped folder you created earlier, drag them to the zipped folder.
If you add encrypted files to a zipped folder, they’ll be unencrypted when they’re unzipped, which might result in unintentional disclosure of personal or sensitive information. For that reason, we recommend that you avoid zipping encrypted files.
Some types of files, like JPEG images, are already highly compressed. If you zip several JPEG pictures into a folder, the total size of the folder will be about the same as the original collection of pictures.
How To Compress / ZIP a File in Windows 10
People often use third-party softwares to Compress or Zip the files. These third-party softwares do quite well but are not recommended as security is an ultimate necessity now days. A majority of Windows users don’t use the built-in feature to Compress/ ZIP files and folders that is the most secure and the best way of achieving the desired output. Windows 10 is pretty advanced and the compression tool integrated works quite well. So, you can definitely, Compress / ZIP a file in Windows 10 instead of using the third-party paid tools. You can compress a single file/ folder or you can also compress multiple files/ folders using the compression tool inside Windows 10.
A ZIPPED or Compressed file is the most convenient way of transferring huge sized files and folders over the Internet. Files take less space when they are compressed and can be transferred without consuming a large amount of bandwidth.
Ways of Compressing /Zipping a Single File or Folder in Windows 10:
Method # 1: Using the “Send to” Option to Compress /ZIP a Single File or Folder
You can compress/ ZIP a single file or folder using the “Send to” option inside Windows 10. Follow the instructions below.
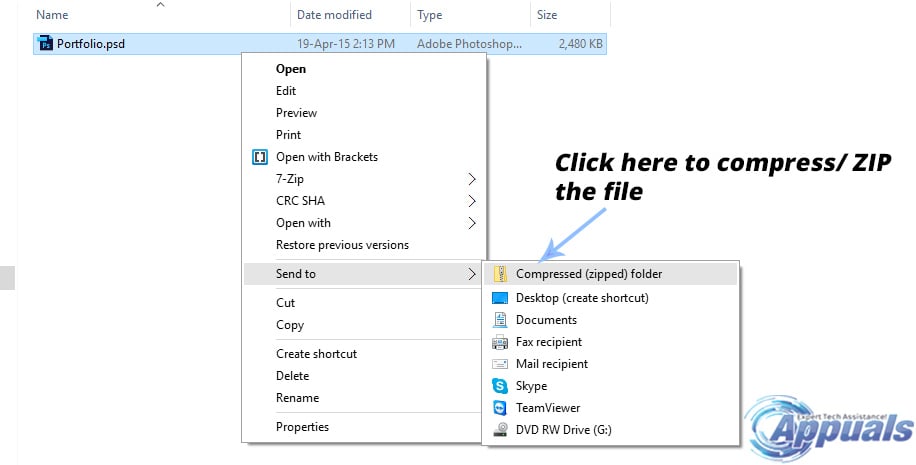
To compress a file/ folder using the “Send to” option, right click on the target, navigate to Send to and click on Compressed (zipped) folder from the menu appearing after. You can refer to the below image for illustration.
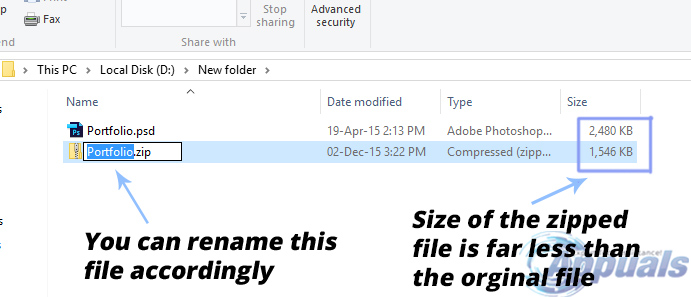
After the file is compressed, you would see a new file with a conventional folder icon. By default, the zipped file will be renamed according to the original file /folder but you can also rename this file. You will notice a big difference between the Zipped file and the Original version of that file.
Method # 2: Using the “Top Ribbon Menu” to Compress /ZIP a Single File or Folder
There is another way to compress/ Zip a file in Windows 10 i.e. using the Ribbon Menu located at the top of the Windows Explorer.
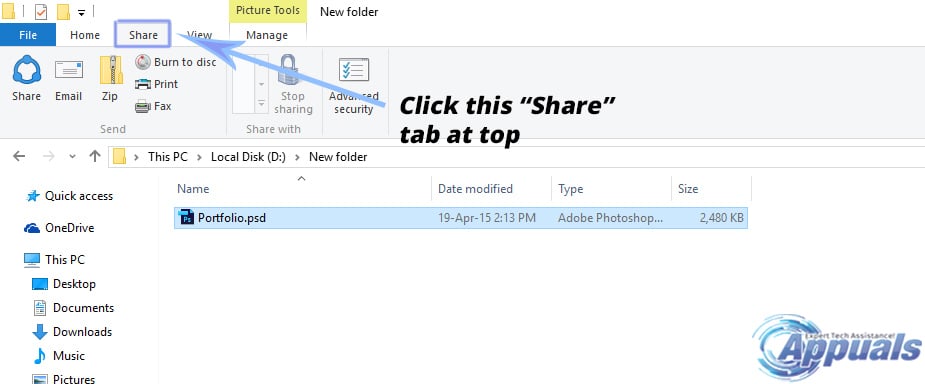
Select the file or folder you want to compress and move your cursor to the top of the Windows Explorer inside the Ribbon Menu area. Click on the Share tab to open the relevant settings.
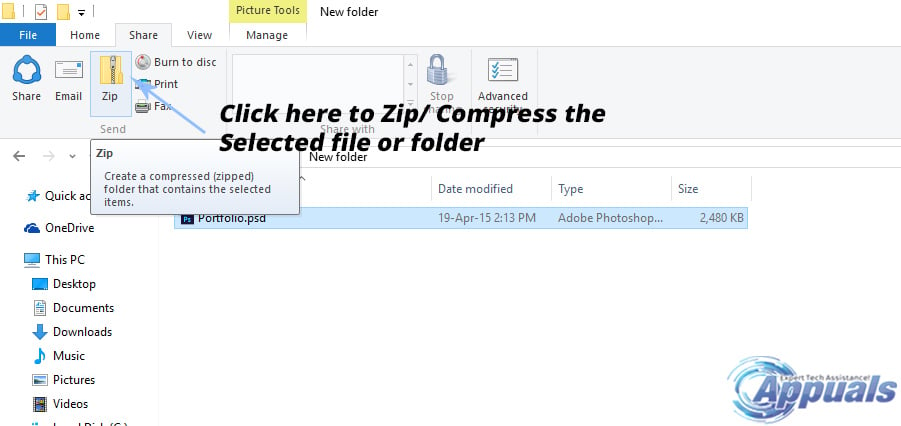
Inside the Share tab, you will see an option called Zip. Click on that option and the selected file will be zipped/ compressed.
Ways of Compressing /Zipping Multiple Files or Folders in Windows 10:
Method # 1: Using the “Send to” Option to Compress /ZIP Multiple Files or Folders
You can also compress multiple files and folders using the Send to option inside Windows 10.
To compress multiple files or folders, press and hold the CTRL button on your keyboard and select the files using the left mouse button.
Right click on the any of the selected file or folder and select the Send to option followed by Compressed (zipped) folder.
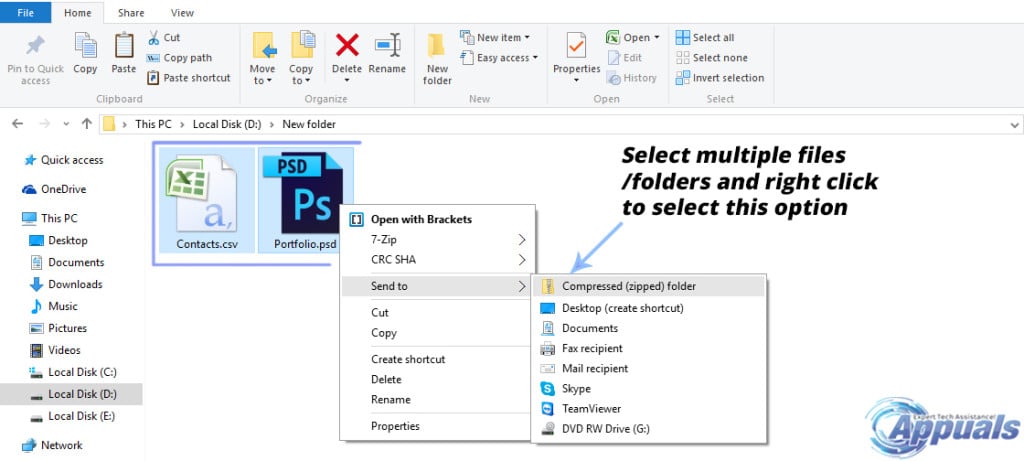
It will create a new compressed folder inside the same directory. You can rename and share the folder accordingly.
Method # 2: Using the “Top Ribbon Menu” to Compress /ZIP Multiple Files or Folders
Multiple files and folders can also be compressed/ zipped using the Ribbon Menu.
Select the desired files and folders by holding the CTRL key and navigate to the Ribbon menu at the top of the Windows Explorer.
Navigate to the Share tab and click on Zip to create a compressed folder.
Compact : compress files from command line (CMD)
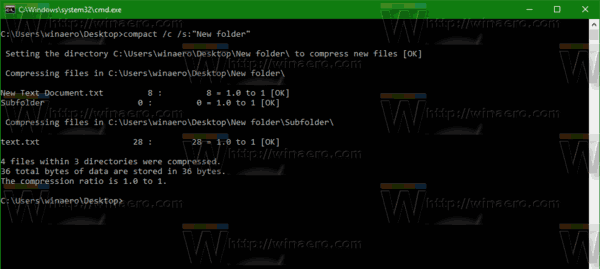
Windows built-in command compact allows one to compress or un-compress files on a NTFS file system. Using this command we can set compression attributes on a directory also so that the new files added to the directory will be compressed automatically.Let’s see the syntax of the command ‘compact‘ with few examples.
Check the compression status of a file:
Compress a file from command line:
Uncompress a file:
To compress all the files in the current directory
To compress all the files in the current directory and also the sub directories and the files within them recursively
To un-compress all the files in the current directory
To un-compress all the files in the current directory and also in its sub directories:
how did you make the compression ratio to 8.0 to 1
can you show how to increase the max compression to a different amount?
Use ‘compact /?’ to find out more details on the command.
the compression ratio will depend on the file type I suspect, text compressing more than pictures for example.
but why i get that error:
‘compact’ n’est pas reconnu en tant que commande interne ou externe ….
.
Can we compress into .ZIP file in cmd without using powershell or vbscripts ?
I have used the same command it has run successfully but when i checked the size of my compressed file it shows same as previous
Where is my Compact file? I am not able to find it on my drive. Please guide.
Please everybody, be aware that this Compact is a bit like the old Drivespace in DOS: it does NOT create a NEW file, like a zip file, but it stores the same file, or the whole directory, in a compressed manner. In NTFS. Because NTFS has the ability to do that, and FAT / FAT32 cannot. Your Compressed file will only take less disk space when stored on that disk it was Compressed on. And I don’t know if that Compression attribute follows along when that file is copied to another (NTFS) disk.
It is possible to select so that compressed files show up in another colour in file explorer, for your convenience. And be aware that compaction ratios aren’t that impressive.
The practical use of Compress is less nowadays as we collect lots of images and sound and these can’t be compacted more, and Compress is a tradeoff between process speed and file size. Imagine compressing a database file? Great – it has to be unravelled and recompressed by Windows each time you make a record change.
Allegedly Compress works / (worked?) good with CAD programs where you have huge parts libraries with thousands of small component files.
In the best of worlds you can compress your Documents directory and %programfiles% to save disks space. But allegedly Compress interferes with windowsupdate.
Compress Files, Folder, Drive in Windows to save Disk Space in Windows 10
To save disk space, the Windows 10/8/7 operating system allows you to compress files and folders. When you compress a file, using the Windows File Compression function, the data is compressed using an algorithm, and re-written so as to occupy lesser space. When you access that file again, the data has to be again decompressed first before you can access it. Thus reading compressed files require more time and consume processing power too.
In Windows 7, the Compress Old Files option was removed from the Disk Cleanup Utility. This was presumably done since; now, large hard disks have become easily and cheaply available. Moreover compressing files did take a lot of time and therefore delayed the disk cleanup process. Windows has had no way of knowing which files it was compressing and compressed all of which had not been accessed for a particular period. This was not good as many times this could hit performance. This option was therefore removed from the disk cleanup utility.
In these days of large and cheap hard disks, many of us may not choose to use this feature – preferring instead other ways of freeing up disk space or using CCleaner, Quick Clean, or using some good free junk cleaners. But should you wish to compress files, this is how you can do it.
How to compress a file or a folder
To compress a file or a folder, right-click on and the file or folder and under the General tab, select Advanced.
Here check the option to Compress contents to save disk space and click Apply/OK. Windows will start compressing the contents. You can then show Encrypted or Compressed file names in color if you wish.
How to compress a Drive
To compress an entire Drive, right-click on the Drive, and under the General tab, check the option to Compress this drive to save disk space. Click Apply/OK.
While this may not apply to us now, it is good to know that you can compress contents only on an NTFS partition. You will not see the Advanced button if you are not on an NTFS drive.
File Compression Behavior
- If you move a file from a DIFFERENT NTFS drive into a compressed folder, it is also compressed.
- If you move a file from the SAME NTFS drive into a compressed folder, the file retains its original state, either compressed or uncompressed.
Do note that files and folders that are compressed using NTFS compression cannot be encrypted. You cannot further compress again a file which has already been compressed once. It’s not going to help much anyway.
Do Not Compress the System Drive
A Golden Rule! Never compress the C drive or System Drive. System drive compression could cause a lot of problems including causing driver installations to fail. And even if you still do decide to compress the system drive – DO NOT compress the root directory, and DO NOT compress the Windows directory. Doing so could even render your Windows computer un-bootable!
It was just the other day that my neighbor’s little daughter came running me to me telling how she had compressed the C drive on her dad’s computer, to save space – and how now the computer was not starting. Well, her daddy came to know right away, and they decided to reinstall Windows…
But should you face this problem, you can check back tomorrow to find out what to do if you find that your Windows computer will not boot because you compressed the system drive.
How to Compress Files and Folders in Windows 10
In this article, we will see how to enable NTFS compression for files and folders in Windows 10. Unlike ZIP file compression, with this compression type, you do not need to create an archive file. Compression will happen on-the-fly and the files can be accessed transparently as they were before compressing. Windows 10 supports NTFS compression natively like previous versions of Windows.
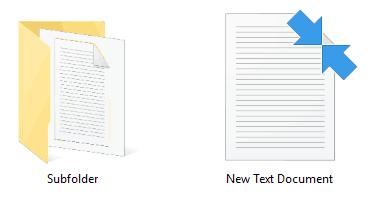
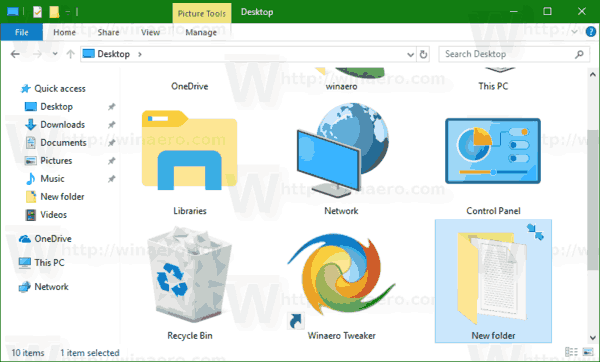
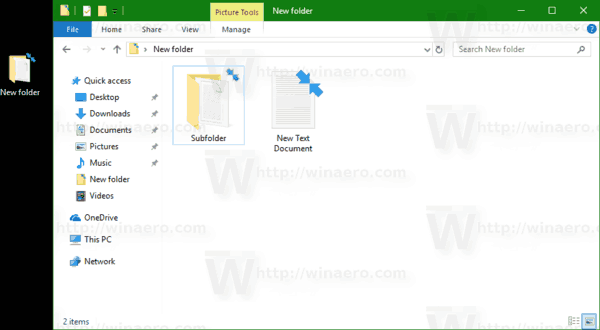
When a file or folder is compressed, Windows 10 displays a special double blue arrows overlay over their icon. See the following example.
Tip: If you are not happy to see this overlay icon, see how to Disable blue arrows icon on folders and files in Windows 10.
If saving disk space is your priority goal, here is how to enable NTFS compression in Windows 10.
To compress files and folders in Windows 10, do the following.
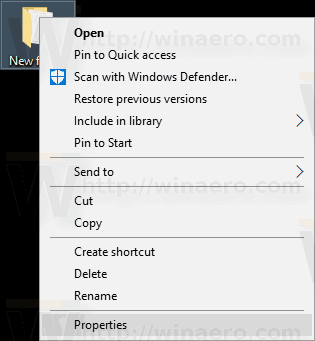
- Right click the file or folder you want to compress and select «Properties».

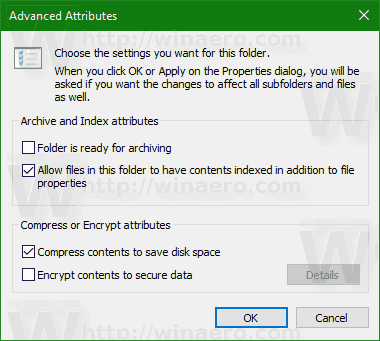
- On the General tab in Properties, click the button Advanced.
- In the next window, tick the check box Compress contents to save disk space under the Compress or Encrypt attributes section.
- Click OK to close the Advanced properties window. If you selected a folder, the following dialog will appear:There, you need to choose «Apply changes to this folder only» or «Apply changes to this folder, subfolders and files». Select the required option.
 There, you need to choose «Apply changes to this folder only» or «Apply changes to this folder, subfolders and files». Select the required option.
To uncompress the file or folder, untick the checkbox Compress contents to save disk space using the sequence described above and you are done.
Windows 10 comes with a console utility «compact» which can be used to compress individual files and folders.
Compress files and folders in Windows 10 with Compact
The compact.exe app supports the following command line switches and options.
/C Compresses the specified files. Directories will be marked
so that files added afterward will be compressed unless /EXE
is specified.
/U Uncompresses the specified files. Directories will be marked
so that files added afterward will not be compressed. If
/EXE is specified, only files compressed as executables will
be uncompressed; if this is omitted, only NTFS compressed
files will be uncompressed.
/S Performs the specified operation on files in the given
directory and all subdirectories. Default «dir» is the
current directory.
/A Displays files with the hidden or system attributes. These
files are omitted by default.
/I Continues performing the specified operation even after errors
have occurred. By default, COMPACT stops when an error is
encountered.
/F Forces the compress operation on all specified files, even
those which are already compressed. Already-compressed files
are skipped by default.
/Q Reports only the most essential information.
/EXE Use compression optimized for executable files which are read
frequently and not modified. Supported algorithms are:
XPRESS4K (fastest) (default)
XPRESS8K
XPRESS16K
LZX (most compact)
/CompactOs Set or query the system’s compression state. Supported options are:
query — Query the system’s Compact state.
always — Compress all OS binaries and set the system state to Compact
which remains unless administrator changes it.
never — Uncompress all OS binaries and set the system state to non
Compact which remains unless administrator changes it.
/WinDir Used with /CompactOs:query, when querying the offline OS. Specifies
the directory where Windows is installed.
filename Specifies a pattern, file, or directory.
Run the app without parameters to see the compression state of the current directory and any files it contains.
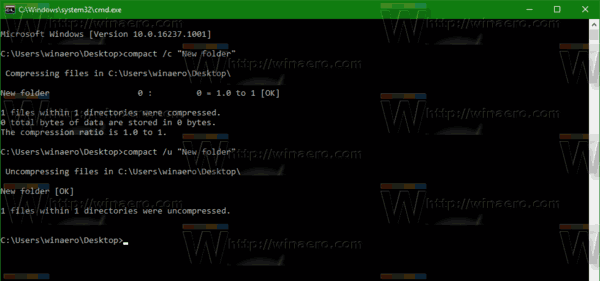
To compress a single file, execute the command:
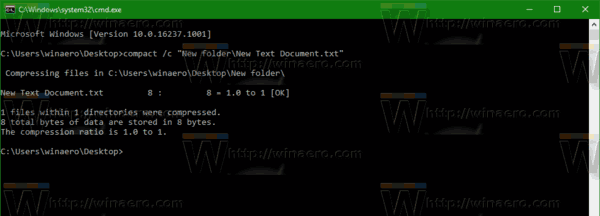 To uncompress a file, run the command
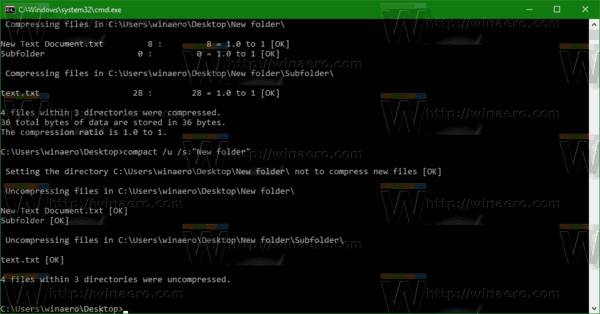
See the following screenshot. 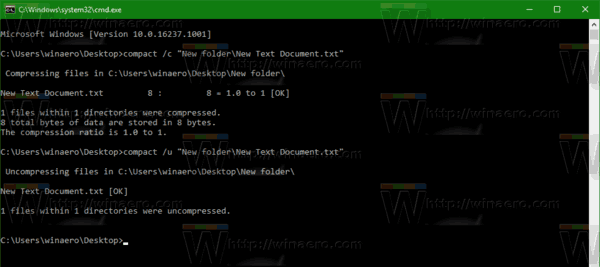
Here is how to compress a folder:
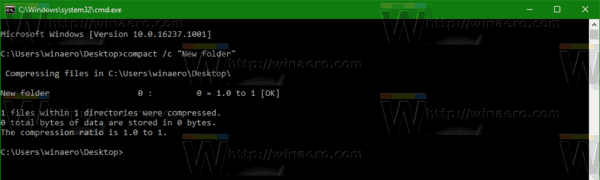 This will compress the specified folder, but not its subfolders.
To compress the whole contents of the folder, use the command:
To uncompress only the specified folder without subfolders, run the command
To do the same for the folder and all its sudfolders, run the command:
Winaero greatly relies on your support. You can help the site keep bringing you interesting and useful content and software by using these options:
Share this post
About Sergey Tkachenko
Sergey Tkachenko is a software developer from Russia who started Winaero back in 2011. On this blog, Sergey is writing about everything connected to Microsoft, Windows and popular software. Follow him on Telegram, Twitter, and YouTube.


