- FIX: Windows Defender closes games in Windows 10
- What can I do if Windows Defender closes your games?
- 1. Switch to a third-party antivirus
- VIPRE Antivirus Plus
- 2. Add an exclusion
- 3. Turn off Windows Defender using group policy and the registry
- 4. Turn off Controlled folder access
- 5. Turn off Real-time protection
- Run a System Scan to discover potential errors
- 6. Make sure that the file you’re trying to run isn’t blocked
- 7. Enable Game Mode
- 8. Install the latest updates
- 9. Perform an in-place upgrade
- How to permanently disable Microsoft Defender Antivirus on Windows 10
- How to disable Microsoft Defender Antivirus using Windows Security
- How to disable Microsoft Defender Antivirus using Group Policy
- Disable Tamper Protection
- Disable Microsoft Defender Antivirus
- How to disable Microsoft Defender Antivirus using a third-party solution
- Check current security provider
- More Windows 10 resources
- Halo: MCC’s live service elements make it better, not worse
- Microsoft’s Surface Duo is not ‘failing up’
- Here’s what you can do if Windows 10 update KB5001330 is causing issues
- These external monitors go perfectly with the Lenovo ThinkPad X1 Carbon
FIX: Windows Defender closes games in Windows 10

- Windows Defender is the default antivirus protection software preinstalled in Windows 10.
- Sometimes, Windows Defender is held responsible for closing games, but we will fix that quickly.
- It’s very important to stay protected so check out our Antivirus Software section.
- Visit our Windows 10 Hub for any news, guides, and tips about this popular OS.
- Download Restoro PC Repair Tool that comes with Patented Technologies (patent available here).
- Click Start Scan to find Windows issues that could be causing PC problems.
- Click Repair All to fix issues affecting your computer’s security and performance
- Restoro has been downloaded by 0 readers this month.
Windows Defender is a basic antivirus software that comes with pre-installed with Windows 10.
Although Windows Defender isn’t the best antivirus software it can do a decent job, but sometimes it can cause problems.
We have reports that Windows Defender is closing games, so let’s see if we can fix this somehow.
Here are some problems reported by users:
- Windows Defender blocking programs, everything, application – The software can sometimes block certain applications from running. Unblock the application or disable the Controlled folder access feature.
- Windows Defender blocking Steam – Many gamers reported that they are unable to run Steam because Windows Defender is blocking it. Add your Steam folder to the exclusions list.
- Windows Defender exclusions not working – Windows Defender might block certain applications even if they are on the exclusions list. Disable Windows Defender entirely or switch to a different antivirus solution.
What can I do if Windows Defender closes your games?
1. Switch to a third-party antivirus

Windows Defender offers solid protection, but sometimes it can cause certain issues with games to appear. On the other hand, third-party antivirus applications often offer better protection and more security features.
We recommend VIPRE Antivirus Plus because it’s light on your system and it doesn’t interfere with any of your games.
Another great advantage of this solution is the RapidScan technology that speeds up future scans by bypassing the files that were found to safe the previous times.
VIPRE Antivirus Plus offers anti-threat and ransomware protection but it also features cloud-enabled security.
If you care a lot about your privacy, you will also like the History cleaner feature. It checks the system for any files that may hold information about your computer and browsing habits and removes them.

VIPRE Antivirus Plus
2. Add an exclusion
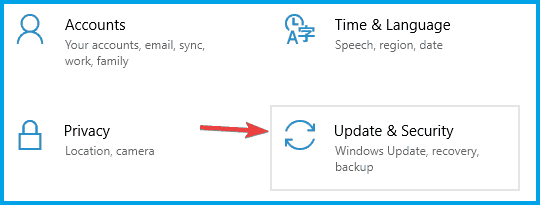
- Go to Settings and open Update & Security.

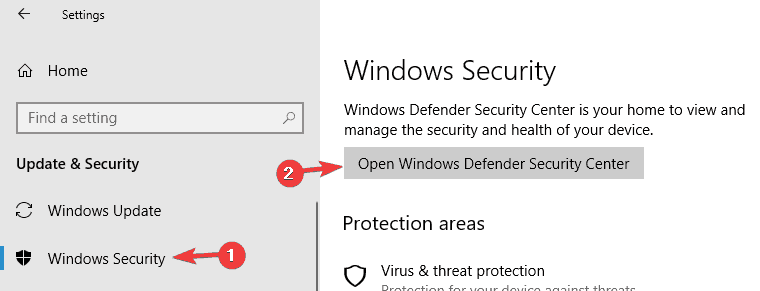
- In the menu on the left select Windows Security. In the right pane click Open Windows Defender Security Center.
- On the right side of the window navigate to Virus & threat protection and click on Add or remove exclusions.
- Choose Add an exclusion.
- Now select the directory of the game that is being closed by Windows Defender.
- Click Exclude this folder and this folder won’t be monitored by Windows Defender anymore.

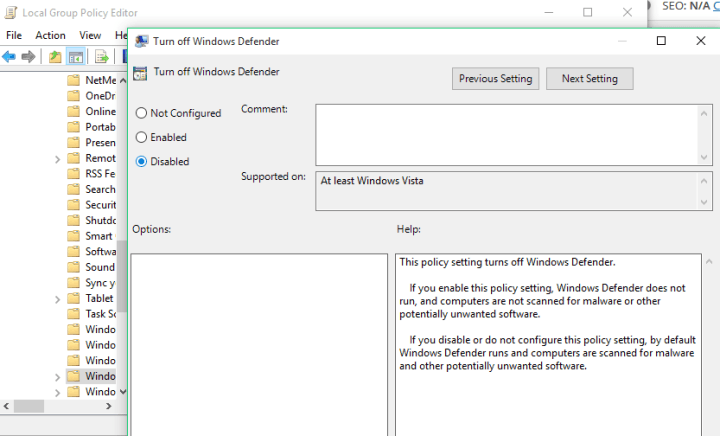
3. Turn off Windows Defender using group policy and the registry
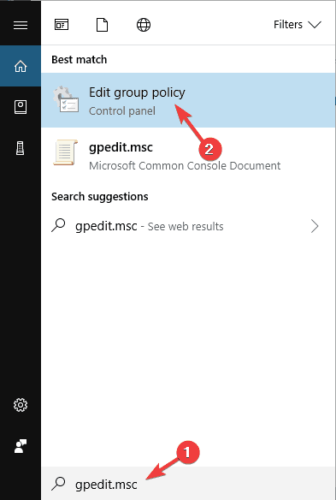
- In the Search bar type gpedit.msc to open Local Group Policy Editor.
- On the left side navigate to: Computer Configuration/Administrative Templates/Windows Components/Windows Defender
- On the right side find Turn off Windows Defender and double-click it.
- Select the Disabled option.
- Click Apply and OK.

4. Turn off Controlled folder access
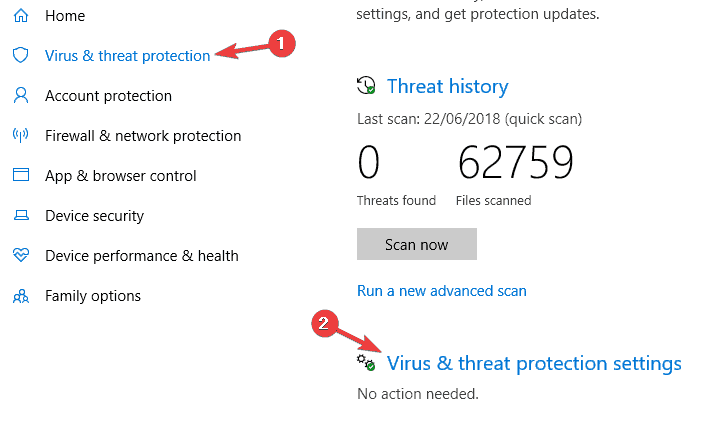
- Open the Settings app and navigate to Windows Defender Security Center.
- Go to Virus & threat protection in the left pane and click on Virus & threat protection settings from the right.
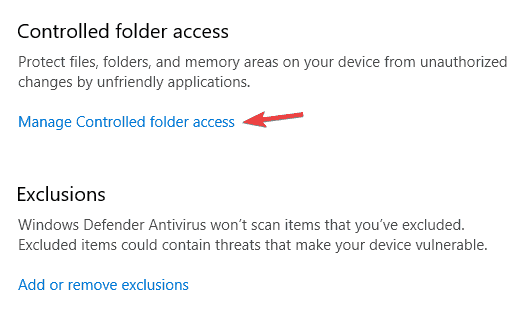
- Scroll all the way down to the Controlled folder access section and click Manage Controlled folder access.
- Disable the Controlled folder access feature.
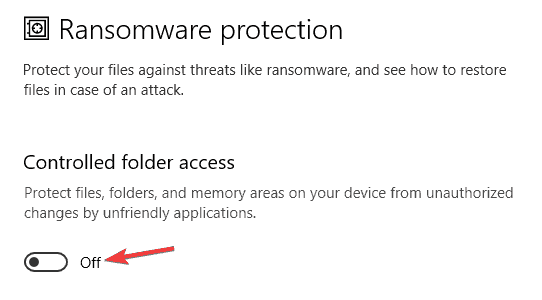
Note: According to users, sometimes certain features can cause Windows Defender to close games. This antivirus has a useful feature called Controlled folder access, and thanks to this feature it protects certain folders from third-party applications.
Unfortunately, this means that this feature can sometimes prevent your games from making changes in certain directories. As a result, the game might not be able to start at all.
After turning this feature off, your games and other applications should be able to modify your directories, and the issue should be permanently resolved.
5. Turn off Real-time protection
- Navigate to Windows Defender Security Center.
- Go to the Virus & threat protection and then choose Virus & threat protection settings.
- Locate the Real-time protection option and disable it.

Note: Windows Defender scans your computer in real-time, and if it notices anything suspicious it will block it from running or give you a notification.
Sometimes, Windows Defender can interfere with certain software, and that can lead to various issues. However, you can circumvent this issue simply by disabling real-time protection.
Run a System Scan to discover potential errors


Once you disable real-time protection, your games should start working again without any issues.
Keep in mind that disabling this option will make your system more vulnerable, so use this workaround only during the gameplay sessions.
Once you’re done with the game, be sure to turn on Real-time protection once again.
6. Make sure that the file you’re trying to run isn’t blocked
- Locate the application you’re trying to run, right-click it, and choose Properties from the menu.
- You should see the Unblock option at the bottom of the Properties window. Check the Unblock option and click Apply and OK to save changes.
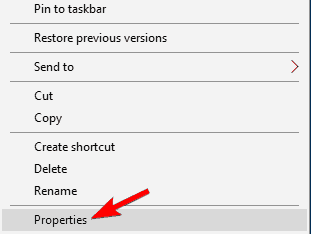
After doing that, the application should be able to run without any problems.
7. Enable Game Mode
- Open the Settings app.
- When Settings app opens, go to the Gaming section.
- In the left pane, select Game Mode and enable the Game Mode feature.
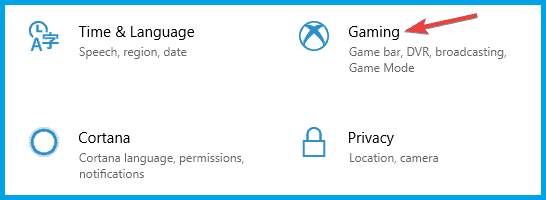
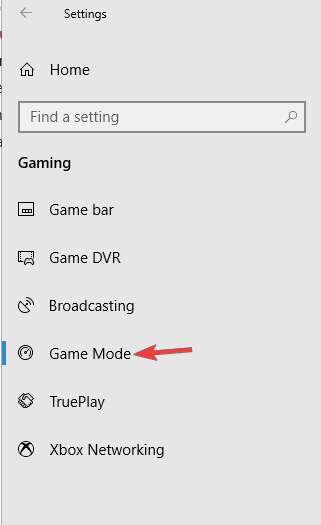
Note: After enabling the Game Mode feature, you should be able to run your games without any interference.
If you found this too complicated, you can also read our complete guide on how to enable the Game Mode in Windows 10.
8. Install the latest updates
- Open the Settings app and navigate to Update & Security section.
- Click the Check for updates button.
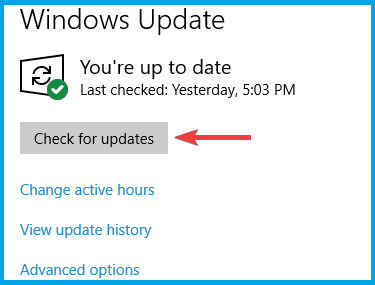
If any updates are available, they will be downloaded automatically in the background. Once the updates are downloaded, you’ll install them automatically as soon as your system restarts.
Once everything is up to date, check if the problem is still there.
Note: According to users, sometimes there might be a bug with Windows Defender that causes issues with games. However, you can fix the problem simply by installing the latest Windows updates.
Microsoft is frequently releasing new system updates, and these updates address various bugs and issues, so if you’re having any problems with Windows Defender, be sure to keep your system up to date.
9. Perform an in-place upgrade
- Download and run Media Creation Tool.
- Select Upgrade this PC and follow the instructions on the screen.
- Select Download and install updates (recommended).
- Follow the instructions until you reach Ready to install screen. Choose Change what to keep.
- Select Keep personal files and apps and click Next.
Follow the instructions to complete the process. Once the in-place upgrade is finished, you’ll have the latest version of Windows 10 installed and the problems with Windows Defender should be resolved.
We have to mention that this method will keep all your files and installed applications, so you can continue where you left off.
At the moment we don’t have any other solutions on how to fix this issue, but we’ll keep you updated with new solutions if we find them.
Meanwhile, we also have an article regarding Windows Defender, so you can learn more about it.
If you have any comments, questions, or suggestions, reach for the comment section below, and maybe we can help you even more.
How to permanently disable Microsoft Defender Antivirus on Windows 10
 Source: Windows Central
Microsoft Defender Antivirus is the Windows 10 built-in anti-malware solution designed to protect your device and data from unwanted viruses, ransomware, rootkits, spyware, and other forms of malware and hackers. Although it’s one of the best antivirus software options for Windows users, there could be scenarios where you may need to disable the protection permanently (or temporarily).
For instance, if you are not confident about a security solution provided by a giant corporation. You have to make system changes that may conflict with the antivirus. You’re setting up a kiosk computer that won’t connect to the network, and security is not an issue. Or you are a network administrator, and you have to comply with the organization’s policies on specific devices.
Regardless of the reason, since Windows 10 does not include an option to uninstall or disable the Microsoft Defender Antivirus, it’s still possible to disable it permanently using Group Policy or installing a third-party solution, or temporarily using the Windows Security app.
In this Windows 10 guide, we’ll walk you through the different methods you can use to disable Microsoft Defender Antivirus permanently (or temporarily) on your device.
How to disable Microsoft Defender Antivirus using Windows Security
If you only need to complete a specific task (such as installing an app), it’s unnecessary to permanently disable Microsoft Defender Antivirus. You can just turn it off temporarily.
To turn off the Windows 10 antivirus protection temporarily, use these steps:
- Open Start.
- Search for Windows Security and click the top result to open the app.
- Click on Virus & threat protection.
Under the «Virus & threat protection settings» section, click the Manage settings option.
 Source: Windows Central
Turn off the Real-time protection toggle switch to disable Microsoft Defender temporarily.
 Source: Windows Central
Once you complete the steps, the Microsoft Defender Antivirus will temporarily disable the real-time protection, allowing you to install apps or make specific system changes without the anti-malware solution flagging the action.
The next time you restart the device, the antivirus will re-enable again automatically. Or you can use the same instructions outlined above, but on step No. 5, make sure to turn on the Real-time protection toggle switch.
This is not a permanent solution, but it’s the best way to disable the Windows 10 virus protection to make system changes or install an application that will usually be blocked by the solution.
How to disable Microsoft Defender Antivirus using Group Policy
If you are running Windows 10 Pro, it’s possible to enable a Group Policy Object to disable the Microsoft Defender Antivirus permanently. The only caveat is that you also have to disable the «Tamper Protection» feature before the policy can apply.
On Windows 10, Tamper protection is a feature designed to protect the Windows Security app against unauthorized changes from outside the experience. Since the Local Group Policy Editor modifies the security settings from outside the app, the antivirus will restore the protection the next time you restart the device.
Disable Tamper Protection
To disable Tamper Protection on Windows 10, use these steps:
- Open Start.
- Search for Windows Security and click the top result to open the app.
- Click on Virus & threat protection.
Under the «Virus & threat protection settings» section, click the Manage settings option.
Source: Windows Central
Turn off the Tamper Protection toggle switch.
Source: Windows Central
After you complete the steps, continue with the below instructions to permanently disable Microsoft Defender Antivirus using Group Policy.
Disable Microsoft Defender Antivirus
To disable Microsoft Defender Antivirus permanently on Windows 10, use these steps:
- Open Start.
- Search for gpedit.msc and click the top result to open the Local Group Policy Editor.
Browse the following path:
Computer Configuration > Administrative Templates > Windows Components > Microsoft Defender Antivirus
Double-click the Turn off Microsoft Defender Antivirus policy.
Source: Windows Central
Select the Enabled option to disable Microsoft Defender Antivirus.
![]() Source: Windows Central
Source: Windows Central
Once you complete the steps, the antivirus will disable permanently on the device, but the «shield» icon will remain in the taskbar. However, this is an expected behavior since the icon is part of the Windows Security app, not from the Microsoft Defender Antivirus.
You can always revert the changes to enable the protection again using the same instructions, but on step No. 5, make sure to select the Not Configured option. In addition to enabling the antivirus, it’s also a good idea to turn on the «Tamper Protection» feature again using the same steps outlined above, but on step No. 5, make sure to enable the toggle switch.
How to disable Microsoft Defender Antivirus using a third-party solution
Alternatively, if you want to install a third-party anti-malware, it’s unnecessary to use workarounds to disable the Microsoft Defender Antivirus, since when you install another antivirus, the built-in protection will disable permanently automatically.
To disable the Microsoft Defender Antivirus using a third-party protection, use these steps:
Open the antivirus website.
Quick note: For this guide, we’ll be installing Bitdefender, but the instructions will be similar for other solutions. However, it’s always recommended to check the software documentation for more specific details.
Click the Download button to save the installers on your device.
Source: Windows Central
Click the Install button.
 Source: Windows Central
After you complete the steps, the Windows 10 built-in antivirus will disable, and you can start using the new solution.
Check current security provider
You can always check the Defender antivirus has been disabled permanently with these steps:
- Open Start.
- Search for Windows Security and click the top result to open the app.
- Click on Settings at the bottom of the page.
Under the «Security providers» section, click the Manage providers option.
Source: Windows Central
Under the «Antivirus» section, you can confirm that Microsoft Defender Antivirus is turned off.
Source: Windows Central
Alongside these methods, in the past, you were also able to modify the HKEY_LOCAL_MACHINE\SOFTWARE\Policies\Microsoft\Windows Defender\DisableAntiSpyware registry key to disable the Windows 10 built-in protection permanently. However, Microsoft has removed the option, making it harder to get rid of the antivirus.
According to the Microsoft Hardware Dev Center documentation website (via Reddit), the «DisableAntiSpyware» option was only implemented to allow manufacturers and network administrators to deploy other security solutions during setup. Since the Microsoft Defender Antivirus can now disable itself automatically when adding a third-party solution, starting with the engine version 4.18.2007.8, Windows 10 no longer includes the registry key to disable the anti-malware feature on Windows 10 Pro and Home.
If you want to disable the Microsoft Defender Antivirus feature, you now have three choices. You can temporarily disable real-time protection. You can permanently disable the protection using the Group Policy Editor on Windows 10 Pro or Enterprise, or you can install a third-party solution.
Although you can use multiple methods to disable the Windows 10 antivirus, we don’t recommend using a device without anti-malware software. However, there might be situations when disabling the security feature could make sense.
If you want an alternative solution to the Microsoft Defender Antivirus, you should consider these options:
More Windows 10 resources
For more helpful articles, coverage, and answers to common questions about Windows 10, visit the following resources:
We may earn a commission for purchases using our links. Learn more.
![]()
Halo: MCC’s live service elements make it better, not worse
Halo: The Master Chief Collection is more popular than ever, but some fans don’t agree with the live service approach 343 Industries has taken with it. Here’s why those elements are, at the end of the day, great for the game and for Halo overall.
![]()
Microsoft’s Surface Duo is not ‘failing up’
Microsoft announced this week that it was expanding Surface Duo availability to nine new commercial markets. While Surface Duo is undoubtedly a work in progress, this is not a sign of a disaster. It’s also doesn’t mean that Surface Duo is selling a ton either. Instead, the reason for the expansion is a lot more straightforward.
![]()
Here’s what you can do if Windows 10 update KB5001330 is causing issues
In this guide, we’ll show you the steps to get rid of the update KB5001330 to fix profile, gaming, and BSoD problems with the Windows 10 October 2020 Update and May 2020 Update.
![]()
These external monitors go perfectly with the Lenovo ThinkPad X1 Carbon
The Lenovo ThinkPad X1 Carbon is an excellent laptop, but what if you want to project the display onto a larger screen? You’ll need an external monitor for that. Here are our favorite options.


