- POST troubleshooting steps
- Remove new hardware
- Remove any disks or USB devices
- Disconnect external devices
- Reconnect and check power cords
- Identify beep code
- Check all fans
- Check all cables
- Disconnect all expansion cards
- Disconnect all drives
- Remove the RAM
- Power cycle the computer
- Disconnect and reconnect the CPU
- Loose BIOS chip
- Bad motherboard, CPU, RAM, or power supply
- Network Computers are not Showing Up in Windows 10
- Windows 10 Can’t See Other Network Computers in Workgroup
- How to Enable Network Discovery on Windows 10?
- The SMB 1.0 Protocol and Master Browser Problems on Windows 10
- Windows 10 Can’t Connect Network Shared Folders
- Related Reading
- How to Run Windows File Explorer Elevated (as.
- Using Malicious Software Removal Tool (MRT.exe) on Windows
- How to Clean Up Large System Volume Information.
- How to Disable NetBIOS and LLMNR Protocols in.
- Enable Windows Lock Screen after Inactivity via GPO
- 65 comments
POST troubleshooting steps

The POST (power on self-test) is a set of procedures that a computer runs through each time it is turned on. It ensures that all of the system’s hardware is working properly before trying to load the operating system. If the computer does not pass POST, it will not boot.
If you’re experiencing POST errors when you boot your computer, the following steps may help you fix the problem.
Make sure the computer turns on. If nothing happens (no lights, no sound, no fans, etc.), see: Why won’t my computer turn on?
Some of the steps below recommend removing physical parts from inside the computer. While working inside the computer, it’s highly recommended you be aware of ESD (electrostatic discharge) and its potential hazards.
Remove new hardware
If any new hardware was recently added to the computer, remove that hardware to make sure it is not causing your issue. If your computer works after removing the new hardware, it can mean a few things. Either the new hardware is not compatible with your computer, a system setting needs to be changed, or the new hardware is defective.
Remove any disks or USB devices

Remove any disks, CDs, or DVDs that are in the computer. If any USB devices (iPods, drives, phones, etc.) are connected, disconnect all of them as well. Reboot the computer and see if anything changes.
Disconnect external devices
Remove everything from the back of the computer, except the power cable. Turn on the computer and see if it beeps normally. If the computer has never beeped, keep the monitor or display connected to see if any change occurs.
Reconnect and check power cords
If the computer is not getting enough power or the power is getting interrupted, the computer can encounter problems. Disconnect your power cables from any power strip or UPS (uninterruptible power supply) and connect the computer directly to a known good wall outlet.
Identify beep code
If you are receiving a sequence of beeps, see the beep code page for a listing of different beep codes and their explanation. You can also check your motherboard or computer documentation for information on the beep codes. These beep codes are meant to help identify which computer component is failing or bad. If your beep code is not listed, continue troubleshooting.
Check all fans
Make sure all fans are running on the computer. If a fan has failed (especially the heat sink fan for the CPU), your computer could be overheating or detecting the fan failure, causing the computer not to boot.
Check all cables
Verify all the cables are securely connected to the computer and that there are no loose cables by firmly pressing in each cable.
- All disk drives should have a data cable and power cable connected to them.
- Your power supply should have at least one cable going to the motherboard. Many motherboards may also have additional cables connected to them to supply power to the fans.
Disconnect all expansion cards
If the above recommendations still have not resolved the irregular POST, disconnect the riser board (if applicable) and each of the expansion cards. If this fixes the problem or allows the computer to POST, connect one card at a time until you determine which card is causing the problem.
Disconnect all drives
If you cannot diagnose the problem by the beep code (or you do not hear a beep code), power off the computer. Then, disconnect any IDE, SATA, SCSI, or other data cables from the motherboard. When they are disconnected, try booting the computer again.
If this resolves your irregular POST or generates error messages, reconnect each device until you determine which device or cable is causing the issue. In some situations, it can also be a loose cable connection that causes the issue.
Remove the RAM
If you continue to experience the same problem with all the above hardware removed, remove the RAM from the motherboard and turn on the computer. If the computer has a different beep code or was not beeping but is now, turn off your computer and try the suggestions below. Make sure to turn off the computer before adding and removing the memory and then turning it back on to see if the suggestion resolves the issue.
- Re-insert the memory into the same slot.
- If you have more than one stick of memory, remove all but one stick of memory and try rotating through each stick.
- Try one stick of memory in each slot.
If you can get the computer to boot with one or more of the sticks of memory installed, you are likely dealing with some bad memory. Try to identify which stick of memory is bad and replace it.
If you can get the memory to work in one slot but not another slot, the motherboard is likely defective. You can either workaround the issue by running the memory in a different slot that does work or replace the motherboard.
Power cycle the computer
In some situations, a computer may have power related issues often caused by either the power supply or the motherboard. To help determine if this is the issue, try turning the computer on, off, and back on as fast as possible, making sure the computer power light goes on and off. In some situations, you may get the computer to boot.
Try this method only as a temporary workaround or as a last resort to get any valuable information from the computer.
Disconnect and reconnect the CPU
For users who’re more comfortable working inside their computer, reseat the CPU by removing it and re-inserting it into the socket. You should also apply a fresh layer of thermal compound between the CPU and the heat sink.
Loose BIOS chip
If your motherboard has a BIOS chip, it can become loose over time due to heat expansion and cause the computer to give an irregular POST. Gently press down on the BIOS chip to make sure it has not become loose.
Bad motherboard, CPU, RAM, or power supply
If, after trying all of the above recommendations you still have an issue, you likely have a bad motherboard, power supply, CPU, or RAM stick. The next step would be either to replace these components or have the computer serviced. If you plan on doing the repairs yourself, we suggest you replace or swap in parts from another computer that is known to work. Replace the motherboard first, then the RAM, the CPU, and finally, the power supply.
Network Computers are not Showing Up in Windows 10
I received several emails from readers asking me to help solving the problem of displaying computers in a network environment on the latest Windows 10 builds. Indeed, there are device network discovery problems in the latest releases of Windows 10: you can’t see other computers on network, or your Windows 10 is not showing up in Workgroup. Let’s see how to fix Network Discovery on the latest Windows 10 builds (up to 1909).
Windows 10 Can’t See Other Network Computers in Workgroup
The problem of not displaying network computers in Windows 10 Workgroup environment began to appear since the Windows 10 1703 (Creators Update). After upgrading to this (or newer) Windows 10 build, your computer may stop seeing neighboring computers when viewing devices in Network item of File Explorer.
You can see the list of computers in the network environment in the File Explorer or with the command:
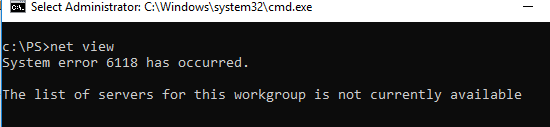
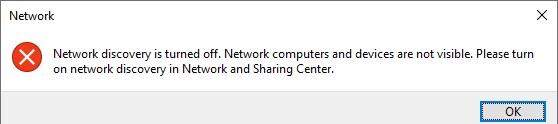
And when you click on the Network icon in Windows 10 File Explorer, this error is displayed:
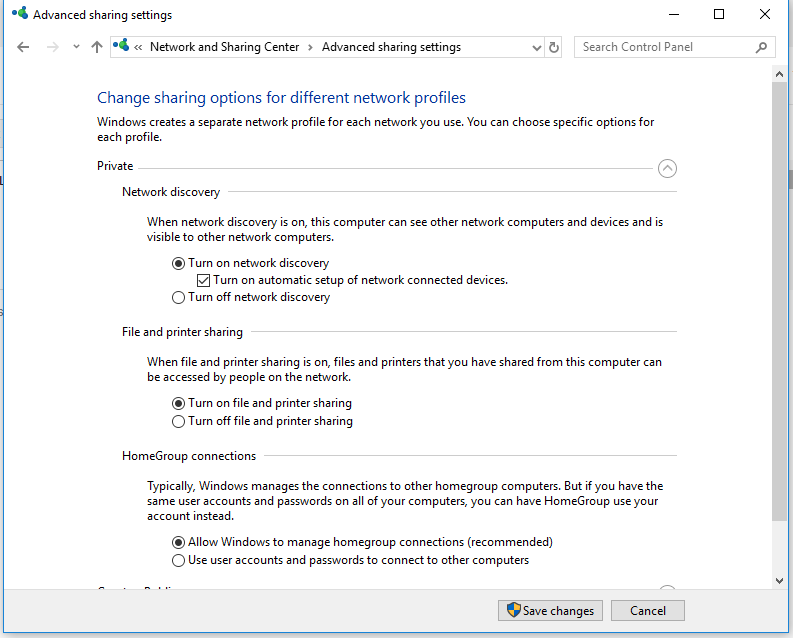
Advanced sharing settings. Make sure that in the Private network profile section the following options checked:
- Turn on network discovery + Turn on automatic setup of network connected devices;
- Turn on file and printer sharing;
- Allow Windows to manage homegroup connections (recommended).
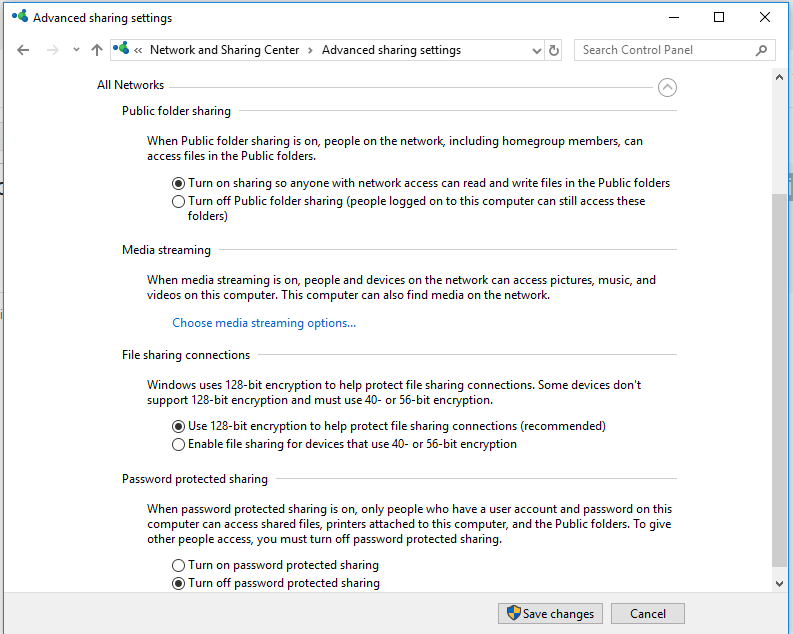
Then enable the following options in the All networks section:
- Turn on sharing so anyone with network access can read and write files in the Public folders;
- Turn off password Protected Sharing (if you trust all the devices in your network);
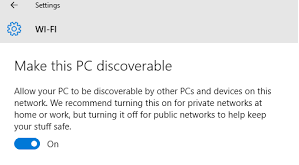
Then go to Settings -> Network and Internet -> Ethernet (or select Wi-Fi, if you are connected to a local network through a wireless connection). Click the network icon and verify that the Make this PC discoverable option is enabled.
Flush the DNS cache on the computer:
To enable the Network Discovery traffic on Windows 10 Defender Firewall, you must run the following command in the elevated command prompt:
netsh advfirewall firewall set rule group=»Network Discovery» new enable=Yes
Get-NetFirewallRule -DisplayGroup «Network Discovery» -Enabled True -Action Allow -Direction Inbound
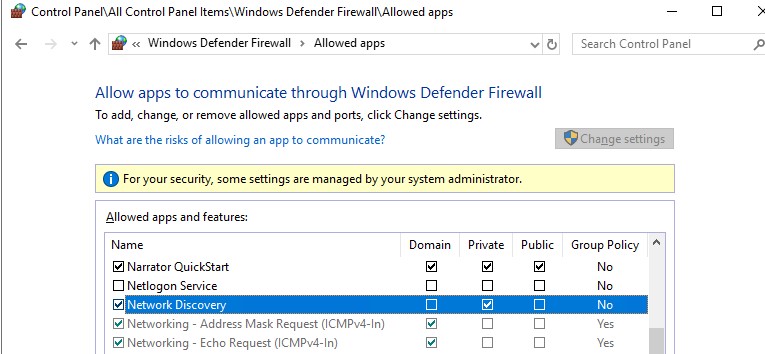
Also, you can manually enable the Network Discovery protocol for at least the Private network in the Windows Defender Firewall settings (Control Panel\All Control Panel Items\Windows Defender Firewall\Allowed apps).
In some cases, Windows computer may not be displayed in the network environment due to incorrect workgroup settings. Try to re-add this computer to the workgroup. Go to the Control Panel -> System and Security -> System -> Change Settings -> Network ID.
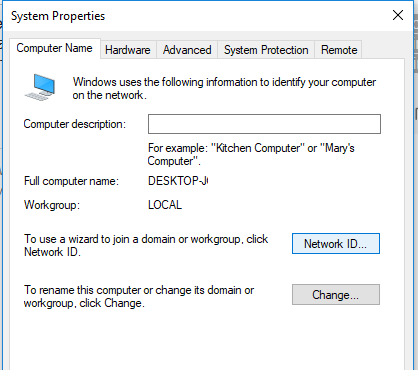
In the Join Domain or Workgroup Wizard that opens, select: This computer is part of a business network -> My company uses a network without a domain -> enter your workgroup name. After that, you need to restart the computer.
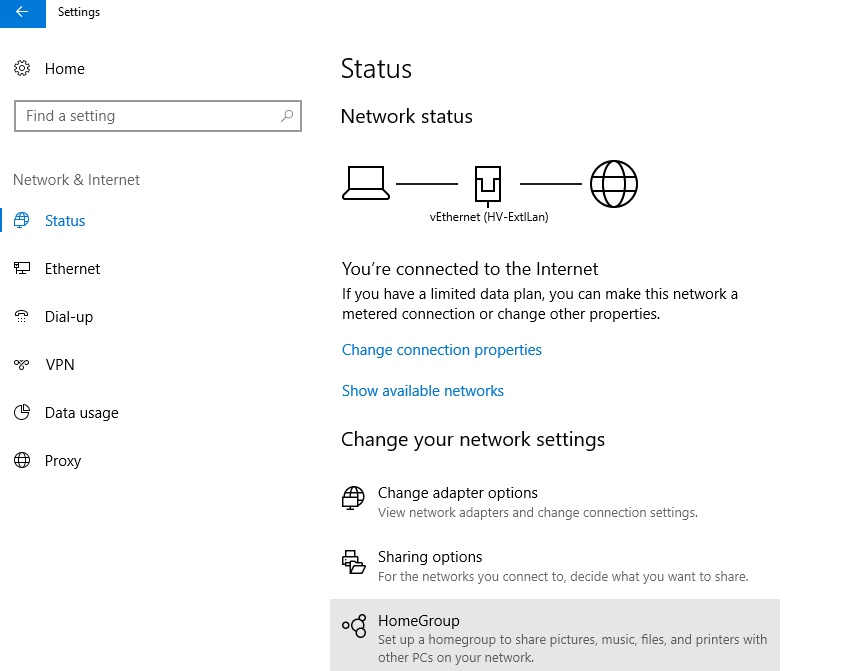
If after rebooting the computer appeared in a network environment, but you can’t access it, check the network profile type (location) on your computer. Most likely your local network was recognized as Public. You need to change the network location to Private. To do this, open the Settings -> Network and Internet -> Status -> Homegroup.
Click Change network location, then select “Yes” in the dialog box “Do you want to allow your PC to be discoverable by other PCs and devices on this network? We recommend allowing this on your home and work network, but not public ones”.
Open the Network and verify that you are now seeing the neighboring Windows computers.
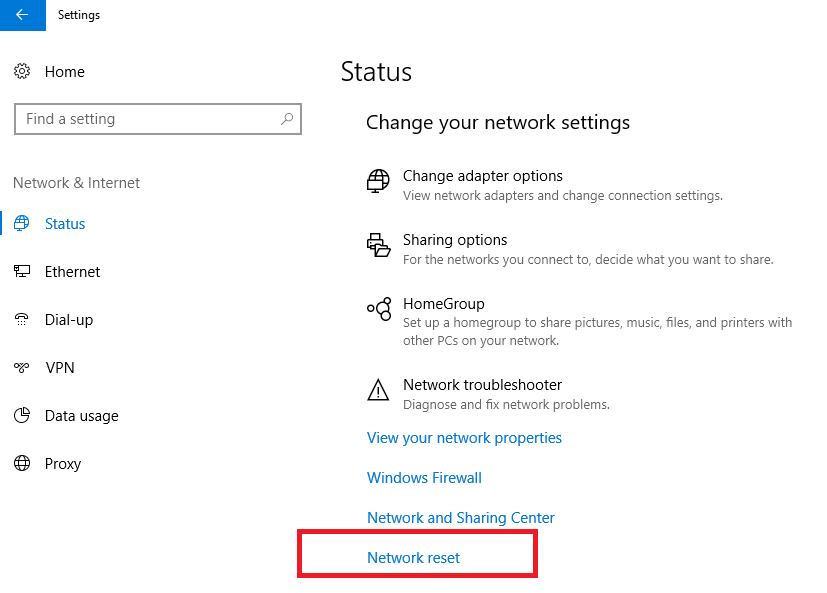
If these tips did not help, and the computers in the workgroup are still not displayed, try to reset the network settings (Settings -> Network and Internet -> Status -> Network Reset).
You can also reset the network settings and firewall rules with the commands:
netsh int ip reset reset.txt
netsh winsock reset
netsh advfirewall reset
Then you need to reboot the computer.
Then restart your computer. Windows should automatically detect your network adapter and install the appropriate drivers. In this case, all old protocol settings for the network card will be reset.
Also, check whether the following services are running (they should be in the automatic startup state to correctly display your network environment). Run the services.mcs console and check the services state:
- FdPHost – Function Discovery Provider Host (responsible for other computers discovering on the network);
- FDResPub – Function Discovery Resource Publication (allows other computers to detect your device on the network);
- Dnscache – DNS Client;
- SSDPSrv – SSDP Discovery;
- Upnphost – PnP Device Host.
In some cases, third-party anti-viruses and firewalls can block NetBIOS name resolution requests, WDS and broadcast DNS queries (there was definitely a problem with ESET NOD32). Try to temporarily disable your antivirus/firewall and check if the network discovery works properly on your Windows 10 device.
How to Enable Network Discovery on Windows 10?
Starting with Windows 10 1803 (Spring Creators Update), Microsoft developers removed the ability to create a HomeGroup. In addition, Windows 10 computers no longer displayed in the network environment of the File Explorer when viewing network devices.
From Microsoft’s point of view, a HomeGroup is a legacy way to create a local area network to share folders and printers. Instead of using a HomeGroup, Microsoft suggests using its cloud services (OneDrive or access through Microsoft Accounts).
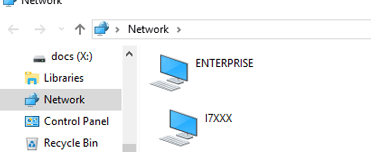
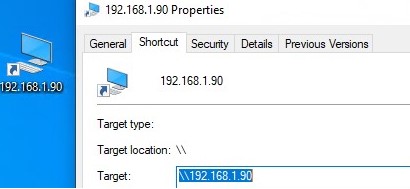
In Windows 10 1803 (and newer), in order to access the shared resources on another computer over the local network, you need to know its hostname ( \\pcname1 ) or IP address ( \\192.168.1.90 ), but neighboring computers in a network are not showed. However, this can be fixed.
The fact is that a separate Function Discovery Provider Host service is responsible for discovering neighboring computers on a Windows 10 network. Another service, Function Discovery Resource Publication, is responsible for discovering of your computer.
These protocols replace the NetBIOS over TCP/IP, which has historically been used to discover devices on Microsoft Windows networks with Master Browser. Accordingly, you can safely disable the NetBIOS protocol for your network adapters.
After installing the latest Windows 10 builds, these services can be disabled (the startup type is changed from Automatic to Disabled). If these services are stopped, the computer is not discovered on the network by other computers and cannot see others. You can enable the network discovery services in Windows 10 as follows.
- Open the Windows Services Management Console (services.msc);
- In the list of services, find the Function Discovery Resource Publication service;
- Change the service startup type from Manual to Automatic (Delayed Start);

- In the same way, enable the Function Discovery Provider Host service;
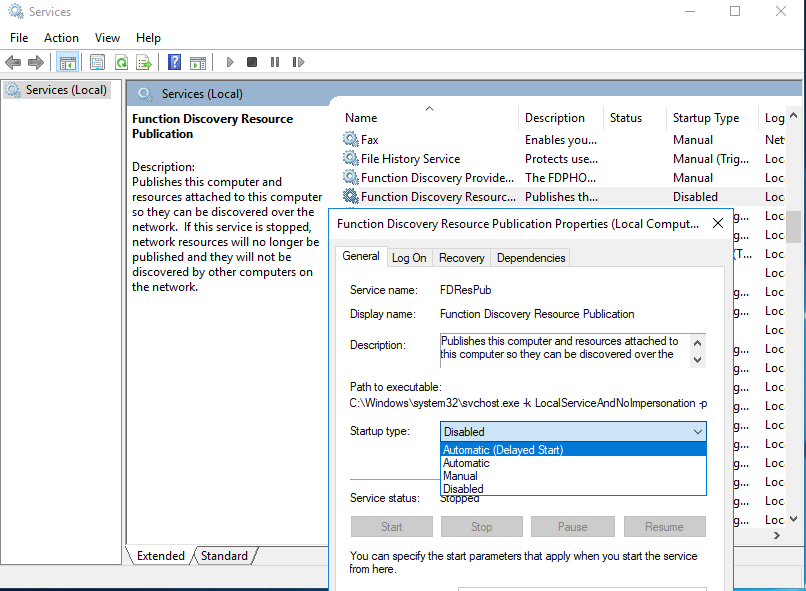
After rebooting, other computers on the local network will be able to discover this computer and its resources (shared network printers and folders).
The SMB 1.0 Protocol and Master Browser Problems on Windows 10
It happens that problems with displaying computers in a network environment are related to the Computer Browser service. This service is responsible for generating and maintaining a list of active computers on the local network. In the local network there can be only one computer with the role of the Master Browser.
You can identify current Master Browser in your network by running the following command for each computer in your network:
nbtstat -a ComputerName
The computer that is the Master Browser is the only one that has the value __MSBROWSE__.
In Windows 10 1703, the Computer Browser service works incorrectly. It is recommended to completely disable this service on Windows 10 and use the computer with Windows 7 (or Windows 8.1/Windows Server 2012 R2 according to the Windows 7 EoS) as the Master Browser on your network. You can set the Master Browser computer via the registry.
In addition, in Windows 10 1709 and newer (1803, 1809, 1903, 1909), the Computer Browser service and the SMB v1.0 protocol are disabled by default. The Computer Browser service is responsible for compiling the list of computers on the network and displaying them (this discovery protocol is widely used before switching to the SSDP and WS-Discovery protocols).
If you have only computers with Win 10 1709 and newer in your local network (see the table of SMB versions), and you still want to use the Computer Browser, you must enable the SMB v1.0 protocol (it is unsafe!) on at least one computer. This computer will be used as the Master Browser on your network.
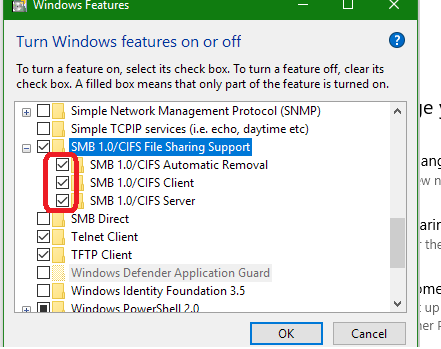
You can enable the SMB 1.0 support by enabling the following Windows features from the Control Panel:
- SMB 1.0 /CIFS Client;
- SMB 1.0 /CIFS Server.
Or you can enable the SMB 1 client and server features from OptionalFeatures.exe or with the DISM commands:
Dism /online /Enable-Feature /FeatureName:»SMB1Protocol-Client»
Dism /online /Enable-Feature /FeatureName:»SMB1Protocol-Server»
If you enabled the SMB1 protocol, then in order to assign the current computer as the Master Browser on the network, run the following commands:
reg add «HKEY_LOCAL_MACHINE\SYSTEM\CurrentControlSet\Services\Browser\Parameters» /v IsDomainMaster /t REG_SZ /d True /f
reg add «HKEY_LOCAL_MACHINE\SYSTEM\CurrentControlSet\Services\Browser\Parameters» /v MaintainServerList /t REG_SZ /d Yes /f
This computer will be the Master Browser in your network.
Windows 10 Can’t Connect Network Shared Folders
In some cases, Windows 10 can see and explore a neighboring device in a workgroup environment, but cannot display a list of shared network folders on it. This is most often accompanied by the error “0x80070035 – Network path not found”. The solution to this problem is described in this article.
If the neighboring computer (device) is visible on the network, but when you try to open any network folder from the network environment or using the UNC path (\\Hostname_or_IP), an error appears “You can’t access this shared folder because your organization’s security policies block unauthenticated guest access”. In this case, you need to enable the AllowInsecureGuestAuth registry parameter using the command (for details, see the article Can’t Access Shared Folder from Windows 10):
reg add HKLM\SYSTEM\CurrentControlSet\Services\LanmanWorkstation\Parameters /v AllowInsecureGuestAuth /t reg_dword /d 00000001 /f
How to Install and Use the PowerShell Active Directory Module?
Extend Volume Blocked by a Recovery Partition on Windows 10
Related Reading
How to Run Windows File Explorer Elevated (as.
Using Malicious Software Removal Tool (MRT.exe) on Windows
How to Clean Up Large System Volume Information.
How to Disable NetBIOS and LLMNR Protocols in.
Enable Windows Lock Screen after Inactivity via GPO
65 comments
The only workaround to fix Master Browser elections that I have found in Windows 10 1709 / 1803:
1. Prevent all Win10 1709 from becoming Master Browser using registry
2. Select another Windows device that can become the single Master Browser on your LAN
This experience of MS killing the Workgroups browser just reinforces the idea that Windows is just another name for the world’s largest virus. As a small business with 6 workstations, workgroups has been working fine, until this nonsense from Microsoft.
If some malware from North Korea had done the same thing, all hell would have broken loose. But let it be Microsoft and Windows 10 is “not much to see here, move along”.
When it comes to Windows networking issues, I couldn’t agree more. And it seems this behemoth called Microsoft just seems to get away with largely ignoring this broken mess forever.
I provide IT services for very small business and all too often find myself forced to use free third party IP and network shares scanner software utilities to help me find the computers that the lame Windows Network fails to show, even when all network and sharing related settings are set exactly as they should be. Without these helpful free tools, IT work would be a hell for me. Shame on you Microsoft. Fix this networking problem that you created or at least provide the tools for people like me to quickly fix it instead of manually having to take the time to check and correct all the related network services and various settings on each and every computer.
So true. Pls share some tools you use for the network shares.
Can you recommend any of the network discovery tools. I am experiencing the same difficulties in multiple customers networks when adding new W10 pcs.
Thank you
Helpful and comprehensive. Thank you very much.
Hello!
I am trying many possibilities to comeback works fine in home groups. Think about this problem, I would like that I choose to domain mode (I know, my NAS samba config and more) solve the problem to show and connect share folders or not?
You can access neighboring computers without the Home Group (How to share files and printers without HomeGroup on Windows 10). Access to other PCs is based on the names or IP addresses you need to know (ask, write down, etc.). You can also create shortcuts for specific PCs. In the network settings, select a private network and make sure that “Network Discovery” is enabled.
Another option is a separate server / NAS and network printers. Today even the cheapest printers come with Wi-Fi, so it’s not a problem.
To provide remote access to printers and shared folders, you need to choose at one of three options:
- 1. Allow anonymous access (Not recommended for the same reasons as SMB1).
- 2. Create the identical users on all PCs with the same passwords (The problem with changing passwords on all PCs).
- 3. Use a domain (local or remote).
Hello Admin!
Thank you so much your attention. I will try follow all steps to see if I can solve this. One sector have 4 win10. The users need use share print (samsung 6555nx) and share folder to scan documents. No 4 pcs win10 see network, printer and share folder. I hope that solve it.
Hello!
I did follow ALL steps this webpage and the oher links inside. Not work! I have no accesses by network, by //name or by //IP. I did disable smbv2, up smbv1. All pcs on the same workgroup and not works. I add Linux samba (version 4.3) sharefolder. Same workgroup, right access and windows with smbv1 to access samba Linux and not work. I will stay crazy!
Thanks
Hi Douglas,
Check the availability of other PCs from Windows 10 computers.
Open the PowerShell console as administrator and execute the commands:
ping here_remote_ip_address
tnc here_remote_ip_address -port 445
Are they successful?
Check back access.
I fixed my issues of not connecting to my other pcs after the 1803 update is just to type in the IP address of the computer you want to connect to and it should show up. Fixed.
Thank you so much! I have spent hours today trying to solve this, and your complete explanation did it for me. The Network Reset turned out to be key for me.
None of this worked (Network Rest did not) until I went into Services and set Function Discovery Resource Publication to start (yes, I know it says not to have it running). After that, everything behaved as it should.
Applying the FDRP steps brought my p2p networked computer devices back in view using Win File Explorer under “network”. I’m working 2 homebuilt PCs and my wife works with a Win surface tablet all running with Win OS 10 pro. We will also continue using Quick Access with the \\pcname\ pinned and ready to click. Thanx a bunch for the clear and concise steps. Pete in TX
Just to say thanks. Setting the Function Discovery Resource Publication to Automatic (delayed), worked perfectly for me. All PC’s now visible on the local network!
A thousand thanks, I was stuck with two PCs not connecting, and checking the list I was able to finally solve the problem, one of the PC (the older) hasn’t one of the services enabled. Thanks!
I have troubershoting all problem. Howover im not happy because not sloving . Laptop run win10 1803 ping other pc run win7 is ok but can not access. Why? Please help me
Good grief! After a year of screwing around with this awful MS Network and endless googling, I finally stumbled on this site. As others have said, when MS went 1709 to 1803, Workgroups – which worked flawlessly (the only MS app I’ve ever seen that has) was gone. Nothing I did, or googled, worked. Until today.
Function Discovery Resource set to Automatic (With Delay) did the trick. It did not happen on reboot, rather it took a few minutes until the rest of the workstations suddenly saw the missing system.
THANKS FOR POSTING THIS WHOEVER YOU ARE!!
I had to run Services as an Administrator (right click) for this to help for me. The PC now shows up under Network in File Explorer on other PCs.
You saved me
Thank you very much. : )
The smb10 thing worked for me on 1903 thanks for the tip
What worked for me was a bit cumbersome, but 100% effective. (I did not try the Pete Jacobs July 5th fix, nor anything after that date, but here’s what worked for me:
– Named on the folder on 2nd hard drive that I wanted to access from other PC’s on my LAN to ONE WORD (no spaces/dashes, etc.), i.e. MRBackups (for Macrium Reflect Backups)
– Used Advanced Sharing of that folder and Set its Permissions to “Everyone”.
– Then changed that Folder Ownership (Owner) to “Everyone” and allowed “Full Control” access.
– Then select “Enabled inheritance” and selected “Replace all child object permission entries with inheritable permission entries from this object”.
– Then made sure Control Panel\Network and Internet\Network and Sharing Center\Advanced sharing settings
o (for Private (current profile) were set to “Turn on network discovery” and “Turn on file and print sharing”
o And for “All Networks”, “Public Folder Sharing”, “Turn off password protected sharing”
and it worked perfectly.
After tried out all the above suggested, none of it work.
Found a solution That Works!!
UNCHECK – “Turn No Automatic Setup Network Connected Devices” in advanced sharing setting.
Nothing worked for me either. Then I found simply turning off “FAST STARTUP” in the power section under addition power settings did the trick.
HI I DO “SMB 1.0 and problems with Master Browser in Windows 10” PART AND NOW IT WORK, THANKS
Windows10 Pro has this missing network PCs problem despite correct settings in network discovery, etc. Windows10 Home doesn’t have this problem.
Try the following steps to resolve this missing network PCs problem.
1. Click on magnifying glass icon at bottom left of screen to open search dialog box, and type TURN WIN to open Turn Windows features on or off. You should see a list of settings with leading check boxes.
2. Pull slider bar on right side to scroll down to SMB 1.0/CIFS File sharing support, click on + to expand.
3. Click to check SMB 1.0/CIFS Client (2nd of 3 sub SMB settings)
4. Click OK to complete and restart. You may see message “Getting Windows ready. Don’t turn off your computer”. Then, “Restarting”.
After computer restarts, you may see missing network PCs using explorer and clicking on Network.
I noticed that step 3, 1st 2 settings were already checked for Windows10 Home, but not for Windows10 Pro.
The above steps worked for me. I hope they work for you too.
This worked great for me, I just enabled SMB 1.0/CIFS.
The reason I needed this was that some legacy application I had to install could only map the network location by browsing via the Network location window and mapping my location. Super annoying, but without the fix I couldn’t map the application to my server.
Please take note that in enabling SMB 1.0/CIFS, your PCs become vulnerable to potential attacks by hackers, like Wannacry, etc. Micosoft deliberately disabled this feature to prevent cyberattacks by malicious hackers. Use SMB1.0 enabled PCs at your own risk. I understand that SMB2.0 and SMB3.0 have overcome this vulnerability problem, but I don’t see them being implemented yet.
I took all your advice and finally, on the most stubborn ‘invisible’ Windows 10 system on my 3-Windows 10 Home LAN, did a network reset, rebooted, then got the all 3 showing in the network on all 3 computers again. Thank you!
RE: After Windows 10 v1803 or v1903 Upgrade
1.Open the Windows Services Management Console (services.msc). Click on the Windows Start icon then type services.msc and click on Services App
2.In the list of services, look for the Function Discovery Resource Publication service. It will show as manual.
3.Change the service startup type from Manual to Automatic (I changed this setting to Automatic rather than delayed). Click on Apply, then OK.
To make this change, right click and select Properties
I also changed Function Discovery Resource Provider Host to Automatic (click on Apply, then OK).
Restart the computer and re-enter services.msc
Check to make sure the changes are still there.
If the services do not show as running, right click, select Restart.
Thank you. And going through all this will work until one of the computers updates again. I found a workaround. I place a shortcut to each of the other computers on my desktop. Wouldn’t it be wonderful if Microsoft would just fix this problem? I have long believed that Windows is junk software and Microsoft could care less if it works.
I’ve done all these things with NO LUCK. But then I tried your NETWORK RESET!
Wow, I finally have both computers listed.
THANKS SO MUCH FOR YOUR HELP.
The part with the “Function Discovery Resource Publication” set to “automatic, delayed star”, solved the long lasting problem for me. Much obliged!
The best answer on the earth for the issue. Thank you.
If you have Nordvpn it has an “Invisibility on lan” option. Make sure this is turned Off. Took me quite some while to realize this was also in effect when not connected to a vpn network. Hope this helped someone ^^,
This was my problem. Thank you very very very much JS .
Probably many people are suffering from this issue.
That’s why I stick to Linux, not only can I see my entire home-network. I have the freedom to modify it as I see fit. I have only one and one Alienware R7 with this crappy Windows 10 – After so many frustrations with it. I installed Linux, out the door W10 no more issues for me.
“That’s why I stick to Linux, ….. no more issues for me”.
Oh there are plenty issues with Linux, believe me! Having tried numerous times over the years to install it on ex Windows laptops, Linux always makes those laptops run on high CPU and high fan speeds due to its lack of proper control over these. Unlike Windows, Linux is often a pain on laptops for this reason. Look it up.
I’ve tried all these things and nothing has worked. However, I have a twist, the only computer that won’t show up, is my Linux box running Samba. What is crazy, when I do the “nbtstat -a ” it shows up as the master. Which makes sense, I havec made the appropriate settings with my Samba server to make it the master. I’ve also ensured everything is using the same workgroup. I have no problem going to \\
I have a Windows 7 Pro desktop, a Windows 10 desktop, and a Windows 10 Pro laptop. After changing all of the settings as recommended and rebooting, I was able to see all of the computers from all of the other computers. But the laptop keeps randomly disappearing from the other two, and the other two keep losing visibility of the laptop. Today, all of them were visible and I could share files fine. Then I closed my laptop, (sleep mode.) When I opened the laptop up again, I could no longer see the Windows 7 computer, but I could still see the other Windows 10 PC. I restarted the laptop, and then I could see the Win 7 PC again. Is there a setting that I’m missing so that I don’t have to reboot every time I want to see that Win 7 PC? Thanks in advance.
I had window 8 and 7 and worked perfectly. I now upgraded all three office computers to window 10. I just cannot get the network done even though I seem to have done all the above article suggested. This is a nightmare. Why can Microsoft get away with this? They really need to fix this.
oh yea…. that totally solved it
really nice article thanks for sharig, problem solved
There is no homegroup for years. Network discovery turned on, cannot see anything at all
I had to use the services management console which resolved the issue about network discovery. It worked.. Thank you!
Tons of work in this article and informative. But, when I see a screenshot that is from an old build like the one that shows homegroup you have, it makes me believe the information may not be up to date on the other examples and fix suggestions. Windows will not allow you as you know to not do updates so there should be no one that has the “homegroup” option in advance sharing section (3rd screenshot down). Just a friendly FYI
Hi,
in my company used 600 work group computers. my manager required need to all pc same login only but most of computer log in different login so how to create same login and easy way. I think new user Id create is not a easy way(no possiablity).so need to your help. I need to smart way(any run script file) this issue resolved thankful.
Here is a new solution I have not seen addressed in any of the blogs regarding this issue.
I have been dealing with this problem for years. My home office Windows network sharing has always been intermittently reliable with some devices showing up and others not showing. I almost never know what changed between times working and not working times. From my perspective, MS shared networking is pretty much a black box. I’ve literally tried everything mentioned in this blog in the past years (including when we still had Home Groups) and again recently. This time, I was really stuck with absolutely no luck for a few weeks. By chance, I was looking at my 3 month old Comcast XB7 wireless router. I was surprised to see that even though all of my wireless devices were working perfectly, the Comcast router said they were all offline. To be clear, sharing was working in the past after installing the XB7 so I didn’t really expect the issues to be related. After spending an hour with Comcast tech support, we completely reset my router and WiFi connection. Immediately, all my active devices showed up as online on the router and MS Internet Explorer showed all of my active devices with sharing working.
I’m guessing more problems will return in the future but, I now have a new arrow in my quiver to fight this unstable monster with. I hope this helps one or two of my frustrated comrades.
All I do now when a PC doesn’t show up on my network is run a batch file I have saved on each Windows system with the following commands to stop then start its Function Discovery Resource Publication service:
net stop FDResPub
net start FDResPub
It works like a charm.
Thank you Deirdre, that’s the only fix that worked for me. I just stopped and restarted both Function Discover Resource Publication services from services.msc and indeed it works like a charm.
Before attempting esoteric “fixes” for your NAS not showing in File Explorer (FE) in Win 10 check to see if your anti-malware program is blocking the visibility of the NAS. I discovered by painstaking trial-and-error that on my old VAIO (after installing a clean from scratch build (2004 latest as at 17/10/2020) of WIN10Pro x64) my Synology NAS was picked up immediately by the OS in its base standard configuration and a list of its Shared folders cascaded nicely down the left column under “Network”. Then I installed the current version of “Malwarebytes” (4.2.1.89) which I have endorsed/used for many years and found that it immediately made my NAS disappear from FE Network along with its folders. Oddly, having pinned the Synology to my “Quick Access” list the folders could still be accessed through QA but not under Network. Go figure. I discovered that only by disabling Malwarebytes (right-click System Tray icon and select “Quit/Exit”) and rebooting/logging out of my account did this allow the NAS to re-appear as before with its list of Folders. This was repeatable ad nauseam.
I filed a Support Ticket with Malwarebytes and await their response.
For clarity, the following conditions are true:-
1. The WIN10Prox64 install was downloaded from MS servers and updated to latest 2004 build by WU OOBE with no “tweaking”.
2. The deprecated SMB1 was not re-engaged in “Programs & Features/Turn Windows Features On and Off” for the security reasons explained in this article.
3. The Synology NAS was connected on a standard 192.xxx.xxx.xxx APIPA internal network and DSM v6 was set to disallow SMB1 and instead force SMB2 as a minimum and SMB3 as a Max. Local Master Browser was un-checked (as enabling opens the Guest Account by default).
4. On the PC, Network Discovery File and Printer Sharing was allowed and set to Private with Public turned off by default.
Great list of solutions! When I exhausted all the tips with no success, I rebooted my modem. All workstations now visible.


