- Automatic Reboot in Windows 10, Windows 8, or Windows 7 | PRR Computers, LLC
- You may also like
- Recommended Webcams 2021
- 8 Must-Have WordPress Plugins for 2021
- Toner for the HP Color LaserJet MFP M180nw
- 29 Comments
- FIX: Windows 10 restarts randomly
- How do I fix random restarts in Windows 10?
- 1. Change Advanced Power Settings
- 2. Make sure the Sleep mode is enabled
- 3. Uninstall your antivirus
- 4. Update / uninstall your graphics card drivers
- 5. Change your power plan to High performance
- 6. Update your BIOS
Automatic Reboot in Windows 10, Windows 8, or Windows 7 | PRR Computers, LLC
Restarting your computer periodically is a good idea, especially if it’s a computer that is left on much of the time. In Windows 10 (or Windows 8, or Windows 7), you can easily schedule an after hours reboot by following these steps:
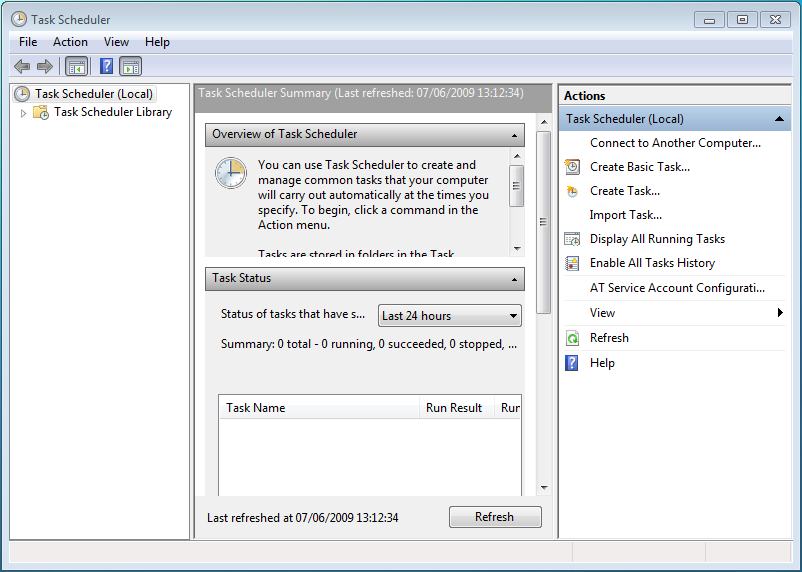
- Press Start, and in the search box type “Task Scheduler.” Atop your list of choices will be the Task Scheduler. Click it.
- Click the Action menu and then select Create Basic task.
- Choose a name for the task (like AutoReboot), type it in the Name box and click Next.
- Select Daily (if you want a daily reboot) and click Next
- Type the time you want to restart the computer, set recurrence to your liking, and click Next.
- Select Start a program and click Next.
- Click Browse and navigate to %SystemRoot%\System32 (that’s going to be C:\Windows\System32 for most people). Find the file named Shutdown (.exe) and click Open. Type /F /R in the Add arguments (optional) box and click Next.
- Click Finish.
Now your computer will automatically restart at the date, time, and frequency you specified.
If you’re going to have a scheduled task like this in place, make sure to develop the habit of closing documents and programs when you’re done using them, so the reboot won’t close them for you and cause you to lose unsaved work.
Do you have multiple computers at a business that need maintenance tasks like this on a regular basis? A Managed Services Program is a great solution to get this responsibility delegated to a trusted professional so you can focus on running your business.
You may also like
Recommended Webcams 2021
8 Must-Have WordPress Plugins for 2021
Toner for the HP Color LaserJet MFP M180nw
29 Comments
Thanks, found the information to be quite useful. I have implemented it on several system now.
It was very helpful.
Thank you for your assistance.
Tip: add “-t 60” & create a batch file separately on the desktop with “%SystemRoot%\System32\Shutdown.exe /a”, name it “Cancel Reboot.bat”. This way if u are working on the machine and the scheduled reboot comes up, just run that batch file to cancel. 🙂
Excellent suggestion, John, thank you.
Arguments need to be /r /f instead of -r -f
It worked other than that though, thanks.
Automatically Restart Windows every night
I set my computer to do this a long time ago. I can’t remember how I did it. I don’t see anything in Task Scheduler. I’d really like to change the time it reboots. But I can’t seem to find where to do so. I’ve set up a new Action in Task Scheduler, but that may mean that my computer will reboot again at the original time.
If you know what time your computer was previously set to reboot, you might be able to find it based on that time. If you open Task Scheduler, and then click on “TASK SCHEDULER LIBRARY” on the left, the main window should show a list of all active tasks. Focus your attention on the “Triggers” column, you’ll see that most tasks probably mention a time of day in which they occur.
If that doesn’t help, scroll to the right in that same window and look for the “AUTHOR” column. If you click the “Author” label at the top of that column, it will sort/group the tasks by their author. Any tasks created by you will stand out in that list because they will show an author that consists of your computer name and then your username, for example: GABRIELLE-PC\GABBY (just for example). That will help set your own manually created tasks apart from ones created by other programs and processes. NOTE: NOT ALL the tasks with this AUTHOR label will be ones you created… there very well may be some in there which you didn’t manually create too. But all the ones you DID manually create should show that author designation. Hope this helps!
Very useful information thanks for sharing. Anyway i know this is an old tread but i just want to ask does anyone know how to do something like this on a Domain in order to schedule restart all client computers on the domain? Am guessing there should be a way to set this up on the domain controller server but how can i do it without shutting down or restarting the server itself? Thanks in advance for any help.
Hello Abdoulie, the version showed here is probably a little clunky for deploying across a domain (i.e. via Group Policy). I think you’ll have better luck using a PowerShell solution like the following: https://gallery.technet.microsoft.com/scriptcenter/Reboot-Computerps1-5d530000
Should it run under system account?
How or can it run if user not logged in?
Rickkee, you should be able to have the task run under any account with administrative privileges. I don’t think the SYSTEM account will work well but you can try it.
To get a task to run when the user isn’t logged in… after creating the task, go back into Task Scheduler and right-click the task and choose PROPERTIES. On the first “General” tab of Properties, near the bottom you should see some choices under Security Options. You’ll want to select “Run whether user is logged on or not” and “Run with highest privileges” to ensure the task will run even if you’re not logged on.
Very helpful post.
Where can we check that the reboot actually occurred?
Hi Matt, you can check the Event Log (Event Viewer > Windows Logs > System) and look for (or filter by) event ID 6006. Event ID 6006 is triggered when the Event Log service is shut down, something that happens right before a shut down or restart. Pretty reliable indicator in my experience. FYI, Event ID 6005 is triggered when that same service starts up again, a decent indicator of when the system came back up from its reboot.
To check the last reboot time, type “net stats srv” and scroll back to the top
Is there a way to run this task but then log in as a specific user after the restart?
No, there is no way to do this that I am aware of.
Open “run” box, type “netplwiz” & enter >
Uncheck “Users must enter a user name and password to use this pc” or something like that, click OK >
Now you should see a pop-up window asking for your username & pass. Just key in your specific user & pass and viola, done.
To undo, simply relaunch netplwiz & recheck it.
Thank you, Phil for your instructions. However, it didn’t work for me. I followed the directions, but wanted to check if it works for me, that is why I set up not recurrent action but “once” and selected specific time (one minute later from current time). At scheduled time the quick window flashed on the screen, but computer (Win7 pro) actually didn’t do anything.
Can you advise what can be wrong?
Will answer to myself. Never mind. In arguments I typed the \f instead of /f. Working now.
Thanks again
Thanks,
But, How to delete them (if we don’t need)
Great tip, Phil! I have a Windows 7 HTPC I use as a DVR; Quad digital tuners, 6 TB HD with NAS backups, etc. How can I add an exception so the task does not run if Windows Media Center is recording? Thank you, Jeff
Hi Jeff. The Windows task scheduler isn’t terribly versatile in terms of exceptions / conditions for running a task. To accomplish what you’re describing, I can think of two possible approaches.
1) If you open the Properties of the task created using the steps outlined above, check out the “Conditions” tab. There is an option labeled “Start the task only if the computer idle for…” The big question here will be, how does Windows define “idle” with respect to Windows Media Center. If by chance Windows considers your machine to be in a not idle state when WMC is recording, then this might work great to get the task to not run during recording. If, however, Windows determines a computer’s “idle” status depending on user interaction (mouse/keyboard for example), then this won’t help. I know that on my HTPC, when we’re watching a movie – either streaming or a local file in VLC Media Player, the screen saver for the TV does NOT turn on, even if we go a long time without touching inputs. But with no video playing, the screen saver does turn on. I believe a screen saver in Windows relies on the same “idle” detector that scripts would… if so, recording should make the computer appear not idle and thus suspend this script if this option is turned on. But I don’t know for sure. It’s something you’ll need to test and see.
2) The other option would be, instead of your task running the “shutdown” command directly as we did above, to instead make yourself a batch or script file to run that command, and then work into that batch/script some kind of logic that detects when WMC is recording. Maybe there is a specific process running on the computer when recording is active which you could detect and have your batch/script make a decision about whether to execute the shutdown command? The particulars of the script you’ll need to work out, or hire a freelancer to work out for you if scripting isn’t your thing. But in theory, there’s a good chance this could be made to work.
Either way, if you have success with it, would love to have you return here and let us know how you fared. Best of luck!
Hi Quang, sorry I am just now getting to your comment.
A scheduled task can be removed by opening Task Scheduler, finding your task in the list, right-clicking on that task, and choosing either Disable (to stop it from running but not get rid of it permanently) or Delete (to get rid of it permanently).
Hello
Thanks for giving a solution of this issue. I found out your site. I can fix it following your step by step guide. Keep up the great work.
FIX: Windows 10 restarts randomly

- Restarting your PC can be an ideal solution for when you need to finalize software installations, or when you simply need to perform a clean boot of your system.
- Various software and hardware issues can cause your PC to restart on its own, which can severely hinder work productivity and gameplay experiences.
- Most restarts are caused by a failing hard drive, so maybe it is time that you upgrade yours to a better model that offers a lot of storage space.
- Since you’re using Windows 10 on a daily basis, don’t forget to check out our in-depth Windows 10 errors page.

- Download Restoro PC Repair Tool that comes with Patented Technologies (patent available here).
- Click Start Scan to find Windows issues that could be causing PC problems.
- Click Repair All to fix issues affecting your computer’s security and performance
- Restoro has been downloaded by 0 readers this month.
Windows 10 is a stable operating system, but some users are having a different experience with it. According to them, the random restart occurs in Windows 10, and that can be quite inconvenient, so let’s see how to fix this issue.
Here are some more examples of this or similar issues:
- PC randomly restarts when playing games
- Windows 10 restarts automatically
- My Windows 10 random restart no BSOD
- Windows 10 restarts when idle
- Windows 10 random restart update
How do I fix random restarts in Windows 10?
Table of contents:
1. Change Advanced Power Settings
- Press Windows Key + S and type Power Options.
- From the list of results choose Power Options.

- When Power Options window opens, find your plan and click on Change plan settings.
- Now click on Change advanced power settings.
- Scroll down and locate Processor Power Management.
- You should see the Minimum Processor State value that is set to 100%.
- Change Minimum Processor State to some other value, such as 0.
- Save changes.

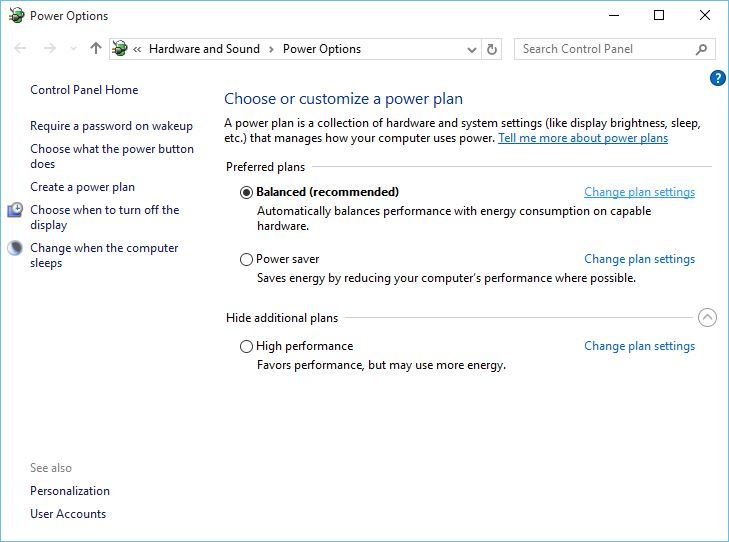

If you are having random restarts on Windows 10, you might want to try changing the power settings.
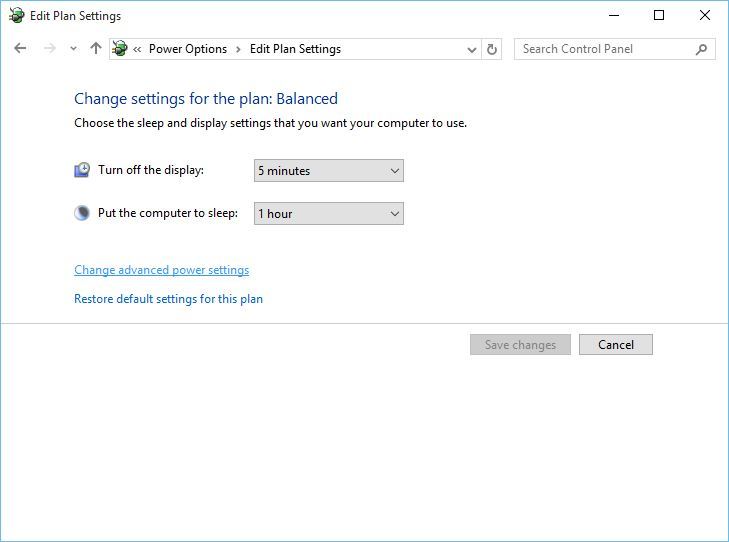
2. Make sure the Sleep mode is enabled
- Open Power Options, find your current plan and click on Change plan settings.
- After you’ve done that, find Put the computer to sleep option and choose any value except Never.
- Click Save changes and your problem should be fixed.
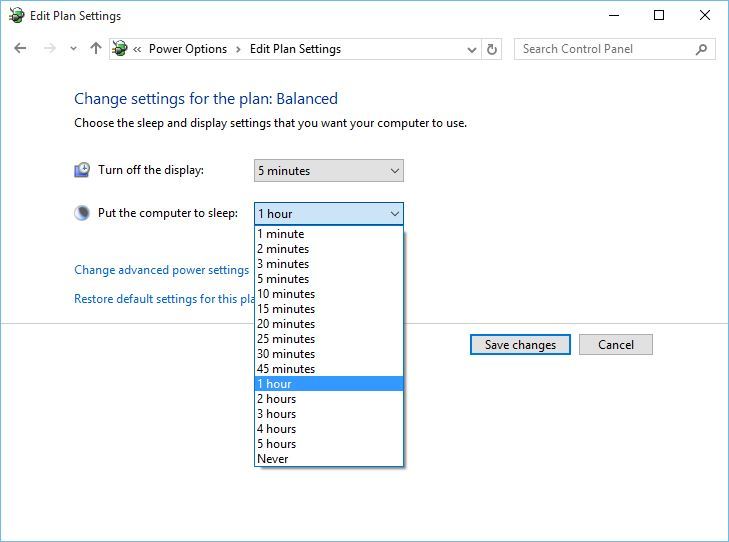
Sometimes random restart on Windows 10 can be triggered if Sleep mode timer is set to Never. In order to fix this issue, you need to set Sleep mode timer to any other different value.
3. Uninstall your antivirus
If you’re having random restarts, this can be caused by your antivirus software.
Users have reported that Kaspersky antivirus is sometimes the cause for a random restart on Windows 10, so if you’re using Kaspersky antivirus, you might want to temporarily uninstall it or upgrade it to a newer version.
If that doesn’t work, you might want to consider switching to different antivirus software.
We strongly recommend you Bitdefender as the world’s No. 1 Antivirus. It has a bunch of useful features that will keep your computer safe and optimized.
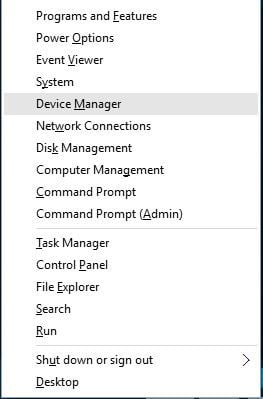
4. Update / uninstall your graphics card drivers
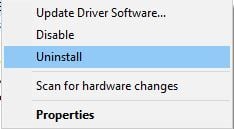
- Press Windows Key + X and choose Device Manager from the list.
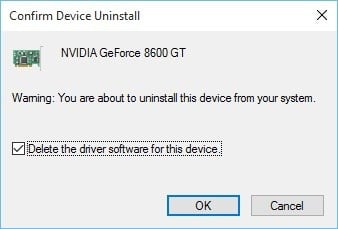
- When Device Manager opens, locate your graphics card, right-click and choose Uninstall.
- Check Delete the driver software for this device and click OK.
- After the driver has been uninstalled, restart your computer.
- Download the latest driver from your graphics card manufacturer’s website and install it.
As you know, Windows 10 automatically installs its drivers, and if you install graphics card drivers from your graphics card manufacturer, you can sometimes cause conflicts and random restarts.
To fix this issue, you need to install additional drivers after Windows 10 performs its update and installs the necessary drivers first.
If you have already installed your graphics card drivers, you might need to uninstall them and install them again in order to fix this issue.
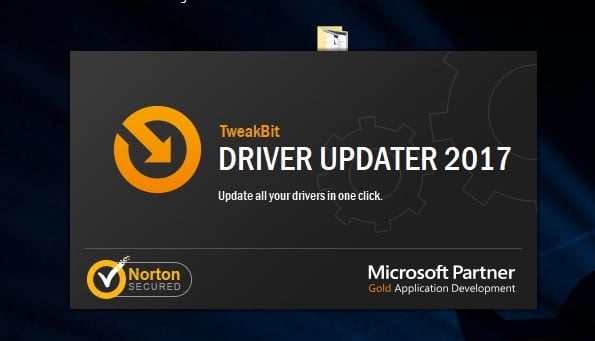
4.1 Update drivers automatically
If you try to install the drivers manually you risk to damage your system by downloading and installing the wrong version, thus we recommend using a dedicated tool.
This is a tedious process and we suggest to do it automatically by using Tweakbit’s Driver Updater tool.
This tool is approved by Microsoft and Norton Antivirus and uses an advanced updating technology. After several tests, our team concluded that this is the best-automatized solution.
Below you can find a quick guide on how to do it.
-
- Download and install TweakBit Driver Updater
- Once installed, the program will start scanning your PC for outdated drivers automatically. Driver Updater will check your installed driver versions against its cloud database of the latest versions and recommend proper updates. All you need to do is wait for the scan to complete.
- Upon scan completion, you get a report on all problem drivers found on your PC. Review the list and see if you want to update each driver individually or all at once. To update one driver at a time, click the ‘Update driver’ link next to the driver name. Or simply click the ‘Update all’ button at the bottom to automatically install all recommended updates.
Note:Some drivers need to be installed in multiple steps so you will have to hit the ‘Update’ button several times until all of its components are installed.
- Download and install TweakBit Driver Updater
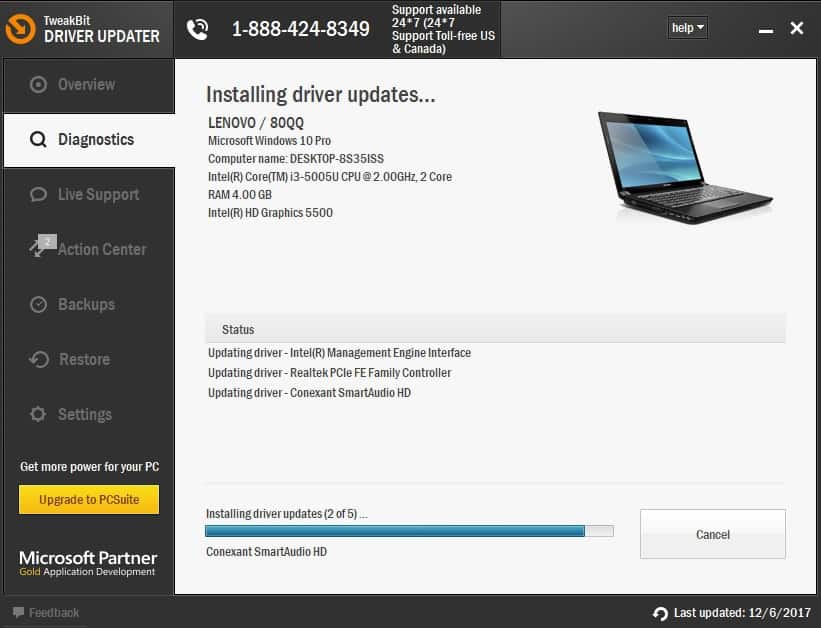

Disclaimer: some features of this tool are not free.
5. Change your power plan to High performance
- Open Power Options.
- When Power Options window opens, choose High performance.
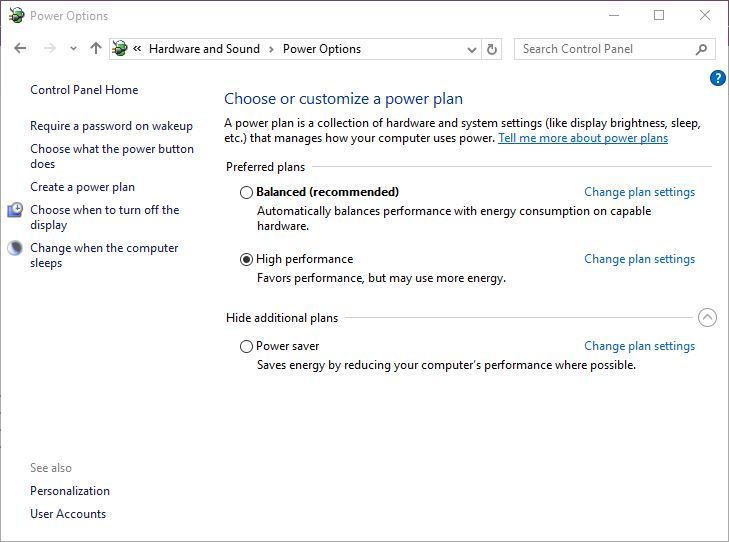
If you’re having random restarts on Windows 10, sometimes the best solution is to change your power plan to High performance.
We have to mention that by changing your mode to High performance your PC or laptop will consume more power, so keep that in mind.
This is especially important for laptop users because your battery will drain faster and you’ll have to recharge it more often.
6. Update your BIOS
Sometimes you can fix random restarts on Windows 10 by updating your BIOS. To update your BIOS, you need to visit your motherboard manufacturer’s website and download the latest version of BIOS.
Before you update BIOS, make sure that you check your motherboard’s manual in order to update BIOS properly.
If you’re not careful, you can cause permanent damage to your computer, so be careful if you decide to update your BIOS. If you don’t know how to do it properly, please contact an expert.


