- Installing XGBoost on windows 10 (64 bit) with Anaconda Python Package
- 1. Install MingW64
- MinGW-w64 — for 32 and 64 bit Windows
- Download MinGW-w64 — for 32 and 64 bit Windows for free. A complete runtime environment for gcc. The mingw-w64 project…
- 2. Download and install git for windows
- Git for Windows
- We bring the awesome Git VCS to Windows
- 3. Install xgboost
- 4. Install python bindings
- 5. Demo Example
- Algomaster
- Conda install xgboost windows
- Installers
- conda install
- Description
- Installing on Windows
- Installing in silent mode
- Updating conda
- Uninstalling conda
- xgboost installation issue with anaconda
- 7 Answers 7
- XGBoost Python Package
- Installation
Installing XGBoost on windows 10 (64 bit) with Anaconda Python Package

Jun 2, 2018 · 4 min read
XGBoost is an advanced implementation of gradient boosting that is being used to win many machine learning competitions.
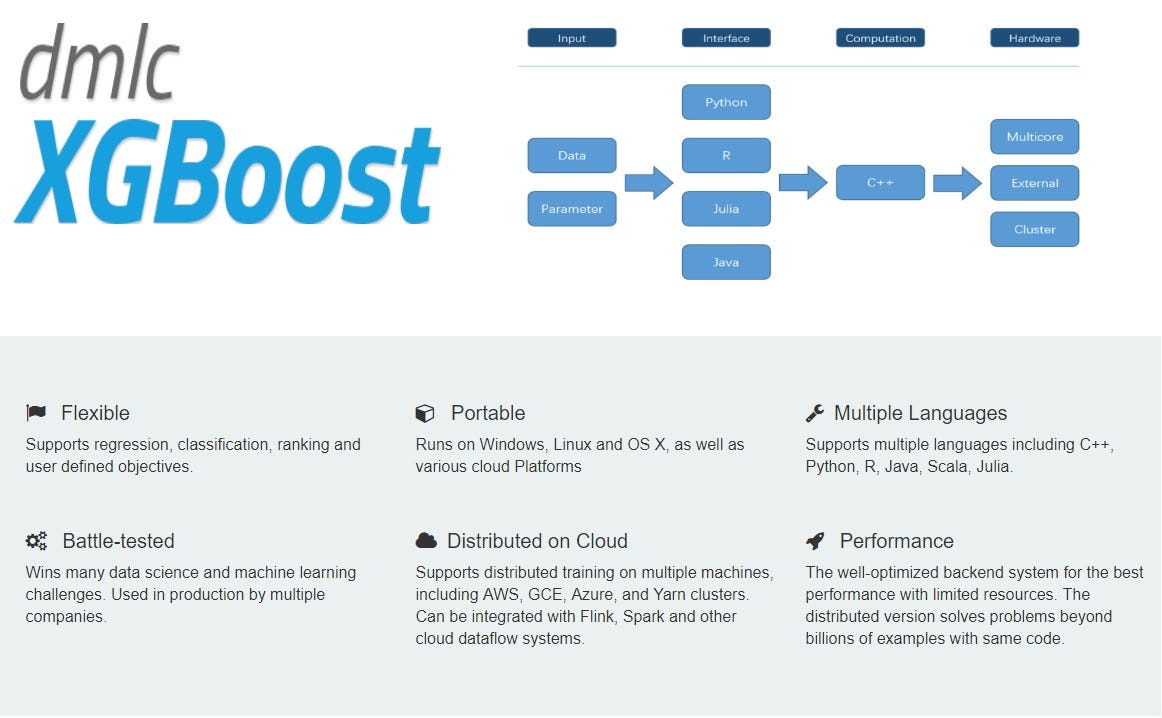
It is compelling, but it can be hard to get started. Installing xgboost in windows can be very tedious task. In windows the xgboost package needs compiling. Here I put up a set of steps that will help in installing the library successfully.
My system’s specification: Windows 10, 64 bit ;Anaconda 5.2 ;Python 3.6
1. Install MingW64
MinGW-w64 — for 32 and 64 bit Windows
Download MinGW-w64 — for 32 and 64 bit Windows for free. A complete runtime environment for gcc. The mingw-w64 project…
After downloading ‘mingw-w64-install.exe’ start the installation by double clicking the file.

When running ming w -64-install.exe , you have to choose the x86_64 architecture on the settings screen. With this architecture, 64-bit is also the default target.Do not modify the other settings.


Then Click on Next and Make sure you install it in program files and not program Files (x86).

Add a windows path to the folder where you installed mingw-w64 as shown below:
i. Open Advanced System Settings then click on Environment Variables.

ii. Select Path and Click on Edit

iii. Add path into environment variable as shown below and then click on OK.

2. Download and install git for windows
Download git for windows .Follow instructions in link.
Git for Windows
We bring the awesome Git VCS to Windows
If Git Bash terminal is open then close the Git Bash terminal, and launch it again. This will take into account the new Path variable. To check you are fine, type the following
It should return something like:

3. Install xgboost
- Briefly, from git command line go to the directory where you want the xgboost folder to be copied to and type:
- cd into the xgboost folder and type the following in the git console:
It will take a long while to compile. After it finishes compiling open the anaconda prompt (command line).
4. Install python bindings
Hopefully you installed the anaconda version of python.You can download anaconda from https://www.anaconda.com/download/.
Open Anaconda prompt(command line) and cd into the xgboost folder:
Note: Here ‘C:\xgboost’ is Xgboost install directory in my PC.
Then install python bindings as follows:
5. Demo Example
This demo example taken from http://xgboost.readthedocs.io/en/latest/get_started/index.html. We can quickly try out xgboost on the demo dataset on a binary classification task. You can copy demo folder from xgboost install directory to xgboost folder in Anaconda3/LIb/site-packages/xgboost-0.6-py3.6.egg/xgboost to have demo files available in site-packages.
Algomaster
I am a Data Scientist, a professional Embedded Systems Design Engineer and a Biomedical Engineering Post Graduate with great interest in Healthcare Innovations.
Conda install xgboost windows
Scalable, Portable and Distributed Gradient Boosting (GBDT, GBRT or GBM) Library, for Python, R, Java, Scala, C++ and more. Runs on single machine, Hadoop, Spark, Flink and DataFlow
- License: Apache-2.0 Home: https://github.com/dmlc/xgboost Development: https://github.com/dmlc/xgboost/ Documentation: https://xgboost.readthedocs.io/ 21414 total downloads Last upload: 19 days and 14 hours ago
Installers
conda install
- linux-64 v1.3.3
To install this package with conda run one of the following:
conda install -c intel xgboost
conda install -c intel/label/oneapibeta xgboost
Description
LEGAL NOTICE: Use of this software package is subject to the software license agreement (as set forth above, in the license section of the installed Conda package and/or the README file) and all notices, disclaimers or license terms for third party or open source software included in or with the software.
XGBoost is an optimized distributed gradient boosting library designed to be highly efficient, flexible and portable. It implements machine learning algorithms under the Gradient Boosting framework. XGBoost provides a parallel tree boosting (also known as GBDT, GBM) that solve many data science problems in a fast and accurate way. The same code runs on major distributed environment (Hadoop, SGE, MPI) and can solve problems beyond billions of examples.
Installing on Windows
Download the installer:
Double-click the .exe file.
Follow the instructions on the screen.
If you are unsure about any setting, accept the defaults. You can change them later.
When installation is finished, from the Start menu, open the Anaconda Prompt.
Test your installation. In your terminal window or Anaconda Prompt, run the command conda list . A list of installed packages appears if it has been installed correctly.
Installing in silent mode
The following instructions are for Miniconda. For Anaconda, substitute Anaconda for Miniconda in all of the commands.
To run the the Windows installer for Miniconda in silent mode , use the /S argument. The following optional arguments are supported:
/InstallationType=[JustMe|AllUsers] —Default is JustMe .
/AddToPath=[0|1] —Default is 0
/RegisterPython=[0|1] —Make this the system’s default Python. 0 indicates JustMe , which is the default. 1 indicates AllUsers .
/S —Install in silent mode.
/D= path> —Destination installation path. Must be the last argument. Do not wrap in quotation marks. Required if you use /S .
All arguments are case-sensitive.
EXAMPLE: The following command installs Miniconda for the current user without registering Python as the system’s default:
Updating conda
Open your Anaconda Prompt from the start menu.
Navigate to the anaconda directory.
Run conda update conda .
Uninstalling conda
In the Windows Control Panel, click Add or Remove Program.
Select Python X.X (Miniconda), where X.X is your version of Python.
Click Remove Program.
Removing a program is different in Windows 10.
© Copyright 2017, Continuum Analytics Revision b6d32c8d .
xgboost installation issue with anaconda
I am using Anaconda. I first switched to Python2 (Version 2.7.11).
I used the following command to install xgboost in anaconda.
I then checked that xgboost is installed.
I run python in terminal, import xgboost and got the following errors.
I have no idea what to do next.

7 Answers 7
The package image you download is corrupt. What you should do :
First remove your xgboost package with (in the terminal) :
Then reinstall with an other package at https://anaconda.org/aterrel/xgboost So just write :
Then you can check the installation in the python console :
It should be ok.
» to see the dependencies for each package. – Taposh DuttaRoy Jan 18 ’17 at 1:05
I had the same error. I completely uninstalled xgboost by pip unistall. then installed it back by:
This seems to solve the problem

You first need to build the library through «make», then you can install using anaconda prompt.
First follow the official guide with the following procedure (in Git Bash on Windows):
Last, do the following using anaconda prompt:
Also refer to these great resources:

Did you try using pip?
source activate yourenvironment
pip install xgboost

Library not loaded: @rpath/./libgomp.1.dylib
This is the key.
In my case, it is » Library not loaded: /usr/local/opt/gcc/lib/gcc/6/libgomp.1.dylib»
I check my path «/usr/local/opt/gcc/lib/gcc» and there is only a folder named 7 there , no 6.
So i use «sudo find / -name libgomp.1.dylib» to locate all the gcc version i have installed, with I found that there is a version 6 in another location.
Then I create a folder named 6 under ‘/usr/local/opt/gcc/lib/gcc’ and copy those gcc 6 files in there . Finally , «import xgboost» works with no error .
XGBoost Python Package
Installation
We are on PyPI __ now. For stable version, please install using pip:
- pip install xgboost
- Since this package contains C++ source code, pip needs a C++ compiler from the system to compile the source code on-the-fly. Please follow the following instruction for each supported platform.
- Note for Mac OS X users: please install gcc from brew by brew tap homebrew/versions; brew install gcc —without-multilib firstly.
- Note for Linux users: please install gcc by sudo apt-get install build-essential firstly or using the corresponding package manager of the system.
- Note for windows users: this pip installation may not work on some windows environment, and it may cause unexpected errors. pip installation on windows is currently disabled for further invesigation, please install from github.
For up-to-date version, please install from github.
- To make the python module, type ./build.sh in the root directory of project
- Make sure you have setuptools __
- Install with cd python-package; python setup.py install from this directory.
- For windows users, please use the Visual Studio project file under windows folder . See also the installation tutorial from Kaggle Otto Forum.
Add MinGW to the system PATH in Windows if you are using the latest version of xgboost which requires compilation:


