- # config.plist Setup
- # Creating your config.plist
- # Adding your SSDTs, Kexts and Firmware Drivers
- # Selecting your platform
- # Intel Desktop
- # Intel Laptop
- # Intel HEDT
- PlistEdit Pro
- Информация
- Описание
- Создание и настройка config.plist для установки Хакинтош
- Создание plist.config для установки Хакинтош
- Настройка config.plist для установки в Clover Configurator
- Готовые config.plist для разных поколений процессоров
- # Desktop Coffee Lake
- # Starting Point
- # Delete
- # Patch
- # Quirks
- # Booter
- # MmioWhitelist
- # Quirks
- # DeviceProperties
- # Delete
- # Kernel
- # Emulate
- # Force
- # Block
- # Patch
- # Quirks
- # Scheme
- # Debug
- # Security
- # Tools
- # Entries
- # NVRAM
- # Delete
- # PlatformInfo
- # Generic
- # Drivers
- # Audio
- # Input
- # Output
- # ProtocolOverrides
- # Quirks
- # ReservedMemory
- # Cleaning up
- # Intel BIOS settings
- # Disable
- # Enable
- # Now with all this done, head to the Installation Page
# config.plist Setup
Now that we’ve got all our Kexts(.kext), SSDTs(.aml) and firmware drivers(.efi), your USB should start to look something like this:
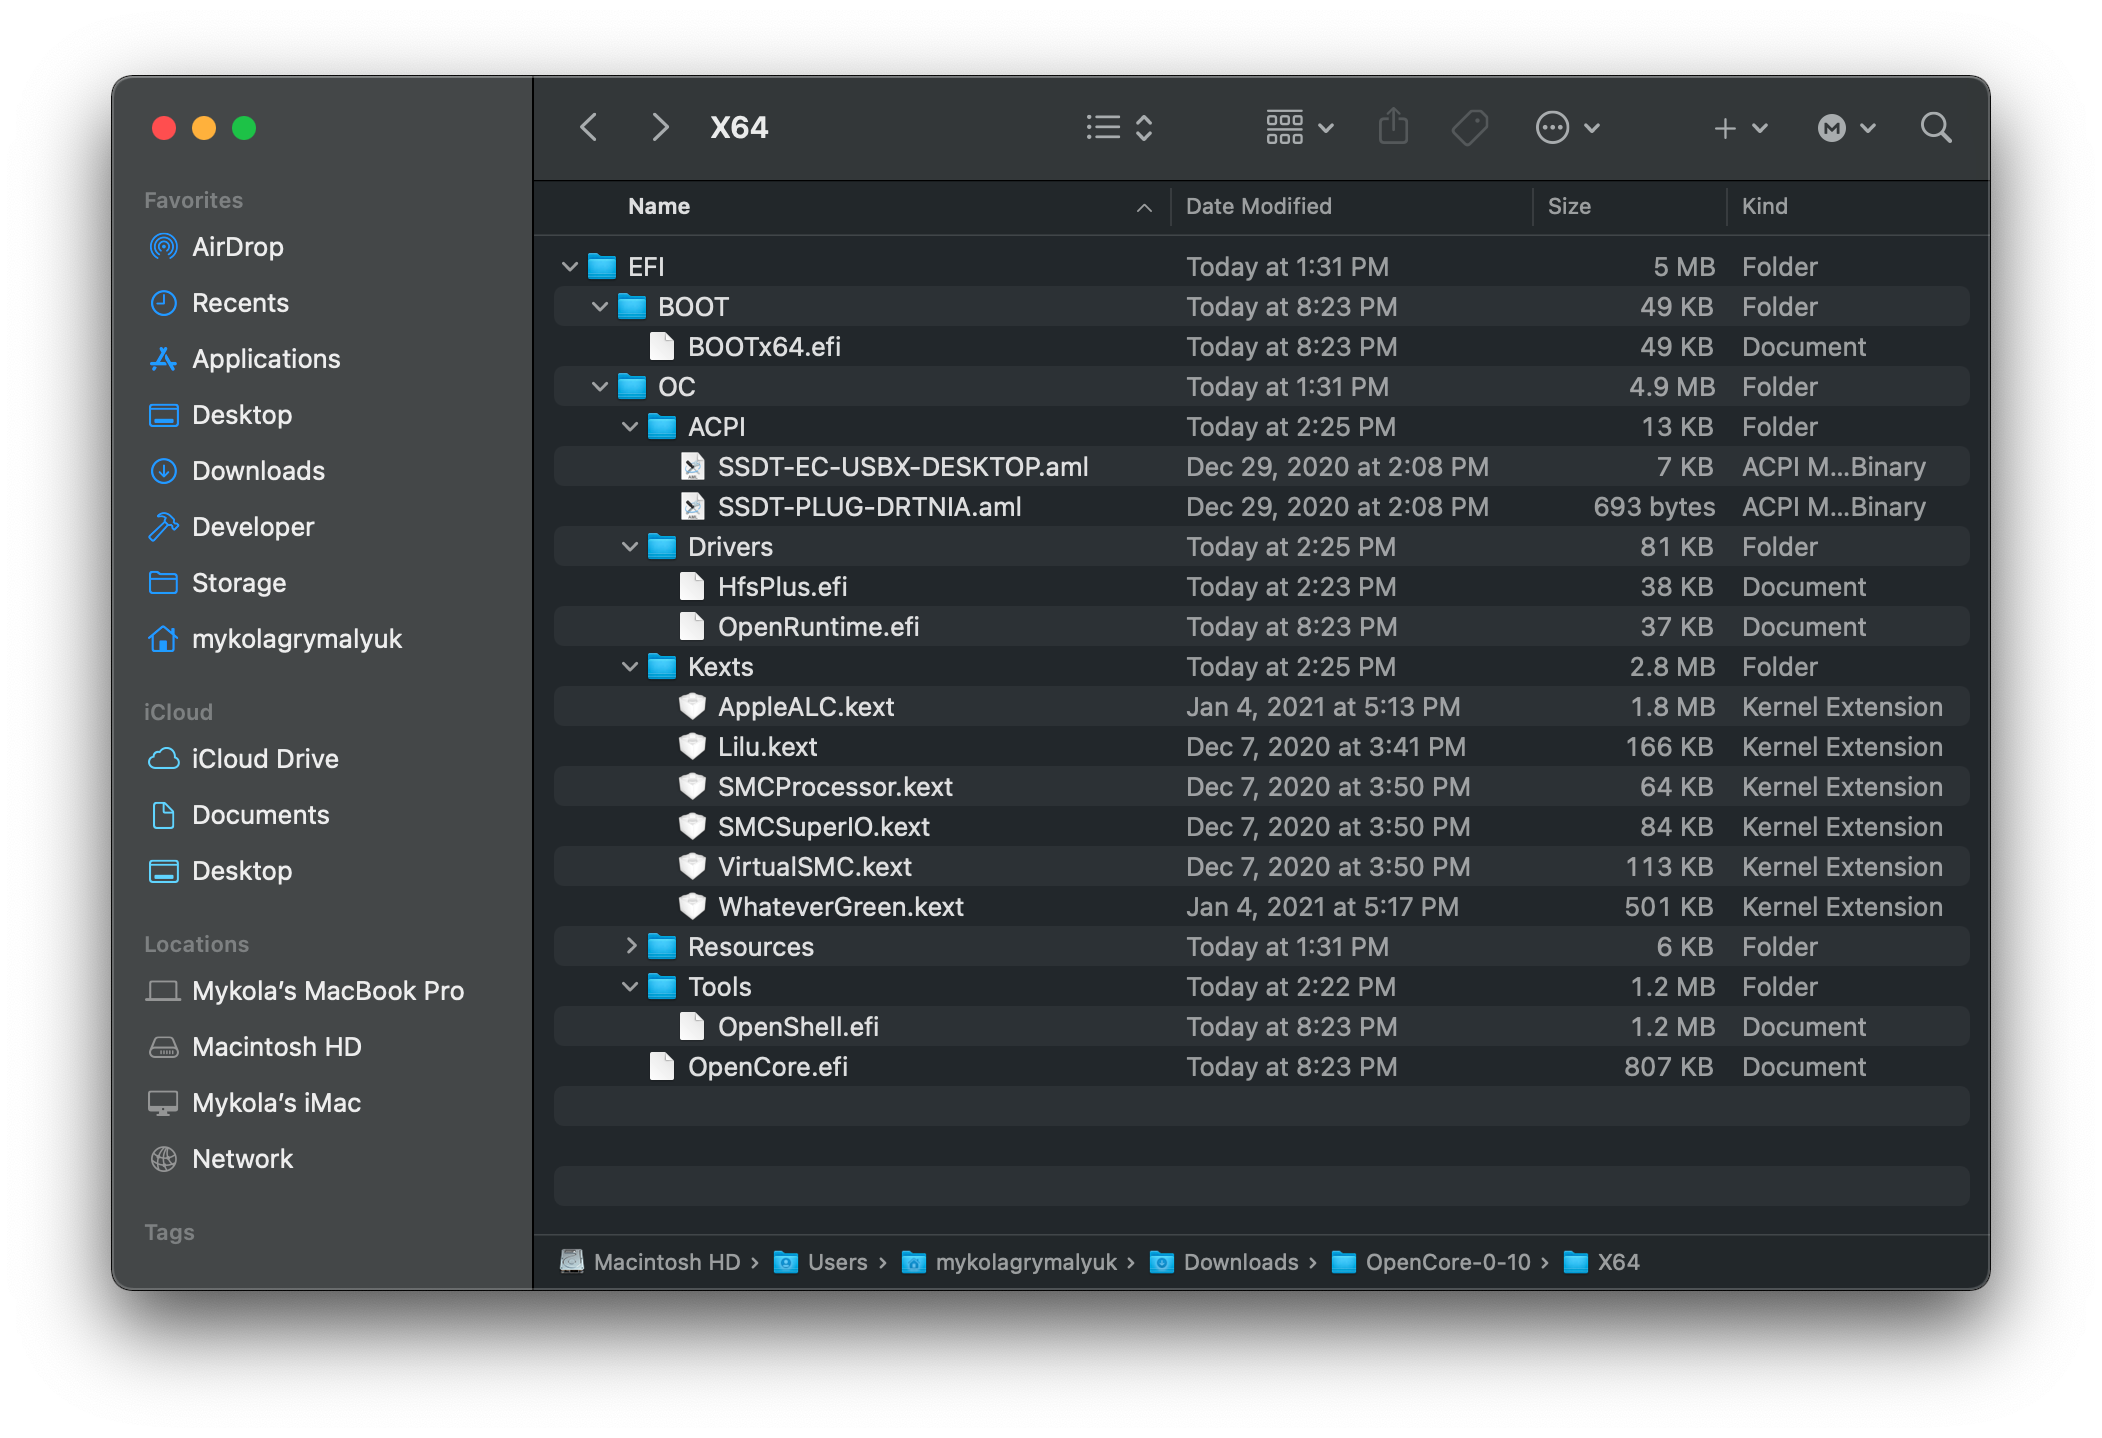
- Note: Your USB will look different, everyone’s system will have different requirements.
# Creating your config.plist
First we’ll want to grab the sample.plist from the OpenCorePkg
(opens new window) , this will be located under the Docs folder:

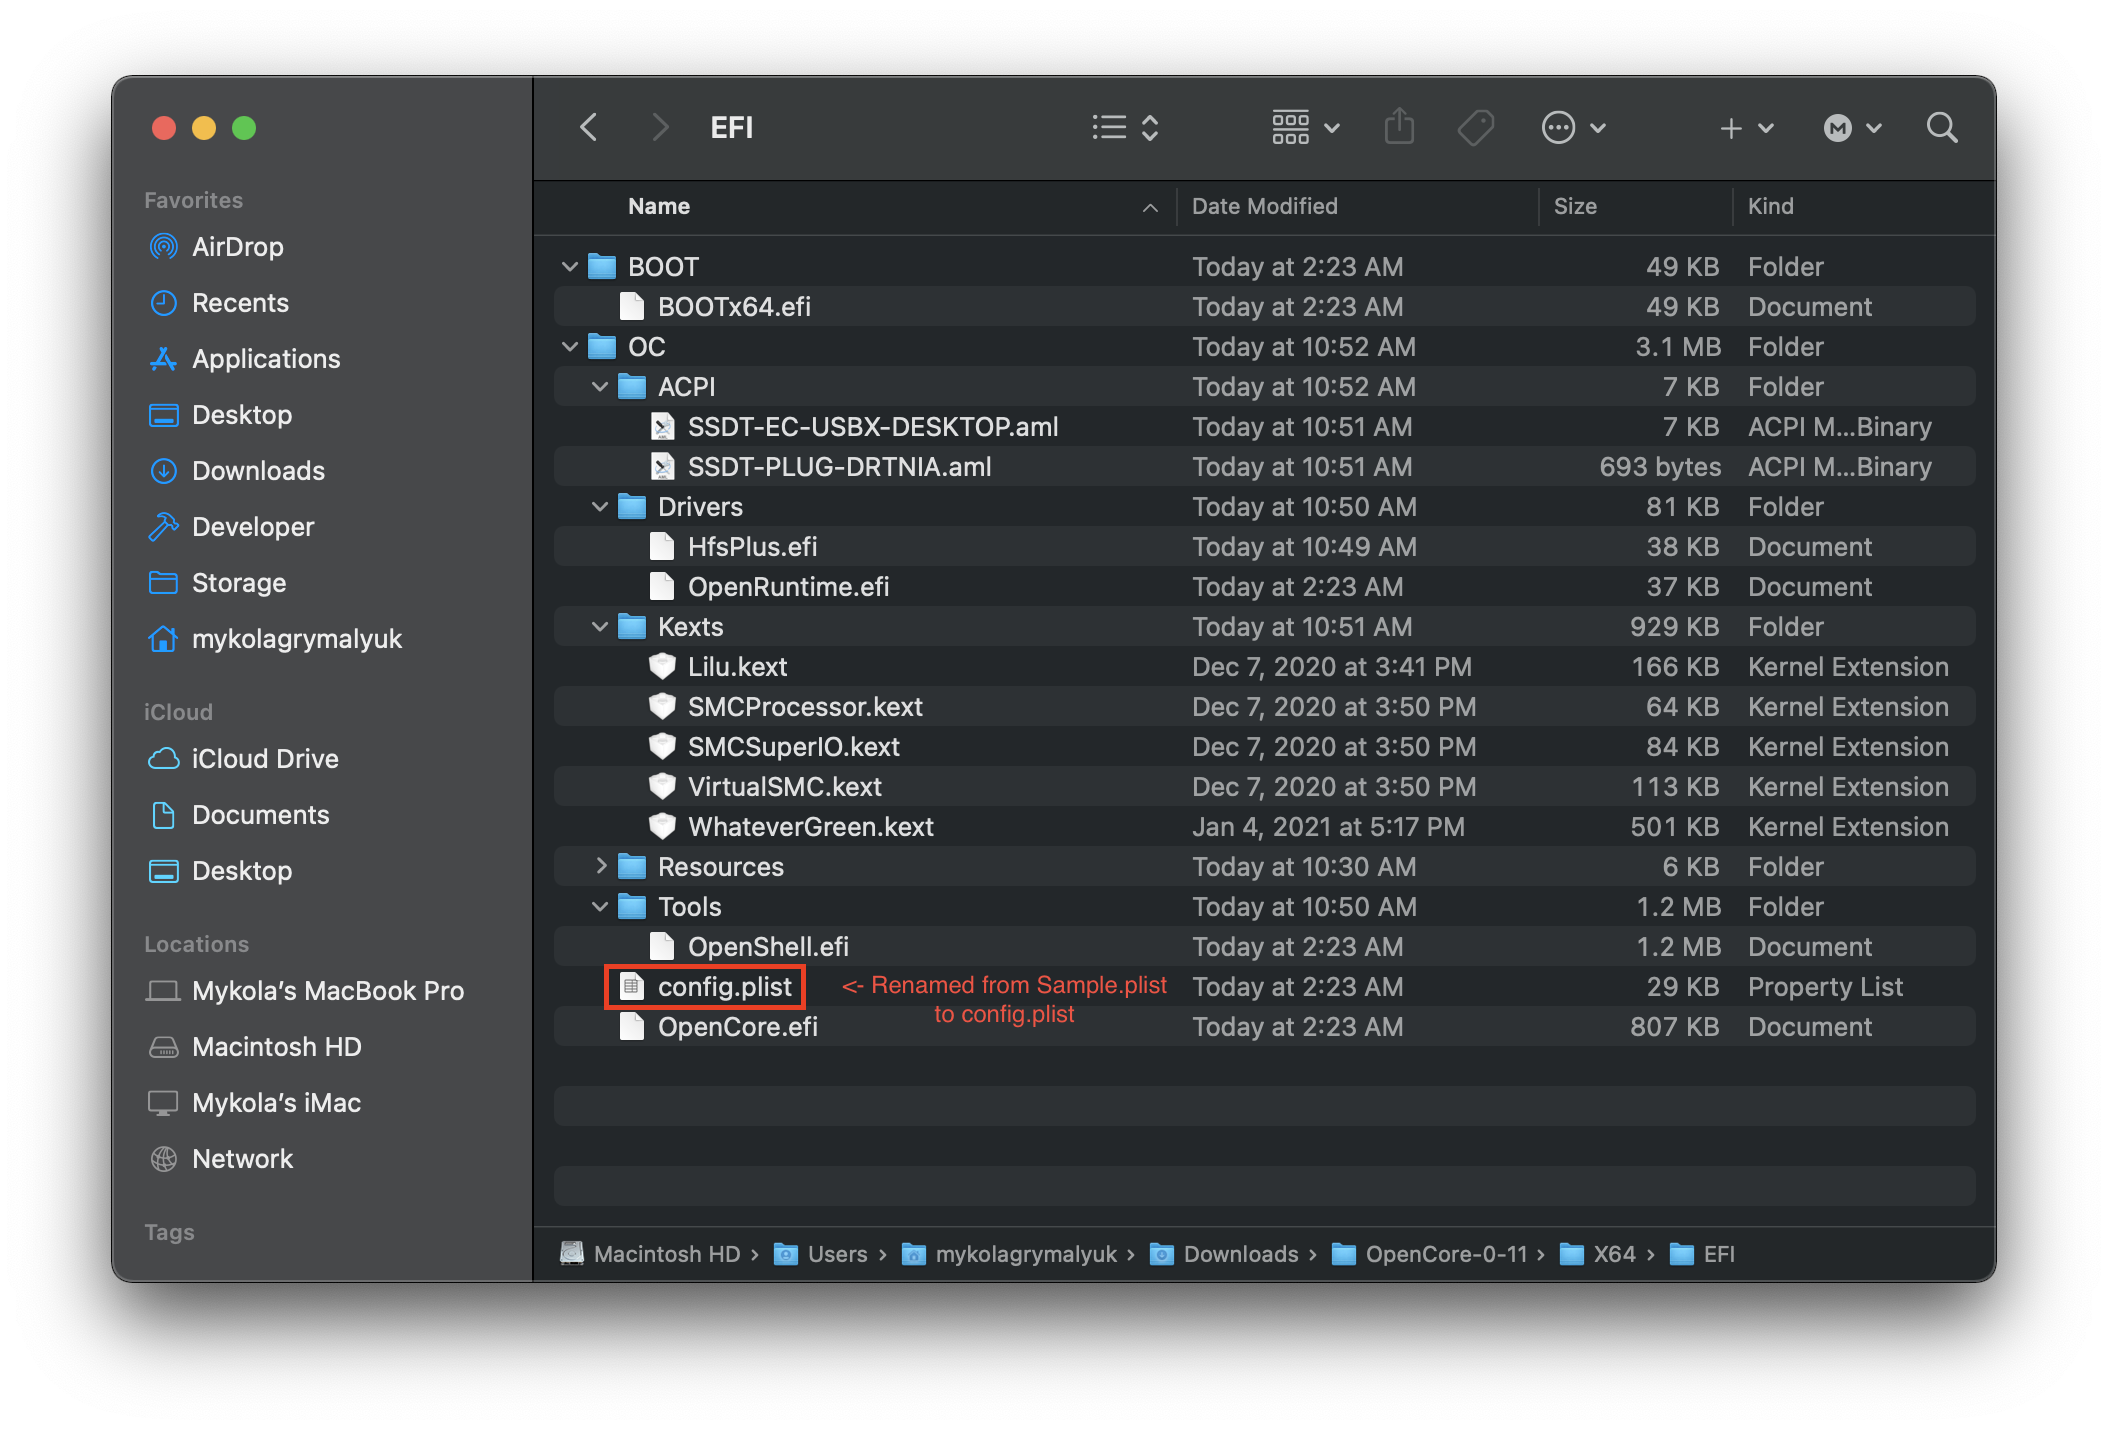
Next lets move it onto our USB’s EFI partition(will be called BOOT on Windows) under EFI/OC/ , and rename it to config.plist:
# Adding your SSDTs, Kexts and Firmware Drivers
For the rest of this guide, you’re gonna need some form of plist editing. And for our guide, we’ll be using ProperTree and GenSMBIOS to help automate some of the tedious work:
Next, let’s open ProperTree and edit our config.plist:
- ProperTree.command
- For macOS
- Pro tip: there’s a buildapp.command utility in the Scripts folder that lets you turn ProperTree into a dedicated app in macOS
- ProperTree.bat
- For Windows
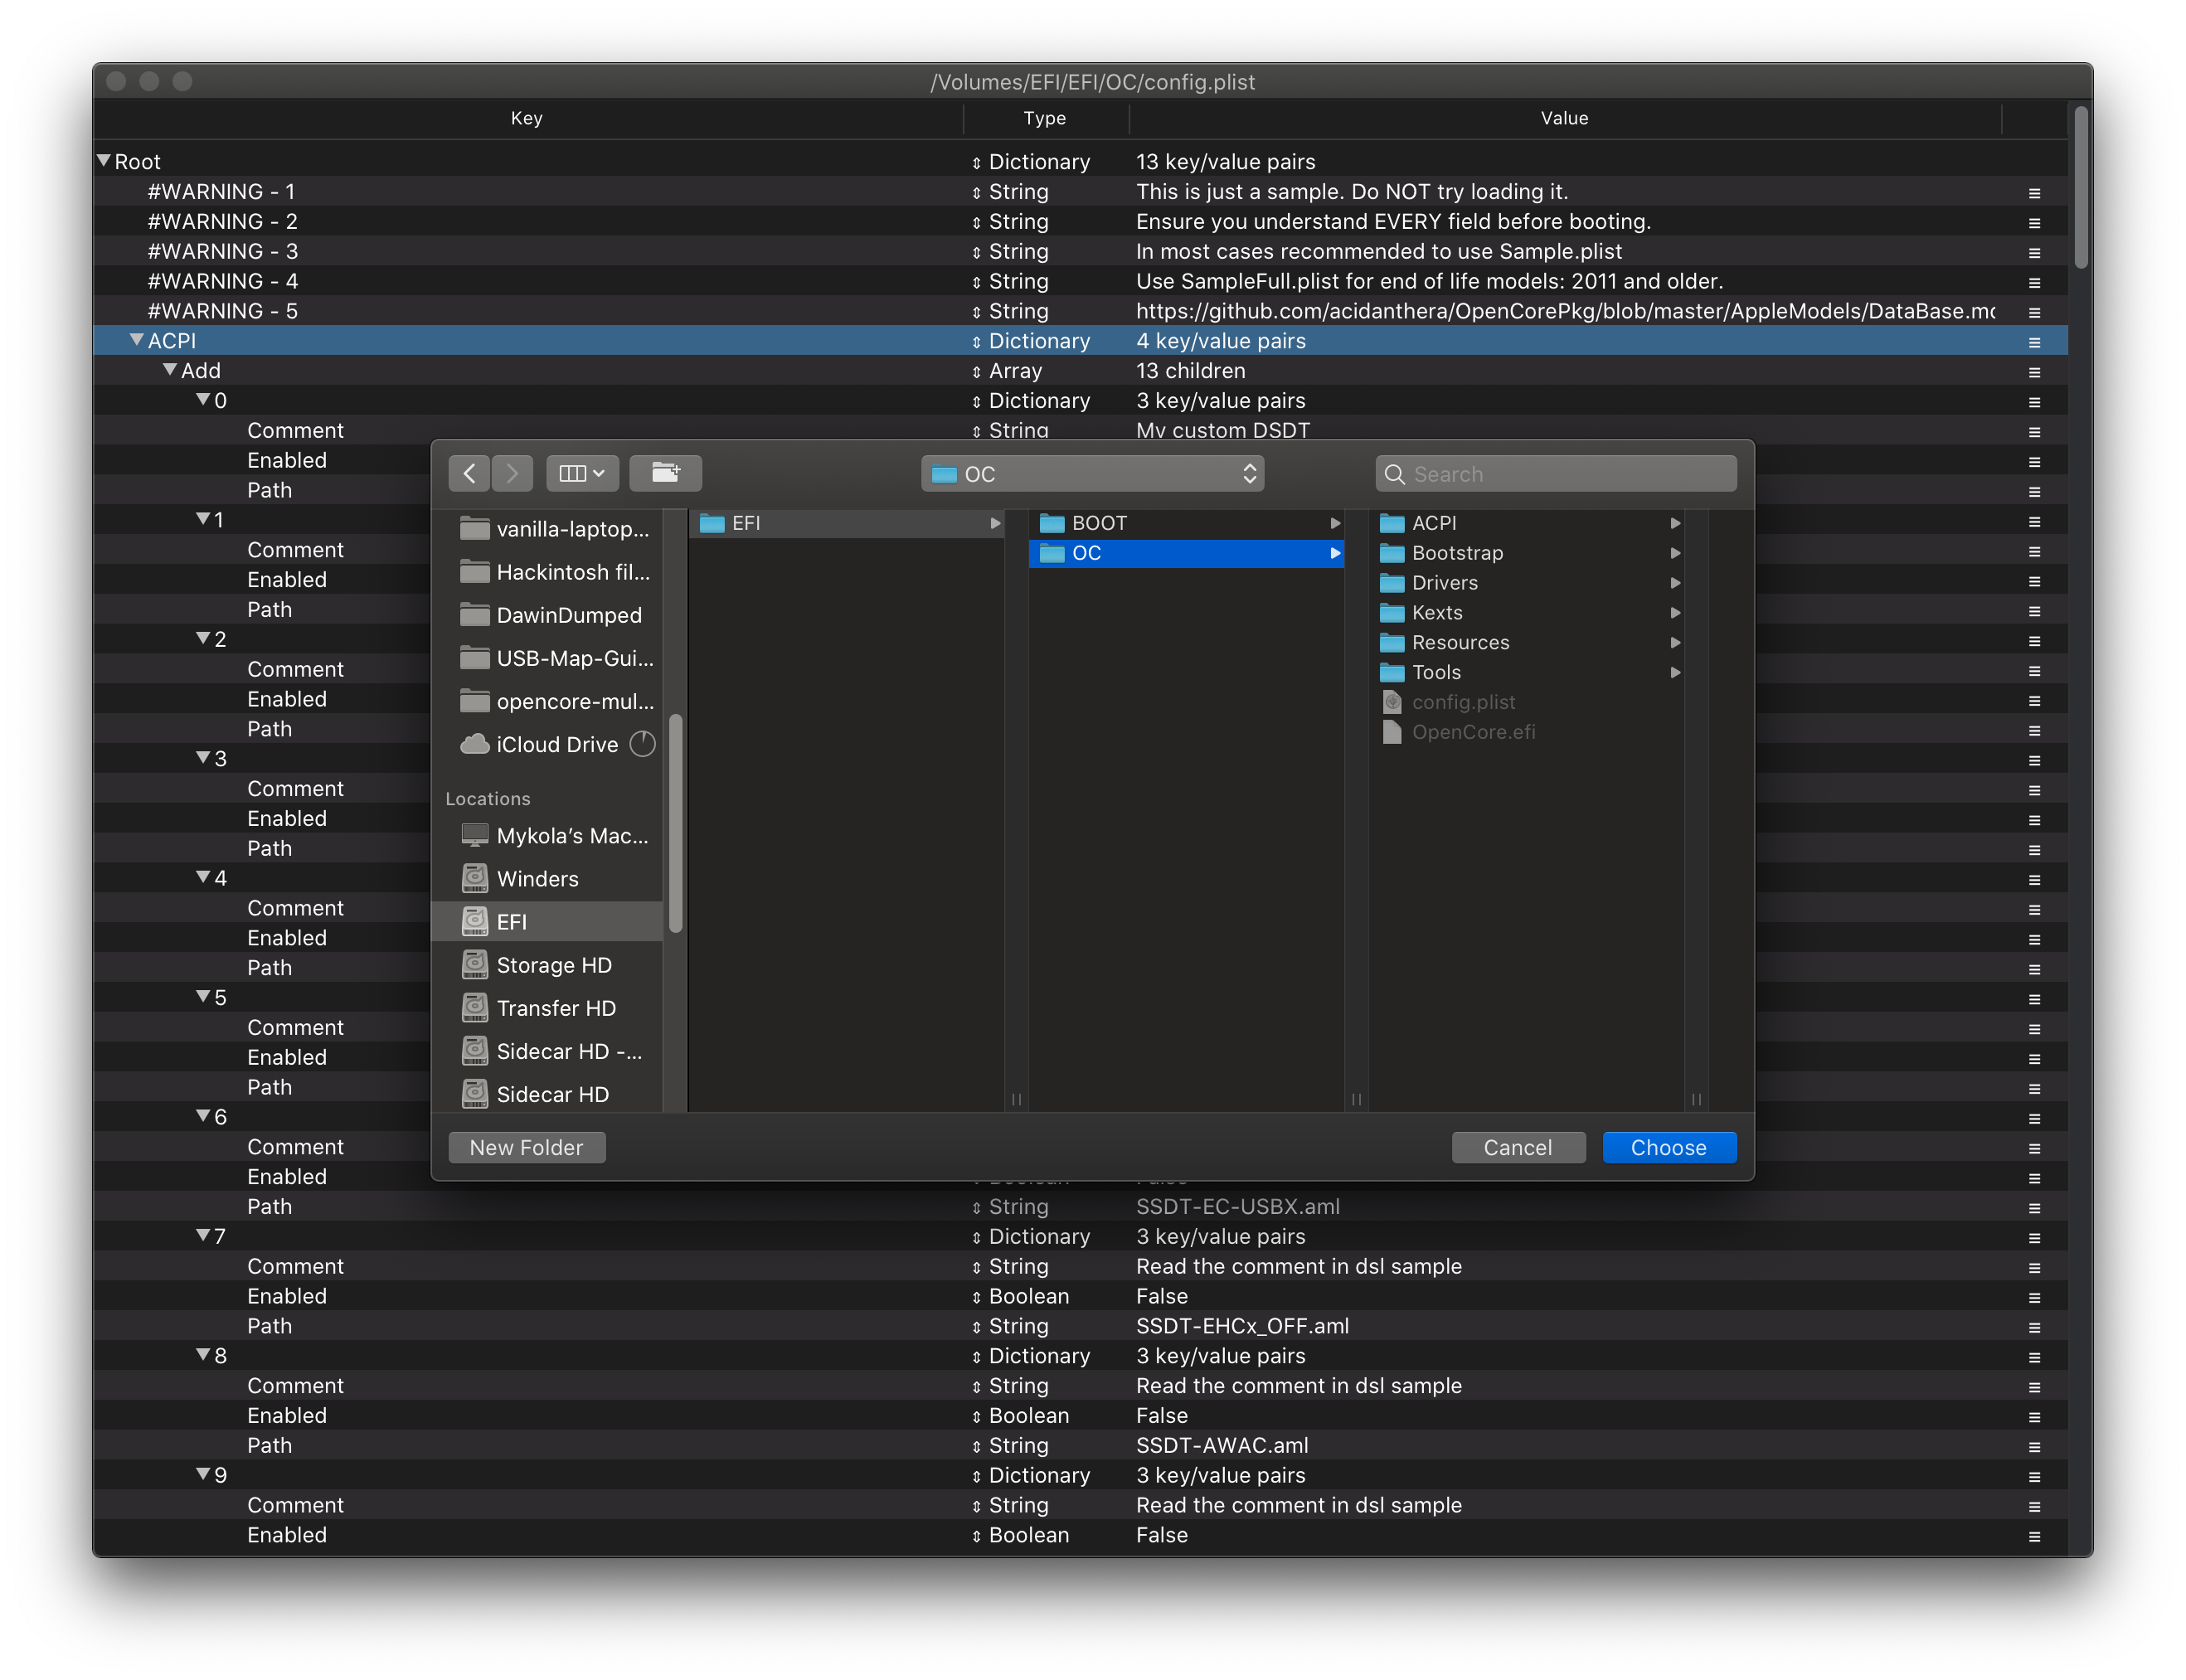
Once ProperTree is running, open your config.plist by pressing Cmd/Ctrl + O and selecting the config.plist file on your USB.
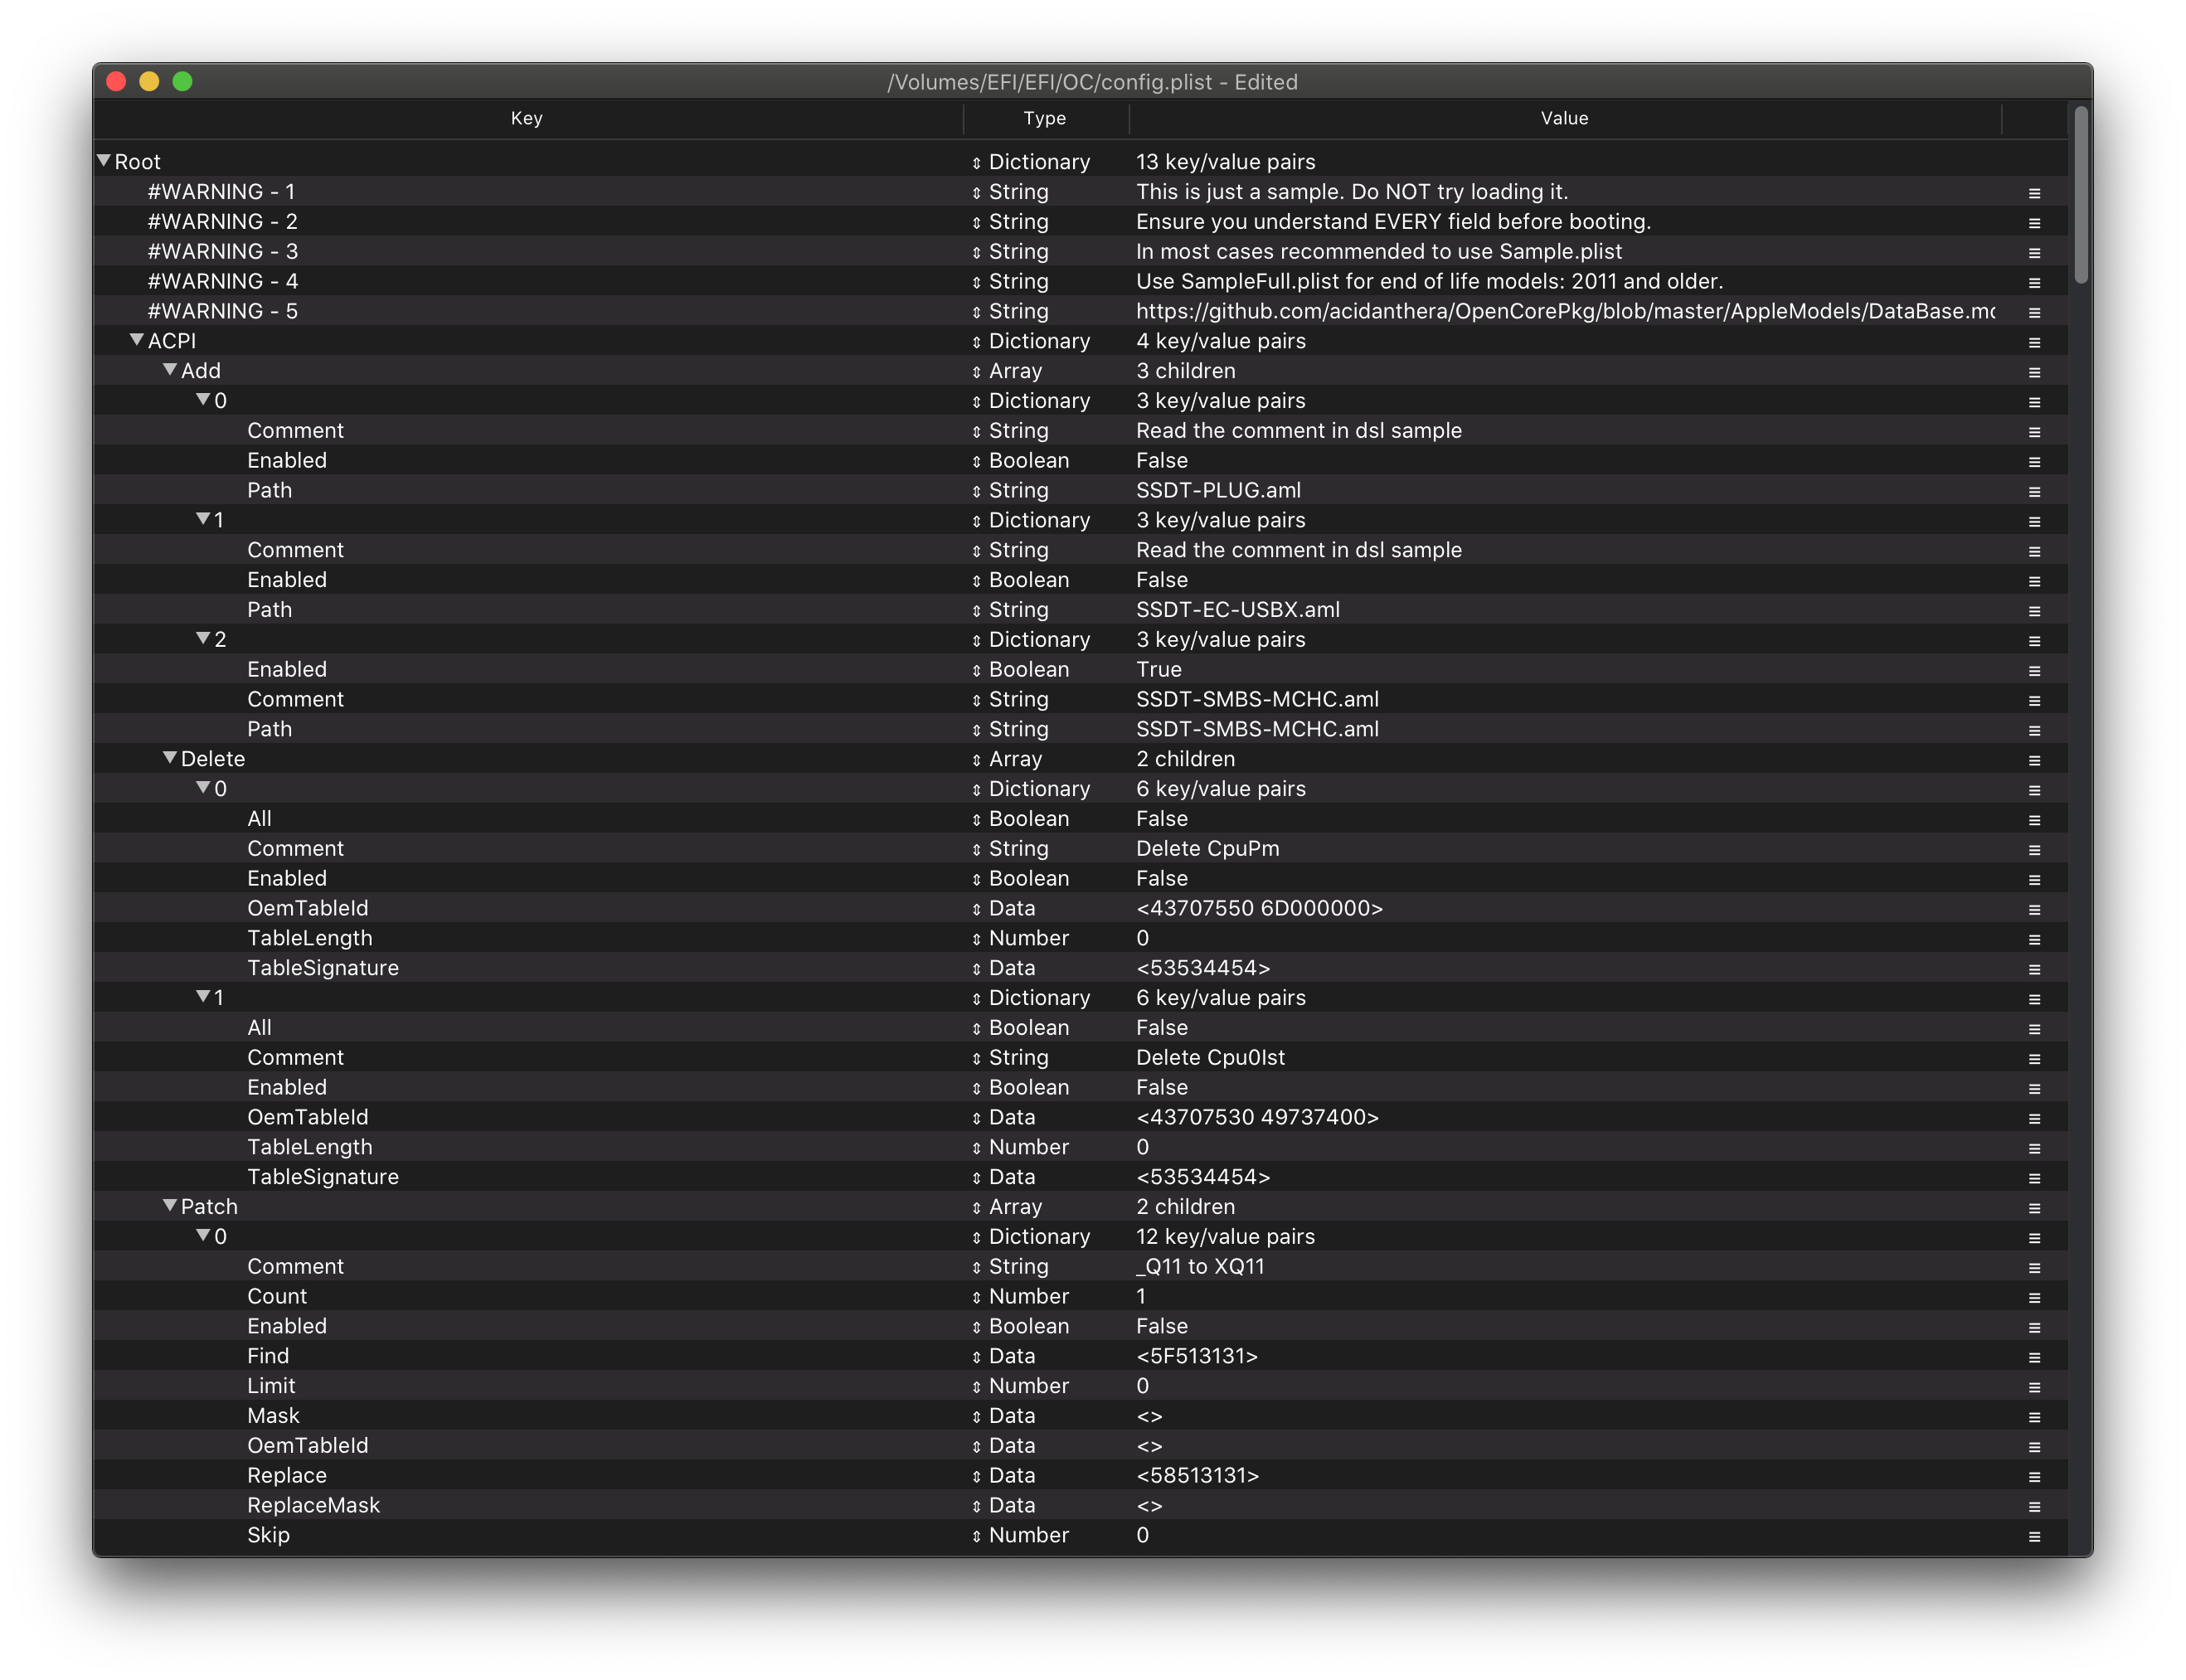
After the config is opened, press Cmd/Ctrl + Shift + R and point it at your EFI/OC folder to perform a «Clean Snapshot»:
- This will remove all the entries from the config.plist and then adds all your SSDTs, Kexts and Firmware drivers to the config
- Cmd/Ctrl + R is another option that will add all your files as well but will leave entries disabled if they were set like that before, useful for when you’re troubleshooting but for us not needed right now
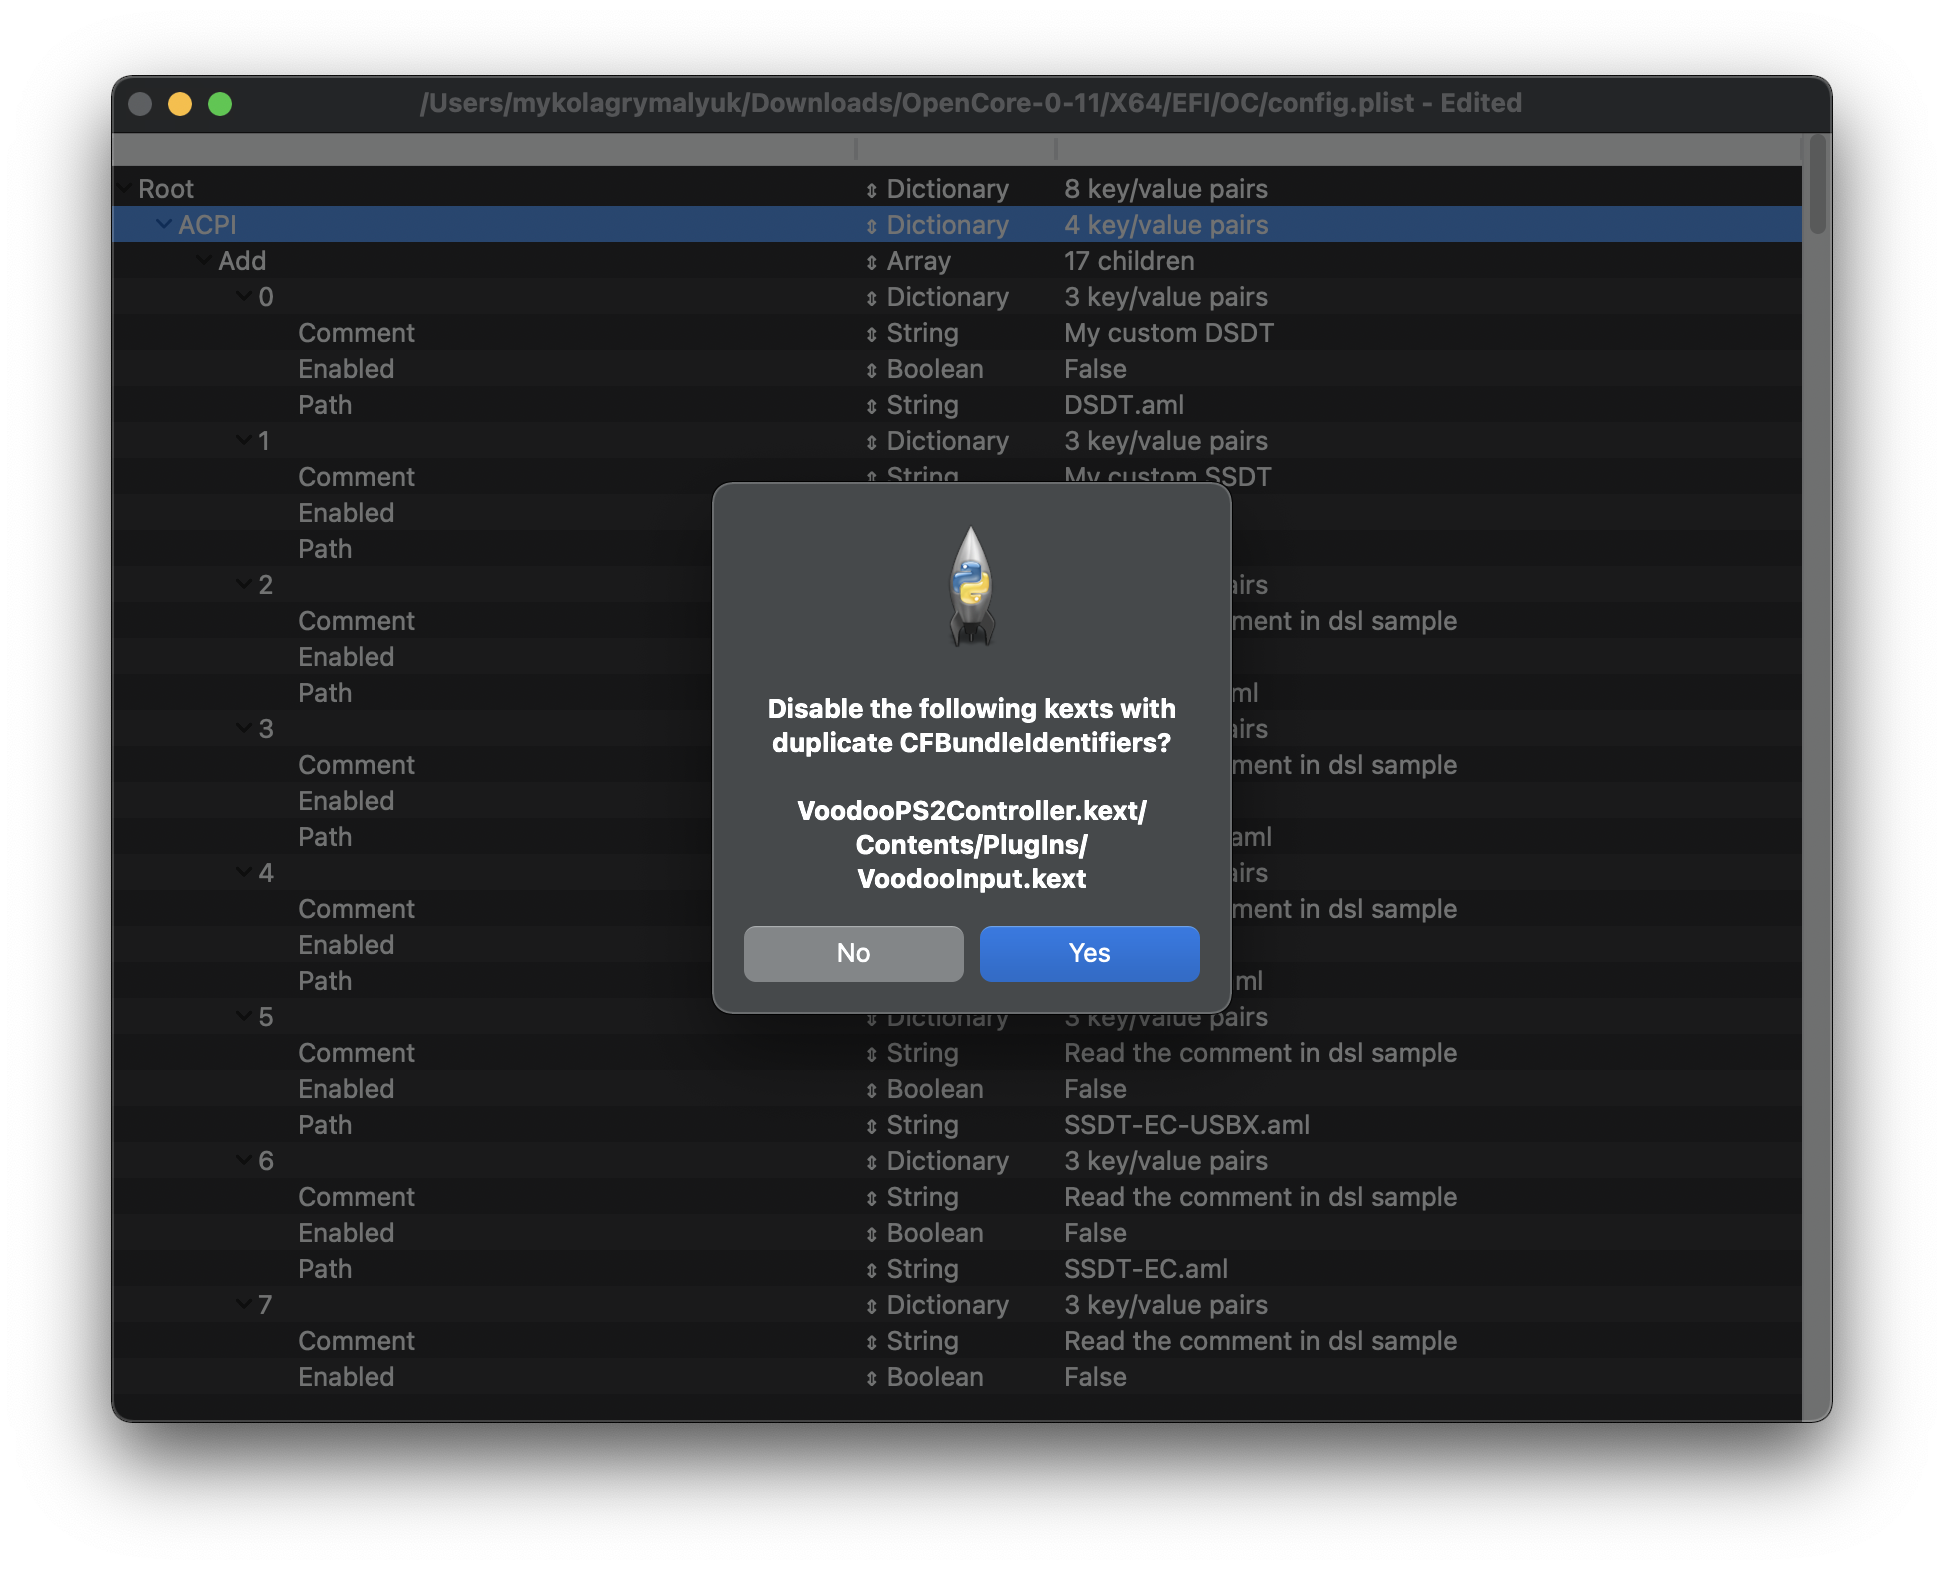
Once done, you’ll see your SSDTs, Kexts and firmware drivers populated in the config.plist:
- Note: If you get a pop up «Disable the following kexts with Duplicate CFBundleIdentifiers?», press «Yes». This is to ensure you don’t have duplicate kexts being injected, as some kexts may have some of the same plugins(ie. VoodooInput is in both VoodooPS2 and VoodooI2C’s plugin folder)
If you wish to clean up the file a bit, you can remove the #WARNING entries. Though they cause no issues staying there, so up to personal preference.
# Selecting your platform
Now comes the important part, selecting the configuration path. Each platform has their own unique quirks that you need to account for so knowing your hardware is super important. See below for what to follow:
# Intel Desktop
- Note: Intel’s NUC series are considered mobile hardware, for these situations we recommend following the Intel Laptop Section
| Code Name | Series | Release |
|---|---|---|
| Yonah, Conroe and Penryn | E8XXX, Q9XXX, etc 1 (opens new window) | 2006-2009 era |
| Lynnfield and Clarkdale | 5XX-8XX | 2010 era |
| Sandy Bridge | 2XXX | 2011 era |
| Ivy Bridge | 3XXX | 2012 era |
| Haswell | 4XXX | 2013-2014 era |
| Skylake | 6XXX | 2015-2016 era |
| Kaby Lake | 7XXX | 2017 era |
| Coffee Lake | 8XXX-9XXX | 2017-2019 era |
| Comet Lake | 10XXX | 2020 era |
# Intel Laptop
| Code Name | Series | Release |
|---|---|---|
| Clarksfield and Arrandale | 3XX-9XX | 2010 era |
| Sandy Bridge | 2XXX | 2011 era |
| Ivy Bridge | 3XXX | 2012 era |
| Haswell | 4XXX | 2013-2014 era |
| Broadwell | 5XXX | 2014-2015 era |
| Skylake | 6XXX | 2015-2016 era |
| Kaby Lake and Amber Lake | 7XXX | 2017 era |
| Coffee Lake and Whiskey Lake | 8XXX | 2017-2018 era |
| Coffee Lake Plus and Comet Lake | 9XXX-10XXX | 2019-2020 era |
| Ice Lake | 10XXX | 2019-2020 era |
# Intel HEDT
This section includes both enthusiast and server based hardware.
Источник
PlistEdit Pro
Информация
Описание
PlistEdit Pro является наиболее продвинутым редактором списков свойств написанных для macOS.
Разработчики Mac и IOS должны редактировать различные файлы списков при разработке своих приложений. PlistEdit Pro позволяет редактировать эти файлы проще, предоставляя интуитивный и мощный интерфейс.
В дополнение к возможности копирования и вставки или перетаскивания данных списка свойств вокруг, PlistEdit Pro также предлагает мощные функции поиска и замены, а также определяет структуры которые обеспечивают легкий доступ к наиболее часто используемые клавиши в различных стандартных файлов из списка свойств.
Опытные пользователи могут также извлечь из браузера PlistEdit Pro, которое обеспечивает легкий доступ к собственности списков используя macOS для хранения настроек в вашей системе. Просмотреть ваши списки предпочтений, или искать папку с PLIST файлов за один раз для конкретного ключа или значения.
PlistEdit Pro также позволяет автоматизировать задачи, связанные списки, через его Applescript поддержки и pledit инструмент командной строки.
Особенности:
полная поддержка Drag&Drop и копи-пейста
поддержка навигации с клавиатуры
возможность просмотра и редактирования свойств в режиме схемы или простого текста
поддержка AppleScript для автоматизации работы
многоуровневый undo
возможности поиска и замены
встроенный браузер plist-файлов
настройка шрифтов
Источник
Создание и настройка config.plist для установки Хакинтош
Во многих инструкциях о том как установить свой первый Хакинтош почему-то упускают один главный и важный шаг — создание файла plist.config. Исправляем данную ситуацию.
Ранее мы рассказывали что необходимо, чтобы установить хакинтош:
Создание plist.config для установки Хакинтош
Может быть и есть люди, которые создали полностью рабочий вариант config.plist в Windows, но сделать это будет очень трудно, либо с помощью web-инструмента. Поэтому создавать данный файл будем в виртуальной машине macOS. О том как их создать читайте в наших прошлых статьях:
Как по мне проще и легче установить в VmWare…
Теперь же необходим инструмент с помощью которого будет мастерить config.plist — скачиваем Clover Configurator и запускаем его.
Настройка config.plist для установки в Clover Configurator
Переходим сразу же на вкладку под названием «SMBIOS». В этой вкладке вам необходимо подобрать максимально похожий Mac. Для этого необходимо знать какой процессор установлен на вашем компьютере и близок к тому, что установлен в настоящем iMac или MacBook, MacPro.
Почти половина дела сделано, переходим во вкладку «System Parameters».
В выпадающем списке Inject Kexts выбираем «Yes» и ставим галочку напротив «Inject System ID». Это необходимо чтобы kext-ы которые мы приготовили, были загружены.
Переходим во вкладку «ACPI». Здесь вам необходимо включить различные Fix (как минимум те что указаны на скриншоте), так как в противном случае может возникнуть паника ядра и система «упадет», а может и нет. Об этом вы узнаете путем личных экспериментов.
Если у вас процессор Haswell, то рекомендуется поставить «1» напротив Plugin Type
Переходим во вкладку «Boot». Ставим как минимум одну галочку напротив -v и устанавливаем таймаут.
Возможно необходимо будет указать и другие ключи, но об этом вы узнаете позже сами экспериментальным путем.
Переходим во вкладку «Devices» и ставим все галочки USB, кроме последнего пункта.
Теперь на панели выбираем «Files» — «Save», чтобы сохранить созданный только что файл config.plist.
Еще раз напомню, что минимум необходимых настроек которые необходимо внести в config.plist и возможно его вам необходимо дорабатывать под себя!
Готовые config.plist для разных поколений процессоров
Если вам лень или настройка конфига вам слишком сложна по первой, то лучше воспользоваться, универсальными файлами config.plist, составленными для определенных поколений CPU:
Они еще требуют доработки, но более или менее подходят многим.
Далее файл config.plist необходимо переместить на загрузочную флешку, раздел EFI, папка Clover.
В следующей статье я расскажу вам как установить macOS (Hackintosh) на компьютер.
У вас еще остались дополнительные вопросы? Задавайте их в комментариях, рассказывайте о том, что у вас получилось или наоборот!
Вот и все! Оставайтесь вместе с сайтом Android +1, дальше будет еще интересней! Больше статей и инструкций читайте в разделе Статьи и Хаки Android.
Источник
# Desktop Coffee Lake
| Support | Version |
|---|---|
| Initial macOS Support | macOS 10.13, High Sierra |
# Starting Point
So making a config.plist may seem hard, it’s not. It just takes some time but this guide will tell you how to configure everything, you won’t be left in the cold. This also means if you have issues, review your config settings to make sure they’re correct. Main things to note with OpenCore:
- All properties must be defined, there are no default OpenCore will fall back on so do not delete sections unless told explicitly so. If the guide doesn’t mention the option, leave it at default.
- The Sample.plist cannot be used As-Is, you must configure it to your system
- DO NOT USE CONFIGURATORS, these rarely respect OpenCore’s configuration and even some like Mackie’s will add Clover properties and corrupt plists!
Now with all that, a quick reminder of the tools we need
And read this guide more than once before setting up OpenCore and make sure you have it set up correctly. Do note that images will not always be the most up-to-date so please read the text below them, if nothing’s mentioned then leave as default.
This is where you’ll add SSDTs for your system, these are very important to booting macOS and have many uses like USB maps
(opens new window) , disabling unsupported GPUs and such. And with our system, it’s even required to boot. Guide on making them found here: Getting started with ACPI
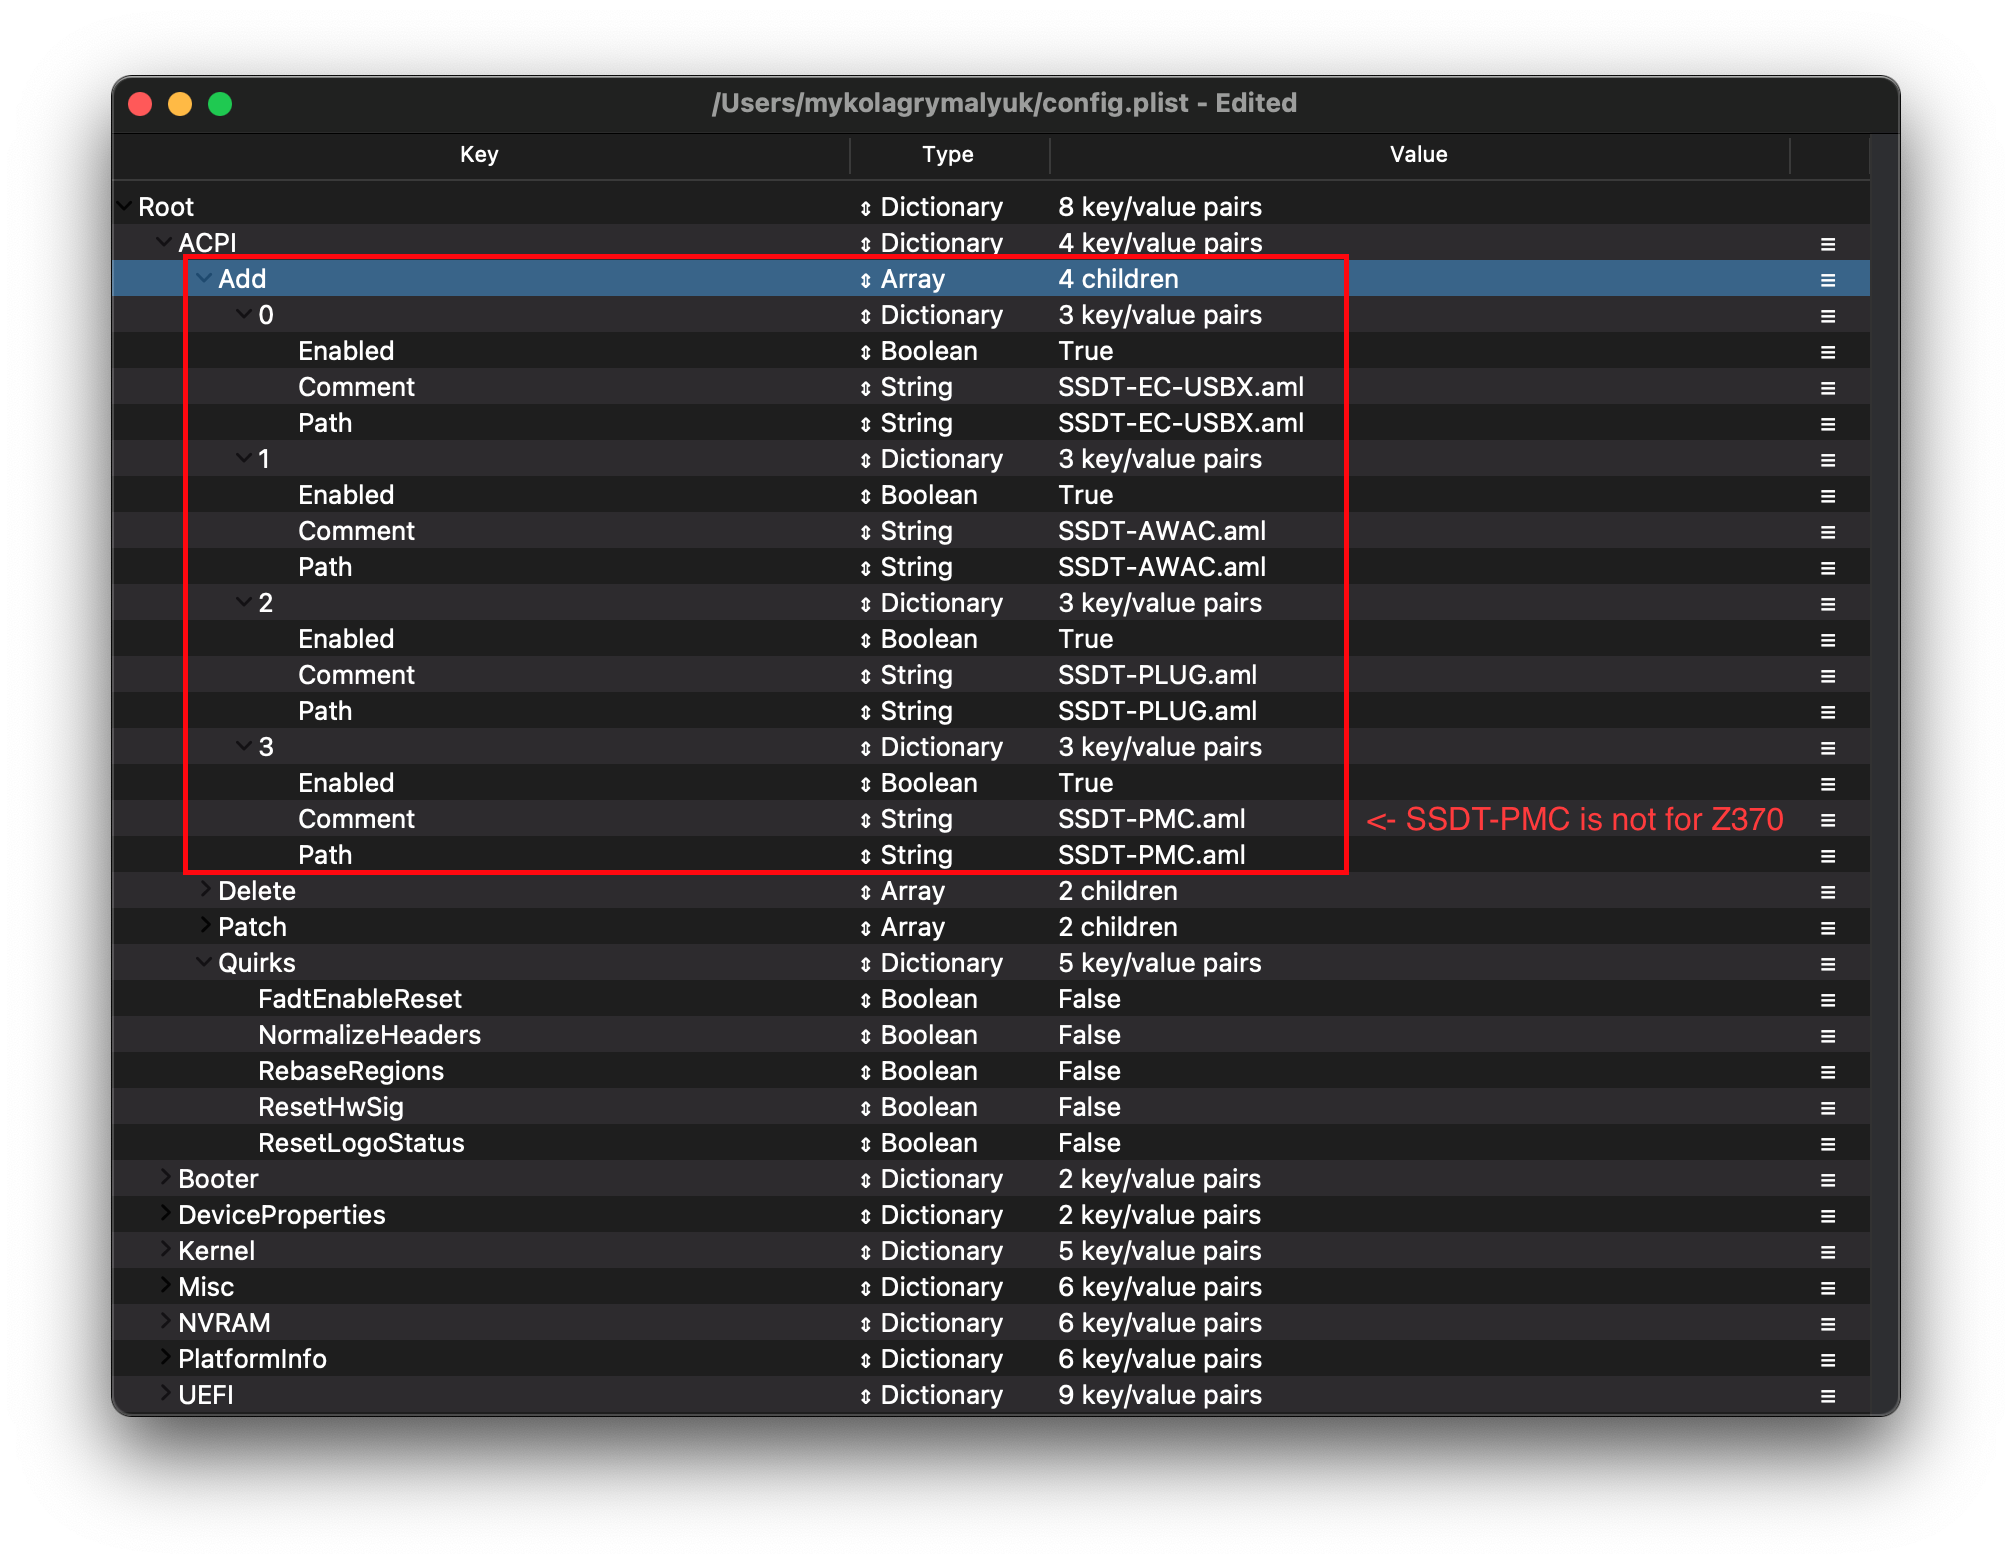
For us we’ll need a couple of SSDTs to bring back functionality that Clover provided:
| Required SSDTs | Description |
|---|---|
| SSDT-PLUG (opens new window) | Allows for native CPU power management on Haswell and newer, see Getting Started With ACPI Guide (opens new window) for more details. |
| SSDT-EC-USBX (opens new window) | Fixes both the embedded controller and USB power, see Getting Started With ACPI Guide (opens new window) for more details. |
| SSDT-AWAC (opens new window) | This is the 300 series RTC patch (opens new window) , required for most B360, B365, H310, H370, Z390 and some Z370 boards which prevent systems from booting macOS. The alternative is SSDT-RTC0 (opens new window) for when AWAC SSDT is incompatible due to missing the Legacy RTC clock, to check whether you need it and which to use please see Getting started with ACPI (opens new window) page. |
| SSDT-PMC (opens new window) | So true 300 series motherboards(non-Z370) don’t declare the FW chip as MMIO in ACPI and so XNU ignores the MMIO region declared by the UEFI memory map. This SSDT brings back NVRAM support. See Getting Started With ACPI Guide (opens new window) for more details. |
Note that you should not add your generated DSDT.aml here, it is already in your firmware. So if present, remove the entry for it in your config.plist and under EFI/OC/ACPI.
For those wanting a deeper dive into dumping your DSDT, how to make these SSDTs, and compiling them, please see the Getting started with ACPI
(opens new window) page. Compiled SSDTs have a .aml extension(Assembled) and will go into the EFI/OC/ACPI folder and must be specified in your config under ACPI -> Add as well.
# Delete
This blocks certain ACPI tables from loading, for us we can ignore this.
# Patch
This section allows us to dynamically modify parts of the ACPI (DSDT, SSDT, etc.) via OpenCore. For us, our patches are handled by our SSDTs. This is a much cleaner solution as this will allow us to boot Windows and other OSes with OpenCore
# Quirks
Settings relating to ACPI, leave everything here as default as we have no use for these quirks.
# Booter

This section is dedicated to quirks relating to boot.efi patching with OpenRuntime, the replacement for AptioMemoryFix.efi
# MmioWhitelist
This section is allowing devices to be passthrough to macOS that are generally ignored, for us we can ignore this section.
# Quirks
Settings relating to boot.efi patching and firmware fixes, for us, we need to change the following:
| Quirk | Enabled | Comment |
|---|---|---|
| DevirtualiseMmio | YES | |
| EnableWriteUnprotector | NO | |
| ProtectUefiServices | YES | Needed on Z390 system |
| RebuildAppleMemoryMap | YES | |
| SyncRuntimePermissions | YES |
# DeviceProperties

Sets device properties from a map.
This section is set up via WhateverGreen’s Framebuffer Patching Guide
(opens new window) and is used for setting important iGPU properties. If you have a -F series CPU, you can ignore this section as you do not have an iGPU.
AAPL,ig-platform-id is what macOS uses to determine how the iGPU drivers interact with our system, and the two values choose between are as follows:
| AAPL,ig-platform-id | Comment |
|---|---|
| 07009B3E | Used when the Desktop iGPU is used to drive a display |
| 00009B3E | Alternative to 07009B3E if it doesn’t work |
| 0300913E | Used when the Desktop iGPU is only used for computing tasks and doesn’t drive a display |
- Note: With macOS 10.15.5 and newer, there seems to be a lot of issues with black screen using 07009B3E , if you get similar issues try swapping to 00009B3E
We also add 2 more properties, framebuffer-patch-enable and framebuffer-stolenmem . The first enables patching via WhateverGreen.kext, and the second sets the min stolen memory to 19MB. This is usually unnecessary, as this can be configured in BIOS(64MB recommended) but required when not available.
- Note: Headless framebuffers(where the dGPU is the display out) do not need framebuffer-patch-enable and framebuffer-stolenmem
For users with black screen issues after verbose on B360, B365, H310, H370, Z390, please see the BusID iGPU patching
| Key | Type | Value |
|---|---|---|
| AAPL,ig-platform-id | Data | 07009B3E |
| framebuffer-patch-enable | Data | 01000000 |
| framebuffer-stolenmem | Data | 00003001 |
(This is an example for a desktop UHD 630 without a dGPU and no BIOS options for iGPU memory)
- Applies AppleALC audio injection, you’ll need to do your own research on which codec your motherboard has and match it with AppleALC’s layout. AppleALC Supported Codecs
(opens new window) .
For us, we’ll be using the boot-arg alcid=xxx instead to accomplish this. alcid will override all other layout-IDs present. More info on this is covered in the Post-Install Page
# Delete
Removes device properties from the map, for us we can ignore this
# Kernel
Here’s where we specify which kexts to load, in what specific order to load, and what architectures each kext is meant for. By default we recommend leaving what ProperTree has done, however for 32-bit CPUs please see below:
More in-depth Info
The main thing you need to keep in mind is:
- Load order
- Remember that any plugins should load after its dependencies
- This means kexts like Lilu must come before VirtualSMC, AppleALC, WhateverGreen, etc
A reminder that ProperTree
(opens new window) users can run Cmd/Ctrl + Shift + R to add all their kexts in the correct order without manually typing each kext out.
- Arch
- Architectures supported by this kext
- Currently supported values are Any , i386 (32-bit), and x86_64 (64-bit)
- BundlePath
- Name of the kext
- ex: Lilu.kext
- Enabled
- Self-explanatory, either enables or disables the kext
- ExecutablePath
- Path to the actual executable is hidden within the kext, you can see what path your kext has by right-clicking and selecting Show Package Contents . Generally, they’ll be Contents/MacOS/Kext but some have kexts hidden within under Plugin folder. Do note that plist only kexts do not need this filled in.
- ex: Contents/MacOS/Lilu
- MinKernel
- Lowest kernel version your kext will be injected into, see below table for possible values
- ex. 12.00.00 for OS X 10.8
- MaxKernel
- Highest kernel version your kext will be injected into, see below table for possible values
- ex. 11.99.99 for OS X 10.7
- PlistPath
- Path to the info.plist hidden within the kext
- ex: Contents/Info.plist
Kernel Support Table
| OS X Version | MinKernel | MaxKernel |
|---|---|---|
| 10.4 | 8.0.0 | 8.99.99 |
| 10.5 | 9.0.0 | 9.99.99 |
| 10.6 | 10.0.0 | 10.99.99 |
| 10.7 | 11.0.0 | 11.99.99 |
| 10.8 | 12.0.0 | 12.99.99 |
| 10.9 | 13.0.0 | 13.99.99 |
| 10.10 | 14.0.0 | 14.99.99 |
| 10.11 | 15.0.0 | 15.99.99 |
| 10.12 | 16.0.0 | 16.99.99 |
| 10.13 | 17.0.0 | 17.99.99 |
| 10.14 | 18.0.0 | 18.99.99 |
| 10.15 | 19.0.0 | 19.99.99 |
| 11 | 20.0.0 | 20.99.99 |
# Emulate
Needed for spoofing unsupported CPUs like Pentiums and Celerons
- Cpuid1Mask: Leave this blank
- Cpuid1Data: Leave this blank
# Force
Used for loading kexts off system volume, only relevant for older operating systems where certain kexts are not present in the cache(ie. IONetworkingFamily in 10.6).
For us, we can ignore.
# Block
Blocks certain kexts from loading. Not relevant for us.
# Patch
Patches both the kernel and kexts.
# Quirks
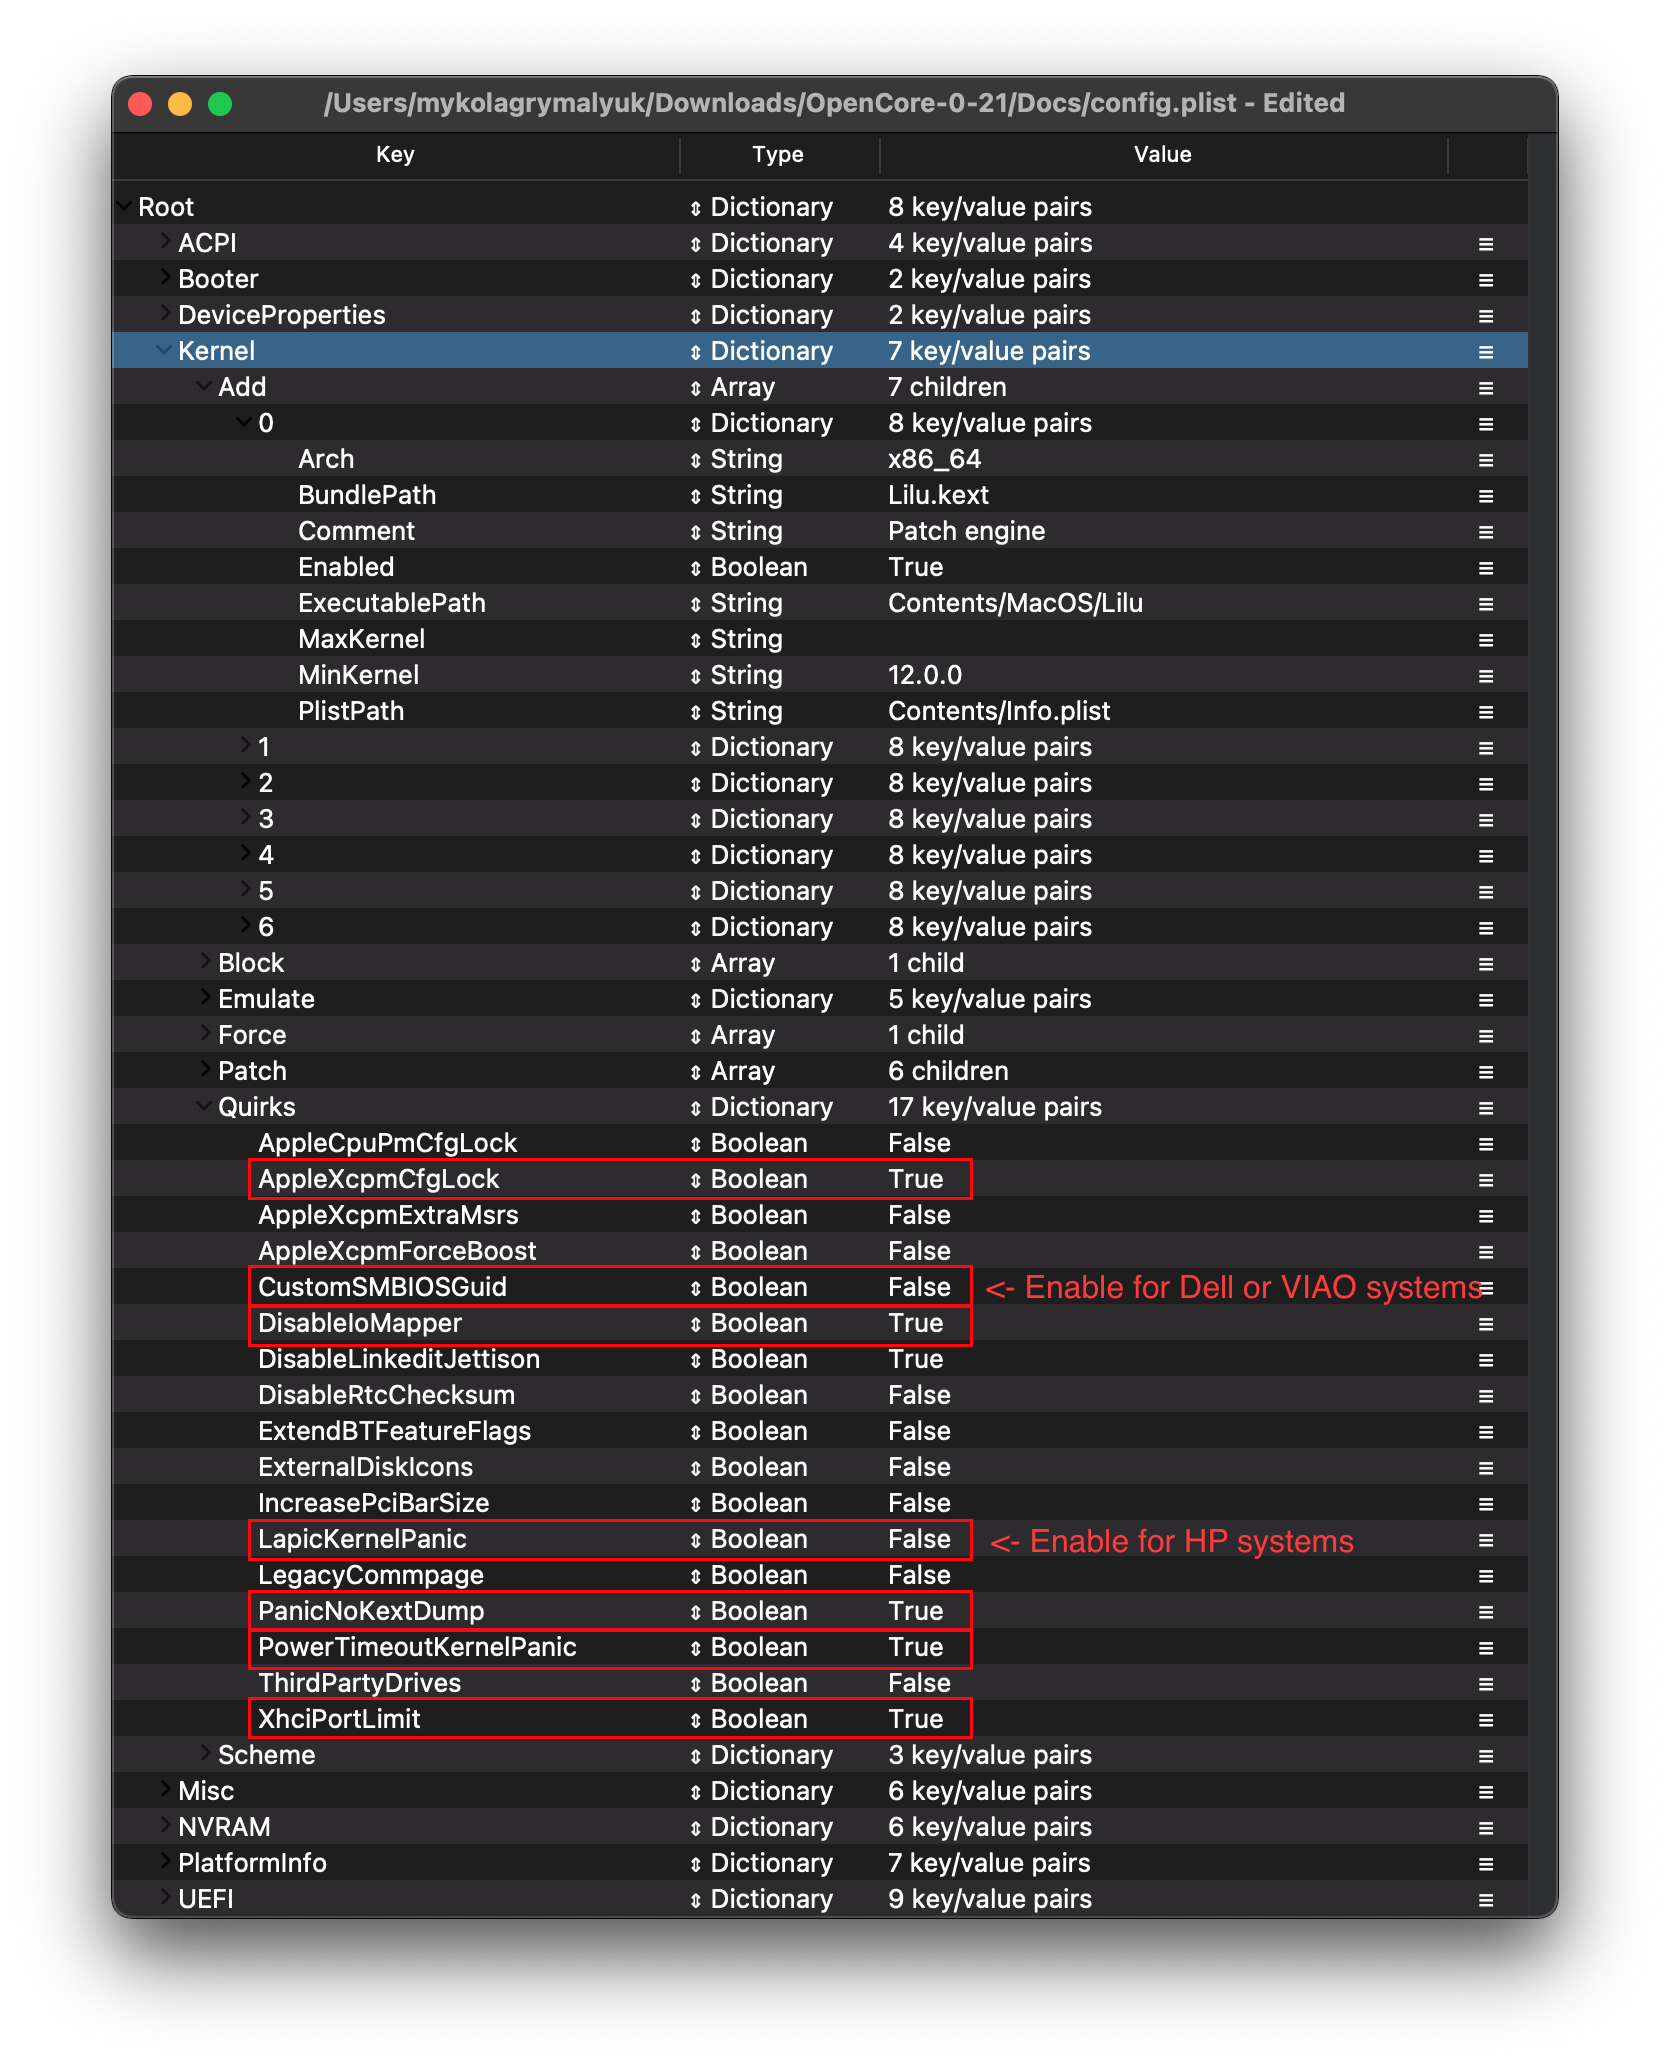
Settings relating to the kernel, for us we’ll be enabling the following:
| Quirk | Enabled | Comment |
|---|---|---|
| AppleXcpmCfgLock | YES | Not needed if CFG-Lock is disabled in the BIOS |
| DisableIoMapper | YES | Not needed if VT-D is disabled in the BIOS |
| LapicKernelPanic | NO | HP Machines will require this quirk |
| PanicNoKextDump | YES | |
| PowerTimeoutKernelPanic | YES | |
| XhciPortLimit | YES | Disable if running macOS 11.3+ |
(opens new window) We recommend users either disable this quirk and map before upgrading or map from Windows
(opens new window) . You may also install macOS 11.2.3 or older. The reason being is that UsbInjectAll reimplements builtin macOS functionality without proper current tuning. It is much cleaner to just describe your ports in a single plist-only kext, which will not waste runtime memory and such
# Scheme
Settings related to legacy booting(ie. 10.4-10.6), for majority you can skip however for those planning to boot legacy OSes you can see below:
More in-depth Info
FuzzyMatch: True
- Used for ignoring checksums with kernelcache, instead opting for the latest cache available. Can help improve boot performance on many machines in 10.6
KernelArch: x86_64
- Set the kernel’s arch type, you can choose between Auto , i386 (32-bit), and x86_64 (64-bit).
- If you’re booting older OSes which require a 32-bit kernel(ie. 10.4 and 10.5) we recommend to set this to Auto and let macOS decide based on your SMBIOS. See below table for supported values:
- 10.4-10.5 — x86_64 , i386 or i386-user32
- i386-user32 refers 32-bit userspace, so 32-bit CPUs must use this(or CPUs missing SSSE3)
- x86_64 will still have a 32-bit kernelspace however will ensure 64-bit userspace in 10.4/5
- 10.6 — i386 , i386-user32 , or x86_64
- 10.7 — i386 or x86_64
- 10.8 or newer — x86_64
- 10.4-10.5 — x86_64 , i386 or i386-user32
KernelCache: Auto
- Set kernel cache type, mainly useful for debugging and so we recommend Auto for best support

Settings for boot screen (Leave everything as default).
# Debug
Helpful for debugging OpenCore boot issues(We’ll be changing everything but DisplayDelay ):
| Quirk | Enabled |
|---|---|
| AppleDebug | YES |
| ApplePanic | YES |
| DisableWatchDog | YES |
| Target | 67 |
These values are based of those calculated in OpenCore debugging
# Security
Security is pretty self-explanatory, do not skip. We’ll be changing the following:
| Quirk | Enabled | Comment |
|---|---|---|
| AllowNvramReset | YES | |
| AllowSetDefault | YES | |
| BlacklistAppleUpdate | YES | |
| ScanPolicy | 0 | |
| SecureBootModel | Default | This is a word and is case-sensitive, set to Disabled if you do not want secure boot(ie. you require Nvidia’s Web Drivers) |
| Vault | Optional | This is a word, it is not optional to omit this setting. You will regret it if you don’t set it to Optional, note that it is case-sensitive |
AllowNvramReset: YES
- Allows for NVRAM reset both in the boot picker and when pressing Cmd+Opt+P+R
AllowSetDefault: YES
- Allow CTRL+Enter and CTRL+Index to set default boot device in the picker
ApECID: 0
- Used for netting personalized secure-boot identifiers, currently this quirk is unreliable due to a bug in the macOS installer so we highly encourage you to leave this as default.
AuthRestart: NO
- Enables Authenticated restart for FileVault 2 so password is not required on reboot. Can be considered a security risk so optional
BlacklistAppleUpdate: YES
- Used for blocking firmware updates, used as extra level of protection as macOS Big Sur no longer uses run-efi-updater variable
DmgLoading: Signed
- Ensures only signed DMGs load
ExposeSensitiveData: 6
- Shows more debug information, requires debug version of OpenCore
Vault: Optional
- We won’t be dealing vaulting so we can ignore, you won’t boot with this set to Secure
- This is a word, it is not optional to omit this setting. You will regret it if you don’t set it to Optional , note that it is case-sensitive
ScanPolicy: 0
- 0 allows you to see all drives available, please refer to Security
(opens new window) section for further details. Will not boot USB devices with this set to default
SecureBootModel: Disabled
- Controls Apple’s secure boot functionality in macOS, please refer to Security
(opens new window) section for further details.
# Tools
Used for running OC debugging tools like the shell, ProperTree’s snapshot function will add these for you.
# Entries
Used for specifying irregular boot paths that can’t be found naturally with OpenCore.
Won’t be covered here, see 8.6 of Configuration.pdf
# NVRAM

Used for OpenCore’s UI scaling, default will work for us. See in-depth section for more info
Booter Path, mainly used for UI Scaling
UIScale:
- 01 : Standard resolution
- 02 : HiDPI (generally required for FileVault to function correctly on smaller displays)
DefaultBackgroundColor: Background color used by boot.efi
- 00000000 : Syrah Black
- BFBFBF00 : Light Gray
OpenCore’s NVRAM GUID, mainly relevant for RTCMemoryFixup users
System Integrity Protection bitmask
- General Purpose boot-args:
| boot-args | Description |
|---|---|
| -v | This enables verbose mode, which shows all the behind-the-scenes text that scrolls by as you’re booting instead of the Apple logo and progress bar. It’s invaluable to any Hackintosher, as it gives you an inside look at the boot process, and can help you identify issues, problem kexts, etc. |
| debug=0x100 | This disables macOS’s watchdog which helps prevents a reboot on a kernel panic. That way you can hopefully glean some useful info and follow the breadcrumbs to get past the issues. |
| keepsyms=1 | This is a companion setting to debug=0x100 that tells the OS to also print the symbols on a kernel panic. That can give some more helpful insight as to what’s causing the panic itself. |
| alcid=1 | Used for setting layout-id for AppleALC, see supported codecs (opens new window) to figure out which layout to use for your specific system. More info on this is covered in the Post-Install Page (opens new window) |
- GPU-Specific boot-args:
| boot-args | Description |
|---|---|
| agdpmod=pikera | Used for disabling board ID checks on Navi GPUs(RX 5000 series), without this you’ll get a black screen. Don’t use if you don’t have Navi(ie. Polaris and Vega cards shouldn’t use this) |
| nvda_drv_vrl=1 | Used for enabling Nvidia’s Web Drivers on Maxwell and Pascal cards in Sierra and High Sierra |
| -wegnoegpu | Used for disabling all other GPUs than the integrated Intel iGPU, useful for those wanting to run newer versions of macOS where their dGPU isn’t supported |
- Settings for ‘System Integrity Protection’ (SIP). It is generally recommended to change this with csrutil via the recovery partition.
- csr-active-config by default is set to 00000000 which enables System Integrity Protection. You can choose a number of different values but overall we recommend keeping this enabled for best security practices. More info can be found in our troubleshooting page: Disabling SIP
- This is used to prevent Apple’s firmware update packages from installing and breaking boot order; this is important as these firmware updates (meant for Macs) will not work.
- Needed for non-latin keyboards in the format of lang-COUNTRY:keyboard , recommended to keep blank though you can specify it(Default in Sample config is Russian):
- American: en-US:0 ( 656e2d55533a30 in HEX)
- Full list can be found in AppleKeyboardLayouts.txt
- Hint: prev-lang:kbd can be changed into a String so you can input en-US:0 directly instead of converting to HEX
csr-active-config: 00000000
run-efi-updater: No
prev-lang:kbd: <>
(opens new window)
| Key | Type | Value |
|---|---|---|
| prev-lang:kbd | String | en-US:0 |
# Delete
Forcibly rewrites NVRAM variables, do note that Add will not overwrite values already present in NVRAM so values like boot-args should be left alone. For us, we’ll be changing the following:
| Quirk | Enabled |
|---|---|
| WriteFlash | YES |
LegacyEnable: NO
- Allows for NVRAM to be stored on nvram.plist, needed for systems without native NVRAM
LegacyOverwrite: NO
- Permits overwriting firmware variables from nvram.plist, only needed for systems without native NVRAM
LegacySchema
- Used for assigning NVRAM variables, used with LegacyEnable set to YES
WriteFlash: YES
- Enables writing to flash memory for all added variables.
# PlatformInfo

For setting up the SMBIOS info, we’ll use CorpNewt’s GenSMBIOS
For this Coffee Lake example, we’ll chose the iMac19,1 SMBIOS — this is done intentionally for compatibility’s sake. There are two main SMBIOS used for Coffee Lake:
| SMBIOS | Hardware |
|---|---|
| iMac19,1 | For Mojave and newer |
| iMac18,3 | For High Sierra and older |
- You’ll use 18,3 when you have a Pascal or Maxwell dGPU and are limited to versions of macOS with Web Drivers
Run GenSMBIOS, pick option 1 for downloading MacSerial and Option 3 for selecting out SMBIOS. This will give us an output similar to the following:
The Type part gets copied to Generic -> SystemProductName.
The Serial part gets copied to Generic -> SystemSerialNumber.
The Board Serial part gets copied to Generic -> MLB.
The SmUUID part gets copied to Generic -> SystemUUID.
We set Generic -> ROM to either an Apple ROM (dumped from a real Mac), your NIC MAC address, or any random MAC address (could be just 6 random bytes, for this guide we’ll use 11223300 0000 . After install follow the Fixing iServices
(opens new window) page on how to find your real MAC Address)
Reminder that you want either an invalid serial or valid serial numbers but those not in use, you want to get a message back like: «Invalid Serial» or «Purchase Date not Validated»
Automatic: YES
- Generates PlatformInfo based on Generic section instead of DataHub, NVRAM, and SMBIOS sections
# Generic
AdviseFeatures: NO
- Used for when the EFI partition isn’t first on the Windows drive
MaxBIOSVersion: NO
- Sets BIOS version to Max to avoid firmware updates in Big Sur+, mainly applicable for genuine Macs.
ProcessorType: 0
- Set to 0 for automatic type detection, however this value can be overridden if desired. See AppleSmBios.h
SpoofVendor: YES
- Swaps vendor field for Acidanthera, generally not safe to use Apple as a vendor in most case
SystemMemoryStatus: Auto
- Sets whether memory is soldered or not in SMBIOS info, purely cosmetic and so we recommend Auto
UpdateDataHub: YES
- Update Data Hub fields
UpdateNVRAM: YES
UpdateSMBIOS: YES
UpdateSMBIOSMode: Create
- Replace the tables with newly allocated EfiReservedMemoryType, use Custom on Dell laptops requiring CustomSMBIOSGuid quirk
- Setting to Custom with CustomSMBIOSGuid quirk enabled can also disable SMBIOS injection into «non-Apple» OSes however we do not endorse this method as it breaks Bootcamp compatibility. Use at your own risk

ConnectDrivers: YES
- Forces .efi drivers, change to NO will automatically connect added UEFI drivers. This can make booting slightly faster, but not all drivers connect themselves. E.g. certain file system drivers may not load.
# Drivers
Add your .efi drivers here.
Only drivers present here should be:
Relating to APFS driver loader settings, for us we’ll be changing the following:
| Setting | Value | Comment |
|---|---|---|
| MinDate | -1 | Not needed if not booting High Sierra — Catalina |
| MinVersion | -1 | Not needed if not booting High Sierra — Catalina |
MinDate: -1
- Sets the minimum date required for APFS drivers to load. The default in OpenCore is 2021-01-01, which limits booting High Sierra — Catalina when you don’t have an APFS driver that satisifes the requirements (aka having Big Sur installed).
- If you’d like to boot High Sierra — Catalina, set this to -1 , otherwise you don’t need to change it
MinVersion: -1
- Sets the minimum version required for APFS drivers to load. The default in OpenCore is versions from Big Sur and above, which limits booting High Sierra — Catalina when you don’t have an APFS driver that satisifes the requirements (aka having Big Sur installed).
- If you’d like to boot High Sierra — Catalina, set this to -1 , otherwise you don’t need to change it
# Audio
Related to AudioDxe settings, for us we’ll be ignoring(leave as default). This is unrelated to audio support in macOS.
- For further use of AudioDxe and the Audio section, please see the Post Install page: Add GUI and Boot-chime
# Input
Related to boot.efi keyboard passthrough used for FileVault and Hotkey support, leave everything here as default as we have no use for these quirks. See here for more details: Security and FileVault
# Output
Relating to OpenCore’s visual output, leave everything here as default as we have no use for these quirks.
# ProtocolOverrides
Mainly relevant for Virtual machines, legacy macs and FileVault users. See here for more details: Security and FileVault
# Quirks
Relating to quirks with the UEFI environment, for us we’ll be changing the following:
| Quirk | Enabled | Comment |
|---|---|---|
| UnblockFsConnect | NO | Needed mainly by HP motherboards |
DisableSecurityPolicy: NO
- Disables platform security policy in firmware, recommended for buggy firmwares where disabling Secure Boot does not allow 3rd party firmware drivers to load.
- If running a Microsoft Surface device, recommended to enable this option
RequestBootVarRouting: YES
- Redirects AptioMemoryFix from EFI_GLOBAL_VARIABLE_GUID to OC_VENDOR_VARIABLE_GUID . Needed for when firmware tries to delete boot entries and is recommended to be enabled on all systems for correct update installation, Startup Disk control panel functioning, etc.
UnblockFsConnect: NO
- Some firmware block partition handles by opening them in By Driver mode, which results in File System protocols being unable to install. Mainly relevant for HP systems when no drives are listed
# ReservedMemory
Used for exempting certain memory regions from OSes to use, mainly relevant for Sandy Bridge iGPUs or systems with faulty memory. Use of this quirk is not covered in this guide
# Cleaning up
And now you’re ready to save and place it into your EFI under EFI/OC.
For those having booting issues, please make sure to read the Troubleshooting section first and if your questions are still unanswered we have plenty of resources at your disposal:
# Intel BIOS settings
- Note: Most of these options may not be present in your firmware, we recommend matching up as closely as possible but don’t be too concerned if many of these options are not available in your BIOS
# Disable
- Fast Boot
- Secure Boot
- Serial/COM Port
- Parallel Port
- VT-d (can be enabled if you set DisableIoMapper to YES)
- CSM
- Thunderbolt(For initial install, as Thunderbolt can cause issues if not setup correctly)
- Intel SGX
- Intel Platform Trust
- CFG Lock (MSR 0xE2 write protection)(This must be off, if you can’t find the option then enable AppleXcpmCfgLock under Kernel -> Quirks. Your hack will not boot with CFG-Lock enabled)
# Enable
- VT-x
- Above 4G decoding
- Hyper-Threading
- Execute Disable Bit
- EHCI/XHCI Hand-off
- OS type: Windows 8.1/10 UEFI Mode
- DVMT Pre-Allocated(iGPU Memory): 64MB
- SATA Mode: AHCI
# Now with all this done, head to the Installation Page
Источник


