- Решаем проблему с бесконечной установкой обновлений Windows
- Устранение неполадок обновления Windows
- Подготовка
- Способ 1: Скрипт сброса параметров
- Способ 2: Утилиты DISM и SFC
- Способ 3: Установка пакета обновлений
- Заключение
- How to stop automatic updates on Windows 10
- How to disable automatic updates using Settings
- How to disable automatic updates using Group Policy
- Disable updates
- Limit updates
- How to disable automatic updates using Registry
- Disable updates
- Limit updates
- More Windows 10 resources
- The Dell XPS 15 is our choice for best 15-inch laptop
- Halo: MCC’s live service elements make it better, not worse
- Microsoft’s Surface Duo is not ‘failing up’
- These are the best PC sticks when you’re on the move
Решаем проблему с бесконечной установкой обновлений Windows

Устранение неполадок обновления Windows
Причин, вызывающих проблемы с апдейтом системы, довольно много. Основными являются сбои в работе служб, отвечающих за обновление, повреждение файлов при скачивании, ошибки при установке, вызванные различными факторами – вирусом или антивирусом или некорректными действиями пользователя. Поскольку точно определить причину мы не можем, то решения проблемы должны быть универсальными, то есть быть направленными на устранение всех причин разом. Далее рассмотрим два варианта действий.
Подготовка
Для начала необходимо выполнить восстановление Виндовс к тому состоянию, в котором она была до попытки установки обновления. Обусловлено это тем, что загрузить систему и произвести в ней какие-либо действия не представляется возможным.
- Перезагружаем компьютер в «Безопасный режим».
Подробнее: Как войти в безопасный режим в Windows 10, Windows 8, Windows 7, Windows XP
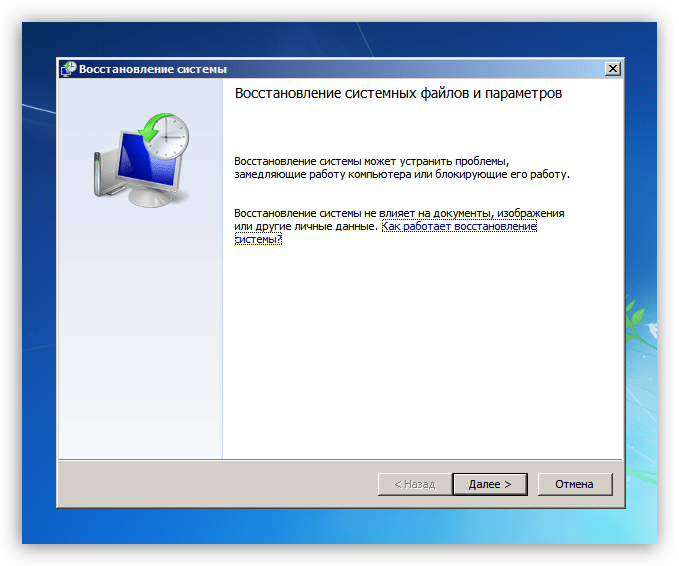
Вызываем утилиту восстановления из строки «Выполнить» (Win+R). Нам поможет вот такая команда:
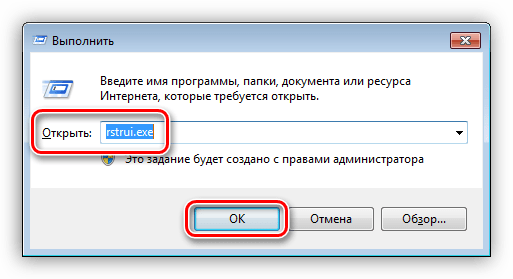
Для Виндовс ХР необходимо прописать полный путь.
C:\WINDOWS\system32\Restore\rstrui.exe
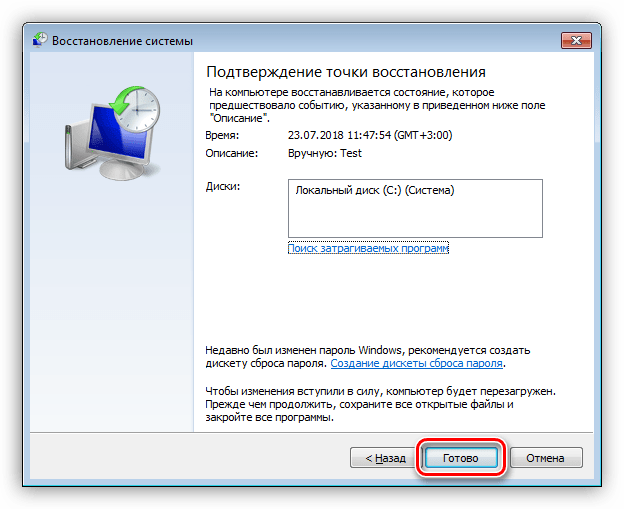
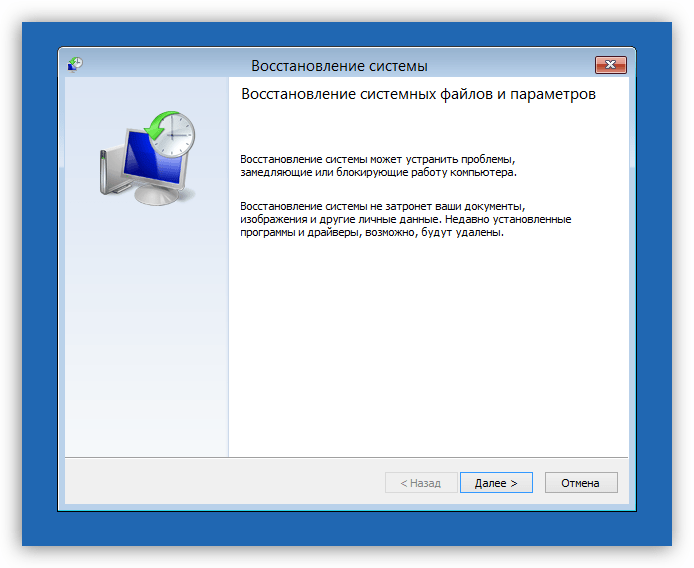
Нажимаем «Далее».

Выбираем точку и снова жмем «Далее».

После нажатия «Готово» утилита начнет процесс восстановления с перезагрузкой компьютера.
Если в безопасный режим войти не получается, то придется воспользоваться установочным дистрибутивом, записанным на диск или флешку. С этого носителя необходимо загрузить компьютер.
После этапа выбора языка нажимаем на ссылку, запускающую средство восстановления.
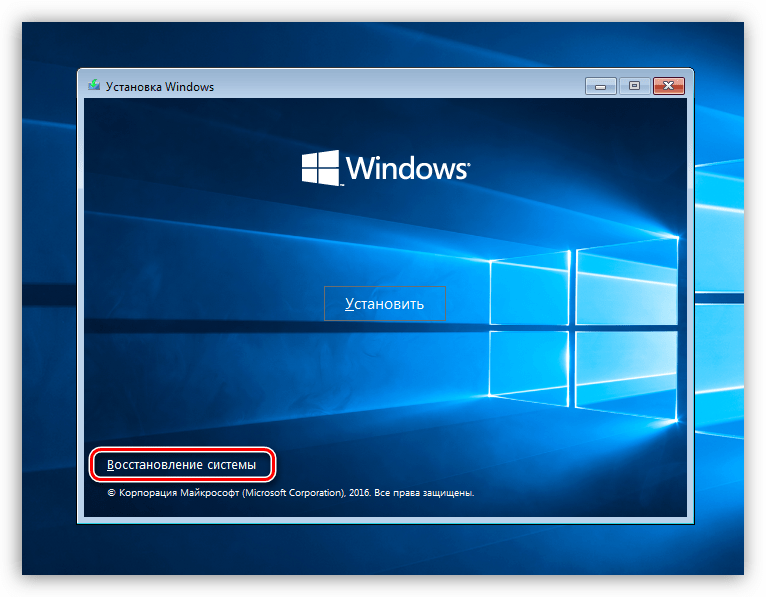
В разных редакциях Виндовс последовательность дальнейших действий будет отличаться.
Windows 10 и 8
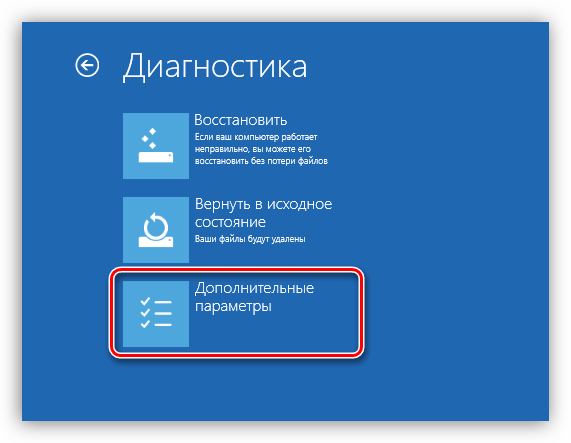
- Открываем блок «Диагностика». В «десятке» эта кнопка называется «Поиск и устранение неисправностей».
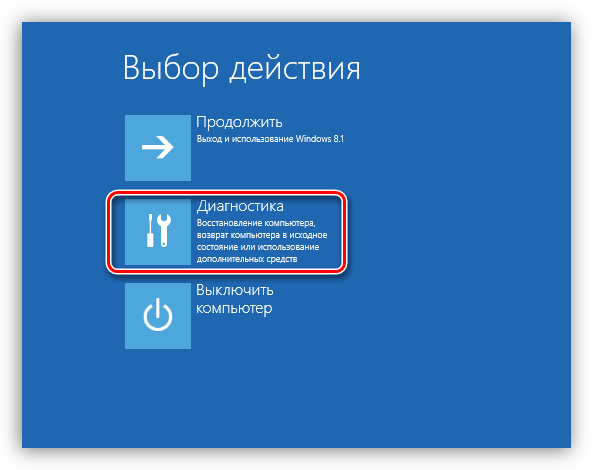
В следующем окне идем в «Дополнительные параметры».
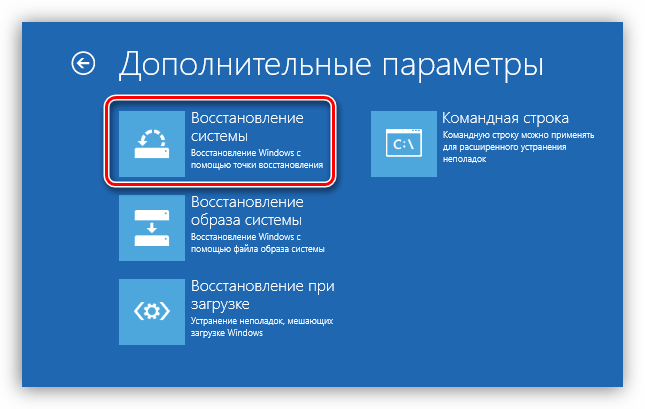
Данный промежуточный шаг в Виндовс 10 отсутствует, поэтому, если установлена «десятка», то сразу переходим к следующему пункту.
Нажимаем кнопку «Восстановление системы».
Выбираем целевую операционную систему.
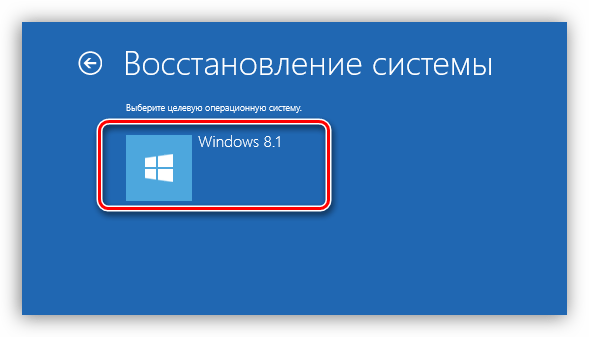
Откроется окно утилиты восстановления.
Windows 7
- В окне параметров жмем «Далее».

Выбираем соответствующий пункт в списке.
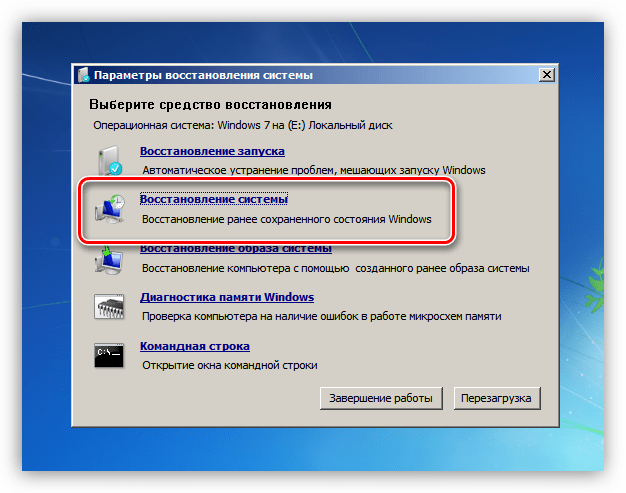
Дальнейшие действия выполняются по тому же сценарию, что и в случае с «Безопасным режимом».
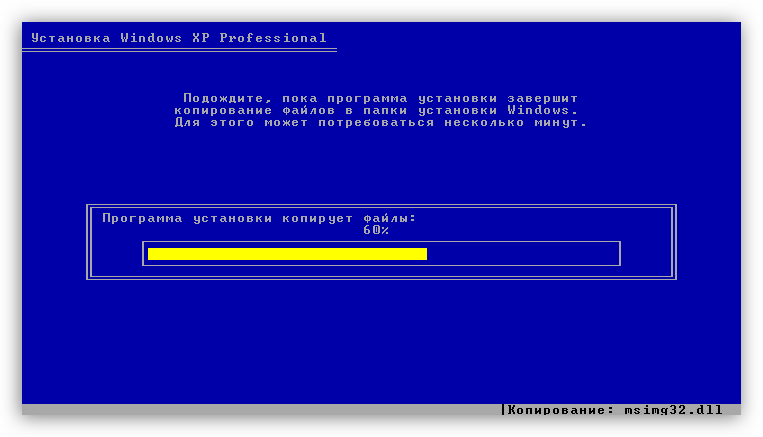
Windows XP
С ХР дело обстоит немного сложнее. Восстановление производится путем удаления старых системных файлов и копированием на диск новых. Пользовательские документы при этом останутся на своих местах.
Уже на этом этапе проблема может быть решена, но не стоит преждевременно расслабляться. Нам еще предстоит установить обновления, а этот процесс наверняка вызовет повторное проявление неполадки.
Способ 1: Скрипт сброса параметров
Данное средство позволяет сбросить настройки «Центра обновлений» и устранить сбои в работе отвечающих за апдейт служб.
Этот вариант является универсальным для всех версий Виндовс, начиная с ХР.
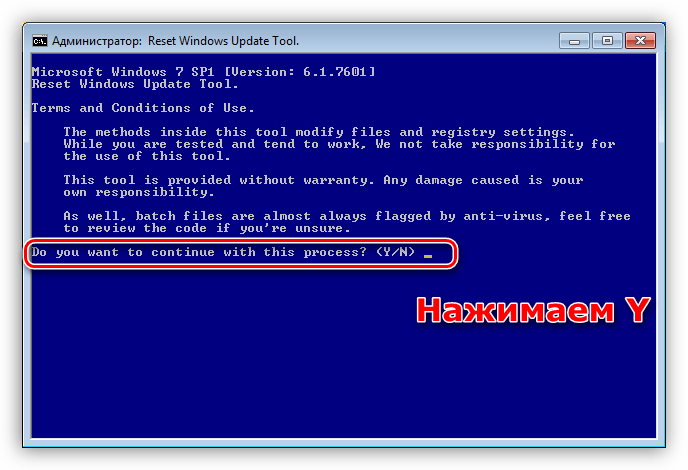
- Распаковываем архив со скриптом и запускаем файл ResetWUEng.cmd.
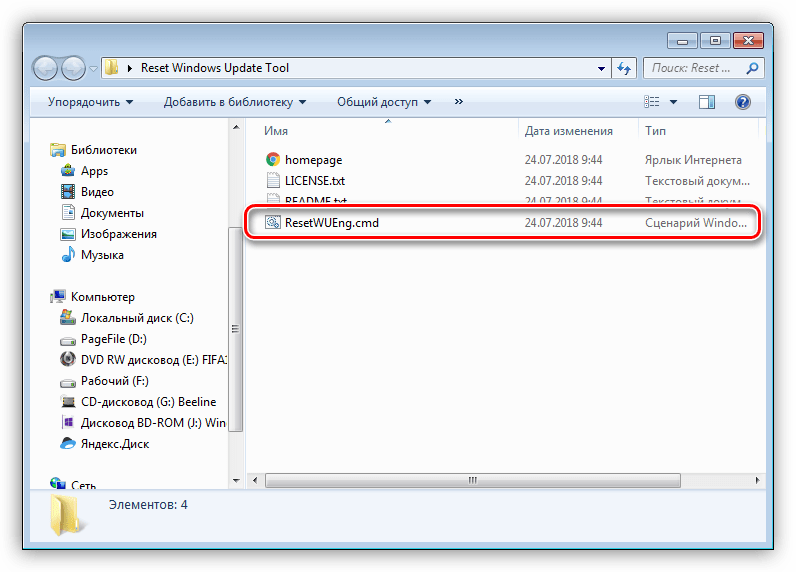
Нажимаем «Y» (без кавычек) на клавиатуре при включенной английской раскладке.
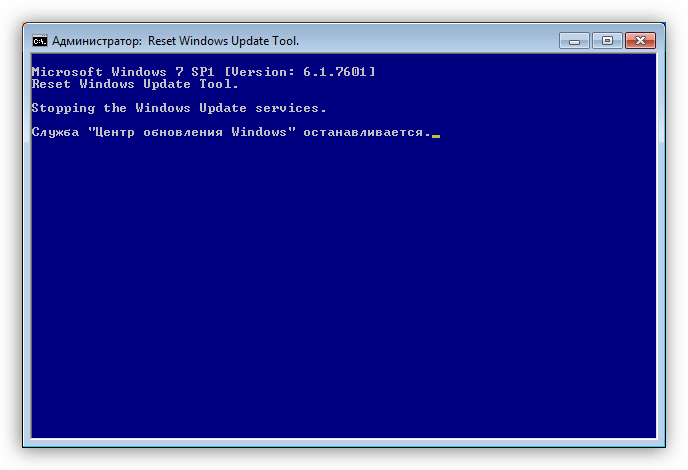
Вводим «2» (без кавычек) и жмем ENTER.
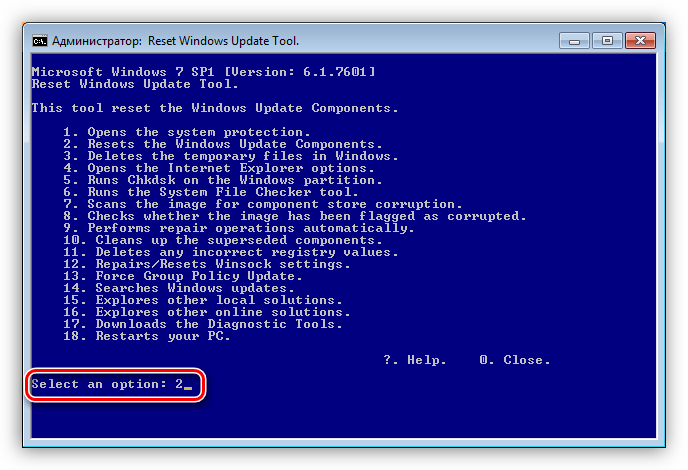
Ждем, пока скрипт завершит работу, после чего перезагружаем компьютер.
Способ 2: Утилиты DISM и SFC
DISM – это консольная (для «Командной строки») утилита, предназначенная для работы с образами Windows. С ее помощью можно вернуть работоспособность компонентам, отвечающих за обновления системы. SFC, в свою очередь, позволяет выявить и восстановить поврежденные системные файлы.
Этот способ поможет решить проблему на системах Windows 8 и 10.
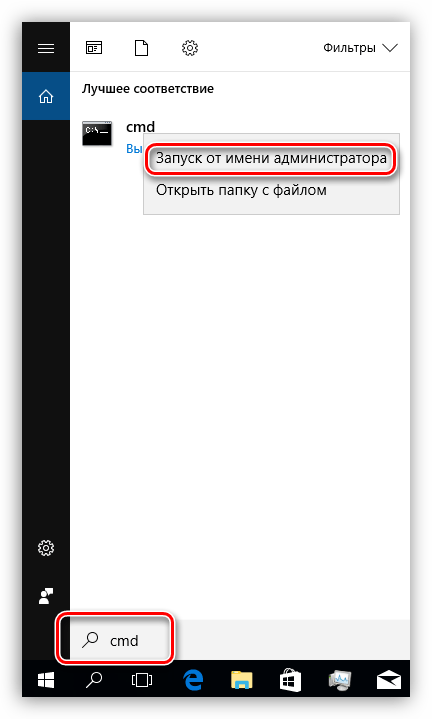
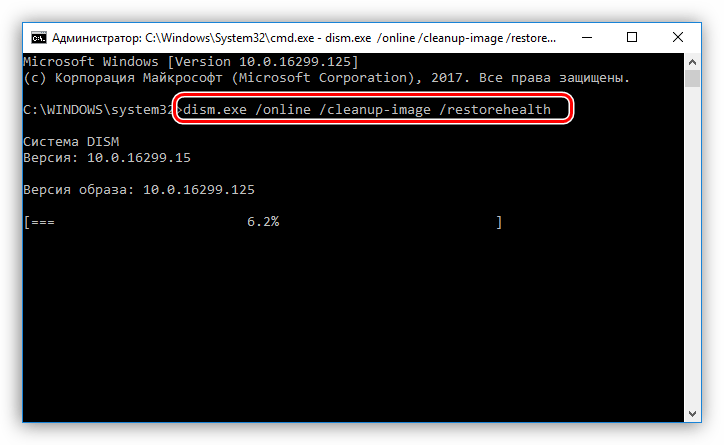
- Для работы нам потребуется «Командная строка», запущенная от имени администратора. В системном поиске вводим
Кликаем ПКМ по найденному приложению и выбираем соответствующий пункт.
Далее вводим следующую строку:
dism.exe /online /cleanup-image /restorehealth
Нажимаем ENTER и ждем завершения процесса.
Запускаем сканирование системных файлов командой
Снова ожидаем, пока утилита справится со своей задачей.

Перезагружаем компьютер и пробуем повторно запустить обновление.
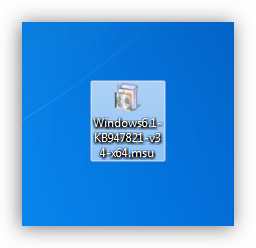
Способ 3: Установка пакета обновлений
Данный пакет содержит в себе файлы, необходимые для успешного обновления. Он должен быть предварительно установлен в систему, на которой планируется произвести данную процедуру.
Этот способ подходит для устранения неполадки на Windows 7.
После загрузки достаточно запустить полученный файл и дождаться завершения установки. После этого можно сразу приступать к инсталляции апдейтов «винды».
Заключение
Как видите, для всех версий Виндовс имеются свои варианты решения проблем с обновлениями. В нормальных условиях, то есть при обычных сбоях, данные рекомендации работают отлично. Если же не удалось восстановить нормальную работу «Центра обновлений», то стоит обратить свое внимание на возможность заражения ПК вирусами.
В некоторых случаях система совсем отказывается работать вне зависимости от наших действий. Выход в такой ситуации один – полная переустановка «винды».
How to stop automatic updates on Windows 10
 Source: Windows Central
On Windows 10, when new quality updates (also referred as cumulative updates) become available, they download and install automatically on your computer. Although the automatic approach ensures that every device receives security updates to patch vulnerabilities and performance as well as stability enhancements, it’s one of the most controversial features.
Typically, the biggest reason is that updates are known to contain bugs that can negatively affect the experience, and they require a restart to complete the installation that can disrrupt the current workflow.
If you’re always noticing problems as a direct result of updates, or you have a good reason to use a device unpatched, depending on your edition of Windows 10, you can stop automatic updates using the Windows Updates settings or permanently using Group Policy or Registry.
In this Windows 10 guide, we’ll walk you through the steps to block Windows Update from downloading and installing updates on your device automatically.
How to disable automatic updates using Settings
Usually, it’s not necessary to disable the Windows Update settings permanently. If you want to skip an update, you can pause updates until the day you want to apply them. Using the Settings app, you can stop system updates for up to 35 days on Windows 10 Pro or Home.
To disable automatic updates temporarily, use these steps:
- Open Settings.
- Click on Update & Security.
- Click on Windows Update.
Click the Advanced options button.
 Source: Windows Central
Under the «Pause updates» sections, use the drop-down menu and select how long to disable updates.
Source: Windows Central
Once you complete the steps, updates for Windows 10 will be completely disabled until the day you specified. When the device reaches the pause limit, you must install the latest updates available for the option to be available again.
You can always undo the changes with the same instructions outlined above, but on step No. 5, choose the Select date option. Another way to perform the same task is to click the Resume updates button on the Windows Update page.
In the past, the «Advanced options» page also included options to defer security and feature updates, but these options are no longer available with the latest version of Windows 10.
How to disable automatic updates using Group Policy
On Windows 10 Pro, the Local Group Policy Editor allows you to disable automatic updates permanently, or you can change the Windows Update policies to decide when updates should install on the device.
Disable updates
To disable automatic updates on Windows 10 permanently, use these steps:
- Open Start.
- Search for gpedit.msc and click the top result to launch the Local Group Policy Editor.
Navigate to the following path:
Computer Configuration > Administrative Templates > Windows Components > Windows Update
Double-click the Configure Automatic Updates policy on the right side.
 Source: Windows Central
Check the Disabled option to turn off the policy and disable automatic updates permanently.
![]() Source: Windows Central
Source: Windows Central
After you complete the steps, Windows 10 will stop downloading updates automatically on the device. However, the ability to check for updates manually will continue to be available in Settings > Update & Security > Windows Update. While on the page, you need to click the Check for updates button to download and install the most recent patches.
If you want to re-enable automatic updates on the device, you can use the same instructions outlined above, but on step No. 5, make sure to select the Not Configured option.
Limit updates
Alternatively, you can customize the policy to decide how you want to disable automatic updates using the Local Group Policy Editor.
To manage Windows Update automatic downloads with Group Policy, use these steps:
- Open Start.
- Search for gpedit.msc and select the top result to launch the experience.
Navigate to the following path:
Computer Configuration > Administrative Templates > Windows Components > Windows Update
Double-click the Configure Automatic Updates policy on the right side.
Source: Windows Central
Check the Enable option to turn on the policy.
![]() Source: Windows Central
Source: Windows Central
Under the «Options» section, select the best settings to prevent updates from downloading and installing automatically on Windows 10:
- 2 — Notify for download and auto install.
- 3 — Auto download and notify for install.
- 4 — Auto download and schedule the install.
- 5 — Allow local admin to choose setting.
- 7 — Auto Download, Notify to install, Notify to Restart.
Quick tip: The closest option to disable automatic updates is the 2 — Notify for download and auto install option, but you can select any other option that best fits your situation. If you choose option number 2, updates won’t download or install automatically. Instead, in the Windows Update settings page, you’ll now see an «Install now» button that you need to click manually to get the improvements.
 Source: Windows Central
Once you complete the steps, automatic updates will be permanently disabled on Windows 10. However, when a new patch becomes available for the system, you’ll be able to install it manually from the Windows Update settings page.
How to disable automatic updates using Registry
On Windows 10 Pro, you can also disable automatic updates using the Registry in at least two different ways.
Warning: This is a friendly reminder that editing the Registry is risky and can cause irreversible damage to your installation if you don’t do it correctly. It’s recommended to make a full backup of your PC before proceeding.
Disable updates
To disable Windows 10 update permanently modifying the Registry, use these steps:
- Open Start.
- Search for regedit and click the top result to launch the Registry Editor.
Navigate to the following path:
Right-click the Windows (folder) key, select the New submenu, and then choose the Key option.
Source: Windows Central
Right-click the newly created key, select the New submenu, and choose the Key option.
Source: Windows Central
Right-click the AU key, select the New submenu, and choose the DWORD (32-bit) Value option.
Source: Windows Central
Double-click the newly created key and change its value from 0 to 1.
Source: Windows Central
After you complete the steps, Windows Update will no longer install monthly updates automatically on Windows 10. However, similar to using the Local Group Policy Editor, you’ll still be able to download and install updates as needed by clicking the Check for updates button in the Windows Update settings.
Limit updates
It’s also possible to use the Registry to configure how updates are delivered for Windows 10 to prevent automatic installs.
To customize Windows Update settings to block updates with the Registry, use these steps:
- Open Start.
- Search for regedit and click the top result to open the Registry Editor.
Navigate to the following path:
Right-click the Windows (folder) key, select the New submenu, and choose the Key option.
Source: Windows Central
Right-click the newly created key, select the New submenu, and choose the Key option.
Source: Windows Central
Right-click the AU key, select the New submenu, and select the DWORD (32-bit) Value option.
Source: Windows Central
Double-click the newly created key and change its value (number only) to:
- 2 — Notify for download and auto install.
- 3 — Auto download and notify for install.
- 4 — Auto download and schedule the install.
- 5 — Allow local admin to choose settings.
- 7 — Auto Download, Notify to install, Notify to Restart.
These options work identically to the Group Policy settings, and number 2 is the closest option to disable Windows Update on Windows 10 permanently on your computer.
Source: Windows Central
Once you complete the steps, Windows 10 will stop installing updates automatically. However, you’ll receive notifications when new updates are available, allowing you to install them manually.
You can always use the same instructions to restore the original settings, but on step No. 4, right-click the WindowsUpdate key, select the Delete option then reboot the device to complete applying the settings.
On Windows 10, like in any other platform, updates are essential to improve the experience, and they’re critical to keeping your computer and data safe against malicious attacks and malware.
Typically, it’s never a good idea to continue using a device without the latest patches, but there are some situations when disabling updates might be appropriate. For instance, if you want to have complete control when applying updates. You want to minimize the chances of running into problems due to bugs with cumulative updates. Or you’re working with critical software and equipment that may stop working if updates are installed.
More Windows 10 resources
For more helpful articles, coverage, and answers to common questions about Windows 10, visit the following resources:
![]()
The Dell XPS 15 is our choice for best 15-inch laptop
For a lot of people, a 15-inch laptop is a perfect size that offers enough screen for multitasking, and in a lot of cases, some extra performance from powerful hardware. We’ve rounded up the best of the best at this size.
![]()
Halo: MCC’s live service elements make it better, not worse
Halo: The Master Chief Collection is more popular than ever, but some fans don’t agree with the live service approach 343 Industries has taken with it. Here’s why those elements are, at the end of the day, great for the game and for Halo overall.
![]()
Microsoft’s Surface Duo is not ‘failing up’
Microsoft announced this week that it was expanding Surface Duo availability to nine new commercial markets. While Surface Duo is undoubtedly a work in progress, this is not a sign of a disaster. It’s also doesn’t mean that Surface Duo is selling a ton either. Instead, the reason for the expansion is a lot more straightforward.
![]()
These are the best PC sticks when you’re on the move
Instant computer — just add a screen. That’s the general idea behind the ultra-portable PC, but it can be hard to know which one you want. Relax, we have you covered!


