- Удаленное управление IIS в Windows Server 2016/2012 R2
- Установка службы управления IIS Management Service
- Предоставление прав пользователям на удаленное управление сайтом IIS
- Удаленное управление IIS из Windows 10
- Удаленное управление IIS и поддержка TLS 1.1/ TLS 1.2
- Подключение к удаленному компьютеру Connect to a Remote Computer
- Чтобы подключиться к удаленному компьютеру из диспетчера ресурсов файлового сервера, выполните следующие действия. To connect to a remote computer from File Server Resource Manager
- Дополнительные сведения Additional considerations
- Get Connected in Windows Server Essentials
- Prepare to connect computers to the server
- Connector software overview
- Connector software overview
- Prerequisites for connecting a computer to the server
- Prerequisites for connecting a Mac computer to the network
- Supported operating systems for client computers
- Windows Server Essentials
- Windows Server Essentials
- Changes the server makes to a client computer
- Network user name and password information
- Network user name and password information
- Server administrator’s account
- Remove a computer from a Windows domain
- Connect computers to the server by using the Connector software
- Connect computers to the server
- Connect computers to a Windows Server Essentials server without joining the domain
- Feature limits
- Prerequisites
- Connect to a Windows Server Essentials network
- Join a second server to the network
- Install the Connector software
- Move computer data and settings manually
- Transfer multiple user profiles during computer deployment
- Uninstall the Connector software
- Disconnect your computer from or reconnect your computer to the server
- How backup works with sleep and hibernate modes
- Use the Launchpad
Удаленное управление IIS в Windows Server 2016/2012 R2
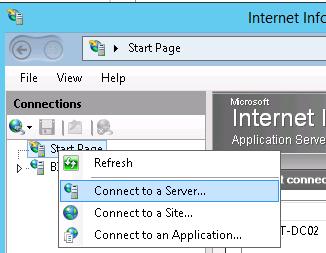
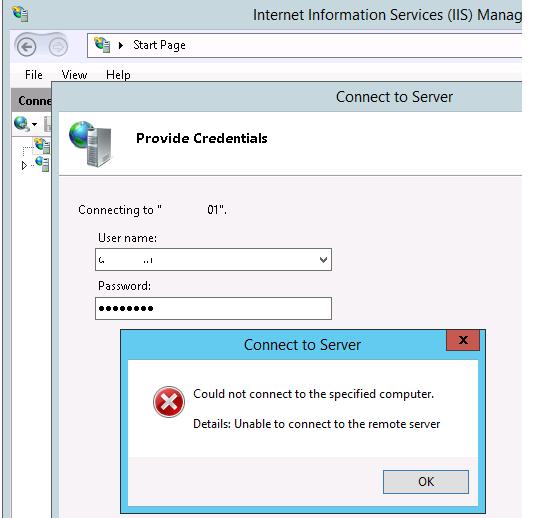
Веб-сервер Internet Information Service в Windows 2016/ 2012 / R2, как и предыдущие версии IIS имеет возможность удаленного управления. Ведь управлять множеством IIS серверов из одной консоли довольно удобно, а для веб-серверов, работающих в режиме Core/Nano, это практически единственный удобный способ управления веб сервером. Однако по умолчанию функционал удаленного управления в IIS отключен и в том случае, если на другом сервере попытаться добавить удаленный сервер с запущенным IIS в консоль управления IIS (меню Connect to a Server), появится ошибка:
Установка службы управления IIS Management Service
Дело в том, что при стандартной установке IIS, служба IIS Management Service, отвечающая за его удаленное управление не устанавливается. Убедится, что данная служба отсутсвует в системе можно с помощью Powershell команды:

Как вы видите, служба Web-Mgmt-Service не установлена. Установите компонент Windows Server с помощью командлета Add-WindowsFeature , выполним с правами администратора следующую команду Powershell:
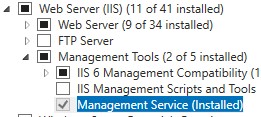
Также вы можете установить компонент Management Service из консоли Server Manager.
Затем перезапустите веб сервис IIS:
iisreset –noforce  Следующий шаг – нужно разрешить удаленные подключения в настройках веб сервера IIS. Для этого в диспетчере служб IIS в секции Management откройте появившийся пункт Management Service.
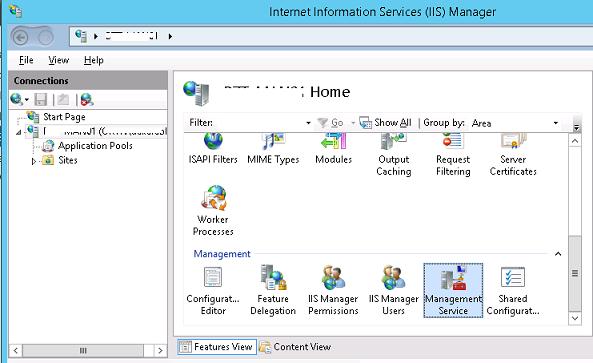
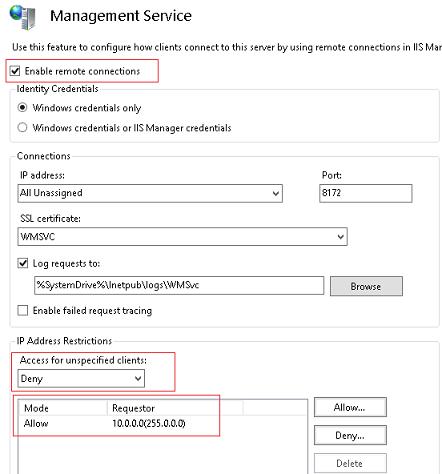
В разделе Management Service включите опцию «Enable remote connections».
Здесь же можно ограничить возможность подключения к консоли управлений веб сервера по IP адресу. Для этого запретите подключение с неизвестных клиентов (Access for unspecified clients:Deny) и укажите IP адрес / или IP подсети, с которых будет разрешено подключение. Служба удаленного подключения использует SSL сертификат, но вы можете использовать другой, если вы импортировали его в хранилище сертификатов (вы можете создать и использовать самоподписанный сертификат). Сохраните изменения.
Reg Add HKLM\Software\Microsoft\WebManagement\Server /V EnableRemoteManagement /T REG_DWORD /D 1
В этом случае придется создать правило для файервола вручную:
netsh advfirewall firewall add rule name=”Allow IIS Web Management” dir=in action=allow service=”WMSVC”
Осталось запустить службу Web Management Service:
net start wmsvc
set-service wmsvc -StartupType Automatic
sc config WMSVC start= auto

После этого удаленный веб сервер IIS возможно добавить в консоль управлений IIS Manager и управлять сервером IIS, всеми сайтами на нем так же, как и локальным веб-сервером. 
Предоставление прав пользователям на удаленное управление сайтом IIS
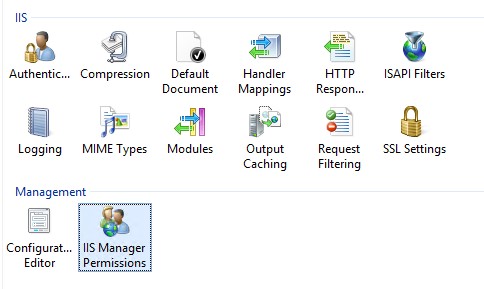
По-умолчанию право на удаленное управление сервером IIS есть только у пользователей с правами администратора сервера. Чтобы предоставить право на удаленное управление обычным пользователям, необходимо раздать соответствующие права на уровне каждого сайта IIS. Выберите сайт и найдите опцию IIS Manager Permissions.
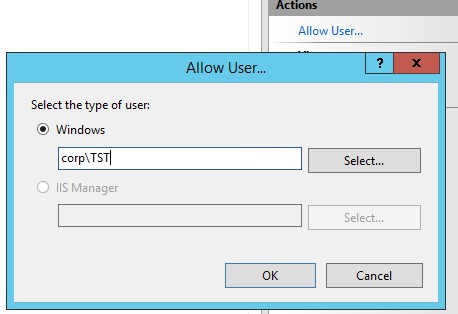
В панели Actions нажмите на Allow User. Выберите учетную запись, которой нужно предоставить доступ к IIS и нажмите Ок.
Права пользователям по управлению сайтами на IIS настраиваются в секции Feature Delegation на уровне всего сервера IIS.
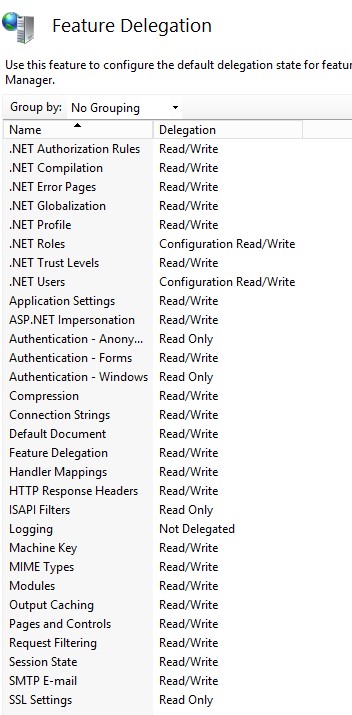
Вы можете задать один из трех уровней доступа пользователям для каждого функционала управления сервером IIS: Read Only, Read/Write или Not Delegated.
Удаленное управление IIS из Windows 10
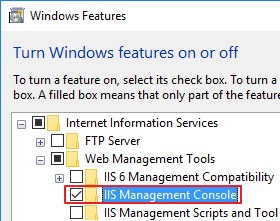
Если вам нужно удалено управлять серверов IIS с клиентской рабочей станции с Windows 10 (Windows 7 или 8.1), необходимо установить консоль управления IIS: Turn Windows features on or off -> Internet Information Services -> Web Management Tools -> IIS Management Console.
Вы можете установить компонент управления следующей командой PowerShell:
Enable-WindowsOptionalFeature -Online -FeatureName «IIS-ManagementService»
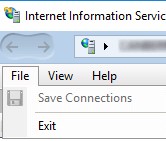
Однако при запуске консоли IIS Manager в Windows 10 оказывается, что пункт Подключение к серверу (Connect to a server) в меню отсутствует.
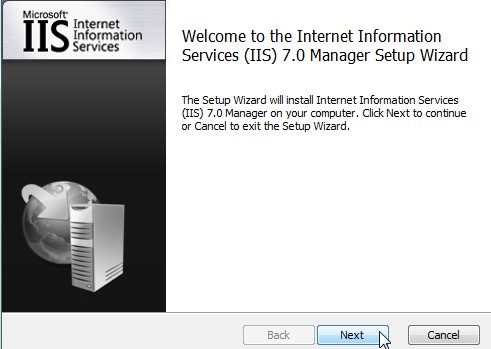
Для возможности удаленного подключения к IIS в Windows 10 нужно скачать и установить компонент IIS Manager for Remote Administration (https://www.microsoft.com/en-us/download/details.aspx?id=41177).
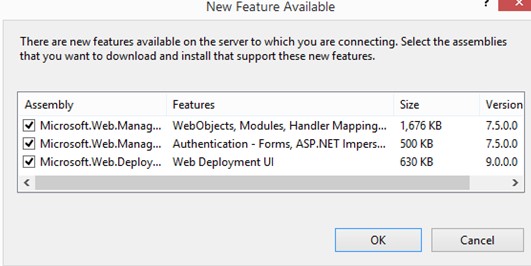
После установки нужно перезапустить консоль диспетчера IIS и подключится к сайту. Если при подключении к IIS окажется, что версия консоли на клиенте и сервере отличается, появится уведомлении о необходимости обновить версию консоли (все необходимые файлы будут автоматически скачаны с сервера).
Теперь вы должны успешно подключиться к своему серверу IIS и удаленно управлять им со своего рабочего места.
Удаленное управление IIS и поддержка TLS 1.1/ TLS 1.2
Если на IIS вы отключили устаревших протоколов SSLv3 и TLS 1.0, оставив только TLS 1.1/ TLS 1.2 то при удаленном подключении к IIS появится ошибка:
Для исправления проблемы, необходимо на стороне клиента внести изменения в реестре, для обязательного использования протокола TLS1.2 при подключении. Настройки зависят от версии Windows.
Windows 10 и Windows Server 2016:
Windows 2012/ R2 и Windows 8/8.1:
Windows Server 2008 R2 / Windows 7:
Предварительно нужно установить обновление KB3154518 для поддержки TLS 1.2 в .NET Framework 3.5.1.
Подключение к удаленному компьютеру Connect to a Remote Computer
Область применения: Windows Server (Semi-Annual Channel), Windows Server 2016, Windows Server 2012 R2, Windows Server 2012, Windows Server 2008 R2 Applies to: Windows Server (Semi-Annual Channel), Windows Server 2016, Windows Server 2012 R2, Windows Server 2012, Windows Server 2008 R2
Чтобы управлять ресурсами хранилища на удаленном компьютере, можно подключиться к компьютеру из диспетчера ресурсов файлового сервера. To manage storage resources on a remote computer, you can connect to the computer from File Server Resource Manager. При установленном подключении диспетчер ресурсов файлового сервера позволяет управлять квотами, файлами фильтра блокировки файлов, управлять категориями, планировать создание задач по управлению файлами и создавать отчеты по этим удаленным ресурсам. While you are connected, File Server Resource Manager allows you to manage quotas, screen files, manage classifications, schedule file management tasks, and generate reports with those remote resources.
Диспетчер ресурсов файлового сервера может управлять ресурсами на локальном или удаленном компьютере, однако не на обоих одновременно. File Server Resource Manager can manage resources on either the local computer or a remote computer, but not both at the same time.
Чтобы подключиться к удаленному компьютеру из диспетчера ресурсов файлового сервера, выполните следующие действия. To connect to a remote computer from File Server Resource Manager
В разделе Администрирование выберите Диспетчер ресурсов файлового сервера. In Administrative Tools, click File Server Resource Manager.
В древе консоли щелкните правой кнопкой мыши Диспетчер ресурсов файлового сервера, а затем нажмите Подключение к другому компьютеру. In the console tree, right-click File Server Resource Manager, and then click Connect to Another Computer.
В диалоговом окне Подключение к другому компьютеру нажмите кнопку Другой компьютер. In the Connect to Another Computer dialog box, click Another computer. Затем введите имя сервера, к которому необходимо подключиться (или щелкните Обзор, чтобы найти удаленный компьютер). Then type the name of the server you want to connect to (or click Browse to search for a remote computer).
Нажмите кнопку ОК. Click OK.
Команда Подключение к другому компьютеру доступна только при открытии диспетчера ресурсов файлового сервера в разделе Администрирование. The Connect to Another Computer command is available only when you open File Server Resource Manager from Administrative Tools. При осуществлении доступа к диспетчеру ресурсов файлового сервера из диспетчера серверов эта команда недоступна. When you access File Server Resource Manager from Server Manager, the command is not available.
Дополнительные сведения Additional considerations
Для управления удаленными ресурсам с помощью диспетчера ресурсов файлового сервера: To manage remote resources with File Server Resource Manager:
- Вы должны осуществить вход в систему локального компьютера, используя учетную запись домена, являющуюся членом группы Администраторы на удаленном компьютере. You must be logged on to the local computer with a domain account that is a member of the Administrators group on the remote computer.
- Удаленный компьютер должен работать под управлением Windows Server, и должен быть установлен диспетчер ресурсов файлового сервера. The remote computer must be running Windows Server, and File Server Resource Manager must be installed.
- На удаленном компьютере должно быть включено исключение Управление удаленным диспетчером ресурсов файлового сервера. The Remote File Server Resource Manager Management exception on the remote computer must be enabled. Включите это исключение, используя брандмауэр Windows на панели управления. Enable this exception by using Windows Firewall in Control Panel.
Get Connected in Windows Server Essentials
Applies To: Windows Server 2016 Essentials, Windows Server 2012 R2 Essentials, Windows Server 2012 Essentials
You can connect your computers to the Windows Server Essentials server by using the Connector software. The Connector software is installed when you connect a computer to the server by using the Connect a Computer to the Server Wizard. You can start this wizard by typing http:// /connect, where is the name of your server.
Prepare to connect computers to the server
This section discusses the Connector software, the operating systems that are supported by Windows Server Essentials, the prerequisite tasks that must be completed before connecting your computers to the server, and the changes the server makes to the computers when you run the Connector software.
Connector software overview
The Connector software for the Windows Server Essentials operating system connects the computers in your network to the Windows Server Essentials server. When you connect computers to the server, the Connector software enables you to automatically back up the computers and monitor their health. The Connector software also enables you to configure and remotely administer the Windows Server Essentials server. The Connector software is installed when you connect a client computer to the server. For detailed instructions about connecting client computers to the Windows Server Essentials server, see Connect computers to the server later in this topic.
Prerequisites for connecting a computer to the server
The following requirements must be met before you connect a computer to the network:
The installation of Windows Server Essentials is complete, and the server is running. The Connector software will exit its installation if it is unable to communicate with the server.
The client computer is running a supported operating system. For more information, see Supported operating systems for client computers.
The client computer must have a valid connection to the Internet.
The client computer is on the same IP subnet as the server that is running Windows Server Essentials when the client computer is on the same network as the server.
The client computer has .NET Framework 4.5 installed on it. The Connector software automatically installs it on the computer.
The client computer meets the following minimum system requirements:
1.4 GHz or faster processor
1 GB RAM or more
1 GB of available hard drive space (a portion of this space is freed after installation)
The boot partition (that is, the disk partition where the Windows operating system is installed) is formatted with the NTFS file system.
The computer name does not include more than 15 characters.
The computer name does not include an underscore (_).
The computer’s date and time settings align to the settings on the server.
A client computer can be connected to only one Windows Server Essentials server at any given time.
A client computer that is already joined to another Active Directory domain cannot join a Windows Server Essentials domain.
In an on-premises client deployment for Windows Server Essentials or Windows Server Essentials, you can connect computers to the server without adding them to the Windows Server Essentials domain. This method is not available for all supported client operating systems, and features such as Group Policy and virtual private networks (VPNs), which require that a computer be connected to the domain, are not available. For requirements and instructions, see Connect computers to a Windows Server Essentials server without joining the domain.
For step-by-step instructions to connect a computer to the server running Windows Server Essentials, see Connect computers to the server.
Prerequisites for connecting a Mac computer to the network
The following requirements must be met before you connect a Mac computer to the network:
The installation of the server operating system is complete, and the server is running. The Connector software will not install if it cannot communicate with the server.
The computer is running Mac OS X 10.5 (Leopard) or later.
The computer is on the same IP subnet as the server.
The computer must have a valid connection to the Internet.
Ensure that the computer meets the following minimum system requirements:
1.4 GHz or faster processor
1 GB RAM or more
1 GB of available hard drive space (a portion of this space is freed after installation)
A client computer can be connected to only one server at any given time.
Supported operating systems for client computers
Windows Server Essentials provides the same set of features for all supported client computers. These features include Domain Join, Launchpad, and client-side health notifications.
Windows Server Essentials does not support joining computers running the Home, Starter, or Media Center versions of Windows to the domain. In addition, you cannot use Remote Web Access to connect to these computers.
Windows Server Essentials
This section applies to a server running Windows Server Essentials, or to a server running Windows Server 2012 R2 Standard or Windows Server 2012 R2 Datacenter with the Windows Server Essentials Experience role installed. The following computer operating systems are supported:
Windows 7 operating systems
Windows 7 Home Basic SP1 (x86 and x64)
Windows 7 Home Premium SP1 (x86 and x64)
Windows 7 Professional SP1 (x86 and x64)
Windows 7 Ultimate SP1 (x86 and x64)
Windows 7 Enterprise SP1 (x86 and x64)
Windows 7 Starter SP1 (x86)
Windows 8 operating systems
Windows 8 Enterprise
Windows 8.1 operating systems
Windows 8.1 Enterprise
Windows 10 operating systems
Windows 10 Enterprise
Windows 10 Education
Mac client computers
Mac OS X v10.5 Leopard
Mac OS X v10.6 Snow Leopard
Mac OS X v10.7 Lion
Mac OS X v10.8 Mountain Lion
You can view the health and backup status for a Mac computer from the Windows Server Essentials Dashboard. However, you cannot configure computer backup or start a backup from the Dashboard. In addition, you cannot use Remote Web Access to connect a Mac computer.
Windows Server Essentials
This section applies to a server running Windows Server Essentials. The following computer operating systems are supported:
Windows 7 operating systems
Windows 7 Home Basic (x86 and x64)
Windows 7 Home Premium (x86 and x64)
Windows 7 Professional (x86 and x64)
Windows 7 Ultimate (x86 and x64)
Windows 7 Enterprise (x86 and x64)
Windows 7 Starter (x86)
Windows 8 operating systems
Windows 8 Enterprise
Windows 10 operating systems
Windows 10 Enterprise
Windows 10 Education
Mac client computers
Mac OS X v10.5 Leopard
Mac OS X v10.6 Snow Leopard
Mac OS X v10.7 Lion
You can view the health and backup status for a Mac computer from the Windows Server Essentials Dashboard. However, you cannot configure computer backup or start a backup from the Dashboard. In addition, you cannot use Remote Web Access to connect a Mac computer.
Changes the server makes to a client computer
When you connect a computer to the server, the Windows Server Essentials software makes a number of changes to the computer so the computer and the server can work together.
The software does the following:
Installs the Connector software on the computer
Installs Microsoft .NET Framework 4.5 on the computer if it is not already installed
Creates shortcuts on the computer’s desktop to the Dashboard and Launchpad
Configures Windows Firewall ports on the computer to allow the following features to work:
Remote Desktop Services
Makes the following changes to the computer to facilitate backups:
Creates scheduled tasks to run automatic backups
Installs services that manage backup operations with the server
Installs a virtual device driver that is used during file and folder restore processes
Installs the Health Agent to detect issues and to create the corresponding alert notifications
Creates scheduled tasks on the computer for recurring health assessments and to synchronize health alert definitions
Adds services to the computer, which the computer uses to communicate with the server and with other Windows Server Essentials features
Opens TCP port 3389 in client computers running Windows clients to allow Remote Desktop Services to run
Deploys VPN on the client computer and provides a single click experience if the VPN functionality is enabled on Windows Server Essentials, or provides an auto-connect experience if the VPN functionality is enabled on Windows Server Essentials
For information about connecting your computer to the server, see Connect computers to the server.
Network user name and password information
You can obtain your network user name and password information from the person who manages your server. You can use these credentials to connect your computer to the server and access information from the server.
Network user name and password information
You can obtain your network user name and password information from the person who manages your server. You can use these credentials to connect your computer to the server and access information from the server.
If you are the server administrator, you can create the network credentials by adding a user account from the Users tab of the Dashboard. For more information about user accounts, see Manage user accounts using the Dashboard.
Server administrator’s account
You must be able to provide a network administrator account name and password to install the Connector software. A network administrator account enables the user to manage the local area network for your organization and helps manage and maintain network devices such as switches and routers.
The tasks that can be performed by using a network administrator account can include:
Installing networked applications and other software
Managing storage on the server
Distributing software updates
Performing routine backups
Monitoring daily activities on the network
In Windows Server Essentials, Windows Server Essentials, and Windows Server 2012 R2 with the Windows Server Essentials Experience role installed, you can assign the network administrator access level to any user account. This grants the required permissions to perform network administrator tasks. When a user is assigned the network administrator access level, the User Access Control prompt opens for any task that requires administrator permissions.
Remove a computer from a Windows domain
To remove a computer from its domain, you will be prompted for the user name and password of the domain account.
To remove a computer from a Windows domain
Click Start, right-click Computer, and then click Properties.
Under Computer name, domain, and workgroup settings, click Change settings.
If you are prompted for an administrator password or confirmation, type the domain password or provide confirmation.
In the System Properties dialog box, click the Computer Name tab, and then click Change.
In the Computer Name/Domain Changes dialog box, under Member of, click Workgroup, and then do one of the following:
To join an existing workgroup, type the name of the workgroup that you want to join, and then click OK.
To create a workgroup, type the name of the workgroup that you want to create, and then click OK.
Your computer will be removed from the domain and your computer account on that domain will be disabled.
Connect computers to the server by using the Connector software
This section provides access to procedures and information that will help you install the Connector software, connect your computer to the server, and troubleshoot connecting computers to the server.
Connect computers to the server
When you connect a computer to a server that is running Windows Server Essentials or Windows Server 2012 R2 with the Windows Server Essentials Experience role installed, ensure that your client computer has a valid connection to the Internet.
Complete the following procedure on all client computers to connect them to your server.
To complete the procedure, you need the following information:
The user name and password of the person who will use the computer on the new network
The user name and password of the computer’s local administrator account
In an on-premises client deployment for Windows Server Essentials or Windows Server Essentials, you can connect computers to the server without adding them to the Windows Server Essentials domain. This method is not available for all supported client operating systems, and features such as Group Policy and virtual private networks (VPNs), which require that a computer be connected to the domain, are not available. For requirements and instructions, see Connect computers to a Windows Server Essentials server without joining the domain.
In an on-premises client deployment for Windows Server Essentials or Windows Server Essentials, you can connect computers to the server without adding them to the Windows Server Essentials domain. This method is not available for all supported client operating systems, and features such as Group Policy and virtual private networks (VPNs), which require that a computer be connected to the domain, are not available. For requirements and instructions, see Connect computers to a Windows Server Essentials server without joining the domain.
To connect a client computer to the server
Log on to the computer that you want to connect to the server.
If this computer has multiple user accounts, log on by using the user account that has documents, pictures, and personal preferences that you want to keep after you connect the computer to the server.
Open an Internet browser, such as Internet Explorer.
In the address bar, type http:// /Connect, and then press Enter.
If your computer is at a remote location outside of the Windows Server Essentials network, to run the Connect a Computer to the Server Wizard, type http:// /connect in the address bar of your web browser (where is the domain name of your organization). You can get your domain name information from your network administrator.
The Connect your computer to the server page appears. Do one of the following:
For a computer running the Windows operating system, click Download software for Windows.
For a computer running Mac OS X or later, click Download software for Mac.
In the file download security warning message, click Run.
If the User Account Control message appears, click Yes or type the local user name and password, if prompted.
The Connect a Computer to the Server Wizard appears. Do the following to complete the wizard:
Accept the end-user license agreement.
On the Find my server page, auto-detect the server in the local networks and select the server that you want to connect to. Or, if you have the information, you can manually input your server’s name or domain address.
On the Type your new network user name and password page, do the following:
If this is the first computer that you are connecting to the server, and if this is the computer that you will be using to administer the server, use the administrator account that you created during setup.
For all other computers, first create a network user account on the server by using the Dashboard. Create the user account with Administrator or Standard user privileges, based on the tasks that are performed by the person using the computer.
If your computer is running Windows 8, Windows 8.1 or Windows 10, skip this step. If your computer is running Windows 7, and if you have documents, pictures, or personal preferences (such as desktop backgrounds, screen savers, or Internet Explorer favorites) that you want to keep after you join the computer to the new network, on the Choose if you want to move your existing data and settings page of the wizard, select the Move my data and settings to my new network user account.
Choose if you want to automatically wake the computer to create a backup on the Choose if you want to wake this computer to create its backup page.
Follow the remaining instructions in the wizard to join your computer to the network.
After you join your computer to the network, use your new user name and password to log on to the computer.
When you log on to a computer that is running Windows 8 for the first time by using your network account, after it connects to the server, instructions for migrating files and applications from the old user account appear. Follow the instructions on the How do I migrate files and applications from my old user account? page to migrate all files and applications to the network user account.
After the computer is successfully connected to the server, shortcuts to the Connector TrayApp and the server Dashboard appear on the Start menu, which can be used as follows (if your computer is running Windows 8, Windows 8.1 or Windows 10, the Dashboard and Connector TrayApp will be available from the computer’s Start screen):
If your computer is running Windows 8, Windows 8.1 or Windows 10, the Dashboard and Connector TrayApp will be searchable as an App.
From the Connector TrayApp, you can enable or disable the Keep me remotely connected feature. You can also double-click the TrayApp to start the Launchpad. From the Launchpad, you can access the Shared folders shortcut, configure computer backups, address alerts, and open the Remote Web Access website.
From the Dashboard link, you can administer your server.
Connect computers to a Windows Server Essentials server without joining the domain
This topic describes how to add a Windows 7, Windows 8, Windows 8.1 or Windows 10 computer to a Windows Server Essentials network without joining the computer to the Windows Server Essentials domain in an on-premises client deployment. This connection method is supported in Windows Server Essentials and Windows Server Essentials.
This is an alternative to the usual method, which requires joining the computer to the Windows Server Essentials domain. With that method, if the computer is in another domain, it must be removed from that domain before it can be added to the Windows Server Essentials domain.
Feature limits
Some features are limited when a client computer is not added to the Windows Server Essentials domain:
All features that require that the computer be joined to the domain ?including domain credentials, Group Policy, and virtual private networks (VPNs) ?are not available.
Any third-party add-ons that require that the computer be joined to the domain will not work properly.
This method cannot be used to connect an off-premises computer to the server.
Prerequisites
The computer must have a physical connection to the local network.
One of the following operating systems must be installed on the computer:
Windows 10 Pro, Windows 10 Enterprise
Windows 8.1 Pro, Windows 8.1 Enterprise, Windows 8 Pro, Windows 8 Enterprise
Windows 7 Professional (x86 and x64), Windows 7 Enterprise (x86 and x64), Windows 7 Ultimate (x86 and x64)
The computer must meet all other requirements for client computers in Windows Server Essentials. For more information, see Prerequisites for connecting a computer to the server.
To enable a connection without joining the domain, you must sign on to the computer with an account that is a member of the local Administrators group.
To connect the computer to the Windows Server Essentials server, you will need the following account information:
An account with Administrator rights on Windows Server Essentials (your account).
The user name and password for the domain account of the person who will use the computer. The domain account also must have Administrator rights on the Windows Server Essentials server.
Connect to a Windows Server Essentials network
After you verify that all prerequisites have been met, connect the computer to the Windows Server Essentials network.
To connect a computer in a different domain to a Windows Server Essentials network
Sign on to the client computer with an account that is a member of the local Administrators group.
Open a command prompt with Administrator rights.
In Windows 10, click the Start button, select All Apps -> Windows System Tools -> Command Prompt, right-click Command Prompt, and then click Run as administrator.
In Windows 8, on the Start page, type command and then press Enter. In the results, right-click Command Prompt, and then click Run as administrator.
In Windows 7, on the Start menu, enter command in the search box, right-click Command Prompt, and then click Run as Administrator.
At the command prompt, type the following command, and then press Enter:
Join a second server to the network
To join a second server to the network
Log on to the server that you want to connect to the Windows Server Essentials network.
Open an Internet browser, and in the address bar, type http:// /Connect, where is the name of the server running Windows Server Essentials, and then press Enter.
If Internet Explorer Enhanced Security Configuration is enabled on the server that you are trying to connect to the Windows Server Essentials network, complete the following; otherwise, skip this step.
To accept the blocking message, click Close.
Add the http:// /Connect website to the trusted websites as follows:
In the browser navigation pane, click Tools, and then click Internet Options.
Click the Security tab, and then click Trusted sites.
Click Sites.
The website should be shown in the Add this website to the zone field. Click Add.
Click Close, and then click OK.
Refresh the web page.
To connect the second server to a server running Windows Server Essentials, follow the instructions in Connect computers to the server.
After you join the second server to a server that is running Windows Server Essentials, the following features are provided to the connected server:
Update & Alerts status functionalities work the same as other client computers.
Online & Offline functionalities work the same as other client computers.
You can connect to your second server by using Remote Web Access.
The second server will be included in the Health Reports because Windows Server Essentials will generate alerts related to this server.
Management of the second server from the server that is running Windows Server Essentials will differ from managing other client computers as follows:
There will be no entrance point for TrayApp, Launchpad, and Dashboard Client.
The second server is listed within the Servers group on the Devices tab.
Because client computer backup is not supported for the second server, the backup status is displayed as Not supported. In addition, if you select the second server and right-click, there are no backup and restore related tasks displayed for the second server.
If you select the second server, and then click the View the server properties task, there is no Backup tab displayed on the server’s properties page.
Because there is no Security Center on a Windows Server operating system, the second server’s security status displays as Not applicable.
The second server’s Group Policy status displays as Not applicable.
Install the Connector software
The Connector software in Windows Server Essentials is installed when you connect your computer to the server by using the Connect a Computer to the Server Wizard. You can launch this wizard by typing http:// /connect in the address bar of your web browser (where is the name of your server).
If your computer is at a remote location, to run the Connect a Computer to the Server Wizard, type http:// /connect in the address bar of your web browser (where is the domain name of your organization). You can get your domain name information from your network administrator.
The Connector software does the following:
Connects your computer to Windows Server Essentials
Automatically backs up your computer nightly (if you configure the server to create client backups)
Helps administrator monitor the health of your computer
Enables you to configure and remotely administer Windows Server Essentials from your home computer
For step-by-step instructions about connecting your computer to the Windows Server Essentials server, see Connect computers to the server.
Move computer data and settings manually
Windows Server Essentials and Windows Server Essentials support user profile migration only for client computers that are running the Windows 7 operating system. When you connect a Windows 7-based computer to the server, the Connect Computer to the Server Wizard can automatically migrate the user profile.
The user profile cannot be transferred automatically when connecting a Windows 8, Windows 8.1 or Windows 10 computer to the server. However, on a Windows 8 computer, you can use Windows Easy Transfer to transfer data and settings from the original local user to the domain-joined computer. To do that, you must be an Administrator on both the Windows 8 source computer and the Windows 8 destination computer. For information about using Windows Easy Transfer to transfer files and settings, see article 2735227 in the Microsoft Knowledge Base.
Transfer multiple user profiles during computer deployment
Before you connect a computer running the Windows 7 or Windows 7 SP1 operating system to the Windows Server Essentials server, in order to transfer multiple local user profiles you must first create the corresponding network user accounts on the server. For more information about creating network user accounts, see Add a user account.
User profile migration is only supported on a computer running Windows 7 (for Windows Server Essentials) or Windows 7 SP1 (for Windows Server Essentials). When you connect a computer to the Windows Server Essentials server using the Connect Your Computer to the Server Wizard, you are provided an option to move the user data and settings of old user local accounts into the new network user accounts. To do so, on the Move existing user data and settings page of the wizard, map the network user accounts to the local user accounts that exist on the computer to transfer multiple user profiles that are located on the client computer.
Uninstall the Connector software
You can uninstall the Connector software from a computer by using the Control Panel. You will usually do this if there is a problem with the Connector software or if you need to install a newer version of the Connector software. You must be logged on to the computer as an administrator to complete this procedure.
If you upgrade the operating system on a client computer, the Connector software is uninstalled automatically. You must reinstall the Connector software after the upgrade is complete. The preferred method is to uninstall the Connector software before you upgrade the operating system. Uninstalling the Connector software after the upgrade is complete is still acceptable; however, it might result in an inconsistent state for the client computer with the server until the Connector software is uninstalled and reinstalled.
To uninstall Connector software from a computer
From a computer that is running Windows 7, Windows 8, Windows 8.1 or Windows 10, open Control Panel, and then in the Programs section, click View installed updates.
From the list of installed programs, select Windows Server Essentials Connector, and then click Uninstall.
On the warning page, click Yes.
If the User Account Control window appears, click Allow.
In Windows Server Essentials, if the Windows Server Essentials Connector page appears suggesting to close the Launchpad, click OK.
Wait for the program to uninstall. After the software is removed, Windows Server Essentials Connector no longer appears within the list of installed programs or updates. In addition, the shortcuts to the Launchpad and the Dashboard are no longer displayed on the computer’s desktop.
Uninstalling the Connector software does not remove the computer from the list of computers that are displayed on the DEVICES tab of the Dashboard. To remove the computer from the Dashboard, see Remove a computer from the server.
- When you uninstall the Connector software, shared folders on the client computer that were mapped to the server are not deleted. You must manually delete the shared folders that are mapped to the server.
Uninstalling the Connector software does not make the computer unjoin the original domain. You must manually unjoin the computer from the domain. For instructions, see Remove a computer from a Windows domain.
Disconnect your computer from or reconnect your computer to the server
To disconnect a computer from the server, you must complete the following steps:
Uninstall the Connector software from the computer by using the Control Panel. For step-by-step instructions, see Uninstall the Connector software.
Unjoin the computer from the Windows Server Essentials domain and join it to the workgroup. For step-by-step instructions for joining Windows to a workgroup, Join or create a workgroup.
Remove the computer from the server by using the Dashboard. For step-by-step instructions, see Remove a computer from the server.
To reconnect a computer to the server that was previously disconnected from your Windows Server Essentials server network, you must complete the following steps:
Uninstall the Connector software from the computer by using the Control Panel. For step-by-step instructions, see Uninstall the Connector software.
Unjoin the computer from the Windows Server Essentials domain and join it to the workgroup. For step-by-step instructions for joining Windows to a workgroup, Join or create a workgroup.
Connect the computer to the server by using the Connect Computer Wizard. For step-by-step instructions, see Connect computers to the server.
How backup works with sleep and hibernate modes
If you select the Wake This Computer for Backup option when you connect a computer to the server, the computer will automatically wake up from sleep or hibernate mode every day as specified in the Backup schedule so that it can be backed up. After the backup is finished, the computer will return to sleep or hibernate mode, based on its power management settings. If you do not select this option, the server will not back up a computer if the computer is sleeping or hibernating. For more information, see Manage Client Backup.
Use the Launchpad
You can use the Launchpad to access shared resources from the Windows Server Essentials server, perform computer backups, and respond to system health alerts.


