- Connect samba from linux
- Mounting and mapping shares between Windows and Linux with Samba
- More Linux resources
- Connect to your Samba server from Linux
- Connect samba from linux
- What you’ll learn
- What you’ll need
- 2. Installing Samba
- 3. Setting up Samba
- What we’ve just added
- 4. Setting up User Accounts and Connecting to Share
- Connecting to Share
Connect samba from linux
Машины с Linux (UNIX) могут также просматривать и монтировать SMB-ресурсы. Заметьте, что это может быть сделано когда сервером является либо машина с Windows, либо с сервером Samba!
Программа клиента SMB для UNIX-машин включена в дистрибутив Samba. Она обеспечивает ftp-подобный интерфейс командной строки. Вы можете использовать эту утилиту для переноса файлов между ‘сервером’ под управлением Windows и клиентом под Linux.
Большинство дистрибутивов Linux также включают полезный пакет smbfs, который позволяет монтировать и размонтировать SMB-ресурсы. Больше информации о smbfs можно получить дальше.
Для того, чтобы увидеть какие ресурсы доступны на данной машине, выполните команду:
где ‘host’ это имя машины, которую вы хотите видеть. Эта команда вернет список имен ‘сервисов’ — т.е. имен дисков или принтеров к которым может быть получен доступ. До тех пор, пока SMB сервер не будет настроен без управления доступом, он будет запрашивать у вас пароль. Введите в ответ на запрос пароль для пользователя ‘гость (guest)’ или ваш персональный пароль на этой машине.
Вывод этой команды должен выглядеть примерно так:
Browse list показывает другие SMB сервера в сети с доступными ресурсами.
Для использования клиента, выполните следующую команду:
где ‘service’ — имя машины и сервиса. Например, если вы пытаетесь обратиться к директории, которая доступна под именем ‘public’ на машине названной ‘zimmerman’, то имя сервиса должно звучать как \\zimmerman\public. Однако в следствии ограничений оболочки, вам необходимо спрятать обратный слэш, так что в итоге это командная строка выглядеть следующим образом:
где ‘mypasswd’ — символьная строка вашего пароля.
Вы получите приглашение smbclient:
Напечатайте ‘h’ чтобы получить помощь об использовании smbclient:
Если вы умеете использовать ftp, то вам не будут нужны справочные страницы о smbclient.
Хотя вы можете использовать smbclient для тестирования, вы скоро устанете использовать его в работе. Для работы вам скорее всего понадобится пакет smbfs. Smbfs поставляется с двумя простыми утилитами, smbmount и smbumount. Они работают подобно mount и umount для SMB-ресурсов.
Одно важное замечание: Чтобы использовать эти утилиты, у вас должна быть поддержка smbfs вкомпилированная в ядро!
Следующий пример показывает типичное использование smbmount для монтирования SMB-ресурса, названного «customers» с машины с именем «samba1»:
Запуск команды mount покажет вам, что ресурс смонтирован, точно также как и через экспорт NFS:
Пожалуйста прочитайте справочные страницы smbmount и smbumount для дополнительной информации о описанных выше операциях.
Источник
Mounting and mapping shares between Windows and Linux with Samba

More Linux resources
In my previous article, Interoperability: Getting started with Samba, I covered installing and configuring Samba shares on a Linux server. The real power of Samba comes when Windows clients can communicate with Linux file servers. In this article, I will cover how you can access Samba shares from both Linux and Windows clients.
Install the Samba client packages
To access Samba share from Linux clients we need to install a few Samba client packages.
On the client machine, install the samba-common and samba-client packages.
Check for available shares
Let’s check if we can access our shares from the server. We can use either the hostname or ip address of the server. If you use the hostname , make sure DNS is working.
Create a directory that we can use as our mount point. I’m going to create a directory under /mnt , but you can use any directory you would like to. You may need to configure SELinux on that directory.
Now, mount the share.
Now that we’ve mounted our share, we can check the mounts with the following command:
Let’s make that directory mount persistently so it can withstand a reboot. Using the text editor of your choice, edit the /etc/fstab file. You can do this in multiple ways, but I’m going to demonstrate two ways to mount the Samba share at boot in /etc/fstab .
The first option provides a username and password for the Samba user in the fstab .
The other option is to create a credential file. You can call this file anything, but I would like to call it cred . I would like to place credentials files in the home directory of the user. In our demonstration it will be /home/user/.cred .
The _netdev option is important since we are mounting a network device. Clients may hang during the boot process if the system encounters any difficulties with the network.
Now create that .cred file inside the user’s home directory.
Next, add the Samba user’s username and password.
Finally, mount all filesystems.
Access a share from a Windows client
I will be using Windows 10 as my client machine with a workgroup called SAMBA . We need to create a local user account on the Windows machine that matches the username and password of the Samba user account we created in my previous article. Although account creation is not necessary, this will make things simpler when accessing the share.
Like I mentioned above, this step is optional and you can skip it completely. Although there are multiple approaches to adding a new local user on a Windows machine, for the simplicity of this article I will be using PowerShell. Launch PowerShell as an administrator and issue following commands:
Now that we have created a new local user account matching the Samba user account, we can log in to Windows with our newly created user account.
Access a share from Windows Explorer
To access the Samba share from Windows Explorer, start typing the IP address to our share in the search area. I am using the hostname of the Samba server. In my case, it is centos . You can also access the share by using the IP address of the Samba server.

You might be prompted to enter the username and password to access the share if you skipped the local user creation process. If you get prompted for credentials, enter the Samba username and password we created in the previous article.
You will need to enter the Samba share path every time you want to access the share. There is a better way to access the share by mapping a drive to Samba share in Windows.
Mapping a drive to a Samba share
To map a drive to the Samba share, open PowerShell and issue following command:

Accessing a Samba share on Linux and Windows is easy. With this basic setup, you will be able to access file shares from client machines in your network. With somewhat more configuration, you can deploy Samba shares in a domain environment. Samba can do more than file share. If you would like to learn more about Samba, read this article about Windows and Linux interoperability. This is a basic set up, but you can do so much more with Samba.
[ Want to test your sysadmin skills? Take a skills assessment today. ]
Источник
Connect to your Samba server from Linux
I have written a few articles on Samba here on Ghacks. And most people know how to connect to Samba shares via Windows. Generally speaking (when all is set up correctly) it’s just a matter of opening up Explorer and entering \\ADDRESS_OF_SAMBA_SERVER\SHARENAME to get to your Samba shares. But what about in Linux? How do you go about connecting to Samba shares with the same operating system that is running the Samba server?
One would think that an easy task. It actually is, once you know how it is done. Â And in this article I am going to show you two different ways of making the connection to your Samba server. You will need to have a working knowledge of how the Samba server is set up as well as a username/password configured on the Samba server. There are also a few steps to take on the desktop for one certain method of connection.
The two methods I will describe are: Using GNOME’s Connect To Server dialog and the command line. The latter will be used to show you how to set up auto mounting for Samba.
The graphical method
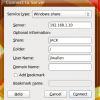 Figure 1
If you take a look at the GNOME Places menu you will see an entry labeled «Connect to server. «. This is what you want to use in order to connect to your Samba server. When you click on that a new window will open. From the Service type drop-down select «Windows share» (see Figure 1).
When you select that entry some of the configuration options will change. As you can see (in Figure 1), I have entered the necessary options to connect to a Samba server on my internal network. You will want to replace the information so it reflects your needs. The only tricky bit of information might be the Folder entry. If you are connecting to the root directory on the share you will not need to enter anything there. Say, for instance, you share is /media/samba/user. If you want to connect to that directory leave the Folder entry blank. Say, however, you want to connect directly to a sub-folder within that share — you can enter that folder here. This, of course, isn’t needed because you can always traverse the sub-directories with simple navigation. You can also choose to add a bookmark instantly, from in this window.
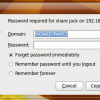 Figure 2
Once you have all of the information entered click Connect and you will be greeted with a new window that requires you to enter a password. Also, if you do not supply a Domain name in the previous window, you will be required to enter it here.
You can also set this up to remember your password either until you logout or until, well, forever. Once you have entered the password/domain click the Connect button and a new Nautilus window will open inside of your Samba Share.
Using the command line
Now we’re going to use the command line to accomplish a similar goal. The biggest difference is that we are going to actually mount the Samba share into another directory, very much the same way we would mount a second hard drive.
There are a few pieces to put together before we actually take care of the mounting. First let’s create a directory that the Samba share will be mounted to. So from the terminal window issue the following command:
sudo mkdir /media/samba
Now let’s make sure our users can read/write to this directory with the command:
sudo chmod -R u+rw /media/samba
Okay now let’s make sure we can see the Samba shares from the command line. We’ll do that with the smbclient command like so:
smbclient -L //SAMBA_SERVER_ADDRESS
Where SAMBA_SERVER_ADDRESS is the actual IP address of the Samba server.
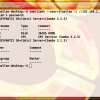 Figure 3
You will be prompted for your username and password. If you get an error it could be that the usernames don’t match on each end. If that’s the case you could add the -U switch to the command like so:
smbclient —user=jlwallen -L  //SAMBA_SERVER_ADDRESS
You should see output similar to that shown in Figure 3.
Now it’s time to try to mount the Samba share to the /media/samba directory. To do this issue the command:
sudo mount -t cifs //SAMBA_SERVER_ADDRESS/SHARE -o username=USERNAME /media/samba/
- SAMBA_SERVER_ADDRESS is the IP address of the Samba server.
- SHARE is the share name.
- USERNAME is the username to connect with.
If that works you can now make this an automated mount by adding the following line to your /etc/fstab file:
//SAMBA_SERVER_ADDRESS/SHARE   /media/samba   cifs  credentials=/etc/samba/user.cred 0 0
Where SAMBA_SERVER_ADDRESS is the IP address of the Samba server and SHARE is the share name.
Notice the user.cred file. This is one last thing we need to create. With your text editor create this file and place into it:
Where USER is the username to log in with and PASSWORD is the password to use for authentication. The final step is the give this new file the proper permissions with the command:
sudo chmod 600 /etc/samba/user.cred
You can ensure this works by issuing the command mount -a which should mount your Samba share.
Final thoughts
You should now have an auto-mounting Samba share — or the ability to easily connect your GNOME desktop to a Samba share. Samba is a very powerful tool that not only can share files with Windows machines, but with Linux machines as well.
Источник
Connect samba from linux
A Samba file server enables file sharing across different operating systems over a network. It lets you access your desktop files from a laptop and share files with Windows and macOS users.
This guide covers the installation and configuration of Samba on Ubuntu.
What you’ll learn
- How to set up a Samba file server
- How to share files across a local network
What you’ll need
- Ubuntu 16.04 LTS
- A Local Area Network (LAN) to share files over
If you have everything ready, let’s dive straight into the installation process on the next step!
Originally authored by Aden Padilla.
2. Installing Samba
To install Samba, we run:
We can check if the installation was successful by running:
The following should be its output:
3. Setting up Samba
Now that Samba is installed, we need to create a directory for it to share:
The command above creates a new folder sambashare in our home directory which we will share later.
The configuration file for Samba is located at /etc/samba/smb.conf . To add the new directory as a share, we edit the file by running:
At the bottom of the file, add the following lines:
Then press Ctrl-O to save and Ctrl-X to exit from the nano text editor.
What we’ve just added
-
- comment: A brief description of the share.
-
path: The directory of our share.
read only: Permission to modify the contents of the share folder is only granted when the value of this directive is no .
browsable: When set to yes , file managers such as Ubuntu’s default file manager will list this share under “Network” (it could also appear as browseable).
Now that we have our new share configured, save it and restart Samba for it to take effect:
Update the firewall rules to allow Samba traffic:
4. Setting up User Accounts and Connecting to Share
Since Samba doesn’t use the system account password, we need to set up a Samba password for our user account:
Note
Username used must belong to a system account, else it won’t save.Connecting to Share
On Ubuntu: Open up the default file manager and click Connect to Server then enter:

On macOS: In the Finder menu, click Go > Connect to Server then enter:
On Windows, open up File Manager and edit the file path to:
Note: ip-address is the Samba server IP address and sambashare is the name of the share.
You’ll be prompted for your credentials. Enter them to connect!
Источник


