- Scott Hanselman
- Connect to a device over Serial COM Port on Windows 10 with WSL1 TTY devices with Windows Terminal and minicom
- Setup WSL1
- Get Minicom on your WSL1 distro
- Ensure dialout permissions to talk to the COM port
- Make a nice menu
- About Scott
- DraTeots / ComPort over Network.md
- Serial Port Programming using Win32 API
- Sourcecodes
- Writing Data to Serial Port
Scott Hanselman
Connect to a device over Serial COM Port on Windows 10 with WSL1 TTY devices with Windows Terminal and minicom
 I hope that this blog post is found and helps someone. I wasn’t sure what to title it. Hope Google Juice got you here!
Read this whole post, there’s a lot initially but there’s really just two or three small pieces. It’ll be worth it because you’ll be able to have a nice one click menu and drop directly into a serial port terminal on Windows in the Windows Terminal
Often when you’re doing embedded systems development you’ll want to monitor or talk to the COM/Serial Port just like you SSH into remote system. Folks ask questions like «How to connect to a serial port as simple as using SSH?»
On Linux you’ll use things like «screen /dev/ttyS0» for COM0. With Windows, however, the historical guidance has always been to use Putty. It’ll work but it’s somewhat old, quirky, and it doesn’t integrate well with the Windows Terminal and a more modern workflow.
Say I have a small embedded microcontroller device that talks over a COM Port (usually via a USB->COM bridge) like an Arduino.
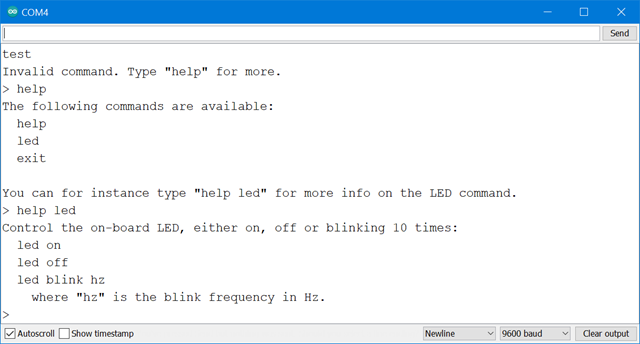
Let’s assume this device talks to the COM port as if it were a terminal and it’s outputting stuff I want to see. I’ll use this great little CLI example app for Arduino from Mads Aasvik to simulate such a device.
Here’s what it looks like under Arduino’s Serial Monitor, for example. This is a Windows app doing serial communication with its own interface wrapping around it. I want to do this at a command line, and bonus points if it’s in Windows Terminal.
Setup WSL1
If you have Windows 10 you can the Windows Subsystem for Linux quickly with this command at a Admin prompt:
Then go to the Windows Store and get any small Linux. Ubuntu or Kali will do for our purposes. Run it and set your user and password. (I tried Alpine but it still has issues with screen and /dev/null/utmp)
NOTE: If you are using WSL2 and have set it as default, run wsl —list -v and ensure that your new distro is using WSL1 as only WSL1 will let us talk to the COM Ports. You can change it to WSL1 with «wsl —set-version DISTRONAME 1» from any command prompt.
To test this out now, run your new distro from any command line prompt like this. Add the «screen» app with sudo apt update » and » sudo app install screen «.
You can see here that my Arduino serial device is on COM4. On Linux that device is /dev/ttyS4
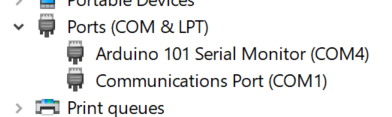
That means that I should be able to talk it from any WSL1 Linux Distro on Windows like » screen /dev/ttyS4 9600 » where 9600 is the speed/baud rate.
Get Minicom on your WSL1 distro
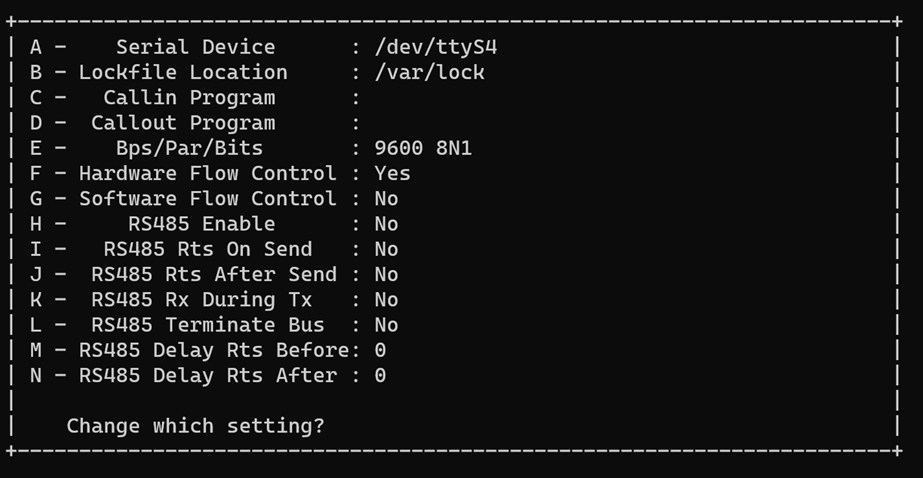
Screen is somewhat persnickety for Serial Port work so try Minicom. Minicom is a nice little text com program. Install with apt install minicom and run for the first time with «sudo minicom -s» to set your default. Note I’ve change the default port from /dev/modem to /dev/ttyS4 and the speed, in my case, to 9600.
Then I hit enter and save settings as the dft (default) in minicom. You can also turn on Local Echo with «Ctrl-A E» and toggle it if needed. Now I can talk to my Arudino with minicom.
Ensure dialout permissions to talk to the COM port
NOTE: If you get «cannon open /dev/ttyS4: Permission denied, you may need to add your user to the dialout group. This way we don’t need to sudo and get no prompt when running minicom!
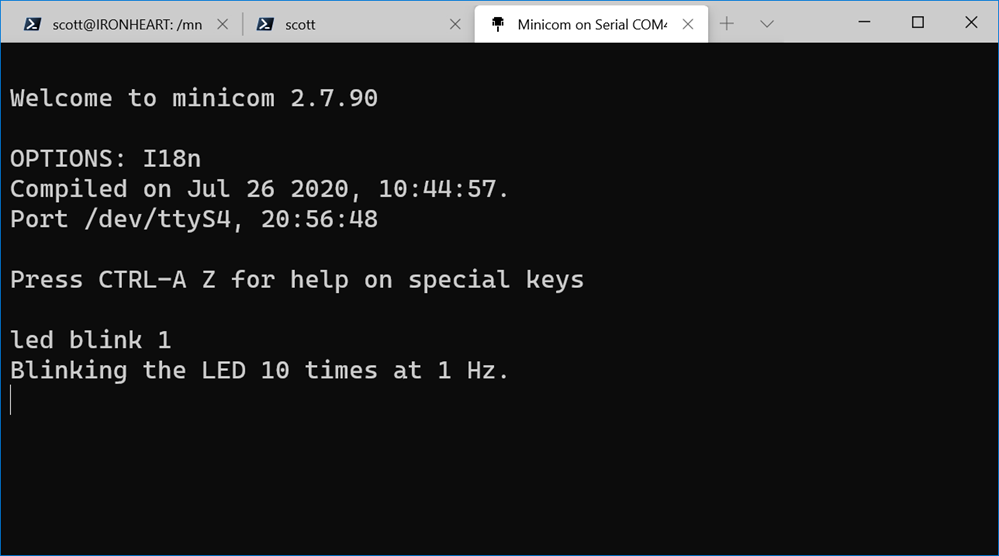
I can now run minicom on my configured COM port 4 (/dev/ttyS4) with wsl -d DISTRONAME minicom without sudo .
Here I’m talking to that Arduino program. This embedded app doesn’t need to me hit enter after I type, so remember your own embedded devices will vary.
Make a nice menu
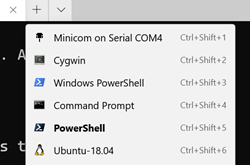
Bonus points, now I’ll add a menu item for Minicom by changing my Windows Terminal settings AND I’ll get more points for adding a nice serial port icon!
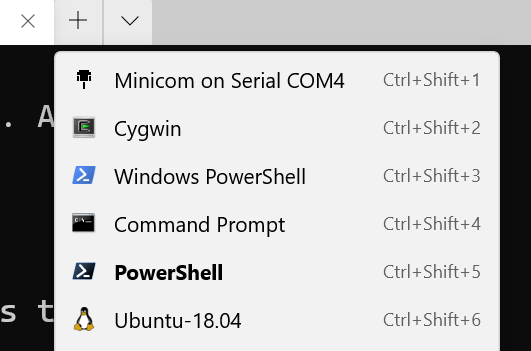
I hit settings and add a new profile like this at the top under profiles in the «list.» Again, your distro name will be different.
- Use a WSL1 distro
- Install minicom, run with minicom -s once to make settings
- Make sure you are using the right /dev/ttyS0 device for your situation
- Ensure your flow control, baud, etc are all correct in minicom
- Add your user to the dialout group so you don’t have to sudo minicom
- Make a menu item in Windows Terminal
- or run minicom manually in your WSL1 instance whenever you like
Hope this helps!
Sponsor: Suffering from a lack of clarity around software bugs? Give your customers the experience they deserve and expect with error monitoring from Raygun.com. Installs in minutes, try it today!
About Scott
Scott Hanselman is a former professor, former Chief Architect in finance, now speaker, consultant, father, diabetic, and Microsoft employee. He is a failed stand-up comic, a cornrower, and a book author.
DraTeots / ComPort over Network.md
Connecting to serial port (com port) over network
(Serial port or com port? — Serial ports are often refered as COM ports. It is the same to be short. You can read abut it in the Wiki article )
Suppose we have an application that works with some device using serial port (com port or comport — the same thing). It could be GPS reader, IRDA, whatever. So it looks like this:
Now what we want, is to have the device connected to one machine (server), and run the application on the remote machine (client) over the network. Real life example: a device is connected to raspberry pi (very small single-board machine) that is connected to a local network, and read the data on a desktop.
Since the application (APP on diagrams) knows only how to communicate with the device by serial port (we suppose), the client machine has to have some virtual serial port that is used by the application. It is called «virtual serial port» or «virtual comport» as this is a software emulated bridge between a client and your application. So the diagram is:
- SERVER that communicates with the DEVICE through physical serial port and then serves the data over network
- Client that connects to the server
- Virtual comport that mimics physical serial port and interface with the APP
So now the application just works with serial port on the client machine, and doesn’t even know that data is actually transmitted over the network.
The solution in theory
One of the solutions is using telnet with RFC2217 — Telnet Com Port Control Option. Is solves exactly the problem above. There are a lot of software that supports telnet+RFC2217 serial port forwarding. It allows you to run the server and the client on linux or windows machines (and MACs I suppose, but haven’t tested it). This allows one to run linux server and windows client. Both would use completely different software, but because of RFC2217 standard they ‘know’ how to communicate.
More over you can multiplex the com ports and encrypt the data. Whatever you want.
The solution in practice
There is an absolutely brilliant free opensoure solution that can be used for comport forwarding, client and server for windows. It is called com0com. It actually consists of two parts a HUB (hub4com) and kernel-mode virtual serial port driver (com0com) — explained further.
For the server you need only hub4com.
Configuration (I just cite the documentation):
You have a server computer with phisical COM1 port and you’d like to share it through the network by the RFC 2217 «Telnet Com Port Control Option» protocol:
Start the com2tcp-rfc2217.bat on COM1 port. For example:
It will listen TCP/IP port 7000 for incaming connections and redirect them to COM1 port.
To be a windows client you have to install com0com virtual comport driver and hub4com (provided as 2 separate files).
Create a PAIR of virtual comports where one is used for RFC2217 and the other is the port for your application will use.
(documentation citation) for RFC 2217 client :
You have a server computer your.comport.server with physical serial port shared through the network by the RFC 2217 protocol (see above example) and you’d like to use it on the client computer like a virtual serial port.
With the com0com’s Setup Command Prompt create COM19 COM20 virtual COM port pair (see com0com’s ReadMe.txt for more info). For example:
Example. Start the com2tcp-rfc2217.bat on COM19 port:
It will redirect virtual serial port COM20 on the second computer to the physical serial port on the first computer.
(!) TL;DR; Your Application should connect to COM20.
Explanation
TL;DR; We have a virtual serial port pair COM19 COM20, we connect com2tcp to one of the ports (COM19) and your application connects to the other (COM20)
It is bit counter intuitive why a virtual pair is created. To explain what happens, imagine we create a virtual comport pair: COM19 COM20 as in the example above. The reason one needs a pair is that only one thing can be connected to a COM port. If hub4com binds network data to COM19, then the port is taken and your application can’t connect to it. So virtual comport pair mirrors everything from COM19 to COM20, which is free and your application can connect to it.
So, the more detailed client diagram looks like this now:
Deprecated part — com0com 3.0.0 comes with driver signarure. Unfortunately on newer windows (since 2018) this doesn’t help.
According to Windows Driver Signing Policy «Starting with Windows 10, version 1607, Windows will not load any new kernel-mode drivers which are not signed by the Dev Portal.» (link)[https://sourceforge.net/p/com0com/discussion/440109/thread/c4d52f1b/?limit=25]
There are 3 solutions:
- Disable driver signature verification (bad)
- Use version 2.2 (it works)
- Use DSEO
(older problem) According to this bug report on Windows 8×64 you may get problem with driver installation if you don’t have the driver signature verification turned off. To enable driver test mode and sign a driver for windows, one may download DSEO
The linux app I’ve got working pretty easy is ser2net
It has configuration file located at /etc/ser2net.conf.
Ubuntu installation
The configuration line (for /etc/ser2net.conf) that corresponds to windows setup above
- 7000 — port
- /dev/ttyUSB0 — name of serial port
- 1000000 . — baud rate etc (actually you can skip it because of remctl)
- remctl — means using remote port configuration as of RFC2217
That is it. Read ser2net docs for more
socat can be used as a linux client. Socat is a command line based utility that establishes two bidirectional byte streams and transfers data between them.
- 192.168.123.30 — your server IP
- 7000 server port
- your app should connect to /dev/ttyS2
- 115200 — port baud rate
Connect over the internet
All the above solutions basically describe how to forward data from com-port (serial port) to network port and then how to bind a network IP with port to a virtual com-port. It is streight forward for a local network but how to connect the devices over the internet? If you are an experiecned IT person, you may think of tons of solutions here, starting from fixed IPs and counting up to infinity.
For me one of the versatile easy to configure ways was to use ZeroTier VPN services. It is free for up to 100 devices and have a good interface for easy configuration, good manuals, etc. In the end you have a network interface on each of the machines which acts as a single local network (basically what VPN is).
I’m NOT connected anyhow with Zerotier co. Just share the solution which was optimal for me. «As is».
Serial Port Programming using Win32 API

This tutorial teaches you to program your Windows PC to communicate with an external peripheral like data acquisition boards, USB GPIO Boards,Relay boards etc through its serial port (Virtual or Real).
Here i am assuming that you are using a Virtual COM port based any of the numerous IC’s available on the market.
The tutorial is aimed at Software/Embedded developers who may want to interface real world sensors like DAQ’s,USB Relays,USB GPIO boards ,Temperature sensors,Humidity sensors etc to Windows PC .
The software is written using C language and communicates with the Serial Port using Win32 API.
All codes have been tested on a 64bit Windows 10 System.
All the codes in this tutorial are licensed under MIT License making it eligible to be used for developing proprietary software applications.
Contents
Isolated USB to Serial Converters
One major issue with interfacing real word devices with your PC’s is that High voltage spurious transients can couple on to your USB or RS232 or RS485 lines.These high voltage transients can cause severe damage to your computer or its ports.
It is highly recommended to use an
to protect your PC .
Sourcecodes

- Please note that the source codes on the website show only the relevant sections to highlight the process of programming the serial port.
- Contact Us to Enquire about the full Source codes
Compilers and IDE’s used
Since we are developing on Windows platform,
- Recommended IDE is Visual Studio (Professional or Community Edition).
In Visual Studio,there is no longer an option for creating a C project.
So create a Win32 C++ project and save your source file with a .C extension (Eg: MySourceFile.C).Compiler would automatically do the rest.
GCC/MinGW
You can also compile the code using GCC or MinGW after a few tweaks.
The Code uses some Microsoft specific safe C functions like
- strcat_s() and
- scanf_s()
which are used to get the COM number from the user and create the COM port address string (Eg «\\.\COM9» ).The code will compile on GCC after removing those functions.
Make sure that variables referenced by those functions are also changed.
Finding out your COM port Number
A little bit of History,
Serial ports are simple 9 pin legacy ports used by the PC to communicate with external peripherals like Printers,Data Acquisition Sytems,Printers etc.
The simple protocol and the 3 pin hardware physical lines (RX,TX,GND) made it quite popular among manufacturers who wanted an easy way to connect their devices with a computer.
In the 2020’s, the old DB9 Serial port is found only on industrial motherboards and old PC’s.The once ubiquitous serial port have been completely replaced by the familiar USB standard.
The arrival of cheap USB to UART chips like FTD FT232RL,TUSB3410,CP2102 have made it quite easy to upgrade the existing software that used to talk over serial to USB protocol.These chips provide a virtual serial port that behaves like a real one but transmits the data through USB.
If your PC does not have any hardware serial ports (RS232 DB9 ports), you can use USB to Serial Converter’s like USB2SERIAL .(non Isolated).
In Windows ,
Serial ports are named as COM1,COM2 ,COM3.. etc .COM1 and COM2 usually refer to the hardware serial ports present in the PC (quite rare now)
while COM numbers in double digits like COM32,COM54,COM24.. etc are given to USB to Serial Converters or PCI serial port extenders.
To find out the COM number corresponding to your serial port,
- Open Device Manager by right clicking on My Computer icon and selecting Manage → Device Manager. or
- by typing «Device Manager» on the taskbar search box in Windows 10
Under Ports(COM & LPT) you can see the parallel and serial ports (COM) detected by your system.

If your PC has any hardware ports, it will be shown either as COM1 or COM2 under the Ports Section.
I am using a FTDI based USB to Serial Converter (USB2SERIAL)which is recognized as COM24 (this may be different under your system).
If you double click on COM24,you can see the details of the corresponding port.

Windows10 Accounts
The codes/executables are able to open the connection to the serial port under both Administrator Account and Standard User Account in Windows 10.
Opening and Closing a Serial Port
we use the CreateFileA() function to open a serial port.
CreateFile() is a Win 32 function which is used to create or open a file, stream or an IO device like serial port.
On success CreateFileA() will return a handle which is then used to refer the connection in all subsequent operations.
After opening a serial port using the CreateFileA() function you should close it with CloseHandle() function, otherwise port will become unavailable to other programs.
Now let’s write a small program to open and close a serial port on Windows.
Open a text editor like notepad and type the below code and save it as “serial.c”.If you are using IDE like VS Express, use the one integrated with it.
#include windows.h >
#include
int main()
<
HANDLE hComm ;
hComm = CreateFileA( “ \\\\.\\COM24 ”, //port name
GENERIC_READ | GENERIC_WRITE, //Read/Write
0 , // No Sharing
NULL, // No Security
OPEN_EXISTING, // Open existing port only
0 , // Non Overlapped I/O
NULL ) ; // Null for Comm Devices
if ( hComm == INVALID_HANDLE_VALUE )
printf(“Error in opening serial port”);
else
printf(“opening serial port successful”);
CloseHandle( hComm ) ; //Closing the Serial Port
Configuring the DCB Structure
In Windows ,settings like Baud rate ,Number of start/Stop bits,data formats etc for the serial port are controlled by the DCB structure.
To Configure the DCB structure we use two functions,
GetCommState() function which retrieves the current control settings of the serial port and
SetCommState() function which configures the serial port with the new values in DCB structure provided by us.
ReadIntervalTimeout Specifies the maximum time interval between arrival of two bytes. If the arrival time exceeds these limits the ReadFile() function returns.
ReadTotalTimeoutConstant is used to calculate the total time-out period for read operations. For each read operation, this value is added to the product of the ReadTotalTimeoutMultiplier member and the requested number of bytes.
ReadTotalTimeoutMultiplier is used to calculate the total time-out period for read operations. For each read operation, this value is multiplied by the requested number of bytes to be read.
WriteTotalTimeoutConstant similar to ReadTotalTimeoutConstant but for write operation.
WriteTotalTimeoutMultiplier similar to ReadTotalTimeoutMultiplier but for write operation.
After this you have to set the values using SetCommTimeouts() function.
Writing Data to Serial Port
Writing data to the opened serial port is accomplished by the WriteFile() function. WriteFile() function can be used to write both into the files and I/O ports.
Status = WriteFile( hComm , // Handle to the Serial port
lpBuffer, // Data to be written to the port
dNoOFBytestoWrite , //No of bytes to write
& dNoOfBytesWritten , //Bytes written
NULL ) ;
If your PC does not have any hardware serial ports you can use any USB to Serial Converters(I am using USB2SERIAL).
Microcontroller Interface
I have interfaced a microcontroller MSP430G2553/ATmega328P to the serial port like this

You can use any microcontroller of your choice like 8051,AVR or ARM(LPC2148).
The Controller waits for a character to be received and lights up the corresponding LED.
The code for interfacing MSP430 is available in the Github repo.
.If you want to know how to configure the MSP430 controller UART you can check this tutorial.

We have also included code for
in the Repo too. The connection setup is similar to the MSP430.
Please note that if you are using a DB9 RS232 Serial Port of your PC, you will have to build a RS232 signal level converter at the microcontroller side to decode the RS232 signal.
Directly connecting the PC’s RS232 Serial port to MSP430 ‘s pins will damage the chip.
Here is the screen shot of the Program writing into serial port of Windows 7 Computer
Please note that i have changed the names of the C files in the latest release.
Use the files in the «PC_Transmits» folder.

Here is the screen shot of the Program writing into serial port of Windows 10Computer
![]()
Reading from the Serial Port
Reading from the serial port is accomplished by the ReadFile() function.
One way to do that is to use polling where the ReadFile() continuously reads from the serial port and checks for any received characters.
Other way is to setup an event and let windows notify us when a character is received.
We are going to use the second method here, following are the steps.
1. Create an Event for a particular action like character reception, change in modem lines etc using SetCommMask() function .
2. Ask windows to wait for the event set by SetCommMask() function using WaitCommEvent() and notify us when the condition happens.
3. Call ReadFile () to read the received data from the Serial port.
Functions used are
SetCommMask() is used to set the events to be monitored for a communication device
WaitCommEvent() is used to wait for the events set by SetCommMask() to happen, i
Codes running on Windows 7 PC.
Please note that i have changed the names of the C files in the latest release.
Use the files in the «PC_Receives» folder.

Reset the Micro controller to transmit the string “Hello from MSP430”.

Codes running on Windows 10 PC .


