- How to connect to CentOS 8 Desktop from Windows using RDP protocol
- Installing Desktop Environment
- Installing XRDP RDP Server
- Configuring XRDP
- Configuring the Firewall
- Connecting to the XRDP using Windows Machine
- Conclusion
- Karim Buzdar
- Одминский блог
- Удаленное X-подключение к серверу CentOS
- CentOS 7 Remote Desktop From Windows
- CentOS 7 XRDP Install
- Configure Firewall
- Access CentOS From Windows Remote Desktop
- How to Connect to a CentOS 7 Server via Remote Desktop Connection using xRDP
- Published by Vlad on January 7, 2019 January 7, 2019
- Prerequisites
- Step 1 – Install xRDP on CentOS 7
- Step 2 – Install Your Preferred Desktop Environment
- 1. Install XFCE Desktop Environment
- 2. Install MATE Desktop Environment
- 3. Install GNOME Desktop Evironment
- Step 3 – Connect to Your Machine Using Remote Desktop Connection
- Connect from Windows
- Connect from Linux
- Connect from OSX
- Conclusion
How to connect to CentOS 8 Desktop from Windows using RDP protocol
XRDP is an open-source implementation of the Microsoft Remote Desktop (RDP) that allows you to graphically control your system. With RDP, you can log in to the remote machine the same as you had logged into the local machine. It uses Port 3389 for its connection. In this tutorial, we will look at how to set up the Remote desktop Connection on CentOS 8.
Installing Desktop Environment
I’ll be using a CentOS server for this tutorial which did not has a Desktop environment installed yet. So the first step on my system is to install the Desktop environment. If you have already a GNOME Desktop installed on your CentOS system, then proceed with the next chapter to install XRDP.
To install GNOME on your remote machine, open up the terminal and run the following command:

Depending on your system, downloading and install the GNOME packages and dependencies may take some time.
Installing XRDP RDP Server
XRDP is available in the EPEL software repository. If EPEL is not enabled on your system, enable it by typing the following command:

Now install the XRDP package.

Once the installation is complete enable and start the XRDP service.
To verify the XRDP is running, type the following command:
If the XRDP service is running, the output should be like this as shown in the figure below:
 Advertisement
You can also verify the XRDP service state by using the following command:

Port should be Listening like below:

Configuring XRDP
The configuration file is /etc/xrdp/xrdp.ini. By default, XRDP uses Linux desktop, which is in our case is GNOME. For the connection, you don’t need to make any changes in the configuration file. This file is divided into different sections and allows you to set global configuration settings such as security and listening address and you can also create different XRDP login sessions.
Open up configuration file /etc/xrdp/xrdp.ini and add the following line at the end of the file.
After adding above line restart the XRDP service, using the following command:
Configuring the Firewall
If your firewall is running on your Centos 8, just add the rule to allow the XRDP port/service to allow traffic for the XRDP connection.
Connecting to the XRDP using Windows Machine
Windows, by default, uses the remote desktop client. To connect through Centos 8 using remote desktop type Remote desktop connection in the windows search bar and press enter.

Enter the IP address of the remote machine and click on connect.

It will prompt you to the login screen for the credentials. Enter username and password and click on Ok.

Once logged in, you should see the default GNOME Desktop. Now you can start interacting with the remote machine.
If you are using Mac OS, install the Microsoft Remote Desktop application from Mac App Store, whereas the Linux user can use RDP clients like Remmina or Vinagre.
Conclusion
In this tutorial, we have learned how to configure Remote desktop Connection in CentOS 8 and access using a windows machine. Using XRDP, allows you to manage and control your machine remotely from your local desktop machine with the use of a graphical interface.
Karim Buzdar
About the Author: Karim Buzdar holds a degree in telecommunication engineering and holds several sysadmin certifications. As an IT engineer and technical author, he writes for various web sites. You can reach Karim on LinkedIn
Одминский блог
Блог о технологиях, технократии и методиках борьбы с граблями
Удаленное X-подключение к серверу CentOS
Возникла некая необходимость управлять сервером шуршащим под CentOS, из винюка, причем не абы как, а через X-терминал. Поковырявшись, решили делать через Xming- бесплатный продукт, который можно скачать в инете в версии 6.9.0.31, на данный момент. За версию 7.5 дяди хочут бабла в размере 10 евриков, так что нам этот вариант не катит.
Собственно все достаточно просто. Напишу так, ибо так пишут все, хотя не фига я не считаю, что все так просто, ибо все мануалы в инете похожи как братья близнецы и ни по одному из них у меня ничего не заработало, так что в итоге я провозился полдня пытаясь настроить хоть что нибудь.
Схема работы простая: есть юниксовый сервер UNIX-Server под управлением CentOS на котором крутится X-клиент/сервер; есть виндовая машинка Win-XP на которой поднимается X-сервер Xming с помощью которого мы подключаемся к клиентской части UNIX-Server и по идее должны получить картинку с X-терминалом на рабочем столе виндовой машины.
Для начала скачиваем и устанавливаем на нашу Win-XP рабочую станцию X-сервер Xming, откуда нить с инетовского зеркала, благо их предостаточно разбросано по инету. После установки пробуем настроить работу через Xdmcp. Это специфический незашифрованный протокол, используемый для аутентификации и подключения Х-сервера к Х-клиенту. Поскольку он не является закрытым, то его не рекомендуется использовать в открытых сетях, но это ограничение убирается при использовании сторонних средств шифрования. Ибо это наше первое знакомство, то не будем запариваться на безопасность и попробуем хотя бы запустить данный сервис.
Для этого на UNIX-Server открываем файло /usr/share/config/kdm/kdmrc и в разделе [Xdmcp] проверяем, чтобы активность равенства Enable=true
После этого добавляем в файлы следующие поля:
/etc/gdm/custom.conf
[xdmcp]
Enable=true
/etc/X11/fs/config
# no-listen = tcp
Настроиваем логин: K Menu -> System -> Login Screen
Во вкладке Remote, меню Style выставляем Same as Local
Во вкладке Security, ставим галку Allow local system administrator login
Перегружаем Х-сервер
# /etc/rc.d/init.d/xfs restart
после чего переходим к настройке виндового сервера. Запускаем приложение XLaunch, в котором выбираем
One Window -> Open session via XDMCP -> в Connect to host прописываем IP адрес UNIX-Server и ставим галку Use indirect connect (народ пишет, что её надо снять но в нашем случае заработало только с ней) -> можем оставить пустыми, либо прописать свойства терминала Х, например в Remote font server наш IP UNIX-Server, а в Additional parametrs for Xming строку инициализации десктопа без кавычек “-screen 0 800×600″ -> Готово
Если все настроили правильно, то на выходе получаем консоль с приглашением нашего X-терминала.
CentOS 7 Remote Desktop From Windows
In this guide i will show how to CentOS 7 Remote Desktop From Windows and install tigervnc, xrdp on CentOS 7.
TigerVNC is a high-performance, platform-neutral implementation of VNC, a client/server application that allows users to launch and interact with graphical applications on remote machines.
xrdp – open source remote desktop protocol(rdp) server. Based on the work of FreeRDP and rdesktop, xrdp uses the remote desktop protocol to present a GUI to the user.
First of all we need install Gnome GUI on our CentOS 7 or RHEL 7 – How To Install Gnome CentOS 7.
CentOS 7 XRDP Install
Tigervnc server centos 7 installation with xrdp we can do by using YUM command:
After xrdp and tigervnc-server installing start the xrdp service by using command:
To start xrdp service at boot, use the enable command:
To conform xrdp listening on 3389 port with netstat command:
Configure Firewall
Configure the firewalld to allow incoming RDP connections to TCP 3389 port:
Access CentOS From Windows Remote Desktop
Launch Windows rdp client and try access CentOS from Windows:

Access CentOS From Windows Remote Desktop
Ignore the warning of RDP certificate and accept the certificate:

Ignore the warning of RDP certificate and accept the certificate
In next window make sure you use module Xvnc Session and type your Linux user credentials:

Click OK and in get CentOS 7 remote Desktop:
How to Connect to a CentOS 7 Server via Remote Desktop Connection using xRDP
Published by Vlad on January 7, 2019 January 7, 2019
In this tutorial we’ll cover the steps to install xRDP on your remote CentOS 7 machine, and how to connect to it via Remote Desktop Connection. We’ll also show you how to install and connect to different Desktop Environments on your remote CentOS 7 machine.
xRDP is a a free and open source Remote Desktop Protocol Server that allows other operating systems, other than Windows, to provide a fully functional remote desktop experience.
xRDP is fully compatible with rdesktop, FreeRDP and even Microsoft’s Remote Desktop Client.
Prerequisites
- Although not absolutely required, we recommend acting as a non-root sudo user when proceeding to make any major changes to your system.
- A machine running CentOS 7 with a minimum of 2GB RAM.
Installing xRDP on CentOS 8: For an updated version of this tutorial for CentOS 8, along with installing additional desktop environments and configuring the remote desktop connection for speed, we recommend this article How to Connect to a CentOS 8 Server via Remote Desktop Connection using xRDP
Get a High RAM VPS at Entry-level Pricing
Starting with 2GB RAM at $6.99/month
Take your pick from our KVM VPS that offer a generous amount of RAM at an affordable price. We’ve got 5 plans for you to choose from, our smallest featuring 2GB RAM at $6.99/mo.
Pick one of our KVM plans
Step 1 – Install xRDP on CentOS 7
First, update your package index:
If you’re using FirewallD, then open port 3389/tcp for RDP:
Step 2 – Install Your Preferred Desktop Environment
Now we can install the desktop environment we’ll be using. In this guide we’ll try out XFCE, MATE, and GNOME.
If you’re looking for a lightweight and resource friendly solution, install XFCE.
NOTE: If you can’t connect via Remote Desktop Connection after you’ve installed the desktop environment, then open port 3389/tcp using the firewall-cmd command mentioned above.
1. Install XFCE Desktop Environment
XFCE is one of the most lightweight desktop environments. It’s fast, low on system resources, while still visually appealing. Additionally, it has a very active community, so there are many customization options available.
To install XFCE, run the following commands:
Next, create the .Xclients file in the directory of the user you’re connecting with:
Now you can connect to the server using Remote Desktop Connection.
Here is what XFCE looks like:
Uninstalling XFCE
To uninstall XFCE from your CentOS 7 machine, run the following commands:
2. Install MATE Desktop Environment
To install MATE, run the following commands:
Next, create the .Xclients file in the directory of the user you’re connecting with:
Now you can connect to the server using Remote Desktop Connection.
Here is what MATE looks like:
Uninstalling MATE
To uninstall MATE from your CentOS 7 machine, run the following commands:
3. Install GNOME Desktop Evironment
We’ll now install GNOME 3.
To do this, we’ll just have to install the GNOME Desktop package group, which will install all the packages required for the GUI installation.
This may take a while. There were
1000 packages installed on a minimal CentOS 7 installation.
Start the GUI
Although we installed the GNOME Desktop package group, the GUI will not be loaded by default on reboot.
We can check this by running:
If our default target is multi-user.target , it means that the GUI will not be loaded. What we want is to set the default target to graphical.target .
To do this, run the following commands:
After which, run the following command to change to the GUI immediately:
That’s it. You can now connect via xRDP to your CentOS 7 machine using GNOME.
Here is what GNOME 3 looks like, the first time you connect after installing. Just follow the initial configuration steps to finish setting up.
Uninstalling GNOME
To uninstall GNOME from your CentOS 7 machine, run the following commands:
Step 3 – Connect to Your Machine Using Remote Desktop Connection
With xRDP and your desktop environment installed, you can now connect from your local machine to the remote machine.
How you do this depends on your operating system.
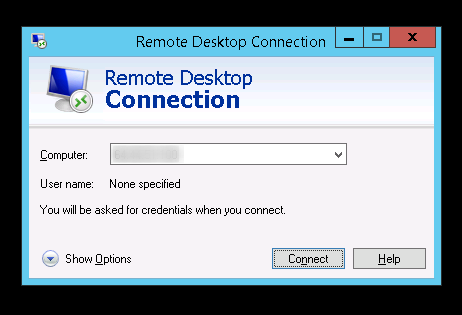
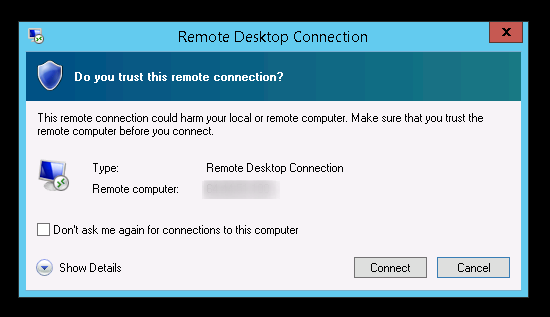
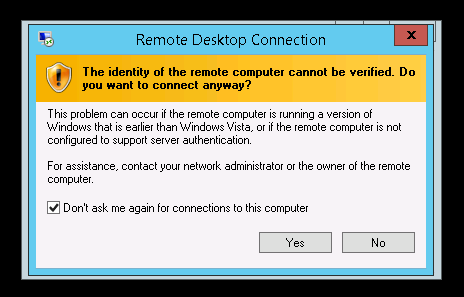
Connect from Windows
To connect to your server from Microsoft Windows, just search and launch the Remote Desktop Connection application and input your hostname or IP:
If this is your first time connecting, then you’ll receive some security warnings. Assuming this is your server and it is secure then just go ahead and confirm them.
Connect from Linux
To connect from a Linux machine, a great option for using remote desktop connection is Remmina. Remmina is a wonderful free and open-source remote desktop client that supports Remote Desktop Protocol, VNC, NX, XDMCP, SPICE and SSH protocols.
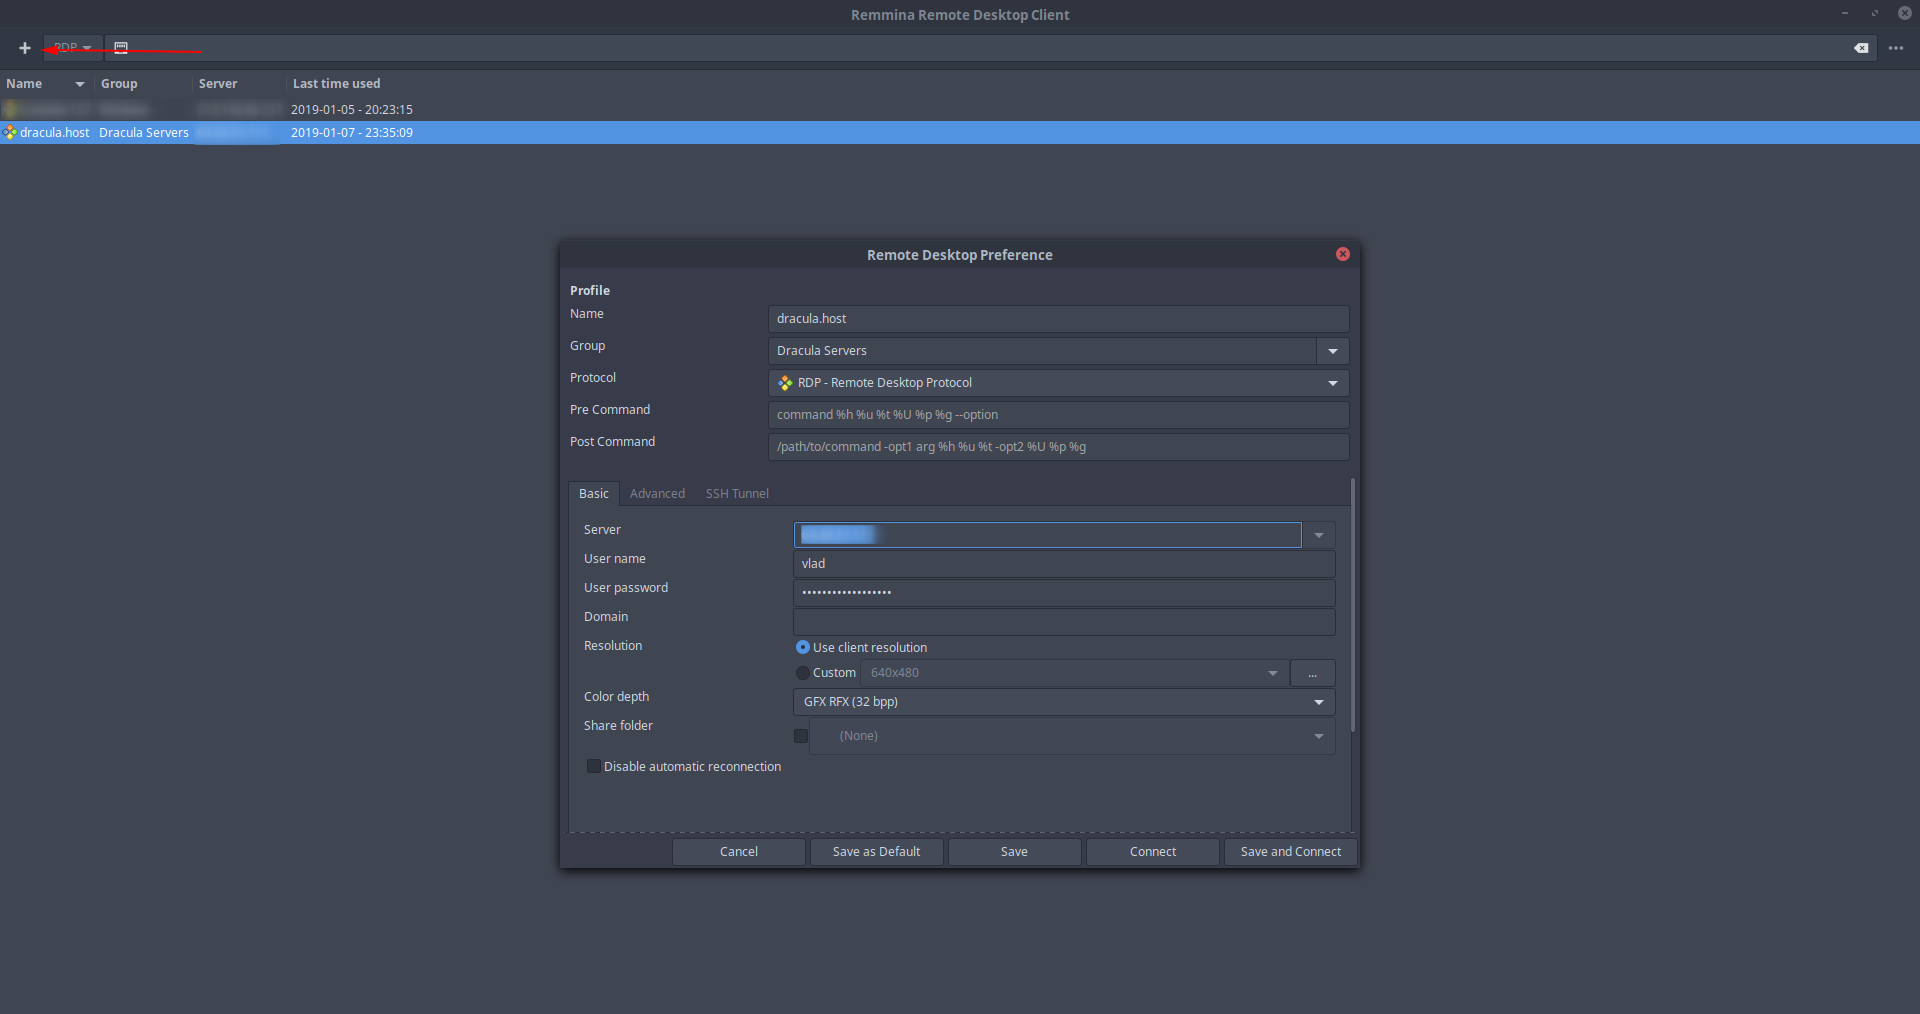
To use Remmina to connect from Linux to your remote machine, just run Remmina after installing it, click the `+` in the top left corner and fill in your remote machine’s IP/Hostname , Username and Password .
If you’re running Debian/Ubuntu/CentOS/Fedora locally, you can install Remmina using the following commands:
Debian/Ubuntu
CentOS/RHEL
Fedora 22
You’ll notice we are also installing `remmina-plugins-*` because our main interest is installing the Remmina RDP plugin, as it may not be installed by default.
You can find more detailed installation instructions, and instructions for other distros on their website, here How to install Remmina — Remmina.
Connect from OSX
To connect from your Mac, you’ll first have to download the Microsoft Remote Desktop App from the App Store
After launching the app for the first time, you’ll first want to create a new connection. To do this click on the `+` in the top left corner of the app window.
The essential information you need here is for PC Name, User name and Password.
Just fill in the info for the 3 mentioned fields as follows:
PC Name — The IP or Host name of your remote machine. Most likely you’ll want to use your IP.
User name — The username you used when installing xRDP and the desktop environment on your remote machine. Either `root` or your `sudo user`.
Password — Your CentOS user’s login password.
After which the connection should be saved and you should be able to start the connection to the remote machine.
For additional info and support, you can read the instructions for Remote Desktop on Mac on Microsoft’s Website.
Conclusion
Well done. You’ve hopefully learned how to install xRDP on a CentOS 7 machine and use 3 different desktop environments over remote desktop connection.
If you’ve encountered any issues when following this tutorial, please feel free to let us know in the comments or by contacting us.
Have a server from a different provider and need help? Hit us up!
We offer various services to assist you in achieving your business goal. Working in the industry, we’ve gained proficiency various areas related to hosting.


