- How to connect to your remote MongoDB server
- 1. Set up your user
- 2. Enable auth and open MongoDB access up to all IPs
- 3. Open port 27017 on your EC2 instance
- 4. Last step: restart mongo daemon (mongod)
- Logging in using the mongo shell on your laptop
- Using pymongo with your remote MongoDB server
- Share on
- Install MongoDB
- What You’ll Need
- Procedure
- Install MongoDB
- Download the binary files for the desired release of MongoDB.В
- Extract the files from the downloaded archive.В
- Copy the extracted archive to the target directory.В
- Ensure the location of the binaries is in the PATH variable.В
- Download the binary files for the desired release of MongoDB.В
- Extract the files from the downloaded archive.В
- Copy the extracted archive to the target directory.В
- Ensure the location of the binaries is in the PATH variable.В
- Run MongoDB
- Set up the MongoDB environment.В
- Start MongoDB.В
- Verify that MongoDB has started successfully
- Connect to MongoDB.В
- Create the data directory
- Set permissions for the data directory
- Run MongoDB
- Connect to MongoDB
- What You’ll Need
- Check Your Environment
- Procedure
- Install your client
- Obtain your MongoDB connection string
- Connect to your MongoDB instance
- Summary
- What’s Next
- See Also
How to connect to your remote MongoDB server
I have MongoDB running on my Ubuntu server in Amazon EC2. Since there’s no simple all-in-one tutorial out there explaining how to set up user authentication for Mongo so that you can read and write to your MongoDB server from your laptop, I decided to write one.
1. Set up your user
First ssh into your server and enter the mongo shell by typing mongo . For this example, I will set up a user named ian and give that user read & write access to the cool_db database.
2. Enable auth and open MongoDB access up to all IPs
Edit your MongoDB config file. On Ubuntu:
sudo vim / etc / mongod . conf
- Look for the net line and comment out the bindIp line under it, which is currently limiting MongoDB connections to localhost:
Warning: do not comment out the bindIp line without enabling authorization. Otherwise you will be opening up the whole internet to have full admin access to all mongo databases on your MongoDB server!
- Scroll down to the #security: section and add the following line. Make sure to un-comment the security : line.
3. Open port 27017 on your EC2 instance
- Go to your EC2 dashboard: https://console.aws.amazon.com/ec2/
- Go to Instances and scroll down to see your instance’s Security Groups. Eg, it will be something like launch — wizard — 4
- Go to Netword & Security -> Security Groups -> Inbound tab -> Edit button.
- Make a new Custom TCP on port 27017, Source: Anywhere, 0.0.0.0/0
4. Last step: restart mongo daemon (mongod)
sudo service mongod restart
Make sure you can still log in with mongo while ssh’d into the box.
If anything goes wrong, look at the log: tail — f / var / log / mongodb / mongod . log (note: non-Ubuntu machines will keep the log in another directory…)
Logging in using the mongo shell on your laptop
You can close out of ssh and go back to your local console. To enter the remote Mongo database we just set up, you can use the mongo shell:
mongo — u ian — p secretPassword 123.45 . 67.89 / cool_db
Where 123.45 . 67.89 is your server’s public IP address.
Now you can read and write within the cool_db database from your laptop without ssh !
Using pymongo with your remote MongoDB server
Share on
How to connect to your remote MongoDB server was published on May 23, 2016 .
Install MongoDB
Author: MongoDB Documentation Team
This guide describes how to install MongoDB locally. If you would like to use MongoDB in the Cloud using Atlas , our managed database product, see Get Started with Atlas.
Time required: 10 minutes
What You’ll Need
MongoDB supports a variety of 64-bit platforms. Refer to the Supported Platforms table to verify that MongoDB is supported on the platform to which you wish to install it.
Procedure
Install MongoDB
Download the binaries from the MongoDB Download Center.
Open Windows Explorer/File Explorer.
Change the directory path to where you downloaded the MongoDB .msi file. By default, this is %HOMEPATH%\Downloads .
Double-click the .msi file.
The Windows Installer guides you through the installation process.
If you choose the Custom installation option, you may specify an installation directory.
MongoDB does not have any other system dependencies. You can install and run MongoDB from any folder you choose.
This tutorial assumes that you installed MongoDB in C:\Program Files\MongoDB\Server\4.2\ .
MongoDB only supports macOS versions 10.11 and later on Intel x86-64.
Download the binary files for the desired release of MongoDB.В
Download the binaries from the MongoDB Download Center.
Extract the files from the downloaded archive.В
For example, from a system shell, you can extract through the tar command:
Copy the extracted archive to the target directory.В
Copy the extracted folder to the location from which MongoDB will run.
Ensure the location of the binaries is in the PATH variable.В
The MongoDB binaries are in the bin/ directory of the archive. To ensure that the binaries are in your PATH , you can modify your PATH .
For example, you can add the following line to your shell’s rc file (e.g.
Replace with the path to the extracted MongoDB archive.
These instructions are for installing MongoDB directly from an archive file. If you would rather use your linux distribution’s package manager, refer to the installation instructions for your distribution in the MongoDB Manual.
Download the binary files for the desired release of MongoDB.В
Download the binaries from the MongoDB Download Center.
Extract the files from the downloaded archive.В
Extract the archive by double-clicking on the tar file or using the tar command from the command line, as in the following:
Copy the extracted archive to the target directory.В
Copy the extracted folder to the location from which MongoDB will run.
Ensure the location of the binaries is in the PATH variable.В
The MongoDB binaries are in the bin/ directory of the archive. To ensure that the binaries are in your PATH , you can modify your PATH .
For example, you can add the following line to your shell’s rc file (e.g.
Replace with the path to the extracted MongoDB archive.
Run MongoDB
Do not make mongod.exe visible on public networks without running in “Secure Mode” with the auth setting. MongoDB is designed to be run in trusted environments, and the database does not enable “Secure Mode” by default.
Set up the MongoDB environment.В
MongoDB requires a data directory to store all data. MongoDB’s default data directory path is the absolute path \data\db on the drive from which you start MongoDB. Create this folder by running the following command in a Command Prompt :
You can specify an alternate path for data files using the —dbpath option to mongod.exe , for example:
If your path includes spaces, enclose the entire path in double quotes, for example:
You may also specify the dbpath in a configuration file.
Start MongoDB.В
To start MongoDB, run mongod.exe . For example, from the Command Prompt :
This starts the main MongoDB database process. The waiting for connections message in the console output indicates that the mongod.exe process is running successfully.
Depending on the security level of your system, Windows may pop up a Security Alert dialog box about blocking “some features” of C:\Program Files\MongoDB\Server\4.0\bin\mongod.exe from communicating on networks. All users should select Private Networks, such as my home or work network and click Allow access . For additional information on security and MongoDB, please see the Security Documentation.
Verify that MongoDB has started successfully
Verify that MongoDB has started successfully by checking the process output for the following line:
The output should be visible in the terminal or shell window.
You may see non-critical warnings in the process output. As long as you see the log line shown above, you can safely ignore these warnings during your initial evaluation of MongoDB.
Connect to MongoDB.В
To connect to MongoDB through the
bin.mongo.exe shell, open another Command Prompt .
Create the data directory
Before you start MongoDB for the first time, create the directory to which the mongod process will write data. By default, the mongod process uses the /data/db directory. If you create a directory other than this one, you must specify that directory in the dbpath option when starting the mongod process later in this procedure.
The following example command creates the default /data/db directory:
Set permissions for the data directory
Before running mongod for the first time, ensure that the user account running mongod has read and write permissions for the directory.
Run MongoDB
To run MongoDB, run the mongod process at the system prompt. If necessary, specify the path of the mongod or the data directory. See the following examples.
Run without specifying paths
If your system PATH variable includes the location of the mongod binary and if you use the default data directory (i.e., /data/db ), simply enter mongod at the system prompt:
Specify the path of the mongod В
If your PATH does not include the location of the mongod binary, enter the full path to the mongod binary at the system prompt:
Connect to MongoDB
Author: MongoDB Documentation Team
There are several ways to connect to your MongoDB instance.
- MongoDB Compass for access through a downloadable user interface
- mongo interactive shell
- programmatic access through a number of programming APIs.
The following guide steps you through installing the MongoDB client of your choice.
Time required: 15 minutes
What You’ll Need
If you are using MongoDB in the Cloud (Atlas), you will need to:
Or, if you plan on using a local instance of MongoDB, you will need to:
- Install MongoDB and start up an instance to which you will connect.
Check Your Environment
- Ensure that your client platform is compatible with MongoDB. Refer to the Supported Platforms table for more information.
Procedure
Select the client and environment you will use at the top of this page.
Install your client
- Mongo Shell
- Compass
- Python
- Java (Sync)
- Node.js
- Other
- Motor
- C#
- Go
The mongo shell is packaged with the MongoDB Server Community and Enterprise distributions, and is also available for users of Atlas as a client-only download.
MongoDB binaries are located in a directory that starts with “mongodb-“. You should see a file named mongo , which is the shell executable.
If you do not have mongo shell installed, follow the install directions for your environment.
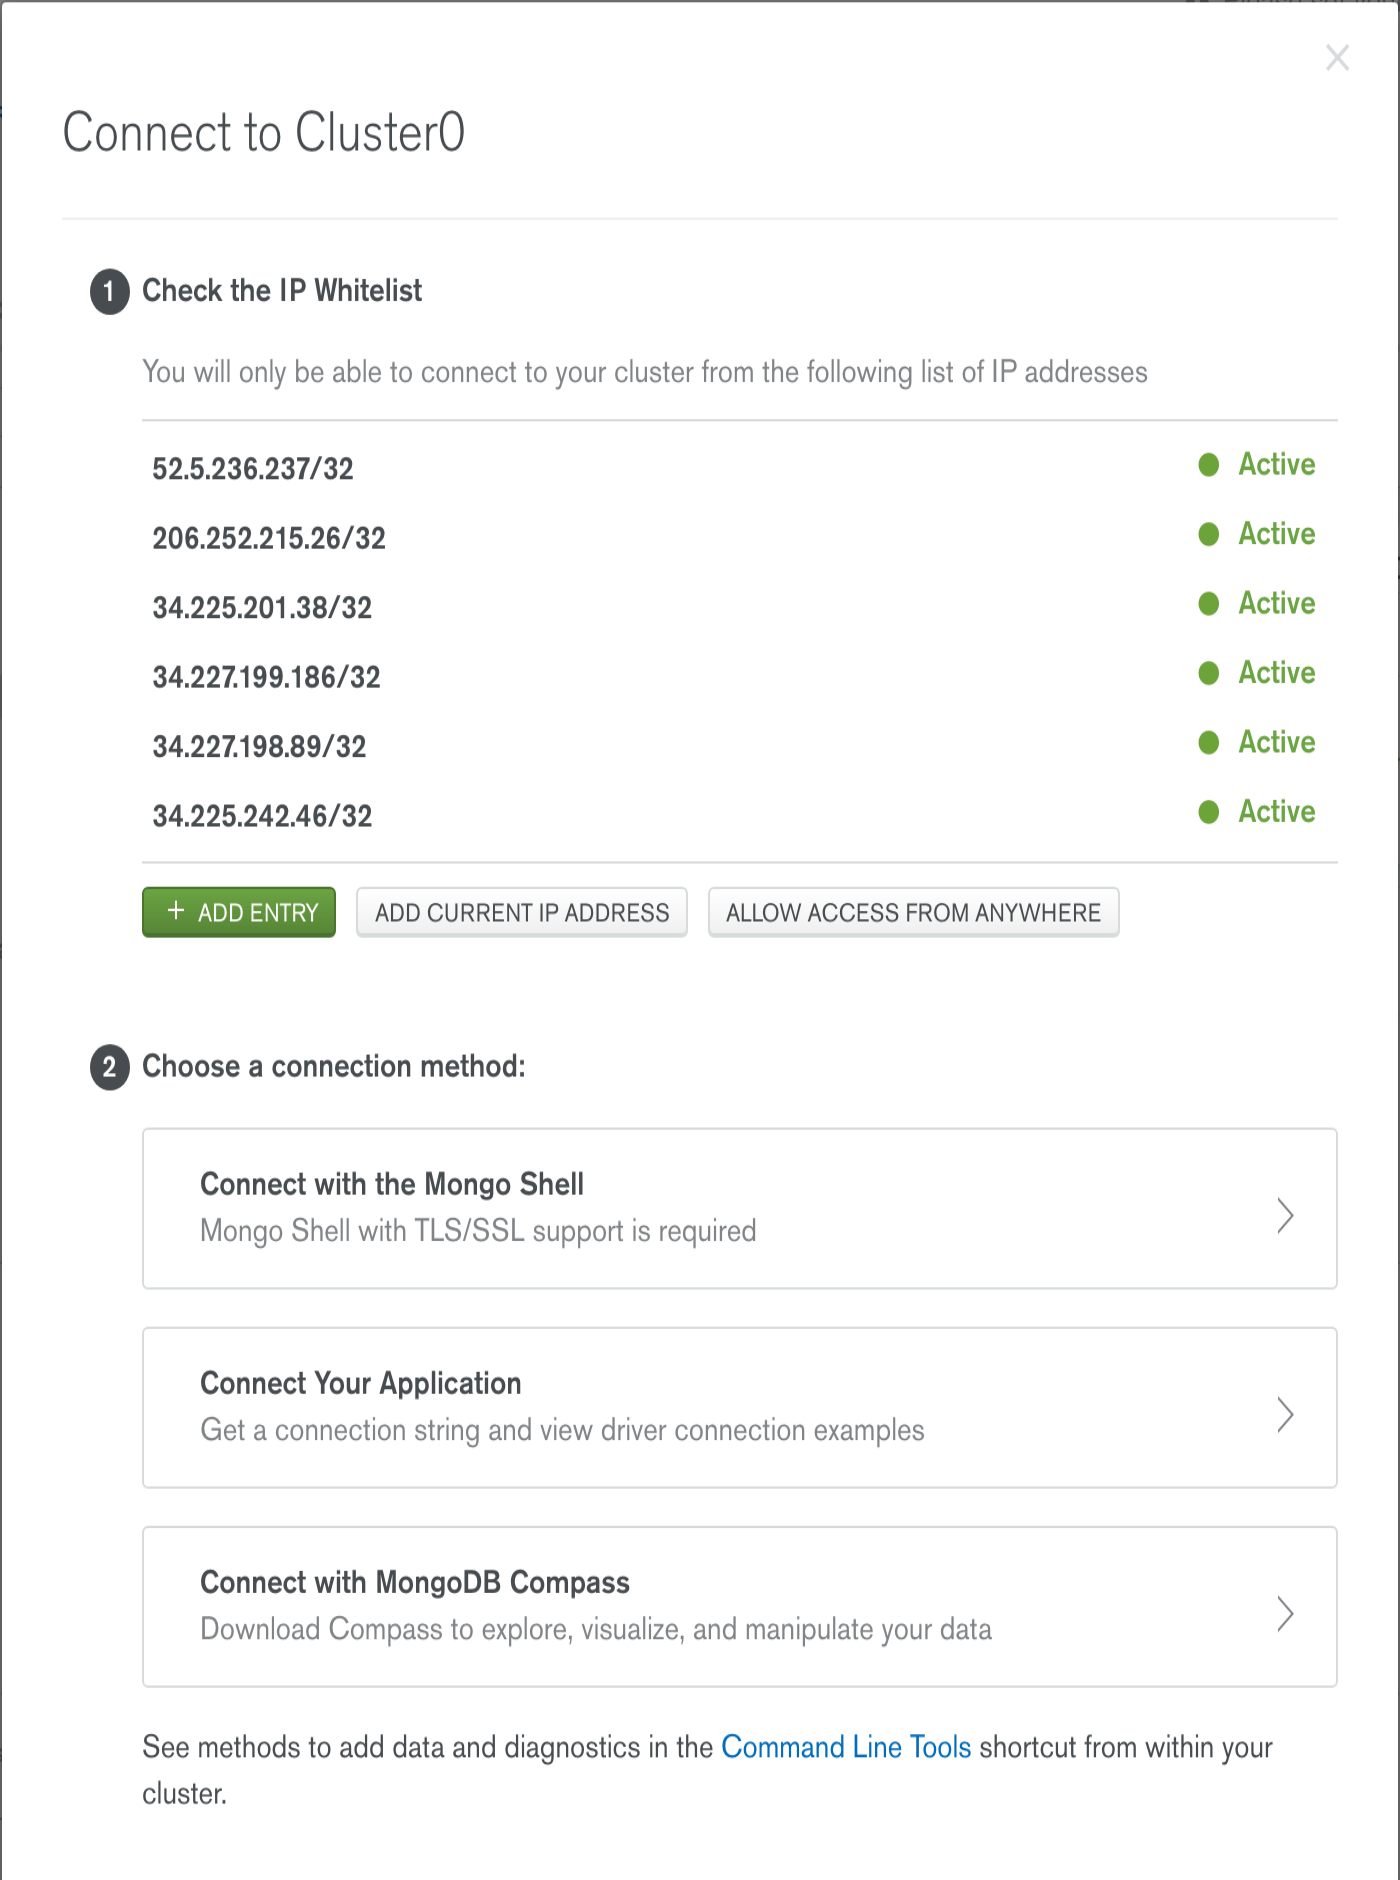
If you do not already have a mongo shell, you can download just the shell by logging into Atlas. For your cluster, click Connect .

Under Check the IP Whitelist , add the IP address of the client you wish to have connecting to Atlas. Then click the Connect with the Mongo Shell . Follow the instructions in the dialog to download and install the shell.
Download the latest stable version for your environment.
After downloading, click on the downloaded .msi file. The Windows Installer will guide you through the installation.
Download the latest stable version for your environment.
Double click the tgz file to untar the file.
Download the latest stable version for your environment.
Extract the tar file and locate the mongo executable under the bin directory of your install root.
To install Pymongo, see the Pymongo documentation.
To install the Java driver, see the Java Driver documentation
To install the node.js driver, see the Node.js Driver documentation
To install Motor, see the Motor documentation
To install the C#/.NET driver, see the C# Driver documentation
The MongoDB Go driver can be installed using go get :
The output of this may look like a warning stating something like:
This is expected output.
Alternatively if you are using the dep package manager to install the driver, you can install the main mongo package as well as the bson and mongo/options package using this command:
Obtain your MongoDB connection string
- Mongo Shell
- Compass
- Python
- Java (Sync)
- Node.js
- Other
- Motor
- C#
If you are using Compass, skip this step.
In order to connect to MongoDB, you will need a URI string . A URI (Uniform Resource Identifier) is similar to a URL, and is supplied as a parameter to the mongo shell, Compass, and the MongoDB drivers when connecting to a MongoDB deployment.
You can create a URI string for your session in MongoDB Guides by copying and pasting your Atlas connection string in the form below. Once you copy the string here, any relevant code examples within the MongoDB Guides will be populated with a URI string. If you have not already retrieved your Atlas connection string, see Set Up Atlas Connectivity guide.
The URI string used in the guides assumes you have set up authentication for your MongoDB instance, and have created a username and password for read and write access to a MongoDB database.
If you have already set up a user with the readWriteAnyDatabase role through the Secure your MongoDB Deployment guide, you may use that username and password here, along with the admin database in your connection string.
The URI form below allows you to create a URI string for your session in MongoDB Guides by filling out a form. Once you fill out the form, any relevant code examples within the MongoDB Guides will be populated with a URI string. You can change these at any time by repopulating the form.
If your connection string contains $[password] , you will need to replace this string with your password. Use caution where you store and enter passwords, particularly when running from a shell or command prompt. Special characters in passwords must be escaped.
Connect to your MongoDB instance
Have you whitelisted your IP address for access to Atlas? For more details see Step 3, Whitelist your IP Address and Select Your Connection Method in Set Up Atlas Connectivity .
- Mongo Shell
- Compass
- Python
- Java (Sync)
- Node.js
- Other
- C#
- Go
Select the operating system platform on which you are running the MongoDB client you have selected.
Pass the URI to the mongo shell followed by the —password option. You will then be prompted for your password.
Pass the URI to the mongo shell followed by the —password option. You will then be prompted for your password.
Pass the URI to the mongo shell followed by the —password option. You will then be prompted for your password.
If you wish to manually configure your Compass connection, load Compass and select the New Connection link. You will see a form where you can enter connection information for MongoDB.
Atlas users can copy a URI string from the Atlas console into Compass. MongoDB Compass can detect whether you have a MongoDB URI connection string in your system clipboard and auto- populate the connection dialog from the URI.
See Set Up Atlas Connectivity for information on how to get the Atlas connection string URI into your copy buffer.
If Compass was already running when you copied the URI string, click the NEW CONNECTION button.
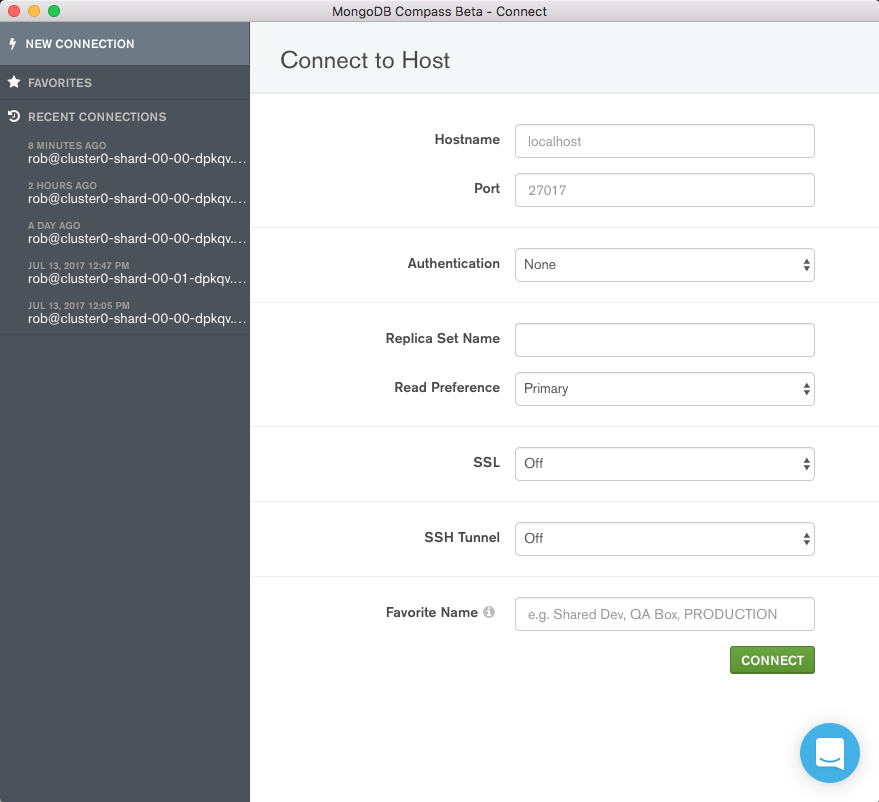
You will be prompted to populate the connection dialog. Click Yes .
You should then populate the password field with the proper password for your MongoDB user in the connection form.
Errors related to connecting through Compass will appear in red at the top of the Connect screen.
It’s a good idea to put your connection code in a class so that it can be reused.
If your connection_string starts with mongodb+srv , you need to install the dnspython module with
Now add code to call the class you just created.
For the MongoDB java driver 3.7 and beyond, use the MongoClients.create() method.
For legacy drivers (prior to 3.7), use:
The MongoDB.Bson package is used in CRUD operations, so you’ll import it here.
Replace your password and any parameters surrounded by $[] in the connection string in the code below.
For now, you will use the context.TODO().
Later you’ll configure the context specific to your requirements.
You won’t know if the connection has been successful until you use the connection. A ping is one way you can test the connection. This is a full example of a Go connection to mongoDB, including a test ping .
In your Go workspace and project folder, run build.
Now run the binary. For binaries that are not installed, you’ll have to specify the path.
If you’d like to run the resulting binary without specifying a path, install the binary you just built into your Go workspace.
Now run the code. “yourprojectname” is the name of the project directory that contains the file with your main() function.
For installed binaries use:
For binaries that are not installed, you’ll have to specify the path.
The default timeout for the Go driver to connect to the database is 30 seconds. In the event that you are unable to connect, you will see an error that resembles this:
Summary
Congratulations. If you have successfully completed this guide, you have connected to your MongoDB instance. In the next group of guides, you’ll learn how to create, read, update, and delete data in MongoDB.
What’s Next
In the next guide, you’ll learn how to insert data into MongoDB.
See Also
For CRUD (Create, Read, Update, Delete) guides:
© MongoDB, Inc 2008-present. MongoDB, Mongo, and the leaf logo are registered trademarks of MongoDB, Inc.


