- How to set up a remote PostgreSQL connection
- Choose a remote PostgreSQL connection method
- Method #1: Set up an SSH tunnel
- Method #2: Set up a direct connection
- Как настроить удаленное подключение к PostgreSQL
- How Do I Enable remote access to PostgreSQL database server?
- Step # 1: Login over ssh if server is outside your IDC
- Step # 2: Enable client authentication
- Step # 2: Enable networking for PostgreSQL
- Step # 3: Allow TCP/IP socket
- Step #3a – Information for old version 7.x or older
- Step # 4: Restart PostgreSQL Server
- Step # 5: Iptables firewall rules
- Step # 6: Test your setup
- Setting up a remote Postgres database server on Ubuntu 18.04
- Introduction
- Prerequisites
- Installing Postgres
- Create user
- We made a custom demo for . No really. Click here to check it out .
- Allow remote access
- Connect to Postgres remotely
- Conclusion
- How to enable remote access to PostgreSQL server on a Plesk server?
- Applicable to:
- Question
- Answer
How to set up a remote PostgreSQL connection
This article describes how to use a local computer to connect to your PostgreSQL databases stored remotely on A2 Hosting servers.
Choose a remote PostgreSQL connection method
You can use either of the following methods to access your PostgreSQL databases remotely:
- SSH tunnel: This is the more secure method. You set up an SSH tunnel that forwards a port on your local computer to the remote PostgreSQL server. The PostgreSQL traffic is encrypted by the SSH tunnel.
- Direct connection: You can set up a direct connection between your local computer and the remote PostgreSQL server on port 5432.
After you have set up a remote PostgreSQL connection, you can use a client application such as psql to work with your databases.
Method #1: Set up an SSH tunnel
The procedure you follow to set up an SSH tunnel between your local computer and the A2 Hosting server depends on the local computer’s operating system.
Microsoft Windows
In order to use an SSH tunnel on a computer running Microsoft Windows, you need an SSH client program. A2 Hosting recommends using PuTTY, which you can download here. After you have downloaded the PuTTY executable to your local computer, you can set up an SSH tunnel.
To set up an SSH tunnel on a computer running Microsoft Windows:
- Start PuTTY.
- In the Category pane, expand Connection , expand SSH , and then click Tunnels .
- In the Source port text box of the Port Forwarding section, type 5432 . This is the local port to forward.
Mac OS X and Linux
To set up an SSH tunnel on a computer running Mac OS X or Linux:
- Open a terminal window and type the following command at the command line. Replace username with your A2 Hosting username, and replace example.com with your site’s domain name:
Type your password, and then press Enter. When the remote server’s command line prompt appears, the SSH tunnel is established and you can use your PostgreSQL client applications on the local computer.
For example, if the psql client application is installed on your local computer, you can type the following command to access a database on the A2 Hosting server. Replace username with the database user, and dbname with the name of the database:
Method #2: Set up a direct connection
To set up a direct connection between your local site and the PostgreSQL server, you must configure a client application. There are several PostgreSQL client applications available, but for all of them, you must provide the following information to establish a remote connection:
Источник
Как настроить удаленное подключение к PostgreSQL
По умолчанию, сервер баз данных pgsql разрешает подключение только с локального компьютера. Данная инструкция показывает, как разрешить подключения с удаленных систем. Она написана на примере Linux CentOS и PostgreSQL 9.5.
Для начала посмотрим путь расположения конфигурационного файла postgresql.conf:
# su — postgres -c «psql -c ‘SHOW config_file;'»
Команда выдаст, примерно, следующее:
* нас интересует строчка /db/pgsql/postgresql.conf — это путь расположения нужного нам конфигурационного файла.
Теперь открываем на редактирование основной файл конфигурации PostgreSQL:
* напоминаю, что начало пути /db/pgsql может быть другим. Мы его получили командой ps.
Находим и редактируем следующее:
* по умолчанию, параметр закомментирован и настроен на прослушивание запросов только с локального сетевого интерфейса. В данном примере мы разрешили прослушивание запросов на всех IP-адресах (*), но, если требуется более безопасная настройка, можно просто перечислить последние через пробел.
После открываем на редактирование следующий конфигурационный файл:
и внизу добавляем следующую строку:
host all all 192.168.0.10/32 password
* в данном примере мы разрешаем удаленные подключения к серверу с компьютера 192.168.0.10. Доступ предоставляется всем учетным записям и всем базам (значение all). При желании, вместо all можно указать конкретные данные для повышения безопасности.
Чтобы изменения вступили в силу, перезапускаем службу postgresql:
# systemctl restart postgresql-9.5
Проверить подключение можно с удаленного компьютера следующей командой:
# psql -h 192.168.0.15 -U usersql
* где 192.168.0.15 — IP-адрес сервера баз данных; usersql — имя учетной записи, от которой идет подключение.
Источник
How Do I Enable remote access to PostgreSQL database server?
By default, PostgreSQL database server remote access disabled for security reasons. However, some time you need to provide the remote access to database server from home computer or from web server.
Step # 1: Login over ssh if server is outside your IDC
Login over ssh to remote PostgreSQL database server:
$ ssh user@remote.pgsql.server.com
Step # 2: Enable client authentication
Once connected, you need edit the PostgreSQL configuration file, edit the PostgreSQL configuration file /var/lib/pgsql/data/pg_hba.conf (or /etc/postgresql/8.2/main/pg_hba.conf for latest 8.2 version) using a text editor such as vi.
Login as postgres user using su / sudo command, enter:
$ su — postgres
Edit the file:
$ vi /var/lib/pgsql/data/pg_hba.conf
OR
$ vi /etc/postgresql/8.2/main/pg_hba.conf
Append the following configuration lines to give access to 10.10.29.0/24 network:
host all all 10.10.29.0/24 trust
Save and close the file. Make sure you replace 10.10.29.0/24 with actual network IP address range of the clients system in your own network.
Step # 2: Enable networking for PostgreSQL
You need to enable TCP / IP networking. Use either step #3 or #3a as per your PostgreSQL database server version.
Step # 3: Allow TCP/IP socket
If you are using PostgreSQL version 8.x or newer use the following instructions or skip to Step # 3a for older version (7.x or older).
You need to open PostgreSQL configuration file /var/lib/pgsql/data/postgresql.conf or /etc/postgresql/8.2/main/postgresql.conf.
# vi /etc/postgresql/8.2/main/postgresql.conf
OR
# vi /var/lib/pgsql/data/postgresql.conf
Find configuration line that read as follows:
listen_addresses=’localhost’
Next set IP address(es) to listen on; you can use comma-separated list of addresses; defaults to ‘localhost’, and ‘*’ is all ip address:
listen_addresses=’*’
Or just bind to 202.54.1.2 and 202.54.1.3 IP address
listen_addresses=’202.54.1.2 202.54.1.3′
Save and close the file. Skip to step # 4.
- No ads and tracking
- In-depth guides for developers and sysadmins at Opensourceflare✨
- Join my Patreon to support independent content creators and start reading latest guides:
- How to set up Redis sentinel cluster on Ubuntu or Debian Linux
- How To Set Up SSH Keys With YubiKey as two-factor authentication (U2F/FIDO2)
- How to set up Mariadb Galera cluster on Ubuntu or Debian Linux
- A podman tutorial for beginners – part I (run Linux containers without Docker and in daemonless mode)
- How to protect Linux against rogue USB devices using USBGuard
Join Patreon ➔
Step #3a – Information for old version 7.x or older
Following configuration only required for PostgreSQL version 7.x or older. Open config file, enter:
# vi /var/lib/pgsql/data/postgresql.conf
Bind and open TCP/IP port by setting tcpip_socket to true. Set / modify tcpip_socket to true:
tcpip_socket = true
Save and close the file.
Step # 4: Restart PostgreSQL Server
Type the following command:
# /etc/init.d/postgresql restart
Step # 5: Iptables firewall rules
Make sure iptables is not blocking communication, open port 5432 (append rules to your iptables scripts or file /etc/sysconfig/iptables):
Restart firewall:
# /etc/init.d/iptables restart
Step # 6: Test your setup
Use psql command from client system. Connect to remote server using IP address 10.10.29.50 and login using vivek username and sales database, enter:
$ psql -h 10.10.29.50 -U vivek -d sales
Источник
Setting up a remote Postgres database server on Ubuntu 18.04
April 10, 2020 3 min read 953

Introduction
Postgres is a powerful relational database management system, it can handle large workloads from a single machine to that of a data center. It is highly scalable and widely popular. In this article, we will be learning how to set up a remote Postgres database server to use for your projects. This article setup will allow Postgres connection from any IP address and will not cover specific/authorized IP connection.
Prerequisites
- Familiarity with the command line interface
- An Ubuntu server, you can quickly provision one from DigitalOcean or any cloud provider
- A lot of patience
- Postgres installed on a local machine
Installing Postgres
In this step, you will be installing Postgres on your server. The first thing to do is SSH into your server by running:
Note:
server_user is your server user you would like to log in with
server_ip is the IP address of your server
Then input your relevant user password or SSH key password if any. Next, update your server packages and dependencies by running:
When that is done, install Postgres by running:
This will install Postgres along with its associated dependencies. When the process is complete, switch the user to postgres to be able to execute Postgres commands with Postgres default user by running:
The server user will be switched from root to postgres . You can access the Postgres shell by running:
You will be shown something similar to this:
Create user
In this step, you will be creating a new user that will be used to access your Postgres database remotely. To create a new user, exit the Postgres shell by executing:
While still being logged in as postgres run the following command to create a new user:
A prompt will be shown to you asking you to input your desired user role, name, password, and if you want the user to be a superuser. Here is an example:
We made a custom demo for .
No really. Click here to check it out .
I named my user role cleopatra and I made my user a superuser. A superuser is a user that has all the privileges available on a Postgres instance. Next, we will be assigning cleopatra to a database. To do this, run the following command:
This command above will create a new database named egypt and assign cleopatra to be the database user.
Allow remote access
In this step, we will look at how to configure Postgres to accept external connections. To begin, open the configuration file with your preferred editor:
Look for this line in the file:
Uncomment, and change the value to ‘*’ , this will allow Postgres connections from anyone.
Save and exit the file. Next, modify pg_hba.conf to also allow connections from everyone. Open the file with your preferred editor:
Modify this section:
This file stores the client authentication, each record specifies an IP address range, database name, username, and authentication method. In our case, we are granting all database users access to all databases with any IP address range, thus, letting any IP address connect. Save and exit the file. Next, allow port 5432 through the firewall by executing:
Finally, restart Postgres to apply all the changes you have made to its configuration by running:
Connect to Postgres remotely
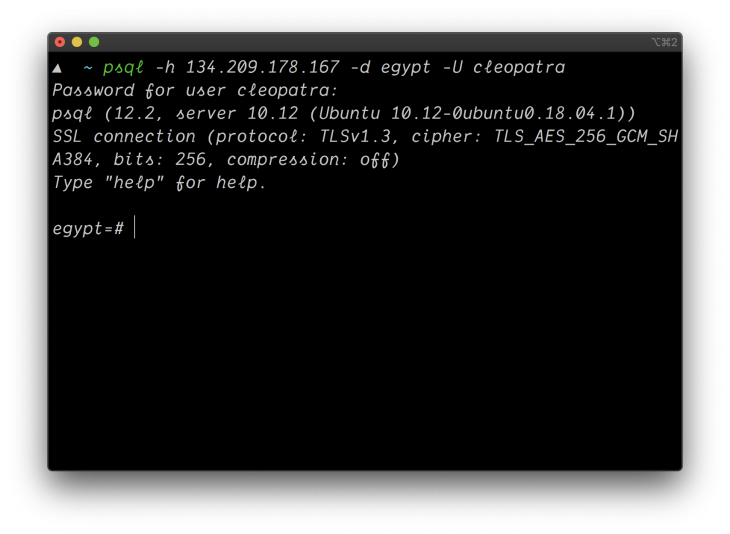
In this step, you will be connecting to your server from an external machine. Connect to the remote Postgres database by running:
Where
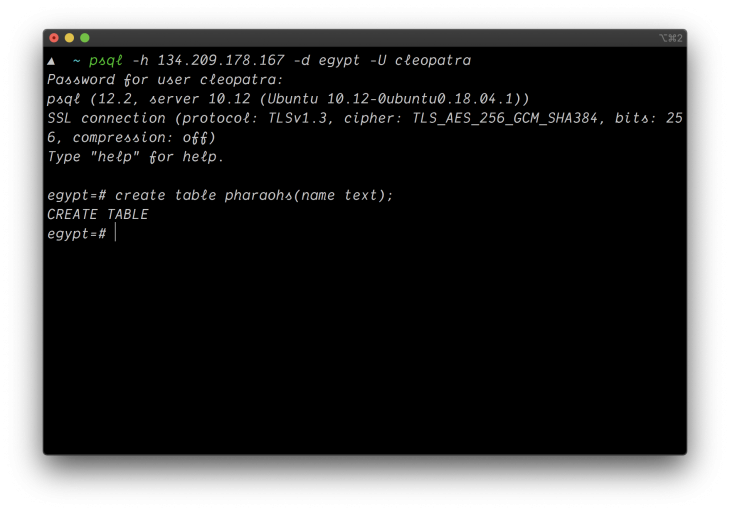
Create a new table and name it pharaohs by executing the following in the Postgres shell:
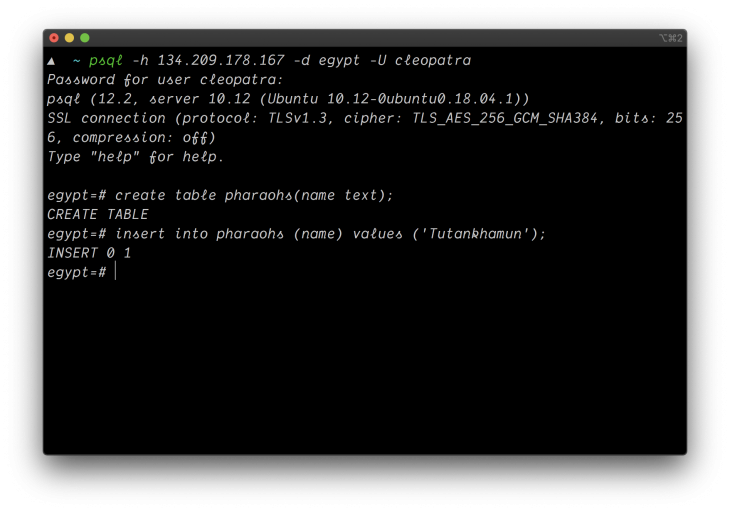
Next, add a record to the pharaohs table, you will be adding Tutankhamun as a string to the table by running the following in the Postgres shell:
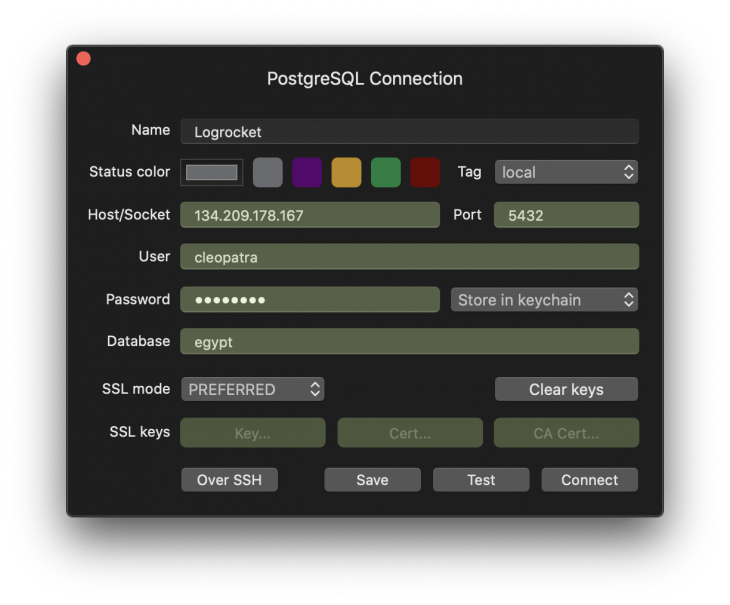
Next, we will be accessing our database using a GUI (Graphical User Interface) tool like tablePlus which enables you to visualize data away from the command line interface to see if we can find the records we created. Open TablePlus and click on Create a new connection .

Select Postgres from the dropdown

Note:
Postgres default port is 5432
Ignore the SSL regions (we won’t cover this topic in this post)
 If your credentials are correct, you will be shown a GUI panel to view your database records in which you will find the table created and the record we added to it.
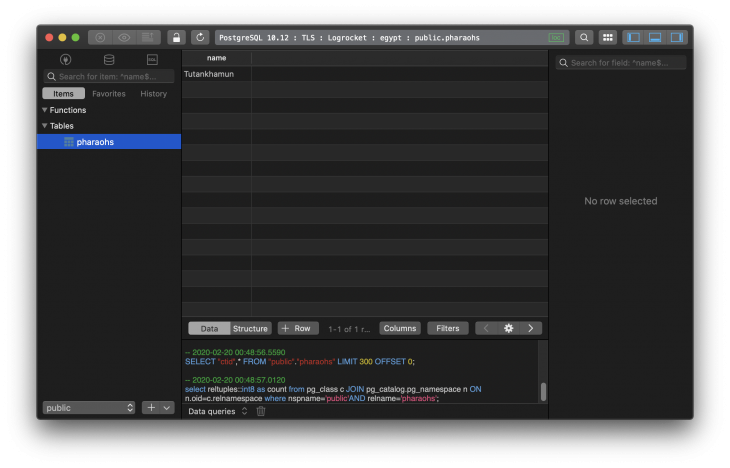
As shown in the image, we can see the pharaohs table we created earlier and the record we added to it. Our remote database is ready!
Conclusion
We have seen how to configure a Postgres database server for remote access. With this knowledge, you can set up a database server for your next project. In production, there are some security measures you will have to keep in mind. For example, only allowing the specified IP address and not allowing root access to your server, you can learn how to set this up in this article.
Источник
How to enable remote access to PostgreSQL server on a Plesk server?

Applicable to:
Question
How to enable remote access to PostgreSQL server on a Plesk server?
Answer
Note: the instructions below were tested on a Plesk server, however, they can be applicable to a non-Plesk server as well keeping in mind the possible different paths to the files.
To enable remote access to PostgreSQL server:
Connect to the PostgreSQL server via SSH.
Get location of postgresql.conf file by executing the command (it should be something like /var/lib/pgsql/data/postgresql.conf ):
# psql -U postgres -c ‘SHOW config_file’
Get the location of pg_hba.conf file:
# grep pg_hba.conf /var/lib/pgsql/data/postgresql.conf
/var/lib/pgsql/data/pg_hba.conf
where /var/lib/pgsql/data/postgresql.conf is the file from output of step 2
Add the following line to the end of /var/lib/pgsql/data/pg_hba.conf file:
CONFIG_TEXT: host samerole all 203.0.113.2/32 md5
- 203.0.113.2/32 is the remote IP from which connection is allowed. If you want to allow connection from any IP specify 0.0.0.0/0 .
- md5 is the authentication method, which requires the client to supply a double-MD5-hashed password for authentication.
- User john.doe from database example1 has access to database example1 only.
As for other authentication methods refer to PostgreSQL documentation.
Restart PostgreSQL server to apply the changes: Plesk > Tools & Settings > Services
Note: if PostgreSQL port was not customized then port 5432 can be configured on the firewall in order to allow access to specific IPs using the following article.
Источник


