- Connect your Mac to shared computers and servers
- Connect to a computer or server by browsing
- Connect to a computer or server by entering its address
- Reconnect to recent servers
- Connect to server from mac os
- Connect to the server
- Change the root password
- Next steps
- Share this information:
- How to Connect to a Remote or Local Server on a Mac
- How to Connect to a Server on a Mac Using The Finder
- How to Connect To Recent Servers On a Mac
- Use The Apple Menu To Connect To a Server On a Mac
- Use The Connect to Server Menu To Connect To a Recent Server
- Use AppleScript To Connect a Mac to a Server
- How To Connect To a Server On a Mac Using Cyberduck
Connect your Mac to shared computers and servers
You can connect to shared computers and file servers on your network, including Mac and Windows computers that have file sharing turned on, and servers that use protocols such as SMB.
You can connect by either browsing or entering the computer’s or server’s network address. See Find your computer’s name and network address.
Connect to a computer or server by browsing
On your Mac, click the Finder icon  in the Dock to open a Finder window, then click Network in the Locations section of the sidebar.
If no items appear in the Locations section of the sidebar, hold the pointer over the word Locations, then click the arrow  .
.
In the Finder window, double-click the computer you want to connect to, then click Connect As.
If you’re connecting to a Mac that has screen sharing turned on and you have the appropriate privileges, you can also click Share Screen.
Select how you want to connect to the Mac:
Guest: You can connect as a Guest user if the shared computer permits guest access.
Registered User: Connect to the other Mac using a valid login name and password. If “Only these users” is selected on the other Mac, make sure the login name you’re using is on the list of allowed users.
Using an Apple ID: Connect to the other Mac using an Apple ID. You must be set up in Users & Groups preferences with this Apple ID, on both this Mac and the other Mac.
If necessary, enter your username and password, then select volumes or shared folders on the server.
In some cases you need the network area or workgroup for the shared computer. If you don’t have this information, contact the computer’s owner or your network administrator.
Tip: To make it easier to connect to the computer in the future, select “Remember this password in my keychain” to add your username and password for the computer to your keychain.
Connect to a computer or server by entering its address
In the Finder on your Mac, choose Go > Connect to Server.
Type the network address for the computer or server in the Server Address field.
For information about the correct format for network addresses, see Network address formats and protocols.
Select how you want to connect to the Mac:
Guest: You can connect as a Guest user if the shared computer permits guest access.
Registered User: Connect to the other Mac using a valid login name and password. If “Only these users” is selected on the other Mac, make sure the login name you’re using is on the list of allowed users.
Using an Apple ID: Connect to the other Mac using an Apple ID. You must be set up in Users & Groups preferences with this Apple ID, on both this Mac and the other Mac.
If necessary, enter your username and password, then select the server volumes or shared folders.
To make it easier to connect to the computer in the future, select “Remember this password in my keychain” to add your username and password for the computer to your keychain.
Reconnect to recent servers
Here are some ways to make it easy to reconnect to shared computers and servers you frequently use:
On your Mac, do any of the following:
Choose Apple menu

> Recent Items, then choose from the list of recent servers.
In the Finder , choose Go > Connect to Server, click the pop-up menu to the far right of the Server Address field, then choose a recent server.
Add shared computers, network areas and workgroups to the Finder sidebar. Select the item, then choose File > Add To Sidebar.
Add a shared computer or server to your list of favourites. In the Finder, choose Go > Connect to Server, enter the network address, then click the Add button  .
.
If you can’t locate a shared computer or server or connect to it, it may not be available, or you may not have permission to connect to it. Contact the person who owns the computer or the network administrator for help.
Источник
Connect to server from mac os
Last updated on: 2018-10-26
Authored by: Rose Contreras
If you use MacOS® X, you don’t need to install a third-party client like PuTTY to connect to your cloud server by using Secure Shell (SSH). Terminal is a terminal emulation program included with MacOS X that you can use to run SSH.
Note: For the corresponding steps for an OnMetal server, see Create OnMetal Cloud Servers.
Connect to the server
These instructions are for users who are connecting to a new Cloud Server for the first time. If you’re connecting as a non-root user, replace root in the instructions with your username.
Go to Applications > Utilities, and then open Terminal.
A Terminal window displays the following prompt:
Establish an SSH connection to the server by using the following syntax:
The following code block uses an example value:
Note: You can find the command that you use to connect to your server via SSH in the right sidebar of the Server Details page of the Cloud Control Panel.
The first time that you connect to your server, a message asks you if you want to continue connecting. This message appears because your server has an RSA key that’s not stored in your system registry. As a result, the identity of the key can’t be verified.
Type yes and press Enter. This action adds the RSA key to the list of known hosts so that you don’t see this warning again when you make future connections.
Enter the root password for the server. The password does not echo to the screen.
If you entered the correct password, a shell prompt is returned:
Change the root password
After your first login, change the root password by using the following steps:
At the shell prompt, enter the following command:
Change your password by entering a new one at the following prompts:
If the passwords that you enter match, you receive the following confirmation that the authentication tokens have updated successfully:
The password does not echo to the screen.
Use the new password with the root user when you connect to your server.
Next steps
The next article shows you how to use Rescue Mode to connect to your Cloud Server. Rescue Mode is useful when you’re troubleshooting and when your server becomes unresponsive.
Share this information:
©2020 Rackspace US, Inc.
Except where otherwise noted, content on this site is licensed under a Creative Commons Attribution-NonCommercial-NoDerivs 3.0 Unported License
Источник
How to Connect to a Remote or Local Server on a Mac
Treat it just like a hard drive or USB
Connecting your Mac to a local or remote server allows you to access all the files available on that particular server. macOS by default has a server connection feature that lets you connect your Mac to any server without any restrictions. It then appears as a normal disk drive in the Finder for you to access, work with, and even delete files from it.
There are actually multiple ways to mount a server as storage on your machine. You can do it using the native feature built into the macOS and you can even use a third-party app to access your servers on your Mac.
How to Connect to a Server on a Mac Using The Finder
Using the Finder to establish a connection to a server is the easiest and quickest way to do the task. Basically, all you need to do is launch an option on your Mac, enter your server details, and you’re good to go.
Keep your server login details handy as you’re going to need them in the following steps.
- Open a Finder window on your Mac. The easiest way to do it is to head to your Desktop and you’ll be inside a Finder window.
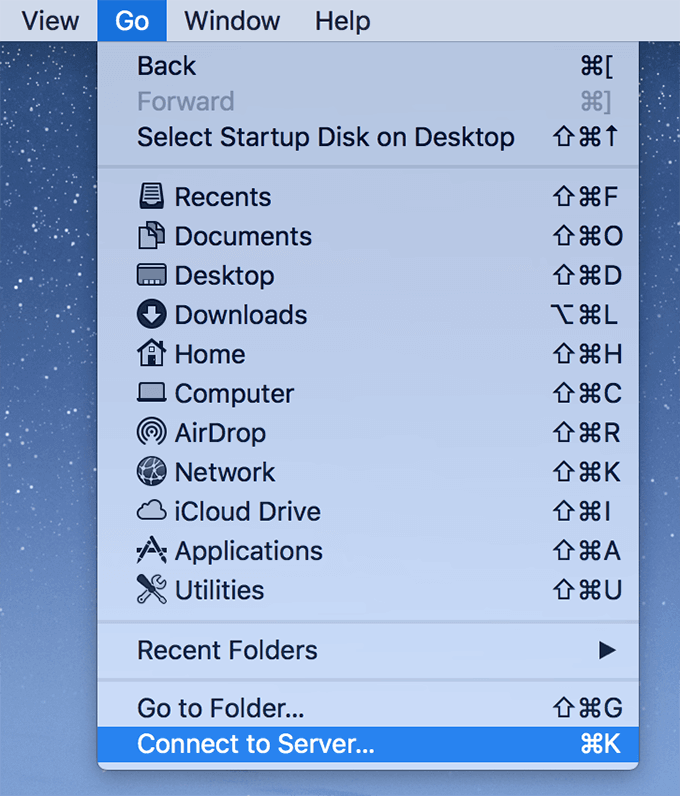
- Click on the Go menu at the top of your window and select the option that says Connect to Server. Alternatively, press the Command + K keyboard shortcut.
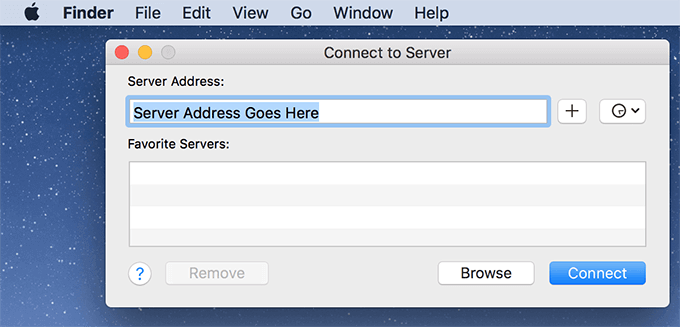
- You’ll see a dialog box that lets you enter your server details to then connect to it. Put your cursor in the field that says Server Address and type in the address of your server. This could be a URL or an IP address. Then click on the Connect button to connect to the specified server.

- A prompt will appear asking you to enter your login details. Enter the details and it’ll connect you to the server.
Once you’re connected, your server will appear as a normal disk drive on your Mac. You can double-click on this driver to access its contents and even add new files from your Mac.
When you’ve finished playing around with the server, you might want to disconnect from it. You can do it by right-clicking on the server and selecting the Eject option.
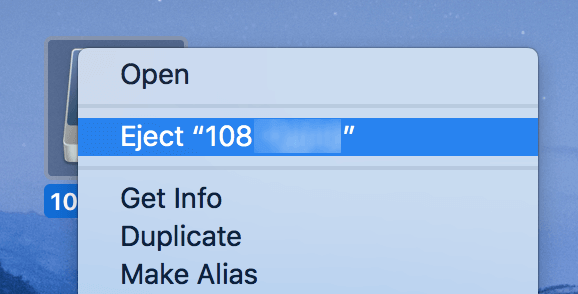
It’ll be removed from the Finder on your Mac.
How to Connect To Recent Servers On a Mac
When you connect to a server on a Mac using the Finder, your Mac saves the server name on your system. It is to help you connect to it at a later time without having you to re-enter the server details.
Finding and connecting to recent servers on a Mac can be done using two ways.
Use The Apple Menu To Connect To a Server On a Mac
The Apple menu on your Mac lets you open the recently accessed items and this includes your servers as well.
- Click on the Apple logo at the top-left corner of your screen, select the Recent Items option, and you’ll find all your recently connected servers in the list.
- Click on any of the servers and you’ll be connected to them.
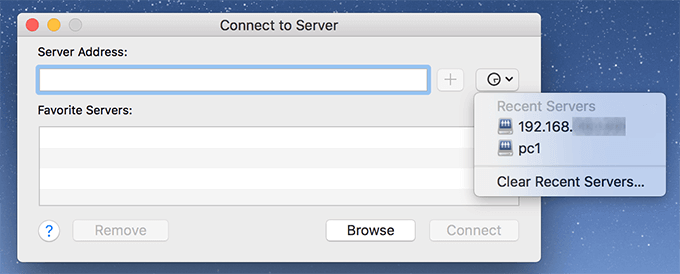
Use The Connect to Server Menu To Connect To a Recent Server
Another way to find and connect to a recent server is to use the same menu that you used in the first place to make the connection.
- Get inside a Finder window, click on the Go menu at the top, and select the Connect to Server option.
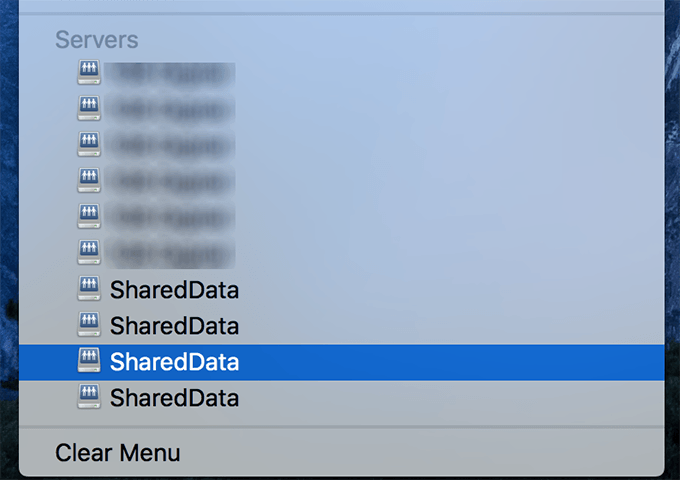
- There’ll be an icon that looks like a time machine. Click on it and you’ll see your recent servers list. Select the server you want to connect and your Mac will connect to it.
Use AppleScript To Connect a Mac to a Server
AppleScript also has a feature that lets you connect your Mac to a server from your code. It’s a single-line code that instructs the Finder to open your specified server on your machine.
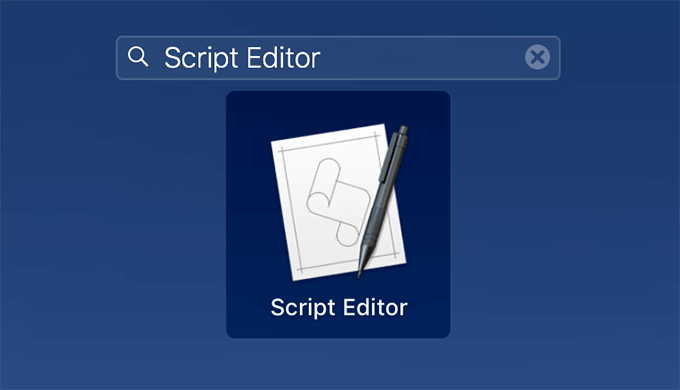
- Click on Launchpad in the Dock, search for Script Editor, and click on it when it appears on your screen.
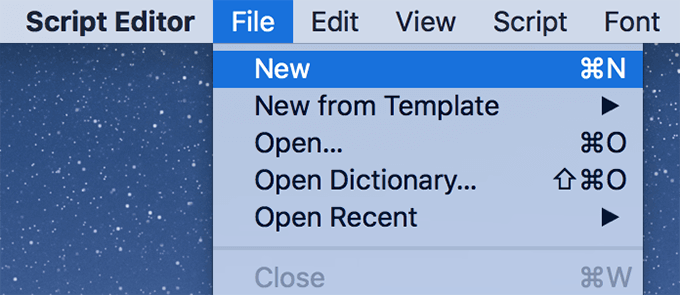
- Click on the File menu at the top and select New to create a new script in the app.
- When the new script editor opens, type the following command into it. Make sure to replace SERVER with the actual address of your server.
tell app “Finder” to open location SERVER
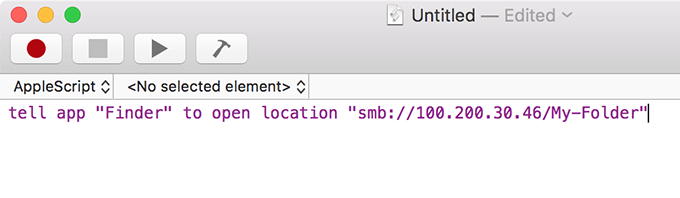
- Click on the Script menu at the top and select Run to test your script and to see if it connects to your chosen server.
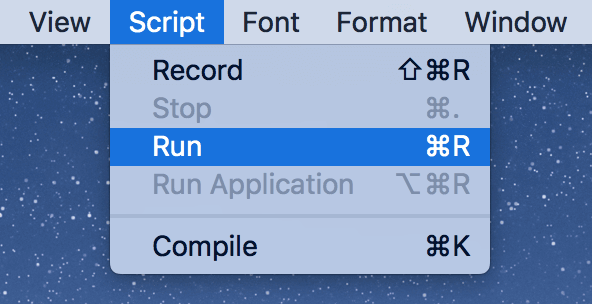
You can save the script to use at a later time on your Mac. Then all you’ll have to do is double-click on the file and it’ll establish the connection.
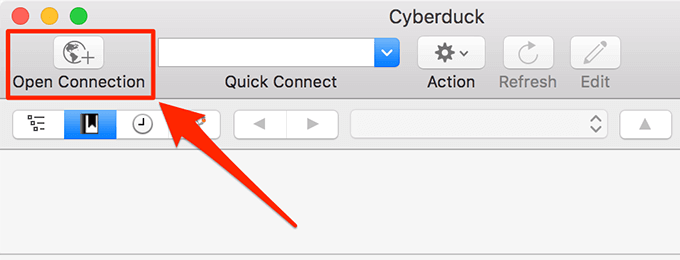
How To Connect To a Server On a Mac Using Cyberduck
If you don’t like the default option to connect to a server for some reason, you aren’t tied to it and you can use any of the third-party apps available in the market for your task.
Cyberduck is one of the free apps that helps you connect to various kinds of servers. You can use it to connect to FTP, SFTP, WebDAV, Amazon S3, and various other server from your Mac.
- Download and install the Cyberduck app on your Mac.
- Launch the app and click on the option that says Open Connection. It’ll let you connect to a server.
- On the following screen, select your server type, enter your server address, type in the login details, and click on Connect to connect to the server.
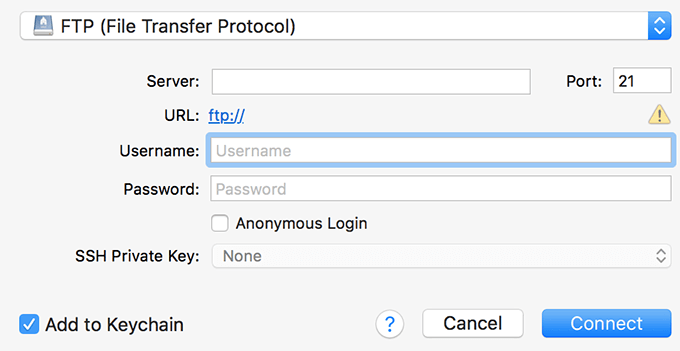
If you’ll be connecting to this server in the future as well, make sure to checkmark Add to Keychain so your login details are automatically filled-up the next time you connect to it.
Mahesh has been obsessed with technology since he got his first gadget a decade or so ago. Over the last few years, he’s written a number of tech articles on various online publications including but not limited to MakeTechEasier and Android AppStorm. Read Mahesh’s Full Bio
Источник


