Connect to a VPN in Windows 10
Whether it’s for work or personal use, you can connect to a virtual private network (VPN) on your Windows 10 PC. A VPN connection can help provide a more secure connection and access to your company’s network and the internet, for example, when you’re working from a coffee shop or similar public place.
Create a VPN profile
Before you can connect to a VPN, you must have a VPN profile on your PC. You can either create a VPN profile on your own or set up a work account to get a VPN profile from your company.
Before you start:
If it’s for work, look for VPN settings or a VPN app on your company’s intranet site while you’re at work, or contact your company’s support person.
If it’s for a VPN service you subscribe to for personal use, visit the Microsoft Store to see if there’s an app for that service, then go to the VPN service’s website to see if the VPN connection settings to use are listed there.
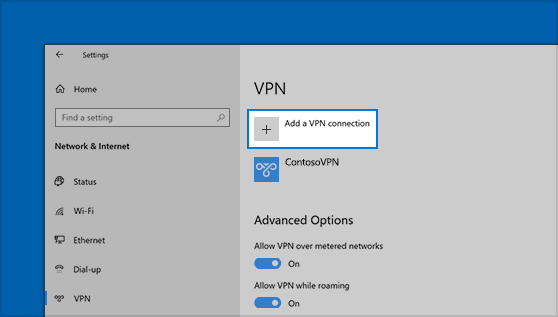
Select the Start button, then select Settings > Network & Internet > VPN > Add a VPN connection.
In Add a VPN connection, do the following:
For VPN provider, choose Windows (built-in).
In the Connection name box, enter a name you’ll recognize (for example, My Personal VPN). This is the VPN connection name you’ll look for when connecting.
In the Server name or address box, enter the address for the VPN server.
For VPN type, choose the type of VPN connection you want to create. You’ll need to know which kind of VPN connection your company or VPN service uses.
For Type of sign-in info, choose the type of sign-in info (or credentials) to use. This might be a username and password, one-time password, certificate, or a smart card if you’re connecting to a VPN for work. Enter your username and password in the respective boxes (if required).
If you need to edit the VPN connection info or specify additional settings, such as proxy settings, choose the VPN connection and then select Advanced options.
Connect to a VPN
When you have a VPN profile, you’re ready to connect.
On the far right of the taskbar, select the Network icon (either or ).
Select the VPN connection you want to use, then do either of the following depending on what happens when you select the VPN connection:
If the Connect button displays under the VPN connection, select Connect.
If the VPN section in Settings opens, select the VPN connection there, then select Connect.
If you’re prompted, enter your username and password or other sign-in info.
When connected, the VPN connection name will display Connected underneath it. To see if you’re connected to the VPN while you’re doing things on your PC, select the Network icon (either or ) on the far right of the taskbar, then see if the VPN connection says Connected.
Remotely Manage a Non-Domain Hyper-V Server from Windows 10
I have grown to be a fan of Hyper-V over the years. It has broad hardware support, costs nothing extra, and can easily be enabled on Windows Server. This makes it a prime candidate for anyone with a home lab. My setup is built on Windows Server 2016 and I use Hyper-V to host a number of virtual servers and workstations for testing. But like most home labs, and the rest of the PCs in my house, they are not joined to a domain which can make remotely managing Hyper-V difficult. To work around the problem I would typically RDP to the server to use the Hyper-V Manager on the server. But this is not the best solution.
I tried to use the Hyper-V Manager client on my Windows 10 PC to connect to my Hyper-V host unsuccessfully for months. It seemed no matter what I tried, I ran into various issues trying to get my Windows 10 PC to authenticate to the Hyper-V host. It wasn’t until I stumbled across this TechNet article that inspired me to give local Hyper-V manager client a second chance. With a few minor tweaks, I was finally able get it working. If you are in the same boat as me, below I detailed each step I took so that you too can remotely manage a Windows Server 2016 Hyper-V server from Windows 10.
Hyper-V Server Configuration
First, we need to configure the Hyper-V host to accept remote connections:
- Log into your Windows server with an administrative level account.
- Click on the Start button, type in Windows PowerShell and hit Enter.
- At a PowerShell prompt, run the following commands:
Make sure to hit Y to confirm you want to enable CredSSP.

Windows 10 Client Configuration
Next, let’s setup the client side:
- Click on the Start Button and type in Turn windows features on or off and hit Enter.
- Navigate through the list of features and check the Hyper-V GUI Management Tools and then click OK.


Type in the following PowerShell commands. My Windows server is called homeserver (named after one of Microsoft best products), make sure to replace «homeserver» in the commands below with the hostname of your Hyper-V host. Hit Y to continue when prompted by the commands to modify the TrustedHosts list and enable CredSSP authentication.


Select Enabled, then click the Show button.

Type in Wsman/homeserver (remember to replace «homeserver» with the name of your hyper-v host)

Ready to Connect
You are now ready to launch the Hyper-V Manager on your local PC. There are a few extra steps that are necessary to connect in the non-domain joined scenario.
- Click on the Start Button and type in Hyper-V Manager and hit Enter.
- When the Hyper-V Manager loads, click the Connect to a Server item under Actions.
- Select Another computer and type in the name of your server.


Connect to windows server from windows 10
This forum has migrated to Microsoft Q&A. Visit Microsoft Q&A to post new questions.
Asked by:
![]()
Question
![]()
![]()
I am new to networking and server configuration, so please bare with me if something is not accurately depicted. Thank you in advance:
I have attempted to connect a Windows 10 Pro computer to a Windows Server 2016 however have been unsuccessful. I am able to connect a Windows 7 and XP system to the server. I can ping the domain and use nslookup to find the domain, however after providing my credentials I get an error that says «Could not connect to (domain). Network path not found.»
After reviewing the logs on Windows 10 I have a code 53, and on the Server an event ID of 1058.
Server is set to a private ip of 10.0.0.x and the router is also set on that ip of 10.0.0.x
I have scoured the internet to find an answer to my problems, but sadly I have not found one yet. I have configured the netlogon, netjoin, TCP/IP Bios Helper in the computer management. I have configured the TCP/IP v4 to include the DNS server address which consisted of the DC private IP and the default gateway, I have enabled NetBios over TCP/IP on the WINS tab. There is no DHCP server set up. I believe that is everything that I have tried. I ran the Dcdiag and it came up with unable to locate the domain.
I will be able to answer any questions as soon as I can and run any tests on the server and Win10 computer. I am planning on restarting everything from scratch and re-installing both the server and PC, but if there is a solution I am open to try it.
Connect to windows server from windows 10
This forum has migrated to Microsoft Q&A. Visit Microsoft Q&A to post new questions.
Answered by:
![]()
Question
![]()
![]()
I’m experiencing an issue where i can’t connect through my newly installed Windows Server 2016 with RD Gateway.
I’m just getting «Your Computer can’t connect to the Remote Desktop Gateway server. Contact your network administrator for assistance.»
Older versions of Windows 10 doesnt have this issue.
Any help would be appreciated.
Answers
![]()
![]()
Please try to add this entry below on Windows 10 1709 system to test:
HKCU\ Software\ Microsoft\ Terminal Server Client\
RDGClientTransport REG_DWORD 0x00000001
Please remember to mark the replies as answers if they help.
If you have feedback for TechNet Subscriber Support, contact tnmff@microsoft.com.
All replies
![]()
![]()
Please try to add this entry below on Windows 10 1709 system to test:
HKCU\ Software\ Microsoft\ Terminal Server Client\
RDGClientTransport REG_DWORD 0x00000001
Please remember to mark the replies as answers if they help.
If you have feedback for TechNet Subscriber Support, contact tnmff@microsoft.com.
![]()
![]()
Right, that fixed the issue.
Any info on what this registry key does exactly, -and maybe why its only som machines experiencing it?
I had this on my work with Windows 10 Enterprise, but not at home on Windows 10 Pro.
![]()
![]()
The registry changes RD Gateway transport from modern HTTP to legacy RPC-HTTP as it’s the most stable one.
What’s new in Windows Server 2012 Remote Desktop Gateway
Please remember to mark the replies as answers if they help.
If you have feedback for TechNet Subscriber Support, contact tnmff@microsoft.com.
![]()
![]()
![]()
![]()
I have the same issue but I have RDS setup to bypass the Gateway.
This works for for my internal users but not some of my VPN users.
From the VPN network, I can telnet to 3389 on both the connection broker and my host servers from the client.
As soon as I launch a remoteapp I get the ‘Your computer can’t connect to the remote desktop gateway server. Contact your network administrator for assistance»
This reg key does fix it but I don’t want VPN users routing through my RD Gateway. From my understanding, It will try the connection broker first, If it fails, it then falls back to the RD Gateway.
![]()
![]()
So thankful this was the solution, modified reg and didn’t have to reboot, it worked.
Now, WHY IN THE NAME OF PETE did I have to loose 6 hours of time at home with my family to solve this RDP riddle?
Hesus Christie, riding on a unicycle through downtown San Francisco, why, why, why Microsoft have to tamper with «Modern» HTTP. Really. What so «Modern» that it don’t work? Just like your «Modern» apps, and your «Modern» Windows 8.0 interface, now mess with HTTP and break it too trying to make it «Modern» Would you please just leave well enough alone before you break the whole Internet? And the sooner the CHROME Edge Explorer the better. Guess Edge not so «Modern» either. 6 hours of my life. gone over this. Miller Time.


