- AF_UNIX comes to Windows
- Introduction:
- Overview :
- Addressing scheme – sockaddr_un :
- Security:
- Implementation:
- Unsupported \unavailable :
- How can I write a Windows AF_UNIX app ?
- What’s next?
- Перекрестное опыление: управляем Linux из-под Windows, и наоборот
- Microsoft Loves Linux
- Магомед не идет к горе
- Гора идет к Магомету
- В хозяйстве пригодится
- Connect unix from windows
- Prerequisites
- More reading
- Conclusion
AF_UNIX comes to Windows
December 19th, 2017
Introduction:
Beginning in Insider Build 17063 , you’ll be able to use the unix socket ( AF_UNIX ) address family on Windows to communicate between W in32 processes . Unix sockets allow inter-process communication (IPC) between process es on the same machine.
Overview :
Support for the unix socket has existed both in BSD and Linux for the longest time, but, not on Windows. On Windows, there were some alternatives for local IPC, such as named pipes . But, calling conventions are different between the named pipes and sockets , making writing low-maintenance cross-platform applications difficult. For example, one such place where these two constructs differ (other than the API) is terminating the connection. BSD Socket API provides a bidirectional close semantics using shutdown . There is no direct equivalent of that in named pipes. Such differences make it difficult to port unix socket applications from Linux to Windows and vice versa; up until now!
Build 17063 brings native support for the unix socket to Windows. Starting this build, two Win 32 process es can use the AF_UNIX address family over Winsock API (which is very similar to the BSD socket API) to communicate with each other. Currently, the support only exists for the stream ( SOCK_STREAM ) socket type , which is a connection-oriented protocol for one-to-one communication. Support for the datagram (SOCK_DGRAM) can be considered in future depending on the adoption, feedback and scenario s .
Addressing scheme – sockaddr_un :
The ‘ sockaddr_un ’ structure is used for defining the address of a unix socket. In the Windows implementation of the unix socket, we have kept the name, definition and semantics of the unix socket address the same as that in Linux , to make cross-platform development easier .
There are three different addressing formats for unix sockets. ‘pathname’, ‘abstract’ and ‘unnamed’ sockets. ‘pathname’ sockets are bound to the filesystem , where in the ‘ sun_path ’ member of the struct is used to specify a null-terminated UTF-8 file system path. You can expect the same from the Windows implementation , where ‘ sun_path ’ specifies a Win32 UTF-8 file system path.
The second category is the ‘abstract’ socket address where the first character in ‘ sun_path ’ is a null byte. Windows implementation of AF_UNIX socket can also accept abstract addresses. The one difference noteworthy here is that the Windows unix socket implementation currently does not support the auto bind feature whereby an abstract address is auto-generated by the implementation on behalf of the user.
Lastly, ‘unnamed’ sockets, where the socket is bound to a pathname with no name. This is also supported on Windows unix socket implementation . Although, one of the socket API’s socketpair that generates unnamed sockets, itself is not supported in Winsock 2.0 .
Security:
Unix sockets provide a mechanism for secure communication. C ommunication over unix sockets can be secured by controlling the file (or directory) permissions on the pathname sockets ( or the parent directory ) . For example, the bind socket API creates a ‘socket’ file with the given pathname . The creation of the new socket file will fail if the calling process does not has write permission on the directory where the file is being created. Similarly, for connecting to a stream socket, the connecting process should have write permission on the socket. The same level of security is available and enforced on the Windows unix socket implementation . See the man page on AF_UNIX for more details on the security .
Implementation:
Majority of the functionality for the Windows AF_UNIX is implemented in the Windows kernel in a driver : afunix.sys . The Windows kernel networking stack provides a very pluggable and extensible model, that makes it easy to support new network providers. The socket file itself that is created as part of the bind call is a custom NTFS reparse point .
Unsupported \unavailable :
Summarizing from the above, the following Linux unix socket features are either currently unavailable or unsupported in the Windows unix socket implementation.
- AF_UNIX datagram (SOCK_DGRAM) or sequence packet (SOCK_SEQPACKET) socket type.
- Ancillary data: Linux ‘s unix socket implementation supports passing ancillary data such as passing file descriptors ( `SCM_RIGHTS` ) or credentials (‘ SCM_CREDENTIALS` ) over the socket . There is no support for ancillary data in the Windows unix socket implementation .
- Autobind feature (see the section on ‘ sockaddr_un ’ for details).
- socketpair : socketpair socket API is not supported in Winsock 2.0.
How can I write a Windows AF_UNIX app ?
- Download the Windows Insiders SDK f or the Windows build 17061 — available here .
- Check whether your Windows build has support for unix socket by running “ scqueryafunix ” from a Windows admin command prompt.
- #include afunix.h > in your Windows application and w rite a Windows unix socket winsock application as you would write any other unix socket application, but, using Winsock API ’s .
Note: As mentioned above in the ‘ security’ section , when a socket binds a socket to a valid pathname address, a socket file is created within the filesystem. On Linux, the application is expected to unlink (see the notes section in the man page for AF_UNIX ) before any other socket can be bound to the same address. The same applies to Windows unix sockets , except that, DeleteFile (or any other file delete API) should be used to delete the socket file prior to calling bind with the same path.
What’s next?
We are listening. Please try out the Windows unix socket provider and let us know what works, what doesn’t work, what you like, what you don’t like or what improvements would you like . For now, the best way to provide feedback is either via Feedback Hub under apps -> Hyper-V, the WSL GitHub issue tracker, or as a comment on this blog.
And, if you are wondering, there is already support for unix socket within Windows Subsystem for Linux (WSL), how does that work with the Windows un ix s ocket implementation? Well, currently, it doesn’t, but stay tuned!
Перекрестное опыление: управляем Linux из-под Windows, и наоборот
В прошлой статье я обещал рассмотреть механизм удаленного подключения с Windows на серверы под управлением *nix, и наоборот при помощи PowerShell. Обещанного обычно ждут три года, но я успел чуть раньше. Что ж, если хочется с верного макбука управлять гетерогенной инфраструктурой, или наоборот ― с Surface Pro рулить Linux-серверами без всяких putty, ― прошу под кат.
Microsoft Loves Linux
Еще в 2015 году Microsoft торжественно объявила о запуске программы «Microsoft Linux». Сюда вошла как банальная поддержка гостевых *nix-like OS на Hyper-V, так и встроенная в Windows 10 Ubuntu и возможность запуска в Docker продуктов Microsoft, таких как SQL Server.
Компания также опубликовала исходный код PowerShell, что позволило запускать «Ракушку Мощи» не только на Windows. Из-под одноименного аккаунта на Github, помимо исходного кода, выложены и бинарники под большинство современных систем (лицензия MIT).
Это позволяет настроить удаленное управление с помощью единого инструмента ― PowerShell. Помимо подключения к консоли компьютера, можно запускать отдельные команды, в том числе и на нескольких серверах одновременно. Довольно удобно для автоматизации задач администрирования, таких как массовое изменение настроек, инвентаризация, сбор логов.
Порой удобно совмещать традиционные консольные команды со вставками PowerShell:
Для подключения к Windows-машинам при помощи PowerShell используется протокол WS-Man. Для GNU\Linux привычен SSH. Так как сегодня становятся универсальными оба протокола, разберем их подробнее.
PowerShell 6.0 под Windows и *nix, пока еще находится в бете. Поэтому не рекомендую без хорошего тестирования применять на боевых серверах описанное ниже.
Магомед не идет к горе
Когда технология удаленного доступа при помощи PowerShell только набирала обороты, единственным универсальным способом подключения к разным системам был протокол WS-Man. Для тестового стенда я взял Windows Server 2016 и Centos 7, для которых и буду настраивать возможность удаленного подключения и выполнения команд при помощи этого протокола.
Для начала установим на Centos свежий PowerShell:
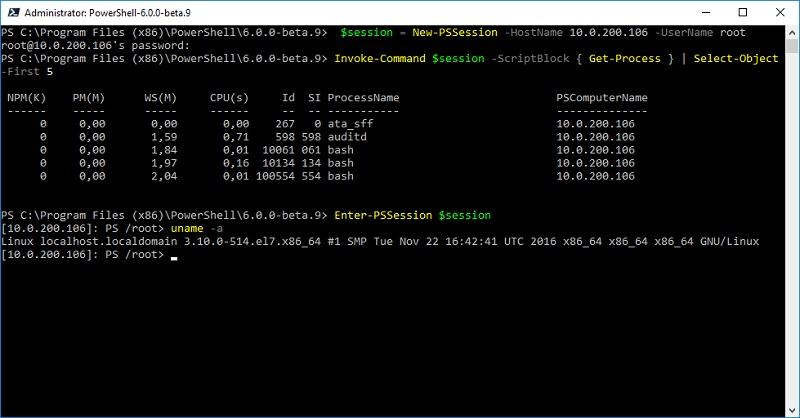
После установки появилась возможность запускать привычные Windows-администратору командлеты. Например, посмотрим версию PS и получим список запущенных процессов командлетами $PSVersionTable и Get-Process:
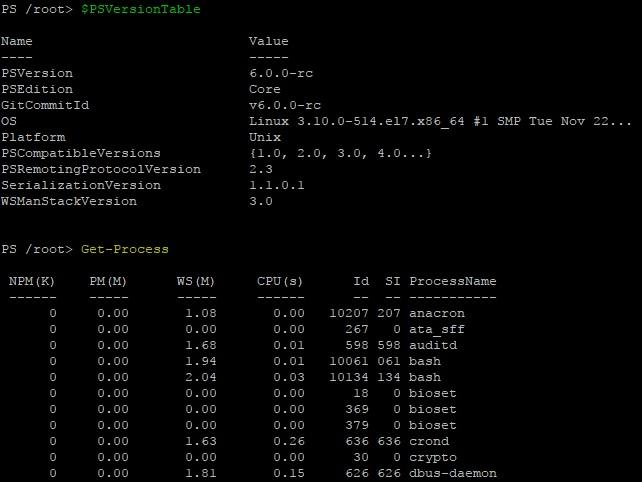
Работаем в консоли PowerShell на CentOS.
Чтобы подключаться к Linux-машине с консоли Windows, нам понадобится установить и настроить:
- OMI (Open Management Infrastructure) ― адаптация WMI, которую также можно использовать для управления компьютерами с ОС, отличными от Windows;
- PSRP (PowerShell Remoting Protocol) ― библиотека, необходимая для удаленного подключения PowerShell.
Подробно с работой и эволюцией OMI и PSRP можно ознакомиться в отличном материале от Matt Wrock, я же просто установлю OMI командой:
Далее нужно настроить порты и аутентификацию в конфигурационном файле /etc/opt/omi/conf/omiserver.conf, после чего перезапустить сервер командой:
Для упрощения эксперимента я не буду настраивать ни NTLM-аутентификацию, ни Kerberos. Еще и шифрование отключу ― разумеется, в боевой среде делать этого не стоит. Для включения текстовой аутентификации и шифрования на стороне Windows в работе winrm достаточно выполнить следующие команды:
После настройки можно проверить работу OMI из консоли Windows:

Подключаемся к CentOS из cmd.
Теперь проверим работу обратным подключением ― из Linux к Windows:

… а затем с CentOS подключаемся к Windows.
После того, как WMI\OMI заработал, нужно установить и настроить PSRP. К сожалению и вопреки инструкции, бинарник отсутствует. Библиотеку пришлось компилировать, долго и нудно исправляя возникающие ошибки зависимостей:
Теперь мы сможем подключаться с Windows на Linux и наоборот при помощи PowerShell. Начнем с Windows на Linux:

С Windows на Linux.
Аналогичным образом можно провести и обратное подключение.
Invoke-Command можно «натравить» на список компьютеров, и с рабочей станции Windows создать пользователя на всех серверах Linux командой вида:
Надо сказать, что способ не самый удобный и эффективный. Минусов добавляет компиляция библиотек, разнообразные баги ― например, на момент написания статьи PSRP не позволял нормально подключиться из Linux в Windows.
Да и сами разработчики рекомендуют не плясать вокруг WS-Man, а обратиться к проверенному способу ― SSH. Что ж, попробуем и его.
Гора идет к Магомету
На этот раз машина с Windows получит чуть больше специфической подготовки ― нужно установить свежий PowerShell и OpenSSH.
После можно проверить синтаксис командлета New-PSSession. Если все произошло как надо, то командлет, помимо привычного параметра ComputerName, будет поддерживать и HostName.
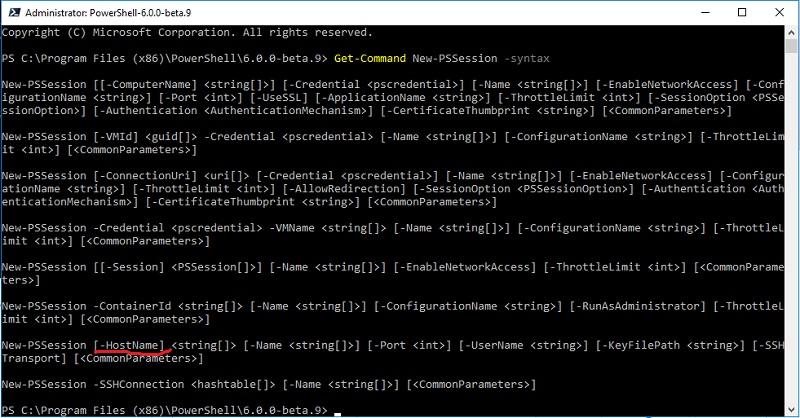
PowerShell 6.0.0-beta.9 и обновленный синтаксис командлета.
Качаем последний релиз или используем пакет из репозитория Chocolatey. Все это разархивируем в \Program Files\OpenSSH.
В консоли с правами администратора переходим в папку с разархивированным содержимым и запускаем установку командой:
Теперь генерируем ключи:
В тестовой среде мы будем использовать парольную аутентификацию, поэтому стоит убедиться что она включена в файле sshd_config:
Если вы также хотите автоматически запускать PowerShell при подключении по SSH, то в параметре subsystem нужно прописать путь к желаемой версии PS:
Для работы клиента SSH нужно добавить директорию в %PATH% любым удобным способом. Например, таким:
Остается только настроить и запустить службы:
После установки уже можно наслаждаться подключением к серверу Windows по ssh.
C Windows через Putty на Linux, с Linux обратно на Windows по SSH.
На достигнутом останавливаться не будем и перейдем к настройке Linux. При настройке сервера SSH по умолчанию достаточно прописать PowerShell в Subsystem:
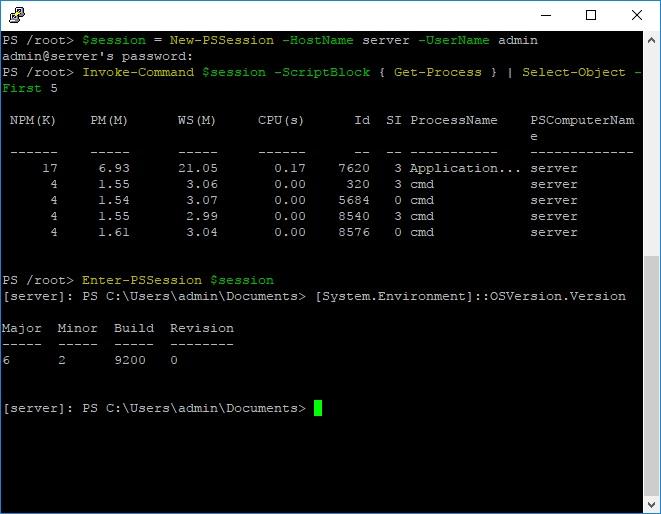
Теперь проверим подключение через командлет New-PSSession и Invoke-Command.
Работаем из PowerShell с Linux-сервером.
Теперь подключимся из Linux к Windows:
Работаем из PowerShell с Windows-сервером.
В отличие от WS-Man, SSH настраивается намного проще и работает стабильнее. Да и беспарольное подключение по ключам настраивать привычнее.
В хозяйстве пригодится
С однозначным «советом потребителю» все опять сложно: SSH проще в настройке и стабильнее, но WS-Man использует API и позволяет применять инструменты вроде JEA. На боевых серверах использовать WS-Man я бы не стал однозначно, а вот реализация OpenSSH в Windows как сервера, так и клиента мне понравилась. Для самопальной автоматизации вполне подойдет даже без PowerShell.
В любом случае, границы между Linux и Windows хоть и медленно, но начинают стираться, что безусловно радует.
Connect unix from windows
Updated: December 22, 2008
A friend of mine asked me how to do this, so I decided to write a tutorial.В If you’re using both Windows and Linux on several computers, a need might arise for you to connect to the Linux machine now and then. Your Linux machine might serve many purposes: it could be a server, a media center (like MythTV), a backup storage area, or just another desktop. You may want to connect to this machine — or even control it. Well, for sharing, we have Samba.
Configuring Samba is very easy. I have demonstrated this in several articles. You can find detailed step-by-step instructions in the reading section below. Now, for remote control, we have this tutorial. Let’s see how we can configure our Linux box to be remotely controlled from Windows.
I will demonstrate how to take control over a Linux machine using SSH and VNC. SSH stands for Secure SHell , a network protocol that allows you to exchange data between two connected network devices using an encrypted tunnel. The tunnel is not limited to just transferring data. You can use it to control the machine on the other end, forward insecure applications through the tunnel and more. VNC stands for Virtual Network Computing , a desktop sharing system that allows you to control other machines.
Prerequisites
Before we begin, I would like to point out that the purpose of this tutorial is to demonstrate how remote connectivity and control can be achieved. It is not a comprehensive security guide into the pitfalls and dangers of opening a port to remote connections and the integrity of transmitted information. This tutorial assumes a safe network where both ends strive toward a mutual goal.
If you plan to deploy a setup like this over the Internet, you must be aware that there could be people who might try to break into your system and take control over it. Or they might want to sniff sensitive data you exchange using these protocols.
A local area network (LAN) setup behind a firewall is one thing. A world-wide open setup is something else entirely.
At the very minimum, the use of SSH or VNC over the Internet will require the use of firewalls with logging enabled, mandatory encryption with long and frequently rotated keys and strong passwords, non-standard ports, a limit on the number of unsuccessful attempts, a time limit between failed logins, no root access, and possibly even other security precautions.
In our setup, we will talk about a cozy LAN at your home or an office, far from the dangers of the Internet. So, now that we know what we’re about to do, let us begin, VNC first.
We will demonstrate using Ubuntu (8.10). Ubuntu comes with the VNC software already installed. You only have to configure it for remote access. Furthermore, Ubuntu makes things simple by using no firewall in its default configuration, since it comes with no open ports — and thus, the use of a firewall is unnecessary.
Ubuntu uses the Vino program for VNC connectivity. You can power Vino by going to System > Preferences > Remote Desktop .В This will open the configuration menu for Vino.
Now, we need to check several boxes: Allow other users to view your desktop and Allow other users to control your desktop . We also want security, so we will require a password and a confirmation.

Under Advanced , we can further configure the connection. Encryption is strongly encouraged. You may also want to consider a non-standard port.

Check that your VNC port is open now. You can use nmap to do that. It’s included in most distributions or can be easily downloaded from repositories.
Now, we need to configure the Windows machine. We require a VNC program to connect to our Linux box. Therefore, download a VNC program and install it. There are many choices, but your easiest best is either RealVNC or TightVNC.В Once you launch the program, specify the address of the remote machine:
P.S. Please note that your choices may differ. It depends how you wish to configure your software. In this case, I made no adjustments and just fired up the program with the default options set.В On the Ubuntu machine, you’ll be asked to confirm the connection attempt:
And here we have a Linux box controlled by a Windows machine:
Job done. Easy peasy.
This time, we need to install the ssh package in Ubuntu. Some distributions will have it installed, others will have it in the repositories. Once it is installed, either via Synaptic or the apt-get (on the command line, sudo apt-get install ssh ), check that the SSH port is open:
The default port is 22.
Now, in Windows, install an ssh client software. A good choice is PuTTY. It is simple, lightweight and will also run from removable media like USB drives.
PuTTY is a command line tool. Open the command line (Run > cmd), navigate to the PuTTY folder and run PuTTY against the remote IP address, something like:
You’ll be asked to import the key of the remote machine. This is a security precaution, so that you really know you’re connecting to the computer you want.
Authenticate with the password:
And you’re logged in:
Now start working:
More reading
And a few more links you might like:
Conclusion
The task of establishing a remote connection with Linux machines is a very simple thing. The entire procedure should take you less than 5 minutes. Of course, if you’re trying to achieve this in an insecure environment, you should take many necessary steps to make sure that both your Linux machine, your client and all the information you’re about to exchange are safe from intrusion, snooping or other potential dangers. This means strong encryption, non-trivial passwords and several other tricks.
In your home environment, where the task is so much simpler, there are simple and easy-to-use tools for the job. If your Linux machine serves a file or printing server, a media center or is simply located beyond the reach of your lazy fingers, gaining control over it takes very little effort.
In the case of ssh, you may also want to use remote connectivity if you’re short of another monitor or just to practice Linux command line.В Either way, it’s simple — and fun.


