- Connect Your Android Phone to Windows 10 with “Continue on PC”
- Connect an Android Phone with Windows 10
- Summing Up
- Windows Phone app for desktop
- How to Use Microsoft’s Remote Desktop Connection
- Set Up Microsoft Remote Desktop Connection
- Connect to Remote PC From Windows
- Remote Desktop Settings
- Use the Remote Desktop App for Windows 10
- Connect to a PC From a Mac
- Connect to a PC From iOS
- Connect to a PC From Android
Connect Your Android Phone to Windows 10 with “Continue on PC”


Your smartphone today has a ton of computing power, but not everything can be done on it. A lot of times, for complex tasks you need to complete your workflow on a PC. Microsoft understands this, and with the upcoming Fall Creators Update, it’s introducing a new Phone-to-PC linking feature that lets you start work on your phone, and then transition it to your Windows 10 system.
We have shown you how to use Continue on PC with iOS and here’s a look at connecting your Android phone with Windows 10. Note that for this to work you’ll need to be running Build 16251 or above.
Note: Since this article was originally written, Microsoft has rolled out the “Your Phone” app. It continues to gain features regularly. Make sure to read our article: How to Send Text Messages from Windows 10 with the Your Phone app.
Connect an Android Phone with Windows 10
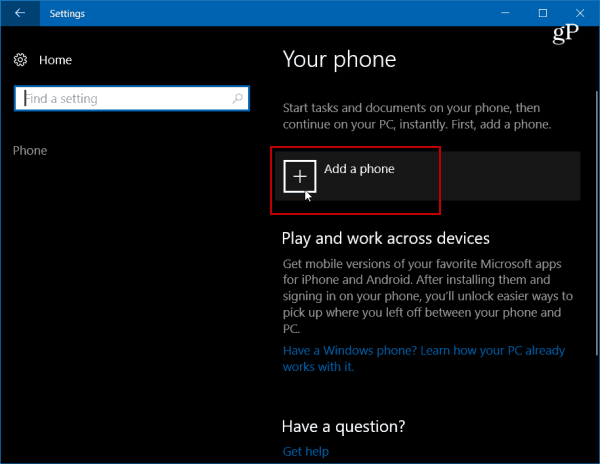
To start off, you need to pair your Android phone with Windows 10. To do that head to Settings > Phone and then select the “Add a phone” button.
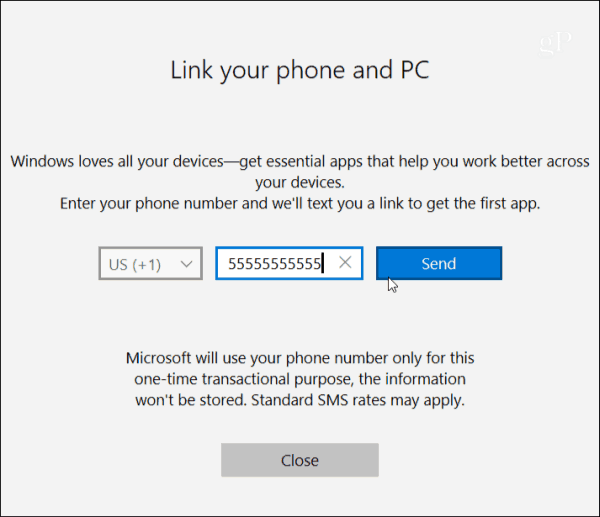
Next, you need to enter your mobile phone’s number to receive an SMS message.
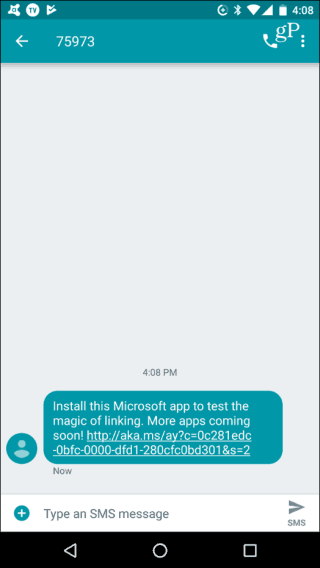
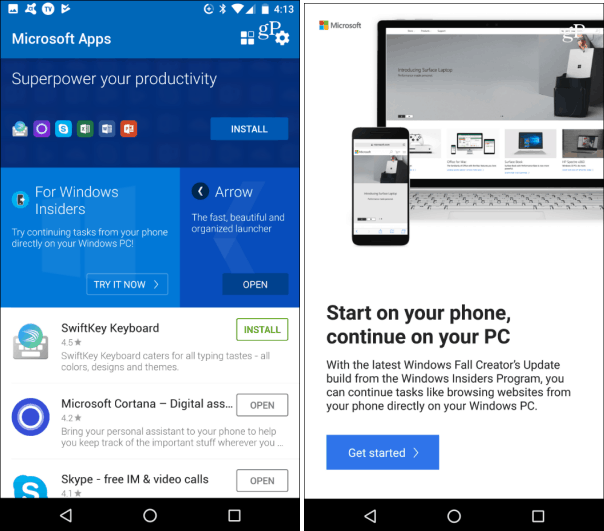
An SMS message will be sent to your Android phone with a link to Microsoft Apps in the Play Store. Tap the link to install it.
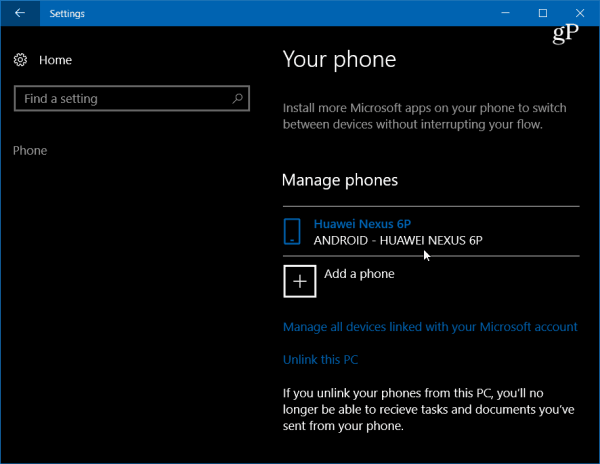
After that, take a look at your Windows 10 system in Settings > Phone and you should see that your phone is paired with Windows 10 and listed as a device you can manage.
Back on your phone, open the app and in the Windows Insiders section tap on “Try It Now” and you’ll get a short tutorial and then introduction screen – tap Get Started.
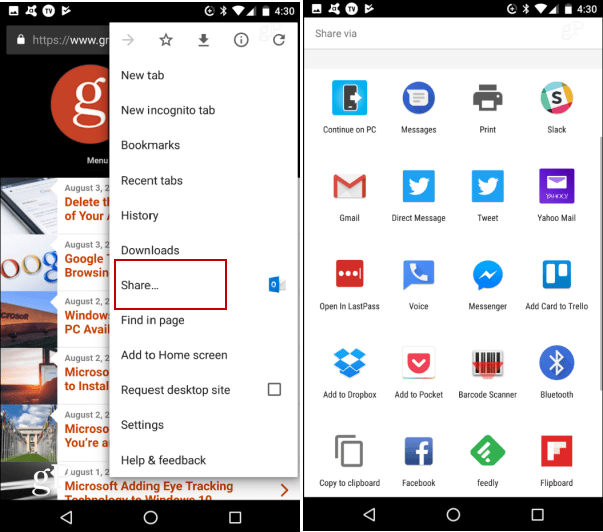
To test out if it’s working, browse to a website you want to share with Windows 10 and tap the options button and then Share. That will open up the menu of sharing options on your phone — select Continue to PC.
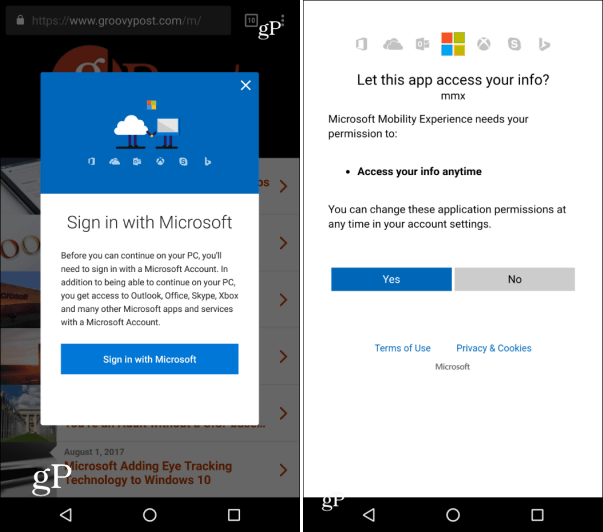
If this is the first time sharing an item you’ll first need to log into your Microsoft Account and approve the connection via Microsoft Authenticator.
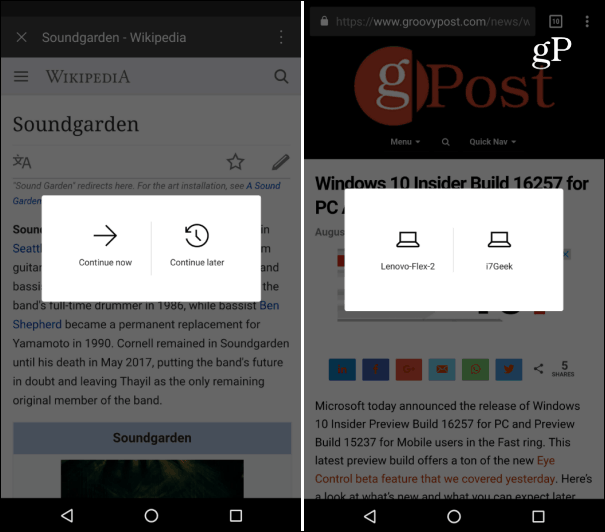
After you’re signed in, you won’t need to sign in again until you use a different device or log out of your account. Another step in the process to point out is when you tap the Continue on PC action, you’ll get the option to send now or later. After that, your phone will scan your network for devices capable of receiving the item. In the example below I have two different systems to choose from.
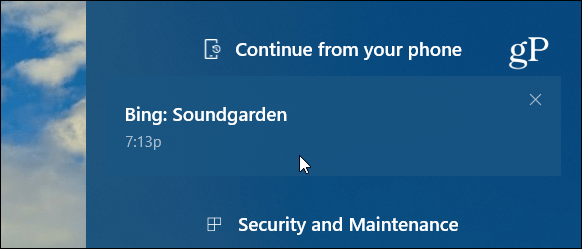
When you send an item over to the PC, you will receive a notification in Action Center that an item has been sent from your Android phone to the PC. For example, here I sent a link to one of our articles.
Summing Up
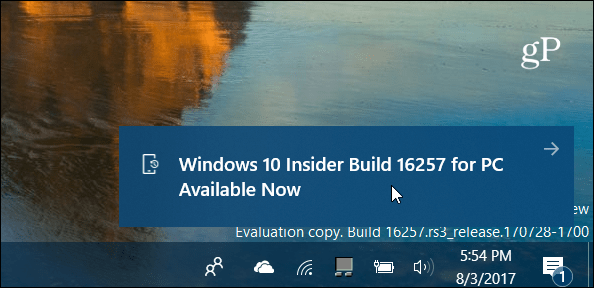
Keep in mind that this feature is still under development and, at the time of this writing, it’s definitely not perfect. I, like my colleague Andre with iOS, had varying degrees of success trying to send over websites. In my testing, I used a Nexus 6P running Android Nougat, a Lenovo Flex 2, and Dell Inspiron desktop (both running Windows 10 Build 16257). Sometimes nothing would be sent over, and sometimes I would receive the notification, but it wouldn’t open in my browser.
However, when things did work as advertised, it showed the potential of how this will surely be handy in the future. Right now it seems to be limited to just sending over websites, and not other items like Office documents. Although, I was able to send over searches from the Bing app for Android.
One more thing to point out is with Microsoft Apps for Android, which allows you to easily find official Microsoft apps has a lot of potential for this Continue on PC feature. Once the functionality gets integrated into more of the available Microsoft apps (and other apps for that matter), there is a ton of potential moving forward.
Windows Phone app for desktop
I downloaded this but it doesn’t work and my Windows 7 PC wont recognise my phone when plugged in.
The application then wont uninstall, so I’m left with a situation where I cant sync my I tunes list with my phone.
OKay, I used Microsoft Fix it and that solved the uninstall, but my PC (or the Windows Phone App) still doesn’t recognise my phone Nokia Lumia 625 Windows 8.1 update.
Statement is USB device not recognised and a repeating triple bleep continuing.
you may want to look at this Knowledge Base article and see if any of the troubleshooting steps work.
Scroll to where it says
Things to Try
To restart your phone, press and hold the Power button until you see Slide down to power off , then flick down. After it’s off, plug into a USB port to turn it back on.
If an update is available, your phone will indicate that you should install the update. If Windows Device Manager indicates a device problem, or if the driver version of Windows Phone 8 that’s installed isn’t the current version, update the driver. To do this, follow these steps:
To manually download and install the Windows Phone driver:
To uninstall and reinstall the Windows Phone app for desktop (Windows 8.1, Windows RT, or Windows 7):
To uninstall and reinstall the Windows Phone app (Windows 8.1 or Windows RT):
then click on the How to Use Microsoft’s Remote Desktop ConnectionDo you need to remotely access and control another PC? Microsoft’s Remote Desktop Connection tool can get it done. Here’s how to set it up.
If you’re in front of your computer and need to access a different machine, Microsoft’s Remote Desktop Connection tool will let you access everything from afar. As long as the computer is turned on and set up for remote connection, you can grab a file, open an application, troubleshoot a problem, or just work remotely. Through RDC, you can remotely access multiple computers over the same network, whether they are elsewhere in your household or at the office. If you remotely log into your employer’s network through a VPN, you can also use it to connect to other PCs in your office or business. Remote Desktop Connection is built into Windows but also exists as a Windows 10 Universal app in the Microsoft Store. If you want to access and control a computer from a non-Windows device, Microsoft’s RDC app is available for Mac, iOS, and Android. Set Up Microsoft Remote Desktop ConnectionFirst, you or someone else must physically sign into the PC you want to remotely access. Turn on Remote Desktop on this computer by opening Settings > System > Remote Desktop. Turn on the switch next to «Enable Remote Desktop.» Click Confirm to enable the setting. By default, the options to keep your PC awake for connections when plugged in and make your PC discoverable on private networks are both enabled. To view or modify either option, click the appropriate Show Settings link, but you can leave both enabled at this point. Instead, click the Advanced Settings link. Check the box next to «Require computers to use Network Level Authentication (NLA) to connect.» NLA adds tighter security for remote connections over the same network as users must be authenticated before gaining access to the remote PC. Assuming you’re connecting to a computer on the same network, you can ignore the «External connections» section. The section for Remote Desktop port shows the default port to listen for and accept a remote connection. Click the back arrow to return to the previous screen and scroll through the Remote Desktop settings. By default, any user who has an administrative account on the remote PC can access it. Assuming you’re using a Microsoft Account to sign into Windows, and your account has administrative rights, your best bet is to simply use that account to sign in remotely. If you want to grant remote access to a different account, click the «Select users that can remotely access this PC» link at the bottom. Click Add and enter the username for that account. Finally, make note of the name of this computer as you’ll need it to log in remotely. If you wish to change the computer name to something easier to remember, follow these steps. Close the Remote Desktop settings screen when you’re finished. Connect to Remote PC From WindowsNow let’s say you want to connect to this remote PC from your current computer at home. Launch the Remote Desktop Connection tool in Windows 10 by clicking the Start button and opening the folder for Windows Accessories. Click the shortcut for Remote Desktop Connection. The process is different for older versions of the OS. In Windows 8.1, press Win key+S to launch the Search tool. In the search field, type “windows remote desktop” and click the result. In Windows 7, click the Start button, open the Accessories folder, and select the shortcut for Remote Desktop Connection. At the RDC window, type the name or IP address of the remote PC in the Computer field. Click the Show Options button, and type the username of the account you’ll use to log in. If you wish to save your credentials so you don’t need to enter them each time, check the box next to «Allow me to save credentials.» Click Connect. Enter your password at the credentials window. Check the “Remember Me” box if you don’t want to enter your password each time you use this account. Click OK. You may receive a message saying that the identity of the remote computer cannot be verified. Check the box for «Don’t ask me again for connections to this computer» and click Yes. You should now connect to the remote computer so you can run applications, open and work with files, and perform other tasks. At the top of the screen is a blue connection bar with various options. The buttons on the left side of the bar let you pin the bar and check the connection speed. Those on the right let you minimize the remote window to the taskbar, change the window size, and terminate the remote session. When you’re finished, click the Close icon to end the connection. Remote Desktop SettingsFrom the setup screen for Remote Desktop Connection, you can tweak several of the tool’s settings.
Use the Remote Desktop App for Windows 10As an alternative to the built-in Remote Desktop Connection tool, you can use the Microsoft Remote Desktop app in Windows 10. Install the app from the Microsoft Store and launch it. Click the Add button and select the option for Desktop to set up a connection. Type the name of the computer to which you want to connect. Click the plus (+) button to add your account. At the account window, add your username and password. You can also add an account nickname/display name if you wish. Click Save. Double-click the icon for the remote PC to connect to it. At the certificate screen, check the box next to «Don’t ask about this certificate again.» Click Connect. You’re now connected to the remote PC. Instead of a blue bar on top of the screen, the Remote Desktop app uses a black panel on the side of the screen. The magnifier icon at the top zooms in and out, while the ellipsis icon switches between full screen and windowed mode. Click the ellipsis icon and then select Disconnect to end the connection. Connect to a PC From a MacTo connect to a remote computer from a Mac, install the Microsoft Remote Desktop app from the Mac App Store. Launch the app and grant the necessary permissions. Click the button to Add PC, then enter the PC name or IP address. If you type the PC name, you need to enter the fully-qualified domain name. In the case of an individual PC, you would add .local to the end of the name, as in LENOVOT460.local. For User Account, choose whether to keep the option set to Ask when required, or enter your username and password at this point so you don’t have to enter them each time. When finished, click Add. At the Home screen, double-click the icon for the remote session. If a message appears telling you that the certificate couldn’t be verified, click Continue. You should then be connected to the remote PC. Move your cursor to the top of the screen to display the menu bar for the remote desktop app. From the Window menu, you can change the size of the window and close the connection. Connect to a PC From iOSYou can connect to a remote PC from an iPhone or iPad by installing the Microsoft Remote Desktop app from the App Store. Launch the app and give it the necessary permissions, then tap the + button and select the option to Add PC. At the next window, enter the PC name or IP address of the computer that you want to access. If you use the PC name, you need to enter the fully-qualified domain name. For an individual PC, that means adding .local to the end of its name. Type or choose your user account. Under Additional Options, you can create a friendly name for the connection and enable other settings. Tap Save, then select the desktop icon to connect to the computer. From the Credentials screen, enter your password and then turn on the switch next to Store username and password if you don’t want to enter them each time. Tap Done. At the authentication window, turn on the switch for «Don’t ask me again for connection to this PC.» Tap Accept, and you’re connected. There should be a small toolbar with several icons at the top of the screen. Tap the magnifying glass to zoom in and out. The middle icon takes you back to the main screen for the app without closing your current session. Select the keyboard icon to pull up the device’s keyboard. Connect to a PC From AndroidConnect to a Windows PC from an Android phone or tablet by downloading the Microsoft Remote Desktop app from Google Play. Open the app and accept the agreement. Tap the + icon to add a connection and select the Desktop option. If you’re near the remote PC, you can scan for it wirelessly. Otherwise, add it manually. Type the PC name and username. Include any additional options. Click Save. Tap the icon to connect to that PC. Enter your password and check the box next to «Store username and password,» then tap Connect. At the certificate verification screen, check the box for «Never ask again for connections to this PC» and click Connect. You’re now connected. At the top of the screen is a small toolbar. Click the first icon to open side panels that open additional options. You can start a new connection, end the current one, go back to the home screen, and switch between touch and mouse pointer. The other icon on the top toolbar opens the device’s keyboard. Tap the X in the upper-left corner to disconnect. |
 to expand and follow the instructions provided. Let us know if any of those things work.


