- Managing Virtual Machines with Windows Admin Center
- Key features
- Monitor Hyper-V host resources and performance
- View virtual machine inventory
- Create a new virtual machine
- Change virtual machine settings
- Live migrate a virtual machine to another cluster node
- Advanced management and troubleshooting for a single virtual machine
- Manage a virtual machine through the Hyper-V host (VMConnect)
- Change Hyper-V host settings
- View Hyper-V event logs
- Protect virtual machines with Azure Site Recovery
- More coming
- Connect with the Windows Desktop client
- Install the Windows Desktop client
- Subscribe to a Workspace
- Use a user account
- Use a specific URL
- Next steps
Managing Virtual Machines with Windows Admin Center
Applies To: Windows Admin Center, Windows Admin Center Preview
The Virtual Machines tool is available in Server, Failover Cluster or Hyper-Converged Cluster connections if the Hyper-V role is enabled on the server or cluster. You can use the Virtual Machines tool to manage Hyper-V hosts running Windows Server 2012 or later, either installed with Desktop Experience or as Server Core. Hyper-V Server 2012, 2016 and 2019 are also supported.
Key features
Highlights of the Virtual Machines tool in Windows Admin Center include:
- High-level Hyper-V host resource monitoring. View overall CPU and memory usage, IO performance metrics, VM health alerts and events for the Hyper-V host server or entire cluster in a single dashboard.
- Unified experience bringing Hyper-V Manager and Failover Cluster Manager capabilities together. View all the virtual machines across a cluster and drill down into a single virtual machine for advanced management and troubleshooting.
- Simplified, yet powerful workflows for virtual machine management. New UI experiences tailored to IT administration scenarios to create, manage and replicate virtual machines.
Here are some of the Hyper-V tasks you can do in Windows Admin Center:
Monitor Hyper-V host resources and performance
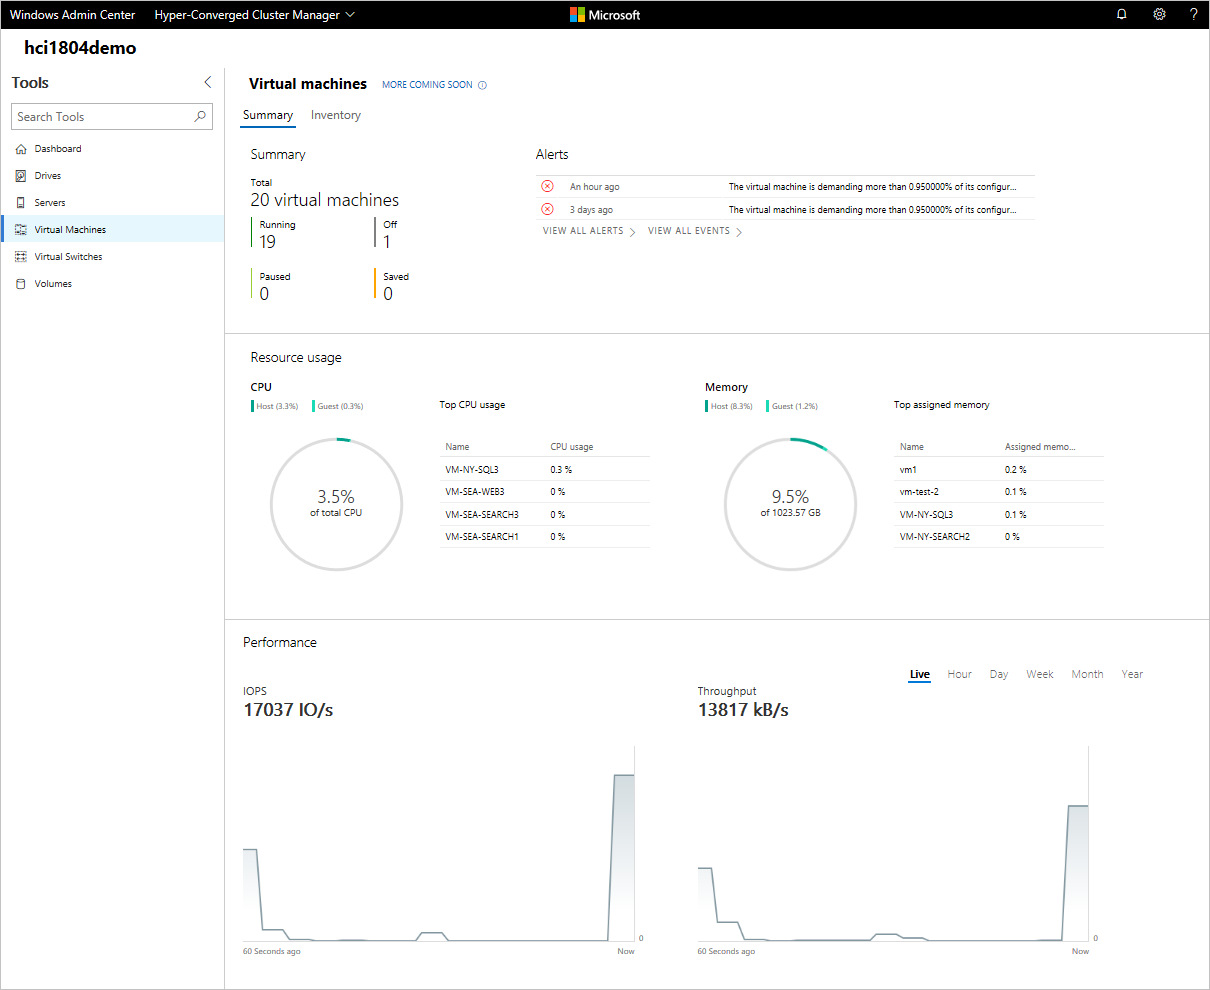
- Click the Virtual Machines tool from the left side navigation pane.
- There are two tabs at the top of the Virtual Machines tool, the Summary tab and the Inventory tab. The Summary tab provides a holistic view of Hyper-V host resources and performance for the current server or entire cluster, including the following:
- The number of VMs grouped by state — running, off, paused and saved
- Recent health alerts or Hyper-V event log events (Alerts are only available for hyper-converged clusters running Windows Server 2016 or later)
- CPU and memory usage with host vs guest breakdown
- Top VMs consuming the most CPU and memory resources
- Live and historical data line charts for IOPS and IO throughput (Storage performance line charts are only available for hyper-converged clusters running Windows Server 2016 or later. Historical data is only available for hyper-converged clusters running Windows Server 2019)
View virtual machine inventory
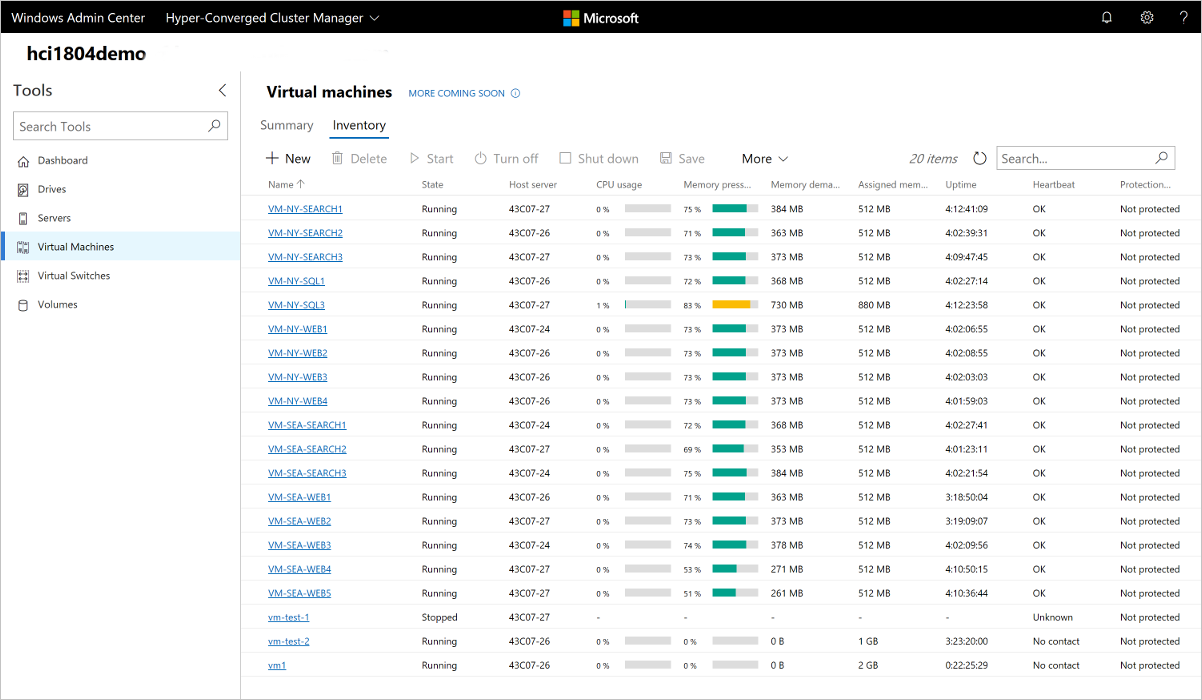
- Click the Virtual Machines tool from the left side navigation pane.
- There are two tabs at the top of the Virtual Machines tool, the Summary tab and the Inventory tab. The Inventory tab lists the virtual machines available on the current server or entire cluster, and provides commands to manage individual virtual machines. You can:
- View a list of the virtual machines running on the current server or cluster.
- View the virtual machine’s state and host server if you are viewing virtual machines for a cluster. Also view CPU and memory usage from the host perspective, including memory pressure, memory demand and assigned memory, and the virtual machine’s uptime, heartbeat status and protection status using Azure Site Recovery.
- Create a new virtual machine.
- Delete, start, turn off, shut down, pause, resume, reset or rename a virtual machine. Also save the virtual machine, delete a saved state, or create a checkpoint.
- Change settings for a virtual machine.
- Connect to a virtual machine console using VMConnect via the Hyper-V host.
- Replicate a virtual machine using Azure Site Recovery.
- For operations that can be run on multiple VMs, such as Start, Shut down, Save, Pause, Delete, Reset, you can select multiple VMs and run the operation at once.
NOTE: If you are connected to a cluster, the Virtual Machine tool will only display clustered virtual machines. We plan to also show non-clustered virtual machines in the future.
Create a new virtual machine
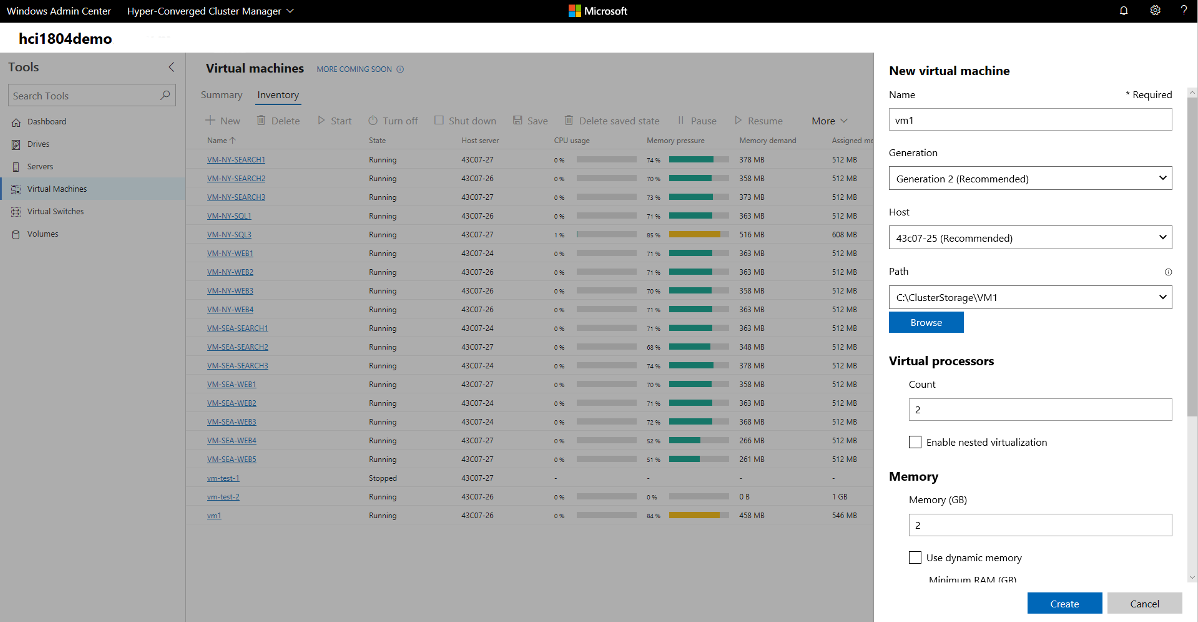
Click the Virtual Machines tool from the left side navigation pane.
At the top of the Virtual Machines tool, choose the Inventory tab, then click New to create a new virtual machine.
Enter the virtual machine name and choose between generation 1 and 2 virtual machines.
If you are creating a virtual machine on a cluster, you can choose which host to initially create the virtual machine on. If you are running Windows Server 2016 or later, the tool will provide a host recommendation for you.
Choose a path for the virtual machine files. Choose a volume from the dropdown list or click Browse to choose a folder using the folder picker. The virtual machine configuration files and virtual hard disk file will be saved in a single folder under the \Hyper-V\\[virtual machine name] path of the selected volume or path.
In the folder picker, you can browse to any available SMB share on the network by entering the path in the Folder name field as \\server\share . Using a network share for VM storage will require CredSSP.
Choose the number of virtual processors, whether you want nested virtualization enabled, configure memory settings, network adapters, virtual hard disks and choose whether you want to install an operating system from an .iso image file or from the network.
Click Create to create the virtual machine.
Once the virtual machine is created and appears in the virtual machine list, you can start the virtual machine.
Once the virtual machine is started, you can connect to the virtual machine’s console via VMConnect to install the operating system. Select the virtual machine from the list, click More > Connect to download the .rdp file. Open the .rdp file in the Remote Desktop Connection app. Since this is connecting to the virtual machine’s console, you will need to enter the Hyper-V host’s admin credentials.
Change virtual machine settings
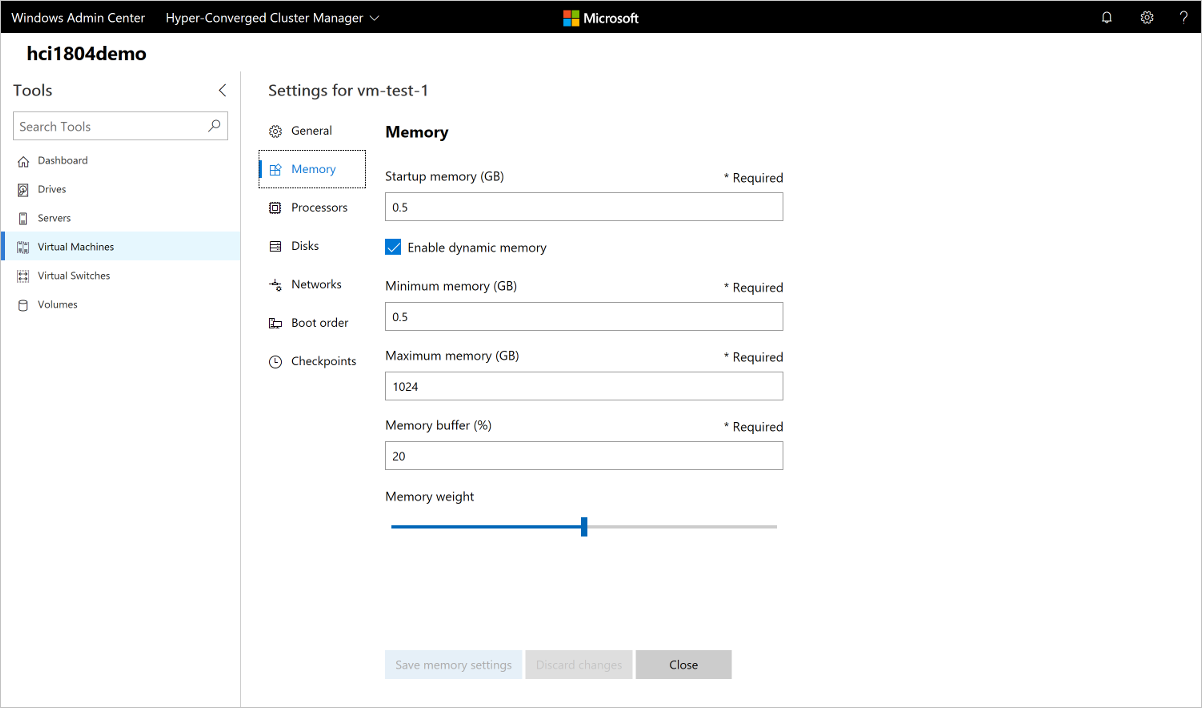
- Click the Virtual Machines tool from the left side navigation pane.
- At the top of the Virtual Machines tool, choose the Inventory tab. Choose a virtual machine from the list and click More >Settings.
- Switch between the General, Security, Memory, Processors, Disks, Networks, Boot order and Checkpoints tab, configure the necessary settings, then click Save to save the current tab’s settings. The settings available will vary depending on the virtual machine’s generation. Also, some settings cannot be changed for running virtual machines and you will need to stop the virtual machine first.
Live migrate a virtual machine to another cluster node
If you are connected to a cluster, you can live migrate a virtual machine to another cluster node.
- From a Failover Cluster or Hyper-converged cluster connection, click the Virtual Machines tool from the left side navigation pane.
- At the top of the Virtual Machines tool, choose the Inventory tab. Choose a virtual machine from the list and click More >Move.
- Choose a server from the list of available cluster nodes and click Move.
- Notifications for the move progress will be displayed in the upper right corner of Windows Admin Center. If the move is successful, you will see the Host server name changed in the virtual machine list.
Advanced management and troubleshooting for a single virtual machine
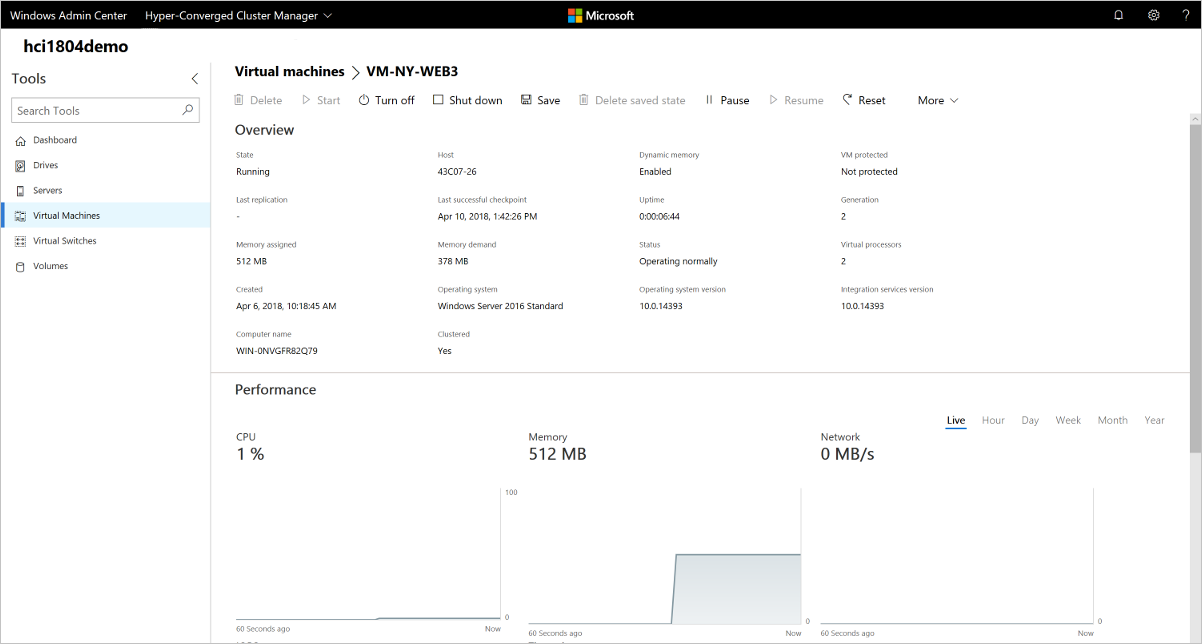
You can view detailed information and performance charts for a single virtual machine from the single virtual machine page.
- Click the Virtual Machines tool from the left side navigation pane.
- At the top of the Virtual Machines tool, choose the Inventory tab. Click on the name of a virtual machine from the virtual machine list.
- From the single virtual machine page, you can:
- View detailed information for the virtual machine.
- View Live and historical data line charts for CPU, memory, network, IOPS and IO throughput (Historical data is only available for hyper-converged clusters running Windows Server 2019)
- View, create, apply, rename and delete checkpoints.
- View details for the virtual machine’s virtual hard disk (.vhd) files, network adapters and host server.
- Delete, start, turn off, shut down, pause, resume, reset or rename the virtual machine. Also save the virtual machine, delete a saved state, or create a checkpoint.
- Change settings for the virtual machine.
- Connect to the virtual machine console using VMConnect via the Hyper-V host.
- Replicate the virtual machine using Azure Site Recovery.
Manage a virtual machine through the Hyper-V host (VMConnect)
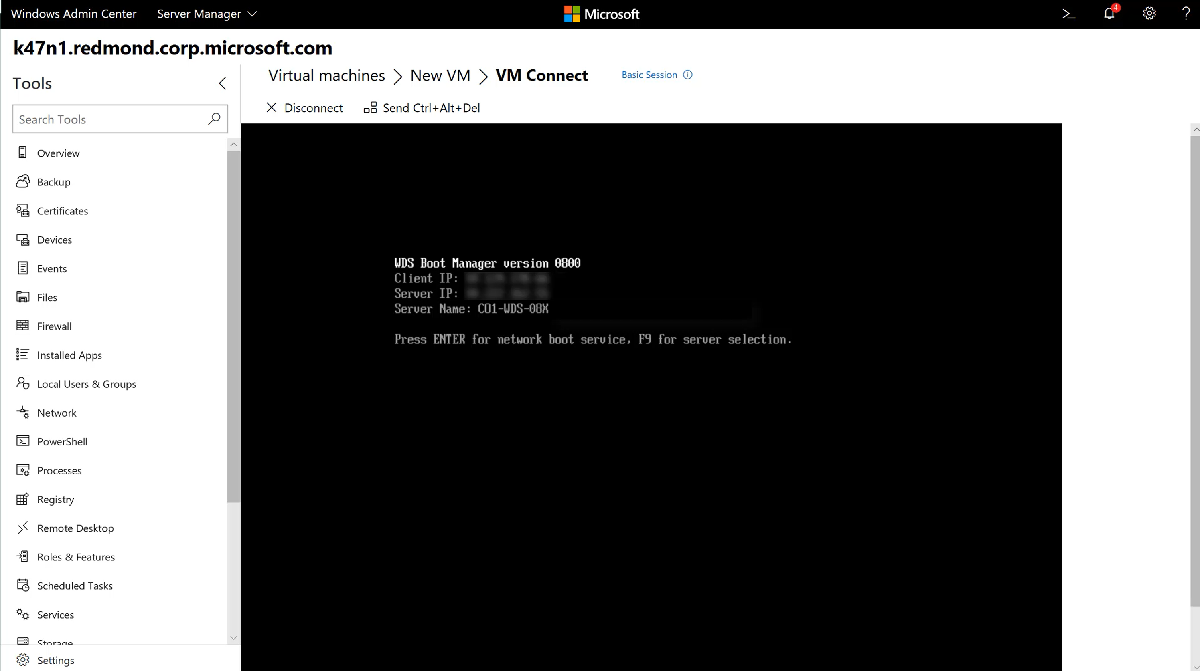
- Click the Virtual Machines tool from the left side navigation pane.
- At the top of the Virtual Machines tool, choose the Inventory tab. Choose a virtual machine from the list and click More >Connect or Download RDP file. Connect will allow you to interact with the guest VM through the Remote Desktop web console, integrated in to Windows Admin Center. Download RDP file will download an .rdp file that you can open with the Remote Desktop Connection application (mstsc.exe). Both options will use VMConnect to connect to the guest VM through the Hyper-V host and will require you to enter administrator credentials for the Hyper-V host server.
Change Hyper-V host settings

- On a Server, Hyper-converged Cluster or Failover Cluster connection, click the Settings menu at the bottom of the left side navigation pane.
- On a Hyper-V host server or cluster, you will see a Hyper-V Host Settings group with the following sections:
- General: Change virtual hard disks and virtual machines file path, and hypervisor schedule type (if supported)
- Enhanced Session Mode
- NUMA Spanning
- Live Migration
- Storage Migration
- If you make any Hyper-V host setting changes in a Hyper-converged Cluster or Failover Cluster connection, the change will be applied to all cluster nodes.
View Hyper-V event logs
You can view Hyper-V event logs directly from the Virtual Machines tool.
- Click the Virtual Machines tool from the left side navigation pane.
- At the top of the Virtual Machines tool, choose the Summary tab. In the top right Events section, click VIEW ALL EVENTS.
- The Event Viewer tool will show the Hyper-V event channels in the left pane. Choose a channel to view the events in the right pane. If you are managing a failover cluster or hyper-converged cluster, the event logs will display events for all cluster nodes, displaying the host server in the Machine column.
Protect virtual machines with Azure Site Recovery
You can use Windows Admin Center to configure Azure Site Recovery and replicate your on-premises virtual machines to Azure. Learn more
More coming
Virtual machine management in Windows Admin Center is actively under development and new features will be added in the near future. You can view the status and vote for features in UserVoice:
Connect with the Windows Desktop client
You can access Windows Virtual Desktop resources on devices with Windows 10, Windows 10 IoT Enterprise, and Windows 7 using the Windows Desktop client.
This does not support Window 8 or Windows 8.1.
This only supports Azure Resource Manager objects, to support objects without Azure Resource Manager, see Connect with Windows Desktop (classic) client.
This does not support the RemoteApp and Desktop Connections (RADC) client or the Remote Desktop Connection (MSTSC) client.
Install the Windows Desktop client
Download the client based on your Windows version:
During installation to determine access, select either:
- Install just for you
- Install for all users of this machine (requires admin rights)
To launch the client after installation, use the Start menu and search for Remote Desktop.
Subscribe to a Workspace
To subscribe to a Workspace, choose to either:
- Use a work or school account and have the client discover the resources available for you
- Use the specific URL of the resource
To launch the resource once subscribed, go to the Connection Center and double-click the resource.
To launch a resource from the Start menu, you can find the folder with the Workspace name or enter the resource name in the search bar.
Use a user account
- Select Subscribe from the main page.
- Sign in with your user account when prompted.
The resources grouped by workspace will appear in the Connection Center.
The Windows client automatically defaults to Windows Virtual Desktop (classic).
However, if the client detects additional Azure Resource Manager resources, it adds them automatically or notifies the user that they’re available.
Use a specific URL
Select Subscribe with URL from the main page.
Enter either the Workspace URL or an email address:
- For Workspace URL, use the URL provided by your admin.
| Available Resources | URL |
|---|---|
| Windows Virtual Desktop (classic) | https://rdweb.wvd.microsoft.com/api/feeddiscovery/webfeeddiscovery.aspx |
| Windows Virtual Desktop | https://rdweb.wvd.microsoft.com/api/arm/feeddiscovery |
| Windows Virtual Desktop (US Gov) | https://rdweb.wvd.azure.us/api/arm/feeddiscovery |
- For Email, use your email address.
The client will find the URL associated with your email, provided your admin has enabled email discovery.
Select Next.
Sign in with your user account when prompted.
The resources grouped by workspace will appear in the Connection Center.
Next steps
To learn more about how to use the client, check out Get started with the Windows Desktop client.
If you’re an admin interested in learning more about the client’s features, check out Windows Desktop client for admins.


