- Use SSH Keys with PuTTY on Windows
- Table of Contents
- Introduction
- Requirements
- Install PuTTY and PuTTYgen
- Use Existing Public and Private Keys
- Create New Public and Private Keys
- Copy Public Key to Server
- Connect to Server with Private Key
- PuTTY: Telnet/SSH Клиент
- Новости PuTTY
- 21.12.2019 — Русская версия PuTTY 0.73-RU-17
- 29.09.2019 — Релиз PuTTY 0.73
- 20.07.2019 — Релиз PuTTY 0.72
- How To Use SSH Keys on Windows Clients (with PuTTY)
- Step 1: Download and Install PuTTY, PuTTYgen and Pageant
- Step 2: Generate the OpenSSH-compatible Keys with PuTTYgen
- Step 3: Save The Public Key On The Server
- Step 4: Create a PuTTY Profile to Save Your Server’s Settings
- Step 5 (Optional): Disable the Password for Root Login via SSH
Use SSH Keys with PuTTY on Windows
Table of Contents
Introduction
SSH can handle authentication using a traditional username and password combination or by using a public and private key pair. The SSH key pair establishes trust between the client and server, thereby removing the need for a password during authentication. While not required, the SSH private key can be encrypted with a passphrase for added security.
The PuTTY SSH client for Microsoft Windows does not share the same key format as the OpenSSH client. Therefore, it is necessary to create a new SSH public and private key using the PuTTYgen tool or convert an existing OpenSSH private key.
Requirements
- PuTTY SSH client for Microsoft Windows
- Remote server accessible over OpenSSH
Install PuTTY and PuTTYgen
Both PuTTY and PuTTYgen are required to convert OpenSSH keys and to connect to the server over SSH. These two tools can be downloaded individually or, preferably, as a Windows installer from the PuTTY Download Page.
Once the PuTTY Windows installer is downloaded, double-click the executable in the Download folder and follow the installation wizard. The default settings are suitable for most installations. Both PuTTY and PuTTYgen should now be accessible from the Windows Programs list.
Use Existing Public and Private Keys
If you have an existing OpenSSH public and private key, copy the id_rsa key to your Windows desktop. This can be done by copying and pasting the contents of the file or using an SCP client such as PSCP which is supplied with the PuTTY install or FileZilla.
Next launch PuTTYgen from the Windows Programs list.
- Click Conversions from the PuTTY Key Generator menu and select Import key .
- Navigate to the OpenSSH private key and click Open .
- Under Actions / Save the generated key , select Save private key .
- Choose an optional passphrase to protect the private key.
- Save the private key to the desktop as id_rsa.ppk .

If the public key is already appended to the authorized_keys file on the remote SSH server, then proceed to Connect to Server with Private Key.
Create New Public and Private Keys
Launch PuTTYgen from the Windows Programs list and proceed with the following steps.
- Under Parameters , increase the Number of bits in a generated key: to a minimum value of 2048.
- Under Actions / Generate a public/private key pair , click Generate .
- You will be instructed to move the mouse cursor around within the PuTTY Key Generator window as a randomizer to generate the private key.
- Once the key information appears, click Save private key under Actions / Save the generated key .
- Save the private key to the desktop as id_rsa.ppk .
- The box under Key / Public key for pasting into OpenSSH authorized_keys file: contains the public key.

Copy Public Key to Server
The OpenSSH public key is located in the box under Key / Public key for pasting info OpenSSH authorized_keys file: . The public key begins with ssh-rsa followed by a string of characters.
- Highlight entire public key within the PuTTY Key Generator and copy the text.
- Launch PuTTY and log into the remote server with your existing user credentials.
Use your preferred text editor to create and/or open the authorized_keys file:
Paste the public key into the authorized_keys file.
Save the file and close the text editor.
Adjust the permissions of the authorized_keys file so that the file does not allow group writable permissions.
Logout of the remote server.
Connect to Server with Private Key
Now it is time to test SSH key authentication. The PuTTYgen tool can be closed and PuTTY launched again.
PuTTY: Telnet/SSH Клиент
PuTTY — клиентская программа для работы с сетевыми протоколами Telnet, SSH, SCP, SFTP, для подключения по COM-порту и ZModem, утилита для генерации RSA, DSA, ECDSA, Ed25519 цифровых SSH-ключей.
PuTTY является свободным приложением с открытым исходным кодом, содержит реализацию сетевых протоколов SSH, Telnet, Rlogin, и распространяется под Open Source лицензией MIT.

Пакет PuTTY включает в себя несколько приложений:
- PuTTY: Telnet и SSH клиент
- PSCP: SCP клиент — копирование файлов по шифрованному протоколу с управлением из командной строки
- PSFTP: SFTP клиент — копирование файлов по SSH, подобно FTP
- PuTTYtel: отдельный Telnet клиент
- Plink: интерфейс командной строки к PuTTY
- Pageant: агент SSH-аутентификации для PuTTY, PSCP и Plink
- PuTTYgen: утилита для генерации SSH-ключей
Вы можете скачать и установить, как полный инсталлятор, так и каждый модуль по отдельности. На странице загрузки PuTTY представлены бинарные файлы под Windows, и исходные коды, в том числе и под Linux/Unix. Помимо официальных релизов и поддерживаемых ОС, существуют аддоны и модификации PuTTY, созданные сторонними разработчиками. А кроме основной документации, рекомендуем ознакомиться с особенностями русской версии PuTTY, часто задаваемыми вопросами FAQ, со статьями, прямо или косвенно связанными с работой PuTTY, SSH, и работе с Linux в целом, а также каталогом цветовых схем PuTTY.
Новости PuTTY
21.12.2019 — Русская версия PuTTY 0.73-RU-17
- Переход на версию PuTTY 0.73.
- Временно деактивированы патчи, некорректно работающие с последними версиями PuTTY: Cygterm, Background Image, Wincrypt.
- Другие исправления ошибок и незначительные багфиксы.
29.09.2019 — Релиз PuTTY 0.73
- В Windows другие приложения могли привязываться к тому же TCP-порту, что и локальный port-forwarding порт PuTTY (см. vuln-win-exclusiveaddruse).
- Исправлена ошибка при обработке терминалом режима xterm bracketed paste mode, из-за которой две escape-последовательности, заключенные в скобки, могли появляться вместе, что позволяло ошибочно идентифицировать вставленные данные как ручной ввод с клавиатуры (см. vuln-bracketed-paste-data-outside-brackets).
- Сервер SSH-1, отправляющий сообщение об отключении, мог вызвать доступ к освобожденной памяти (см. ssh1-disconnect-use-after-free).
- Plink под Windows падал при старте, если он действовал как connection-sharing downstream.
- Теперь PuTTY под Windows корректно обновляет размер окна терминала, если разрешение экрана было изменено, а окно PuTTY в этот момент было развернуто на весь экран.
- Исправлена ошибка, приводившая к потере символов в конце строк при обработке терминалом цветных сообщений GCC.
- Исправлено плохое взаимодействие между операцией «Очистить прокрутку», и выделением мыши, которое могло приводить к появлению сообщений об ошибках.
20.07.2019 — Релиз PuTTY 0.72
Исправления безопасности, найденные в рамках финансируемой EU-FOSSA программы Bug Bounty:
- Целочисленное переполнение при разборе длины пакета SSH-1 (см. vuln-ssh1-buffer-length-underflow).
- Переполнение буфера в SSH-1, если сервер отправляет два крошечных ключа RSA (см. vuln-ssh1-short-rsa-keys).
- Клиентский код Pageant под Windows не проверял поле длины ответа, что могло привести к уязвимости во всех инструментах SSH-клиента (PuTTY, Plink, PSFTP и PSCP), если вредоносная программа могла выдать себя за Pageant (см. vuln-win-pageant-client-missing-length-check).
- Исправлен сбой при обмене ключами GSSAPI/Kerberos, затрагивающий сторонних поставщиков GSSAPI под Windows (например, MIT Kerberos для Windows).
- Исправлен сбой при обмене ключами GSSAPI/Kerberos, происходивший если сервер предоставил обычных ключ хоста SSH как часть обмена.
- Символы доверия («trust sigils» — значки PuTTY в начале локально сгенерированных строк в окне терминал — чтобы отличить их от данных, отправляемых сервером) никогда не отключались в SSH-1 или Rlogin.
- Символы доверия никогда не включались снова, если пользователь инициировал перезапуск сеанса.
- PSCP в режиме загрузки SCP мог создавать файлы с ложной новой строкой в конце их имени.
- PSCP в режиме загрузки SCP с опцией -p генерировал ложные сообщения о несанкционированном переименовании файлов.
- Начальное сообщение с инструкцией никогда не выводилось во время SSH keyboard-interactive аутентификации.
- Вставка очень длинных строк во время совместного использования SSH-соединений могло вызвать падение downstream-окна PuTTY.
- В раскладках клавиатуры с клавишей «,» на цифровой клавиатуре (например, немецкая) PuTTY под Windows могла вернуть «.» вместо «,».
- PuTTYgen мог сгенерировать RSA-ключ на один бит короче, чем было запрошено.
How To Use SSH Keys on Windows Clients (with PuTTY)
Using encrypted keys for authentication offers two main benefits. Firstly, it is convenient as you no longer need to enter a password (unless you encrypt your keys with password protection) if you use public/private keys. Secondly, once public/private key pair authentication has been set up on the server, you can disable password authentication completely meaning that without an authorized key you can’t gain access — so no more password cracking attempts.
It’s a relatively simple process to create a public/private key pair and install them for use on your ssh server.
Step 1: Download and Install PuTTY, PuTTYgen and Pageant
To get started, we’ll need to download and install both PuTTY (putty.exe), PuTTYgen (puttygen.exe) and Pageant (pageant.exe). You can find links to each of these at the project’s website. However, the easiest way to get both of the necessary programs is by downloading and installing the full .msi package, as pictured below:

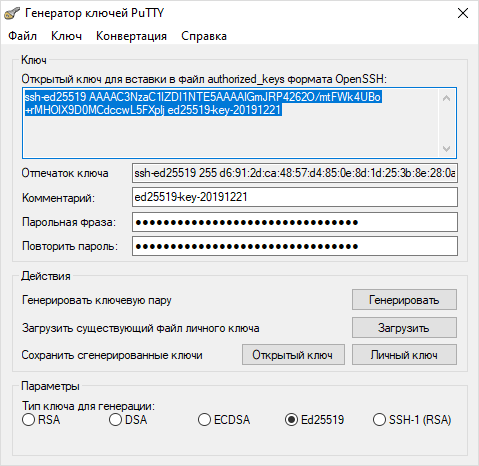
Step 2: Generate the OpenSSH-compatible Keys with PuTTYgen
- Start the PuTTYgen utility, by double-clicking on its .exe file or pressing the Windows key and searching for PuTTYgen
- For Type of key to generate, select SSH-2 RSA
- In the Number of bits in a generated key field, specify either 2048 or 4096 (increasing the bits makes it harder to crack the key by brute-force methods)
- Click the Generate button
- Move your mouse pointer around in the blank area of the Key section, below the progress bar (to generate some randomness) until the progress bar is full
- A private/ public key pair has now been generated
- In the Key comment field, enter any comment you’d like, to help you identify this key pair, later (e.g. your e-mail address; home; office; etc.) — the key comment is particularly useful in the event you end up creating more than one key pair
- Optional: Type a passphrase in the Key passphrase field & re-type the same passphrase in the Confirm passphrase field (if you would like to use your keys for automated processes, however, you should notcreate a passphrase)
- Click the Save public key button & choose whatever filename you’d like (some users create a folder in their computer named my_keys)
- Click the Save private key button & choose whatever filename you’d like (you can save it in the same location as the public key, but it should be a location that only you can access and that you will NOT lose! If you lose your keys and have disabled username/password logins, you will no longer be able log in!)
- Right-click in the text field labeled Public key for pasting into OpenSSH authorized_keys file and choose Select All
- Right-click again in the same text field and choose Copy
NOTE: PuTTY and OpenSSH use different formats for public SSH keys. If the SSH Key you copied starts with «—- BEGIN SSH2 PUBLIC KEY . «, it is in the wrong format. Be sure to follow the instructions carefully. Your key should start with «ssh-rsa AAAA . «
Step 3: Save The Public Key On The Server
Now, you need log into your server via SSH as you normally would using PuTTY and paste the copied public key in the file
/.ssh/authorized_keys on your server.
If your SSH folder does not yet exist, create it manually:
Paste the SSH public key into your
/.ssh/authorized_keys file using the command-line text editor of your choice and save it.
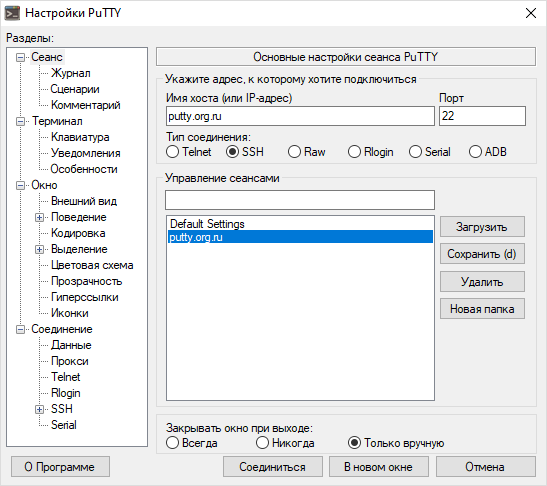
Step 4: Create a PuTTY Profile to Save Your Server’s Settings
In PuTTY, you can create (and save) profiles for connections to your various SSH servers, so you don’t have to remember, and continually re-type, redundant information.
- Start PuTTY by double-clicking its executable file or pressing the Windows key and searching for PuTTY
- PuTTY’s initial window is the Session Category (navigate PuTTY’s various categories, along the left-hand side of the window)
- In the Host Name field, enter the IP address of your server
- Enter the port number in the Port field
- Select SSH under Protocol;
- Along the left-hand side of the window, select the Data sub-category, under Connection;
- Specify the username that you plan on using, when logging in to the SSH server, and whose profile you’re saving, in the Auto-login username field;
- Expand the SSH sub-category, under Connection;
- Highlight the Auth sub-category and click the Browse button, on the right-hand side of the PuTTY window;
- Browse your file system and select your previously-created private key;
- Return to the Session Category and enter a name for this profile in theSaved Sessions field, e.g. user@12.34.56.78 or user@hostname;
- Click the Save button for the Load, Save or Delete a stored session
Now you can log in to user@12.34.56.78 and you will not be prompted for a password. However, if you had set a passphrase on your public key, you will be asked to enter the passphrase at that time (and every time you log in, in the future).
Step 5 (Optional): Disable the Password for Root Login via SSH
Once you have copied your SSH keys unto your server and ensured that you can log in with the SSH keys alone, you can restrict the root login to only be permitted via SSH keys.
In order to do this, open up the /etc/ssh/sshd_config file:
Within that file, find the line that includes PermitRootLogin and modify it to ensure that users can only connect with their SSH key:
Alternatively, if you have configured sudo on your server and are configuring SSH keys for a sudo user, you can disable direct root access altogether:


