- Как подключиться к Microsoft SQL Server из Linux?
- Инструмент для работы с Microsoft SQL Server из Linux
- Подключение к Microsoft SQL Server из Linux
- Шаг 1 – Установка Azure Data Studio на Linux
- Шаг 2 – Настройка подключения к Microsoft SQL Server
- Adam the Automator
- How to Connect to SQL Server from Linux
- Adam Bertram
- Prerequisites
- Summary
- Quickstart: Install SQL Server and create a database on Ubuntu
- Prerequisites
- Install SQL Server
- Install SQL Server
- Install the SQL Server command-line tools
- Connect locally
- Create and query data
- Create a new database
- Insert data
- Select data
- Exit the sqlcmd command prompt
- Performance best practices
- Cross-platform data tools
- Connecting from Windows
- Other deployment scenarios
Как подключиться к Microsoft SQL Server из Linux?
Всем привет! У начинающих разработчиков, кто только начинает работать с Microsoft SQL Server, может возникнуть вопрос – «Можно ли каким-то образом подключиться к Microsoft SQL Server из операционной системы Linux?». Ответ – да, можно, для этого есть специальный инструмент, который позволяет работать с Microsoft SQL Server из Linux, т.е. осуществлять разработку хранимых процедур и функций, посылать SQL запросы, выгружать данные, иными словами, выполнять все те действия, которые выполняет программист, работающий с базой данных SQL Server.
Сегодня я расскажу, что это за инструмент и как с помощью него подключиться к Microsoft SQL Server из Linux.

Инструмент для работы с Microsoft SQL Server из Linux
Как известно, Microsoft SQL Server, начиная с 2017 версии, можно установить на Linux.
Однако основной инструмент для работы с SQL Server, т.е. SQL Server Management Studio, реализован только под Windows. Иными словами, SSMS не получится использовать в Linux, чтобы подключиться к SQL Server и осуществлять разработку баз данных. Это возможно, только если Management Studio установлена на Windows.
При этом операционная система Linux набрала определенную популярность и некоторые организации даже используют Linux в качестве клиентской операционной системы, таким образом, возникла необходимость в инструменте, который позволял бы подключаться к Microsoft SQL Server из Linux и полноценно работать с базами данных.
Компания Microsoft дала нам такой инструмент – это Azure Data Studio.
Azure Data Studio – это бесплатный кроссплатформенный инструмент с открытым исходным кодом для работы с базами данных Microsoft SQL Server.
Более подробно о том, что это за инструмент, для чего он создан, каким функционалом он обладает, я рассказывал в отдельной статье – Обзор Azure Data Studio.
Таким образом, основным инструментом для работы с Microsoft SQL Server, если у нас установлена операционная система Linux, будет именно Azure Data Studio.
Подключение к Microsoft SQL Server из Linux
Чтобы подключиться к Microsoft SQL Server с помощью Azure Data Studio из Linux, необходимо выполнить всего два шага.
Шаг 1 – Установка Azure Data Studio на Linux
Подробно о том, как установить Azure Data Studio на операционную систему Linux, я рассказывал в отдельном материале, поэтому здесь этот процесс я описывать не буду.
Вот этот материал
Шаг 2 – Настройка подключения к Microsoft SQL Server
Теперь, когда Azure Data Studio у нас установлена, мы можем подключиться к Microsoft SQL Server из Linux и работать с базами данных.
Для этого необходимо настроить подключение к SQL Server.
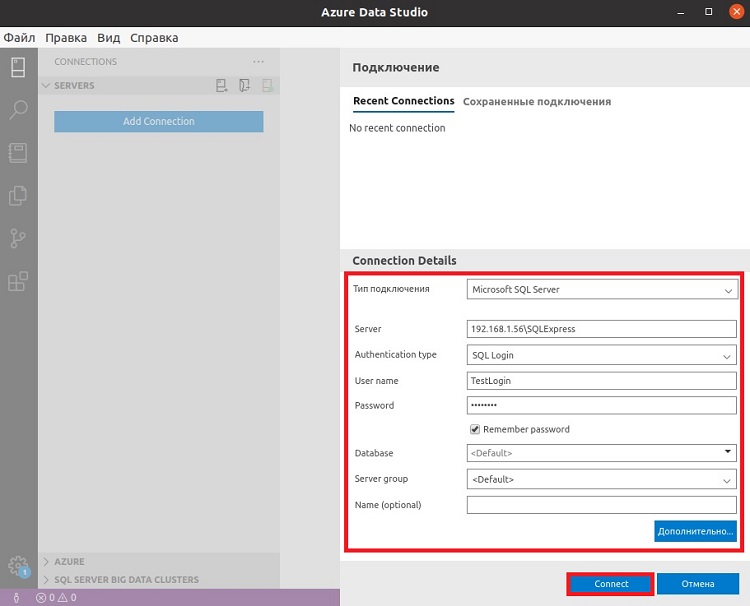
Чтобы настроить подключение, необходимо перейти в раздел «Подключения» (Connections) и нажать кнопку «Добавить подключение» (Add connection).
После этого откроется форма для настройки подключения.
Чтобы настроить подключение к Microsoft SQL Server, необходимо ввести следующие данные:
- Тип подключения – Microsoft SQL Server;
- Server – адрес сервера, на котором установлен SQL Server (включая имя экземпляра сервера);
- Authentification type – тип аутентификации, вводим «SQLLogin», данный тип подразумевает встроенную проверку подлинности SQL Server, т.е. на самом SQL Server у нас должно быть создано имя входа;
- User name – имя входа на SQL Server;
- Password – пароль от имени входа;
По желанию Вы также можете указать:
- Remember password – поставьте галочку, чтобы сохранить пароль для последующих подключений;
- Database name – имя базы данных, к которой подключаться по умолчанию;
- Server group – если есть серверные группы, Вы можете указать здесь ту группу, к которой будет относиться данное подключение.
В случае необходимости Вы можете более тонко настроить подключение, для этого необходимо нажать на кнопку «Дополнительно», в результате откроются расширенные параметры подключения.
После ввода данных нажимаем «Connect».
В итоге в подключениях отобразится новое подключение, в данном случае к Microsoft SQL Server, и Вы можете начать работать с базами данных, например, разрабатывать процедуры, функции, писать SQL запросы, выгружать данные и так далее.
На сегодня это все, надеюсь, материал был Вам полезен, пока!
Источник
Adam the Automator
How to Connect to SQL Server from Linux

Adam Bertram
Read more posts by this author.
In a perfect database administrator world, everything would be the same. All servers would be identical and run the same workloads. They’re easier to manage. But, that’s not the case. Nowadays, System administrators have to manage different environments. This couldn’t be more evident in need to perform SQL queries from a Linux machine. In this post, you’ll learn how to connect to SQL Server from Linux!
One way to connect to SQL Server from Linux is to use a Python module. But before you get that far, let’s first cover what environment I’m working with.
In this article, I’ll be demonstrating this task using Ubuntu 16.04 and I’ll be connecting to SQL Server 2012 R2. But, the same technique should apply to other Linux flavors and SQL Server versions as well. Database administrators rejoice!
Prerequisites
To get started, you’re going to need to install a few prerequisites. First, since you’ll be connecting to a SQL Server instance from Python, you’ll need a Python module. A common Python module to connect to SQL is called PyODBC. This module allows you to query SQL databases via ODBC via a SQL Server ODBC driver for Linux. To get the latest version installed, use pip (the Python package manager).
If this does not work, you might not have pip installed. To install pip:
Next, you need to create a Python script. I’m going to call this one sql_server.py. To create a Python script, first create a blank file.
Then, using your editor of choice, add the below lines. The shebang followed by the path to the Python binary tells the interpreter this is a Python script. The import statement then allows you to call the library methods inside of the pyodbc module. Save this script.
Once you have the Python script created, run the script:
If this runs without error, the pyodbc module has been installed successfully.
Next, add the code to execute a test query. To do this, create an ODBC string.
To learn more about crafting ODBC strings, here‘s a good resource.
The ODBC string is picky about what’s included. It took some time to figure out how to make this work but here’s what mine looks like. Below I’m passing the ODBC string as an argument to the connect() method that’s included with the pyodbc module.
Most of the ODBC string is evident, but one important fact is the double backslash for the UID. Always ensure that you’ve escaped any backslashes in the ODBC string. Also, some of the options I’m using are optional.
Also, you can either use the hostname for SERVER as I’ve done above or you can use the SQL Server IP address.
Feel free to add or remove them as you see fit to match your SQL Server.
Next, you need to create a cursor object that will allow you to pass a T-SQL statement to. This is done with the cursor() method.
Now you have an object with an execute() method that can be used to pass any T-SQL statement we’d like into as shown below. This creates a rows variable containing the resulting dataset.
You’re now to the point where you’ll need to decide what to do with the dataset. You can send the results to a CSV file, put the results into another database or write the contents to the console.
Below, I’m printing the results to the console if the dataset is populated.
You can see that if the dataset is printed out to the console, the output isn’t too pretty. At this point, it’s up to you to decide how to format or parse the data from the database. The hard part is over!
You’ll now end up with a script that looks like this:
Summary
In this blog post, you learned how to use the pyodbc Python module on Linux to connect to a SQL Server data source. The hardest part for me was figuring out the ODBC string but once you get that covered, you should be smooth sailing.
Once you’re connecting from Linux, why not see if you can up the performance using performance counters?
More from Adam The Automator & Friends

With an ever-increasing visitor base searching for solutions to their problems, we can help you connect with and reach the right kind of audience and generate targeted sales leads.

We’ve put together a list of the resources we, at ATA, can wholeheartedly recommend!

Why not write on a platform with an existing audience and share your knowledge with the world?
Источник
Quickstart: Install SQL Server and create a database on Ubuntu
Applies to: SQL Server (all supported versions) — Linux
In this quickstart, you install SQL Server 2017 on Ubuntu 16.04/18.04. You then connect with sqlcmd to create your first database and run queries.
This tutorial requires user input and an internet connection. If you are interested in the unattended or offline installation procedures, see Installation guidance for SQL Server on Linux. For a list of supported platforms, see our Release notes.
In this quickstart, you install SQL Server 2019 on Ubuntu 16.04, 18.04, or 20.04. You then connect with sqlcmd to create your first database and run queries.
Ubuntu 20.04 is supported starting with SQL Server 2019 CU10.
This tutorial requires user input and an internet connection. If you are interested in the unattended or offline installation procedures, see Installation guidance for SQL Server on Linux. For a list of supported platforms, see our Release notes.
Prerequisites
You must have an Ubuntu 16.04 or 18.04 machine with at least 2 GB of memory.
To install Ubuntu 18.04 on your own machine, go to http://releases.ubuntu.com/bionic/. You can also create Ubuntu virtual machines in Azure. See Create and Manage Linux VMs with the Azure CLI.
At this time, the Windows Subsystem for Linux for Windows 10 is not supported as an installation target for production workloads.
Ubuntu 18.04 is supported starting with SQL Server 2017 CU20. If you want to use the instructions on this article with Ubuntu 18.04, make sure you use the correct repository path, 18.04 instead of 16.04 .
If you are running SQL Server on a lower version, the configuration is possible with modifications.
You must have an Ubuntu 16.04, 18.04, or 20.04 machine with at least 2 GB of memory.
To install Ubuntu 20.04 on your own machine, go to https://releases.ubuntu.com/20.04/. You can also create Ubuntu virtual machines in Azure. See Create and Manage Linux VMs with the Azure CLI.
At this time, the Windows Subsystem for Linux for Windows 10 is not supported as an installation target for production workloads.
Install SQL Server
The following commands for SQL Server 2017 points to the Ubuntu 18.04 repository. If you are using Ubuntu 16.04, change the path below to /ubuntu/16.04/ instead of /ubuntu/18.04/ .
To configure SQL Server on Ubuntu, run the following commands in a terminal to install the mssql-server package.
Import the public repository GPG keys:
Register the Microsoft SQL Server Ubuntu repository:
For Ubuntu 16.04:
For Ubuntu 18.04:
If you want to install SQL Server 2019 , you must instead register the SQL Server 2019 repository. Use the following command for SQL Server 2019 installations:
For Ubuntu 16.04:
For Ubuntu 18.04:
Run the following commands to install SQL Server:
After the package installation finishes, run mssql-conf setup and follow the prompts to set the SA password and choose your edition.
The following SQL Server 2017 editions are freely licensed: Evaluation, Developer, and Express.
Make sure to specify a strong password for the SA account (Minimum length 8 characters, including uppercase and lowercase letters, base 10 digits and/or non-alphanumeric symbols).
Once the configuration is done, verify that the service is running:
If you plan to connect remotely, you might also need to open the SQL Server TCP port (default 1433) on your firewall.
At this point, SQL Server is running on your Ubuntu machine and is ready to use!
Install SQL Server
The following commands for SQL Server 2019 points to the Ubuntu 20.04 repository. If you are using Ubuntu 18.04 or 16.04, change the path below to /ubuntu/18.04/ or /ubuntu/16.04/ instead of /ubuntu/20.04/ .
To configure SQL Server on Ubuntu, run the following commands in a terminal to install the mssql-server package.
Import the public repository GPG keys:
Register the Microsoft SQL Server Ubuntu repository for SQL Server 2019:
For Ubuntu 16.04:
For Ubuntu 18.04:
For Ubuntu 20.04:
Run the following commands to install SQL Server:
After the package installation finishes, run mssql-conf setup and follow the prompts to set the SA password and choose your edition.
Make sure to specify a strong password for the SA account (Minimum length 8 characters, including uppercase and lowercase letters, base 10 digits and/or non-alphanumeric symbols).
Once the configuration is done, verify that the service is running:
If you plan to connect remotely, you might also need to open the SQL Server TCP port (default 1433) on your firewall.
At this point, SQL Server 2019 is running on your Ubuntu machine and is ready to use!
Install the SQL Server command-line tools
To create a database, you need to connect with a tool that can run Transact-SQL statements on the SQL Server. The following steps install the SQL Server command-line tools: sqlcmd and bcp.
Use the following steps to install the mssql-tools on Ubuntu.
By default, curl isn’t installed on Ubuntu. To install curl, run this code:
Import the public repository GPG keys.
Register the Microsoft Ubuntu repository.
For Ubuntu 16.04:
For Ubuntu 18.04:
For Ubuntu 20.04:
Update the sources list and run the installation command with the unixODBC developer package. For more information, see Install the Microsoft ODBC driver for SQL Server (Linux).
To update to the latest version of mssql-tools run the following commands:
Optional: Add /opt/mssql-tools/bin/ to your PATH environment variable in a bash shell.
To make sqlcmd/bcp accessible from the bash shell for login sessions, modify your PATH in the
/.bash_profile file with the following command:
To make sqlcmd/bcp accessible from the bash shell for interactive/non-login sessions, modify the PATH in the
/.bashrc file with the following command:
Connect locally
The following steps use sqlcmd to locally connect to your new SQL Server instance.
Run sqlcmd with parameters for your SQL Server name (-S), the user name (-U), and the password (-P). In this tutorial, you are connecting locally, so the server name is localhost . The user name is SA and the password is the one you provided for the SA account during setup.
You can omit the password on the command line to be prompted to enter it.
If you later decide to connect remotely, specify the machine name or IP address for the -S parameter, and make sure port 1433 is open on your firewall.
If successful, you should get to a sqlcmd command prompt: 1> .
If you get a connection failure, first attempt to diagnose the problem from the error message. Then review the connection troubleshooting recommendations.
Create and query data
The following sections walk you through using sqlcmd to create a new database, add data, and run a simple query.
Create a new database
The following steps create a new database named TestDB .
From the sqlcmd command prompt, paste the following Transact-SQL command to create a test database:
On the next line, write a query to return the name of all of the databases on your server:
The previous two commands were not executed immediately. You must type GO on a new line to execute the previous commands:
To learn more about writing Transact-SQL statements and queries, see Tutorial: Writing Transact-SQL Statements.
Insert data
Next create a new table, Inventory , and insert two new rows.
From the sqlcmd command prompt, switch context to the new TestDB database:
Create new table named Inventory :
Insert data into the new table:
Type GO to execute the previous commands:
Select data
Now, run a query to return data from the Inventory table.
From the sqlcmd command prompt, enter a query that returns rows from the Inventory table where the quantity is greater than 152:
Execute the command:
Exit the sqlcmd command prompt
To end your sqlcmd session, type QUIT :
Performance best practices
After installing SQL Server on Linux, review the best practices for configuring Linux and SQL Server to improve performance for production scenarios. For more information, see Performance best practices and configuration guidelines for SQL Server on Linux.
Cross-platform data tools
In addition to sqlcmd, you can use the following cross-platform tools to manage SQL Server:
| Tool | Description |
|---|---|
| Azure Data Studio | A cross-platform GUI database management utility. |
| Visual Studio Code | A cross-platform GUI code editor that run Transact-SQL statements with the mssql extension. |
| PowerShell Core | A cross-platform automation and configuration tool based on cmdlets. |
| mssql-cli | A cross-platform command-line interface for running Transact-SQL commands. |
Connecting from Windows
SQL Server tools on Windows connect to SQL Server instances on Linux in the same way they would connect to any remote SQL Server instance.
If you have a Windows machine that can connect to your Linux machine, try the same steps in this topic from a Windows command-prompt running sqlcmd. Just verify that you use the target Linux machine name or IP address rather than localhost, and make sure that TCP port 1433 is open. If you have any problems connecting from Windows, see connection troubleshooting recommendations.
For other tools that run on Windows but connect to SQL Server on Linux, see:
Other deployment scenarios
For other installation scenarios, see the following resources:
- Upgrade: Learn how to upgrade an existing installation of SQL Server on Linux
- Uninstall: Uninstall SQL Server on Linux
- Unattended install: Learn how to script the installation without prompts
- Offline install: Learn how to manually download the packages for offline installation
For answers to frequently asked questions, see the SQL Server on Linux FAQ.
Источник


